Posts with «arduino» label

Maker faire New York: Interactive Severed Hand Plush Toy

Maker Faire New York is taking place September 29 and 30, and there will be over 500 exhibits showcasing creativity and innovation in technology, craft, science, fashion, art, food and more. Here’s just one of the exhibits I’m looking forward to checking out: “Severed Hand Bop-It” by Sarah Schoemann and Jason Schapiro. Here’s the description:

An Arduino powered plush toy with morbidity to spare! “Severed Hand Bop-It” offers a tactile and quirky take on the classic ‘Simon’ game. With 5 “soft” switches, sounds and LED feedback, it’s sure to provide hours of grisly fun!

Check out Sarah’s other whimsical work on her website.


Filed under: Arduino

Scrolling tweets with a WiFi LED matrix

For his most ambitious build to date, [Param] thought it would be a cool idea to have a LED matrix display spitting tweets out via a WiFi connection. The build is now done, and we’ve got to hand it to him for a very nice build.

The build is based on an Arduino with a Sparkfun WiFi shield providing the network connection. The Arduino pings a Javascript app that pulls down tweets from The Verge and displays them on an 8×8 LED matrix display.

What makes [Param]‘s build so cool is its portable nature; the entire device is completely wireless, getting its power from a Sparkfun LiPower shield  and an apparently extremely capacious LiPoly battery.

With a rat’s nest of wires hanging out the back of the LED display, [Param]‘s build is crying out for a proper enclosure, but even given that it remains a quality project. You can see a video of the WiFi’d Twitter display after the break.


Filed under: arduino hacks
Hack a Day 17 Sep 17:01

Surveillance Rover 540 motor edition

Primary image

What does it do?

Surveillance robot controlled by remote control. autonomous upgrades to follow

Made from: Steel Chassis, aluminium body Powered by: previously powered by 280 size geared motors. (the rolling chassis in the video without the arm and top) Now it is upgraded with geared 540 size brushed motor (3 times faster than in video) Controlled by: Hobbyking 6 channel transmitter/receiver system Features: robot arm, wireless camera with night vision, recorder camera, offroad capability. Top speed: approx 11.3kph Run time (on 4400mah pack-2hour and 15 minutes)

Cost to build

$264,50

Embedded video

Finished project

Number

Time to build

80 hours

Type

URL to more information

Weight

5700 grams

New improved I2C library for Arduino

Recently I have been experimenting a lot with I2C. My A.I. project uses the DS1307 RTC and a work project uses several I2C ADC's.

Normally the Arduino Wire library works fine with the DS1307 RTC but it does not play well with 3.3V @ 8MHz devices such as my Micro Magician and does not support fast mode (400KHz). It also has some compatibility issues with some devices such as my ADC's because it does not support a repeated start condition.

read more

Let's Make Robots 16 Sep 04:22
8mhz  arduino  clock  cool guides  fast  i2c  library  mode  

Turning A Cheap Optical Mouse Into A Robot Odometer

John Graham-Cumming (JGC), author of The Geek Atlas, wrote in to let us know about a fun conversion he did with a cheap optical mouse:

For a small robot project I’m working on I needed a way to measure the robot’s progress across the floor. There are various possibilities, such as: use stepper motors (expensive and am recycling some old continuous run servos), add an encoder to the wheels (would need to go buy some parts for that), or use the optical sensor for a mouse.

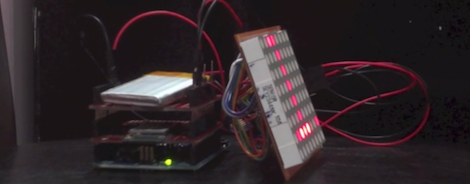
I had a really old PS/2 optical mouse lying around which contains an MCS-12085 optical sensor that has a rather simple serial interface suitable for connection to a microcontroller. Inside there are two separate areas of components. On the right in the picture above is the PS/2 interface chips and four nice extras that I desoldered for later use (three microswitches and a quadrature encoder)…

This is a great example of repurposing something that might otherwise go to a landfill; and to top it off, JGC has posted some code you can use as an Arduino interface to the optical mouse sensor. Read all about his conversion at his blog.


The Geek Atlas
128 Places Where Science and Technology Come Alive
The history of science is all around us, if you know where to look. With this unique traveler’s guide, you’ll learn about 128 destinations around the world where discoveries in science, mathematics, or technology occurred or is happening now. Travel to Munich to see the world’s largest science museum, watch Foucault’s pendulum swinging in Paris, ponder a descendant of Newton’s apple tree at Trinity College, Cambridge, and more.
Filed under: Arduino, Mods
MAKE » Arduino 15 Sep 23:00

Andrew - First robot

Primary image

What does it do?

Change direction when meet wall

Hi all! First robot ever, saying it's not great would be an euphemism, nevertheless I would be very glad to get some feedback from you.

How it works : two switches on the front, when it meets a wall, andrew goes backwards and turn, then turn the other direction and goes forward again (see video - about the video, sorry for the poor quality, I had to use a phone, I can post a better one next weekend)

Cost to build

$35,00

Embedded video

Finished project

Complete

Number

Time to build

15 hours

Type

wheels

URL to more information

Weight

read more

Helmet of many LEDs built for Burning Man

This motorcycle helmet was heavily altered to accept all of the hardware that goes into driving that huge array of LEDs. [Brian Cardellini] built it to wear at burning man. He claims to have been in over his head with the project, but we certainly don’t get that feeling when we see the thing in action. It’s light on build details, but there are plenty of demo shots in the video after the break. The animation and fading action really gets started about a minute and a half into it.

One of the early frames of the video is a shot of the parts order webpage. Since it’s an HD clip we were able to glean a few bits and pieces from that. It includes a MAX7219 LED Display Driver and fifteen 25-packs of Blue LEDs. Now that chip is a great choice, and one of the later shots shows two of them on breakout board driven by an Arduino. The look is very clean since he carved out most of the helmet’s padding to make room for the electronics.

[via Adafruit]


Filed under: led hacks, wearable hacks

16×8 pixel laser projector

[Michiel] gave us a little shout-out by drawing the Hackaday logo with his recently completed 16×8 pixel laser projector. It uses a spinning set of mirrors mounted at slightly different angles to redirect the path of the red laser diode.

The projector is driven by an Arduino. To give it more than just a hard-coded existence [Michiel] included an Xbee module. This lets him connect to it with a computer in order to stream messages. One of the demo videos linked in his project log shows the web interface he coded which will push a message typed in the submission form out to the projector where it is scrolled like a marquee.

This type of spinning display is one of a few common methods for making laser projectors. In the image above you can see the optical sensor which is used to sync the diode with the spinning mirrors, each of which is responsible for a different row of pixels. He lists off several things that he learned when working on the project. We think the most important is the timing issues which go into something like this.


Filed under: laser hacks
Hack a Day 14 Sep 23:01

Brabenec

Primary image

What does it do?

follow wall/avoid obstacles

Overview

We are building this robot with my friend. It is (when finalized) supposed to be able to detect metal objects and interact with them (move them, ideally...). So far it has only two IR sensors for obstacle detection, so no metal detection.


Cost to build

Embedded video

Finished project

Number

Time to build

Type

tracks

URL to more information

Weight

read more

Arduino quadruped robot

Primary image

What does it do?

Walk forward and backword

Hi all,

I’ve been working on my first real robot last week-end and wanted to share it. It’s a simple quadruped arduino robot controlled by serial (via USB). Videos can be viewed on my blog : http://blog.joomun.org/2012/09/09/arduino-quadruped-robot/

The robot structure has been created with cheap mecanno clone

IR control has been added, i'll update the blog later.

Cost to build

$66,00

Embedded video

Finished project

Number

Time to build

10 hours

Type

legs

URL to more information

Weight

300 grams