Posts with «cloud» label

Weasley Clock For Magically Low Cost
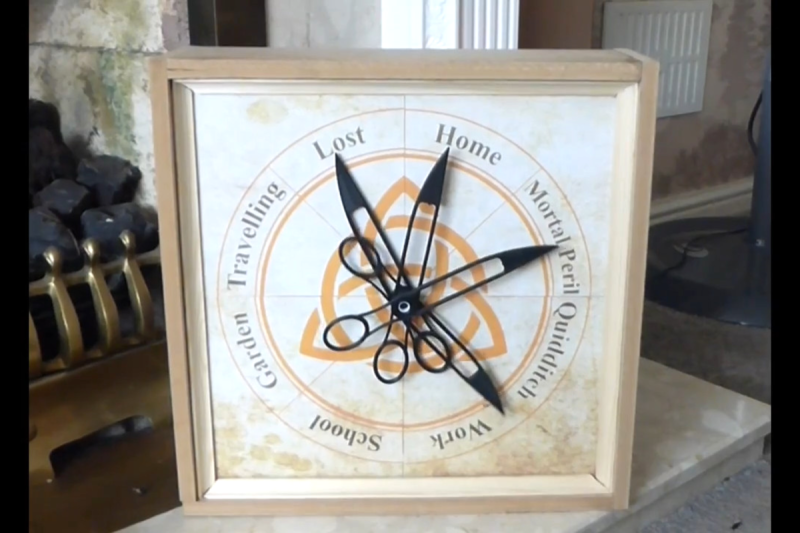
For those unfamiliar with the details of the expansive work of fiction of Harry Potter, it did introduce a few ideas that have really stuck in the collective conscious. Besides containing one of the few instances of time travel done properly and introducing a fairly comprehensive magical physics system, the one thing specifically that seems to have had the most impact around here is the Weasley family clock, which shows the location of several of the characters. We’ve seen these built before in non-magical ways, but this latest build seeks to drop the price tag on one substantially.

To do this, the build relies on several low-cost cloud computing solutions and smartphone apps to solve the location-finding problem. The app is called OwnTracks and is an open-source location tracker which can report data to any of a number of services. [Simon] sends the MQTT data to a cloud-based solution called HiveMQCloud, but you could send it anywhere in principle. With the location tracking handled, he turns to some very low-cost Arduinos to control the stepper motors which point the clock hands to the correct locations on the face.

While the build does rely on a 3D printer for some of the internal workings of the clock, this does bring the cost down substantially when compared to other options. Especially when compared to this Weasley family clock which was built into a much larger piece of timekeeping equipment, having an option for a lower-cost location-tracking clock face like this one is certainly welcome.

Arduino IoT Cloud: Dynamic Dashboard

In this short article we are going to have a look at a new exciting feature: theDynamic Dashboard of Arduino IoT Cloud.

Among other things with Arduino IoT Cloud you can create a dashboard to monitor data and interact with your project.

If you want to know more about properties and widgets you can go here

Now it’s possible to arrange the widgets as you like. You can also increase their size and move them around following your needs.

In order to resize them simply drag the small resize handle in the right bottom corner of each widget. This way they become dynamic and the widgets below will adjust and rearrange accordingly.

How to resize properties boxes

For now, Location and String are the only resizable widgets.

If you want to move the properties around just click and drag the title area.

How to move properties boxes

Below you can see the callbacks used in this easy example

void onLatitudeChange() {
  lat = Latitude;
  GPS = {lat, lon};
  Locations += "lat: " + String(lat) + "; " + "lon: " + String(lon) + "\n";
  Movements ++;
}


void onLongitudeChange() {
  lon = Longitude;
  GPS = {lat, lon};
  Locations += "lat: " + String(lat) + "; " + "lon: " + String(lon) + "\n";
  Movements ++;
}

If you want to further experiment on how multi-value properties work here’s an example

References

Arduino IoT Cloud: April’s New Features

In this short article, we are going to provide an overview of all the new and exciting features the team has been working on.

Multi-Value Property Types: The first two types implemented are Location and Color. With Color, you can pick a color from the palette (clicking on it) or just show one in a small window. With Location, you can see a pin on a map and move it; furthermore, you can drag the box and make it bigger

The number of property types is huge, allowing you to pick the one that best suits your needs. All the possible values are taken from the SenML standard.

Shadow Thing: If a device happens to disconnect from the Cloud, as soon as it reconnects, the board will get back its previous property values. For example, if a property controls the status of a lamp, and the lamp property is set to on, the light will be kept on when the device comes back online.

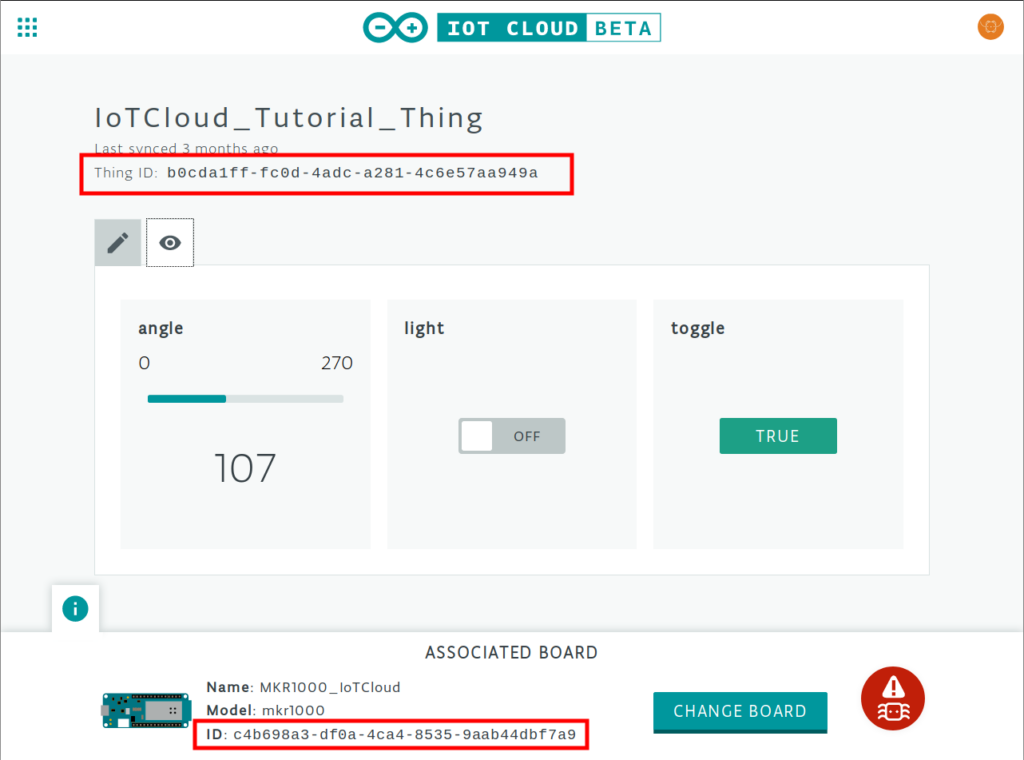
Simply Discover Your Thing ID and Device ID: The panel showing information about its associated board is opened by default, making it easier to read details about the board you are using.

Getting Started Procedure: The procedure is now faster and more reliable, thanks to bug-fixing and a new connection template used in the Cloud_blink sketch.

Getting started with the Arduino IoT Cloud

As previously announced, the Arduino IoT Cloud is an easy to use Internet of Things application platform that enables developers to go from unboxing their board to a working device in just minutes.

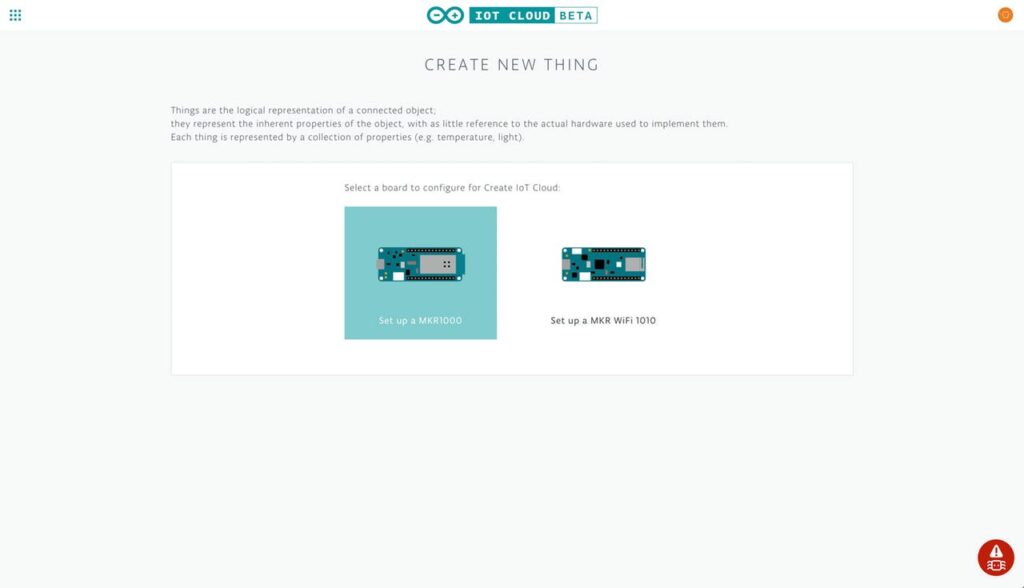
To help you get started, we’ve put together a quick project that’ll walk you through connecting a MKR1000 (or MKR WiFi 1010) to the Arduino IoT Cloud.

By the end of the tutorial, you’ll be able to control and monitor your board over the Internet using the Arduino IoT Cloud site.

First, we’ll add the board to the Arduino IoT Cloud as a Thing — a representation of the board in the cloud. We’ll then give the Thing a set of Properties which represent sensors, LEDs, motors, and many other components in the project that you’ll want to access from the cloud.

Want to see more? You can find the entire step-by-step guide here.

Arduino Enters the Cloud

Love it or hate it, for many people embedded systems means Arduino. Now Arduino is leveraging its more powerful MKR boards and introducing a cloud service, the Arduino IoT Cloud. The goal is to make it simple for Arduino programs to record data and control actions from the cloud.

The program is in beta and features a variety of both human and machine interaction styles. At the simple end, you can assemble a dashboard of controls and have the IoT Cloud generate your code and download it to your Arduino itself with no user programming required. More advanced users can use HTTP REST, MQTT, Javascript, Websockets, or a suite of command line tools.

The system relies on “things” like temperature sensors, LEDs, and servos. With all the focus on security now, it isn’t surprising that the system supports X.509 authentication and TLS security for traffic in both directions.

Honestly, we tried it and the web-based IDE couldn’t find our MKR1000 board under Linux. That could be a misconfiguration on our part, but it is frustrating how little information you get from many web-based tools. It decided we had multiple Arduinos connected (we didn’t). Then removing a multiport serial adapter made it see no Arduinos even though there was an MKR1000 Vidor attached.

Naturally, there are plenty of options when it comes to putting devices on the cloud. However, if you are only using Arduino boards, this one is going to be pretty seamless — assuming it works for you.

Hack a Day 07 Feb 16:30

Codebender Rises from the Ashes

If you were sad that Codebender had bit the dust, cheer up. A site called codeanywhere has acquired the online Arduino development environment and brought it back to life. In addition to the main Codebender site, the edu and blocks sites are also back on the air.

Not only is this great news, but it also makes sense. The codeanywhere site is a development IDE in the cloud for many different programming languages. The downside? Well, all the people who said they’d be glad to pay to keep Codebender alive will get a chance to put their money where their mouth is.

Here’s an excerpt from Codebender’s blog:

First of all, codebender will mostly remain the same. It will continue to operate as a standalone service, so you don’t have to change the way you are currently using codebender. However, it will transition to a monthly subscription service. This means that you will be able to use it for free for 1 month (as a trial, beginning on June 1st, or for the first month after registration), and it will then cost $10/month to keep using it. This is the price to pay for keeping codebender alive and sustainable, and it’s a small one, really.

Secondly, Codeanywhere intends to keep adding more and more features, the same way we have been adding features, libraries, and board support in the past few years. So you can expect codebender to keep improving with time, much as it did until now.

We have to wonder how many people will pay $120 / year to do something they can do for free. Mbed has support from ARM and offers a free IDE. Maybe a better deal with Codebender would have been with Atmel or Arduino. Not that we are opposed to charging for services, but we imagine a lot of people will just use free tools unless they have a strong use case for using a cloud-based service.

We covered Codebender’s short-lived demise back in October of last year.


Filed under: Arduino Hacks, news
Hack a Day 21 Jun 09:00

Hackaday Prize Entry: Water Level Station

All over the world, in particular in underdeveloped countries, people die every year by the thousands because of floods. The sudden rise of water levels often come unannounced and people have no time to react before they are caught in a bad spot. Modern countries commonly have measure equipment deployed around problematic areas but they are usually expensive for third world countries to afford.

[Benne] project devises a low-cost, cloud-connected, water level measuring station to allow remote and central water level monitoring for local authorities. He hopes that by being able to monitor water levels in a more precise and timely fashion, authorities can act sooner to warn potentially affected areas and increase the chance of saving lives in case of a natural disaster.

At the moment, the project is still in an early stage as they are testing with different sensors to figure out which would work best in different scenarios. Latest version consists essentially in an Arduino UNO, an ultrasonic distance sensor, and a DHT temperature/humidity sensor to provide calibration since these characteristics affect the speed of sound. Some years ago, we covered a simple water level monitoring using a Parallax Ping sensor, but back then the IoT and the ‘cloud’ weren’t nearly as fashionable. They also tested with infrared sensors and a rotary encoder.

They made a video of the rotary encoder, which we can see below:


Filed under: The Hackaday Prize

IOT AI in the Cloud using Reinforcement Learning

Let's Make Robots 04 May 23:03
ai  arduino  cloud  esp8266  iot  

Hackaday Links: December 20, 2015

If you don’t have a Raspberry Pi Zero right now, you’re not getting one for Christmas. Who would have thought a $5 Linux computer would have been popular, huh? If you’re looking for a new microcontroller platform you can actually buy, the Arduino / Genuino 101 is available in stores. This was released a few months ago, but it still looks pretty cool: DSP, BTLE, and a six-axis sensor.

If you don’t know [David], the Swede, you should. He’s the guy that launched a glider from a high altitude balloon and is one of the biggest advocates of tricopters. Now he bought an airplane wing for his front yard. It was an old Swedish air force transport aircraft being broken up for scrap. Simply awesome.

Chocolate chips. Now that the most obvious pun is out of the way, here’s how you make DIP8 cookie cutters.

[Barb] is over at the Crash Space hackerspace in LA, and she has a YouTube channel that goes over all her creations. This week, it’s a layered wood pendant constructed out of many layers of veneer. Take note of the 3M 77 spray glue used for the lamination and the super glue used as a clear, hard finish.

Star Wars was released and we have a few people digging through the repertoire to see what [John Williams] lifted for the new movie. Here’s musical Tesla coils playing the theme for the Force.

Flickr gives you a full gigabyte of storage, but only if you upload JPEGs, GIFs, and PNGs. That doesn’t prevent you from using Flickr as your own cloud storage.

We know two things about [Hans Fouche]: he lives in South Africa and he has a gigantic 3D printer. His latest creation is an acoustic guitar. It may not sound great, but that’s the quality of the recording. It may not play great, but he can fix that with some acetone vapor. It would be very interesting to see 3D printing used in a more traditional lutherie context; this printer could easily print molds and possibly even something to bend plywood tops.

Starting in 1990, [deater] would make a yearly Christmas-themed demo on his DOS box. You can really see the progression of technology starting with ANSI art trees written in BASIC, to an EGA graphical demo written with QBASIC to the last demo in 96 made with VGA, and SoundBlaster effects written in Turbo Pascal and asm.


Filed under: Hackaday Columns, Hackaday links

New Project: The Internet of Bees: Adding Sensors to Monitor Hive Health

Learn how to pull realtime sensor data from a beehive to monitor its weight, temperature, and humidity over the internet.

Read more on MAKE

The post The Internet of Bees: Adding Sensors to Monitor Hive Health appeared first on Make: DIY Projects, How-Tos, Electronics, Crafts and Ideas for Makers.