Posts with «makers» label

Teenage Maker builds his own Arduino drone

When most people decide they’re going to build a quadcopter, they likely go to their favorite online retailer or hobby shop, and get the correct parts to connect together.

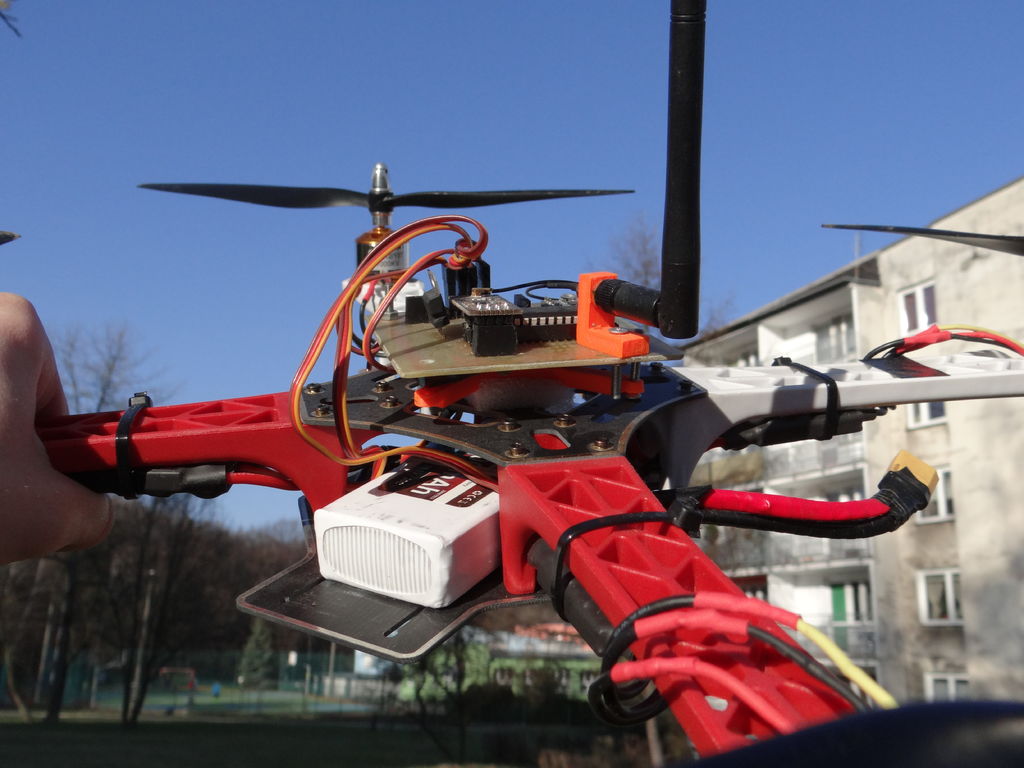
17-year-old Maker Nikodem Bartnik instead decided to customize things further, programming an Arduino to act as his flight controller, and constructing a transmitter (or “pilot” as he refers to it) from scratch. Finally, he attempted to 3D print the frame, but after some difficulty chose to just buy one.

The rest of the electronics consisted of four motors, four ESCs, some propellers, two nRF24L01 radio modules, an MPU-6050, a LiPo battery, and a bunch of other small components. You can see more of Bartnik’s project over on Instructables, as well as check out “Ludwik” (named partially as a nod to Nikodem’s friend “lukmar”) flying quite nicely in the video below.

This animatronic device turns speech into sign language

Using a couple Arduinos, a team of Makers at a recent McHacks 24-hour hackathon developed a speech-to-sign language automaton.

Alex Foley, along with Clive Chan, Colin Daly, and Wilson Wu, wanted to make a tool to help with translation between oral and sign languages. What they came up with was an amazing animatronic setup that can listen to speech via a computer interface, and then translate it into sign language.

This device takes the form of two 3D-printed hands, which are controlled by servos and a pair Arduino Unos. In addition to speech translation, the setup can sense hand motions using Leap Motion’s API, allowing it to mirror a person’s gestures.

You can read about the development process in Foley’s Medium write-up, including their first attempt at control using a single Mega board.

An experimental game with a conductive rubber band controller

RubberArms is an experimental rubber band game, created by Robin Baumgarten at the Global Game Jam 2017 in Yverdon-les-Bains, Switzerland.

The controller uses a conductive rubber cord from Adafruit that changes resistance as it’s stretched. This resistance is measured by an Arduino Micro/Leonardo (or a Teensy 3.2), which acts as a USB joystick sending signals to Unity3D. (The game is coded in Unity3D using Spring Joints and Line Renderers.)

At this point, the game is a simple prototype where you control the distance of two characters whose arms stretch whenever you stretch the rubber band, throwing little ‘Bleps’ around. You can read more about RubberArms on Baumgarten’s page, as well as his earlier project “Line Wobbler” here.

An Arduino laser pinball machine

Pinball machines may seem like a good Maker project, but the mechanical components are quite involved. “Joesinstructables,” however, decided to take on this project on using an Erector Set, solenoids, and an Arduino board. In order to get around the challenge of using a heavy steel ball, he instead used a much lighter ping pong ball, sensed in the game by laser tripwires.

A number of solenoids propel the ball around and sound a service desk bell whenever a target is hit–one to three times depending on the difficulty level. Once the ball comes to rest in a target, a laser tripwire automatically triggers a solenoid to eject the ball, putting it back in play.

You can see more info on this build here, or even check out an earlier version for more inspiration!

A DIY Segway-style vehicle

Instructables user “stoppi71” has been building a DIY Segway for a while now, and just posted a bunch of info on the project.

Balancing on two side-by-side wheels is rather difficult, though as the original Segway showed us, it’s quite possible with electronics to help. Naturally, hobbyists have tried to duplicate this effort, including stoppi71, who started his experiments several years ago. He uses both an accelerometer and gyroscope to determine the angle, along with PID control to apply the correct amount of power to each wheel. Buttons on either side handle steering.

Though not the easiest project featured here, if you’re thinking about doing something simlar, his writeup is worth a look! If you enjoy alternative modes of transportation, you may want to check out this electric unicycle as well!

Peeqo is a desktop bot that communicates through GIFs

If you’ve been looking for a robotic assistant with the functionality of an Amazon Echo and the cuteness of a Disney character, you’re in luck. That’s because Abhishek Singh has created Peeqo, an open-source DIY device that responds to human speech through GIFs.

Peeqo has a Raspberry Pi 3 for his brain along with a pair of Arduino Mini boards for controlling movement and LED notifications. The 3D-printed bot is equipped with a half-dozen servos, four custom microphones, a NeoPixel ring on top of his head, a camera at his chest, a USB speaker, and an LCD display.

As for voice recognition, Peeqo uses the Google Speech API for detecting the wake word ‘Peeqo’ and API.AI for responding to the query. The desktop companion can also serve as a full-fledged entertainment system that plays your favorite Spotify tunes. Ask for a song and he’ll sway to the beat.

But that’s not all. Singh even developed a Chrome extension that uses Peeqo to boost his productivity and motivate him to avoid social media while working. Once he tells it to block a certain site, the robot lets his displeasure be known in the form of a GIF.

Intrigued? You can see how Singh brought Peeqo to life on Imgur.

An Arduino round word clock

After considering building a square word clock, Maker Roald Hendriks and his sister came up with something a bit more unique!

Clocks, being decorative, useful and easily hackable, have been targets for creative types, likely from when they were first invented. You’d think maybe all ideas for new clocks have been exhausted. Fortunately, human ingenuity never seems to run dry, and this latest device tells time using Arduino Uno-controlled LEDs.

Outer numbers on the modified IKEA PUGG wall clock illuminate to indicate the hour, while words on the inside represent the minutes. These minutes are literally spelled out in Dutch phrases reveal the particular time, but if you don’t speak the language, the position of the LEDs should give you some clue as to what is going on.

You can read more about the project on its website, and watch a demo below!

The Sandwich-o-Matic will make your lunch automatically

Love eating lunch, but hate making it? Good news, an automated machine may soon be able to take care of the task for you. Meet Sandwich-o-Matic, a voice-controlled, robotic sandwich-building station.

The project–which was created during a thirty-six hour hackathon by the team of Clive Chan, Colin Daly, Alex Foley and Wilson Wu–is based on an Arduino and a Photon. A rotating dispenser is driven by a series of servos, while a DC motor is responsible for a toaster-lifting mechanism. The backend is running Node.js, hosted on AWS, and the Google Cloud Platform handles the voice-to-text features.

The Sandwich-o-Matic accepts both voice and NFC requests. Simply place your order by saying the ingredients, or tapping their respective images on an accompanying menu. The device will then begin crafting your lunch from scratch.

The Makers hope to even develop a future version, which will include more topping and condiment options as well as a more streamlined voice-to-sandwich process. You can read more about the project on Devpost and its GitHub page.

This Arduino machine will judge how sick your ollies are

In skateboarding, the ollie is a fundamental trick used to leap onto, over or off obstacles, or over gaps of unfriendly terrain such as grass or stairs. But how do you know just how sick your ollie actually was? Josh Sheldon has a solution.

The Maker has built a device that judges the sickness of your ollie and visualizes your score, rewarding the best ones with the chiming of a cowbell. Sheldon describes the project as something “like one of those hammer games at carnivals, but instead of trying to hit that thing with a hammer as hard as you can, the goal is to land the sickest ollie.”

The aptly named Sick Ollie Machine consists of two parts: a stand with LEDs and the skateboard itself. Underneath the board is an Arduino Uno, a 9V battery, and an accelerometer. The stand is equipped with another Arduino, a relay, and an RGB LED strip that goes up mast, as well as a solenoid on top. When the relay closes, the solenoid hits the bell. Both units also contain a wireless transmitter, allowing them to communicate with one another.

Watch Sheldon discuss his project in more detail below!


A 3D-printed lunar phase clock for your nightstand

“Since there isn’t a supermoon everyday, make one for your bedside table!” This is exactly what G4lile0 set out to do using a 3D printer, an Arduino and some open-source tools.

The result was a moon phase clock consisting of a 3D-printed model and an LED strip to create the lunar phases. The lights are driven by an Arduino that precisely calculates which phase to show, as well as controls a 0.96″ OLED display revealing the date and time. Other electronics include an RTC module, a DTH11 sensor, a buzzer, and three push buttons.

The clock also features several modes, including an alarm, a wake-up light, a lamp, a thermometer, and a hygrometer. It can even help set the mood or start your next lunar rave with its relaxation and party-like special effects.

You can read all about this project on Thingiverse and find its code over on GitHub.