Posts with «android» label

Upgraded Infotainment Options on a 14 Year Old Mercedes

It used to be that upgrading a car stereo was fairly simple. There were only a few mechanical sizes and you could find kits to connect power, antennas, and speakers. Now, though, the car stereo has interfaces to steering wheel controls, speed sensors, rear-view cameras, and more. [RND_ASH] was tired of his 14-year-old system so he took an Android head unit, a tablet, and an Arduino, and made everything work as it was supposed to.

The key is to interface with the vehicle’s CAN bus which is a sort of local area network for the vehicle. Instead of having lots of wires running everywhere, today’s cars are more likely to have less wiring all shared with many devices.

[RND_ASH] has several videos describing the whole project and we expect there will be some more upcoming. You can see part one, below.

The project also reverse engineers how to display on the tiny screen in the dashboard. The code for the CAN bus interface is on GitHub. There’s also a written narrative on what he learned about the Mercedes interface in a different repository.

We’ve seen other cars get similar treatment, of course. If you want a gentle introduction to CAN hacking, we’ve done that, too.

Voice Chess Uses Phone, Arduino, And An Electromagnet

[Diyguypt] may be an altruist to provide the means for people who can’t manipulate chess pieces to play the game. Or he may just have his hands too busy with food and drink to play. Either way, his voice command chessboard appears to work, although it has a lot of moving parts both figuratively and literally. You can check out the video below to see how it works.

The speech part is handled by an Android phone and uses Google’s voice services, so if you don’t want Google listening to your latest opening gambit, you’ll want to pass this one up. The phone uses an app that talks to the Arduino via Bluetooth, which means the Arduino needs a Bluetooth module.

The Arduino controls what amounts to an upside-down 3D printer. Instead of a hot end pointing down, the mechanism has an electromagnet pointing up. A small washer in the base of each chess piece makes it susceptible to the magnet’s motion. The electromagnet is required to let go of a piece before a move to a new position. It is possible that a small servo moving a permanent magnet closer to the board for a move and away from the board to reposition could do the same job, though we suspect that could be tricky.

We’ve seen this before, often with a Harry Potter theme. We sort of prefer a more obvious chess robot, but that’s just us.

A Better Embroidery Machine, With 3D Printing and Common Parts

In concept, an everyday sewing machine could make embroidery a snap: the operator would move the fabric around in any direction they wish while the sewing machine would take care of slapping down stitches of colored thread to create designs and filled areas. In practice though, getting good results in this way is quite a bit more complex. To aid and automate this process, [sausagePaws] has been using CNC to take care of all the necessary motion control. The result is the DIY Embroidery Machine V2 which leverages 3D printed parts and common components such as an Arduino and stepper drivers for an economical DIY solution.

It’s not shown in the photo here, but we particularly like the 3D printed sockets that are screwed into the tabletop. These hold the sewing machine’s “feet”, and allow it to be treated like a modular component that can easily be removed and used normally when needed.

The system consists of a UI running on an Android tablet, communicating over Bluetooth to an Arduino. The Arduino controls the gantry which moves the hoop (a frame that holds a section of fabric taut while it is being embroidered), while the sewing machine lays down the stitches.

[sausagePaws]’s first version worked well, but this new design really takes advantage of 3D printing as well as the increased availability of cheap and effective CNC components. It’s still a work in progress that is a bit light on design details, but you can see it all in action in the video embedded below.

Well-Loved Toy Turned Into Robotic Glockenspiel

If there’s a happier word ever imported into the English language than “Glockenspiel”, we’re not sure what it is. And controlling said instrument with a bunch of servos and an Arduino makes us just as happy.

When [Leon van den Beukel] found a toy glockenspiel in a thrift store, he knew what had to be done – Arduinofy it. His first attempt was a single hammer on a pair of gimballed servos, which worked except for the poor sound quality coming from the well-loved toy. The fact that only one note at a time was possible was probably the inspiration for version two, which saw the tone bars removed from the original base, cleaned of their somewhat garish paint, and affixed to a new soundboard. The improved instrument was then outfitted with eight servos, one for each note, each with a 3D-printed arm and wooden mallet. An Arduino runs the servos, and an Android app controls the instrument via Bluetooth, because who doesn’t want to control an electronic glockenspiel with a smartphone app? The video below shows that it works pretty well, even if a few notes need some adjustment. And we don’t even find the servo noise that distracting.

True, we’ve featured somewhat more accomplished robotic glockenspielists before, but this build’s simplicity has a charm of its own.

Knowledge on Android Studio Coding

Hello There,

A while ago I started working on a project of mine with both Arduino and Android (App to interact with the Arduino circuit). I want help with the Android Studio since am new in that section. I manage to establish a connection with the Arduino that has a Bluetooth module and an LCD. I can send text from the phone and get it on the LCD.

read more

Morse code input for Android with Arduino

Morse code may not be as widely used as in its heyday, but it still certainly has its adherents. One avid user is Tanya Finlayson, who has been using this as her method of communication for roughly 40 years. Now, with the Gboard phone keyboard supporting input via dots and dashes, the world of Android computing has been opened up to her as well.

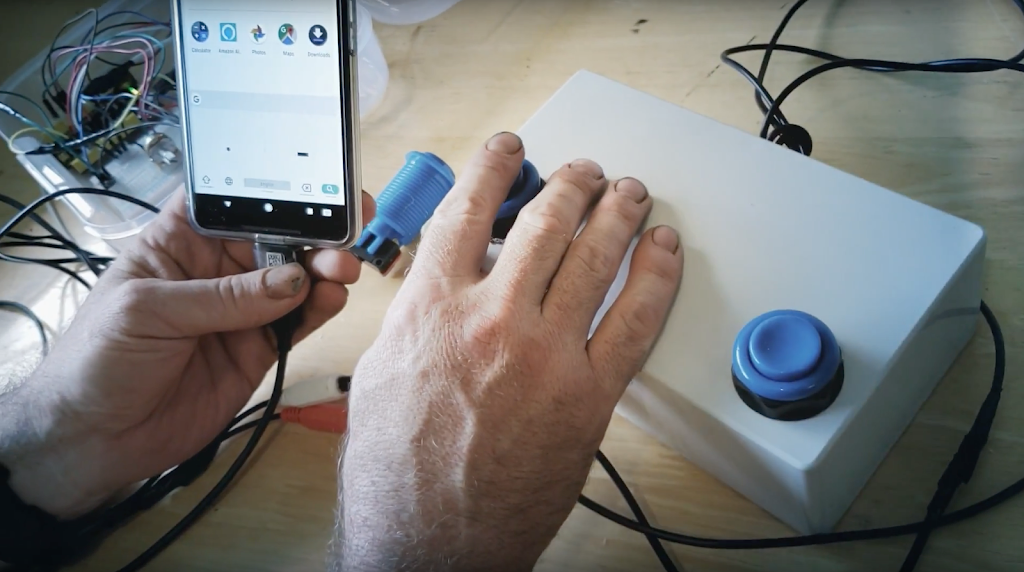
In order to get button presses to the phone, Ken Finlayson used an Arduino Leonardo to read inputs from a trio of buttons, indicating dot, dash, and mode select. The third button allows for phone navigation in addition to text input. Because of its built-in HID capabilities via the ATmega32U4 chip, the Leonardo is a great choice for this application, demonstrated in the video below. 

Many people cannot use keyboards and touchscreens to control their digital devices. Instead, they use custom hardware switches that emulate typing, swiping, and tapping. The Android operating system provides software that allows these switches to control Android devices, and recently Google provided a new Morse Keyboard within the Gboard keyboard for people who find this method easier for text entry.

This experiment is a DIY hardware adapter that enables assistive tech developers to connect existing switch based input systems to their Android device. Once connected, 2 switch assistive systems (with an additional switch for mode switching) can control both the standard Android accessibility func

tions as well as text entry through Morse on Gboard.

This experiment is built using Arduino and is compatible with most standard assistive 2 switch systems with 1/8” mono outputs.

Arduino Blog 12 Jul 22:12

Serial Connection Over Audio: Arduino Can Listen To UART

We’ve all been there: after assessing a problem and thinking about a solution, we immediately rush to pursue the first that comes to mind, only to later find that there was a vastly simpler alternative. Thankfully, developing an obscure solution, though sometimes frustrating at the time, does tend to make a good Hackaday post. This time it was [David Wehr] and AudioSerial: a simple way of outputting raw serial data over the audio port of an Android phone. Though [David] could have easily used USB OTG for this project, many microcontrollers don’t have the USB-to-TTL capabilities of his Arduino – so this wasn’t entirely in vain.

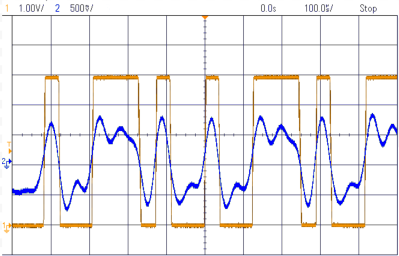
At first, it seemed like a simple task: any respectable phone’s DAC should have a sample rate of at least 44.1kHz. [David] used Oboe, a high performance C++ library for Android audio apps, to create the required waveform. The 8-bit data chunks he sent can only make up 256 unique messages, so he pre-generated them. However, the DAC tried to be clever and do some interpolation with the signal – great for audio, not so much for digital waveforms. You can see the warped signal in blue compared to what it should be in orange. To fix this, an op-amp comparator was used to clean up the signal, as well as boosting it to the required voltage.

Prefer your Arduino connections wireless? Check out this smartphone-controlled periodic table of elements, or this wireless robotic hand.

Hack a Day 31 May 09:00

Building Badges The Hard Way

What’s a hacker to do to profess his love for his dearest beloved? [Nitesh Kadyan] built his lady-love this awesome LED pendant – the LED BLE Hearty Necklace Badge.

The hardware is pretty vanilla by today’s hacker standards. An ATMega328p  does most of the heavy lifting. An HM-11 BLE module provides connection to an Android mobile app. Two 74HC595 shift registers drive 16 columns of red LEDs and a ULN2803 sinks current from the 8 rows. The power section consists of a charger for the 320mAh LiPo and an LDO for the BLE module. All the parts are SMD with the passives mostly being 0603, including the 128 LEDs.

128 LEDs soldered wrong way around

[Nitesh] didn’t get a stencil made for his first batch of boards, so all the parts were painstakingly soldered manually and not in a reflow oven. And on his first board, he ended up soldering all of the LED’s the wrong way around. Kudos to him for his doggedness and patience.

The Arduino code on the ATmega is also quite straightforward. All characters are stored as eight bytes each in program memory and occupy 8×8 pixels on the matrix. The bytes to be displayed are stored in a buffer and the columns are left shifted fast enough for the marquee text effect. The Android app is built by modifying a demo BLE app provided by Google. The firmware, Android app, and the KiCAD design files are all hosted on his Github repository.

[Nitesh] is now building a larger batch of these badges to bring them to hillhacks – the annual hacker-con for making and hacking in the Himalayas. Scheduled for later this month, you’ll have to sign up on the mailing list for details and if you’d like to snag one of these badges. To make it more interesting, [Nitesh] has added two games to the code – Tetris and Snakes. Hopefully, this will spur others to create more games for the badge, such as Pong.

Assemble a Robot Opponent for Air Hockey

Use JJ Robots' kit and your Android phone to build an air hockey partner who's always game.

Read more on MAKE

The post Assemble a Robot Opponent for Air Hockey appeared first on Make: DIY Projects and Ideas for Makers.

adding wifi control input to a robot running Arduino

I would like to add wifi control to my robot.  Right now it uses an Arduino Mega2650 to run the main control program.  I'd like to add to this contol inputs from an Android smartphone app over Wifi.  What do you recommend to do this?