Posts with «can» label

The Quadrivium EnsembleBot Is A Labour Of Love

The Quadrivium EnsembleBot project is a mashup between old school musical instruments and the modern MIDI controlled world. Built by a small team over several years, these hand crafted instruments look and sound really nice.

The electronics side of things is taken care of with a pile of Arduinos and off-the-shelf modules, but that doesn’t mean the design isn’t well thought through, if a little more complicated than it could be in places. Control is taken care of with a PC sending commands over the USB to an Arduino 2560. This first Arduino is referred to as the Master Controller and has the immediate job of driving the percussive instruments as well as other instruments that are struck with simple solenoids. All these inductive loads are switched via opto-isolators to keep any noise generated by switching away from the microcontroller. A chain of four sixteen-channel GPIO expander modules are hung off the I2C bus to give even more opto-isolated outputs, as even the Arduino 2560 doesn’t quite have enough GPIO pins available. The are a number of instruments that have more complex control requirements, and these are connected to dedicated slave Arduinos via an SPI-to-CAN module. These are in various states of development, which we’ll be keeping our beady eyes on.

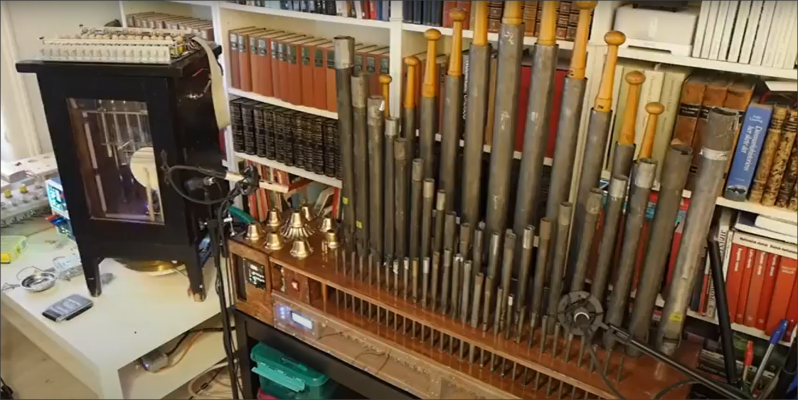
One of the more complex instruments is the PipeDream61 which is their second attempt to build a robotic pipe organ. This is powered by a Teensy, as they considered the Arduino to be a little too tight on resources. This organ has a temperature controller using an ATTiny85, in order to further relieve the main controller of such a burden and simplify the development a little.

Another interesting instrument is Robro, which is a robotic resophonic guitar which as they say is still work in progress despite how long they have been trying to get it to work. There’s clearly a fair bit of control complexity here, which is why it is taking so much fiddling (heh!) to get it work.

This project is by no means unique, lately we’ve covered controlling a church organ with MIDI, as well as a neat Arduino Orchestra, but the EnsembleBot is just so much more.

Thanks [gjerman] for the tip!

Hack a Day 19 Oct 16:30

Upgraded Infotainment Options on a 14 Year Old Mercedes

It used to be that upgrading a car stereo was fairly simple. There were only a few mechanical sizes and you could find kits to connect power, antennas, and speakers. Now, though, the car stereo has interfaces to steering wheel controls, speed sensors, rear-view cameras, and more. [RND_ASH] was tired of his 14-year-old system so he took an Android head unit, a tablet, and an Arduino, and made everything work as it was supposed to.

The key is to interface with the vehicle’s CAN bus which is a sort of local area network for the vehicle. Instead of having lots of wires running everywhere, today’s cars are more likely to have less wiring all shared with many devices.

[RND_ASH] has several videos describing the whole project and we expect there will be some more upcoming. You can see part one, below.

The project also reverse engineers how to display on the tiny screen in the dashboard. The code for the CAN bus interface is on GitHub. There’s also a written narrative on what he learned about the Mercedes interface in a different repository.

We’ve seen other cars get similar treatment, of course. If you want a gentle introduction to CAN hacking, we’ve done that, too.

Reverse Engineering the Smart ForTwo CAN Bus

The CAN bus has become a defacto standard in modern cars. Just about everything electronic in a car these days talks over this bus, which makes it fertile ground for aspiring hackers. [Daniel Velazquez] is striking out in this area, attempting to decode the messages on the CAN bus of his Smart ForTwo.

[Daniel] has had some pitfalls – first attempts with a Beaglebone Black were somewhat successful in reading messages, but led to strange activity of the car and indicators. This is par for the course in any hack that wires into an existing system – there’s a high chance of disrupting what’s going on leading to unintended consequences.

Further work using an Arduino with the MCP_CAN library netted [Daniel] better results, but  it would be great to understand precisely why the BeagleBone was causing a disturbance to the bus. Safety is highly important when you’re hacking on a speeding one-ton metal death cart, so it pays to double and triple check everything you’re doing.

Thus far, [Daniel] is part way through documenting the messages on the bus, finding registers that cover the ignition and turn signals, among others. Share your CAN hacking tips in the comments. For those interested in more on the CAN bus, check out [Eric]’s great primer on CAN hacking – and keep those car hacking projects flowing to the tip line!


Filed under: car hacks

Instrument Cluster Clock Gets The Show On The Road

While driving around one day, [Esko] noticed that the numbers and dials on a speedometer would be a pretty great medium for a clock build. This was his first project using a microcontroller, and with no time to lose he got his hands on the instrument cluster from a Fiat and used it to make a very unique timepiece.

The instrument cluster he chose was from a diesel Fiat Stilo, which [Esko] chose because the tachometer on the diesel version suited his timekeeping needs almost exactly. The speedometer measures almost all the way to 240 kph which works well for a 24-hour clock too. With the major part sourced, he found an Arduino clone and hit the road (figuratively speaking). A major focus of this project was getting the CAN bus signals sorted out. It helped that the Arduino clone he found had this functionality built-in (and ended up being cheaper than a real Arduino and shield) but he still had quite a bit of difficulty figuring out all of the signals.

In the end he got everything working, using a built-in servo motor in the cluster to make a “ticking” sound for seconds, and using the fuel gauge to keep track of the minutes. [Esko] also donated it to a local car museum when he finished so that others can enjoy this unique timepiece. Be sure to check out the video below to see this clock in action, and if you’re looking for other uses for instrument clusters that you might have lying around, be sure to check out this cluster used for video games.

The mechanics in dashboards are awesome, and produced at scale. That’s why our own [Adam Fabio] is able to get a hold of that type of hardware for his Analog Gauge Stepper kit. He simply adds a 3D printed needle, and a PCB to make interfacing easy.


Filed under: car hacks, clock hacks