Posts with «car» label

New Brains Save 12 V Fridge From the Scrap Heap

Recently [nibbler]’s Evakool 55L vehicle fridge started to act strangely, reporting crazy temperature errors and had no chance of regulating. The determination was that the NTC thermistor was toast, and rather than trying to extricate and replace this part, it was a lot easier to add a new one at a suitable location

Bog-standard fridge internals

A straight swap would have been boring, so this was a perfect excuse for an overboard hack. Reverse engineering the controller wouldn’t be easy, as the data wasn’t available, as is often the case for many products of this nature.

While doing a brain transplant, the hacker way, we can go overboard and add the basics of an IoT control and monitoring system. To that end, [nibbler] learned as much as possible about the off-the-shelf ZH25G compressor and the associated compressor control board. The aim was to junk the original user interface/control board and replace that with a Raspberry Pi Pico W running CircuitPython.

For the display, they used one of the ubiquitous SH1106 monochrome OLED units that can be had for less than the cost of a McDonald’s cheeseburger at the usual purveyors of cheap Chinese electronics.  A brief distraction was trying to use a DS18B20 waterproof thermometer probe, which they discovered didn’t function, so they reverted to tried and trusted tech — a simple NTC thermistor.
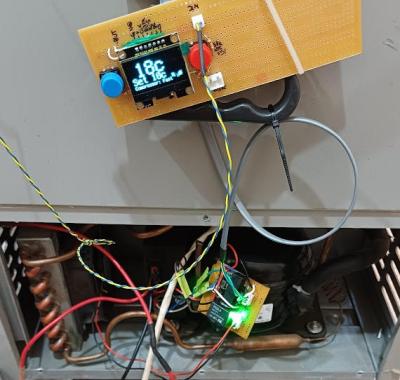
Testing testing

The final puzzle piece was to interface the Pico to the compressor controller. The controller expected a variable resistance to control the speed, for which they could have used a digitally controlled potentiometer. However, after failing to tame this particular beast, an easier solution was to build a small PCB with a few relays and some fixed resistors and call it a hack.

An annoyance was the lack of interrupt support in CircuitPython. This meant that interpreting the fault codes from the controller would be a bit tricky. The solution was to wedge in another microcontroller, a small Arduino. Its job is to sit there, listen for commands on the serial port, control the relay board to drive the compressor, listen for any error codes, and pass those back to the Pico. Of course, this could have all been done directly on the Pico, just not with CircuitPython, and a lot more learning would have been needed.

Of course, you need to own a working refrigerator to hack it, but you can easily build it from scratch. Even on a tight budget, you can get your beers cold. Needs must!

Full Self-Driving, on a Budget

Self-driving is currently the Holy Grail in the automotive world, with a number of companies racing to build general-purpose autonomous vehicles that can get from point A to point B with no user input. While no one has brought one to market yet, at least one has promised this feature and had customers pay for it, but continually moved the goalposts for delivery due to how challenging this problem turns out to be. But it doesn’t need to be that hard or expensive to solve, at least in some situations.

The situation in question is driving on a single stretch of highway, and only focuses on steering, so it doesn’t handle the accelerator or brake pedal input. The highway is driven normally, using a webcam to take images of the route and an Arduino to capture data about the steering angle. The idea here is that with enough training the Arduino could eventually steer the car. But first some math needs to happen on the training data since the steering wheel is almost always not turning the car, so the Arduino knows that actual steering events aren’t just statistical anomalies. After the training, the system does a surprisingly good job at “driving” based on this data, and does it on a budget not much larger than laptop, microcontroller, and webcam.

Admittedly, this project was a proof-of-concept to investigate machine learning, neural networks, and other statistical algorithms used in these sorts of systems, and doesn’t actually drive any cars on any roadways. Even the creator says he wouldn’t trust it himself, but that he was pleasantly surprised by the results of such a simple system. It could also be expanded out to handle brake and accelerator pedals with separate neural networks as well. It’s not our first budget-friendly self-driving system, either. This one makes it happen with the enormous computing resources of a single Android smartphone.

Annoy Yourself into Better Driving with This Turn Signal Monitor

Something like 99% of the people on the road at any given moment will consider themselves an above-average driver, something that’s as statistically impossible as it is easily disproven by casual observation. Drivers make all kinds of mistakes, but perhaps none as annoying and avoidable as failure to use their turn signal. This turn signal monitor aims to fix that, through the judicious use of negative feedback.

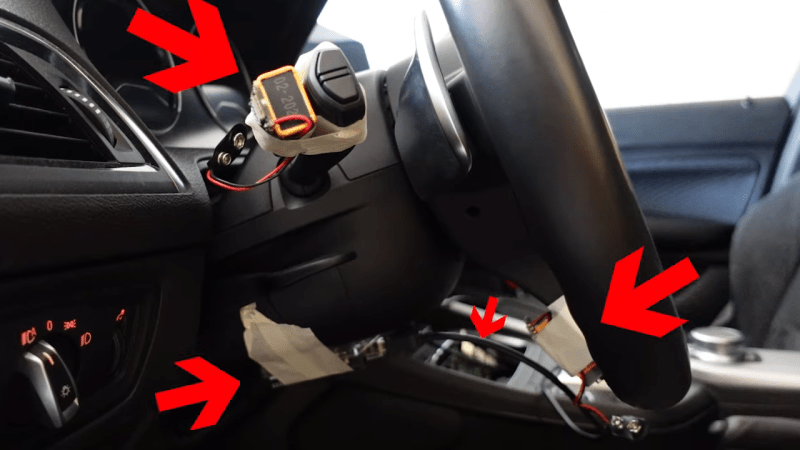
Apparently, [Mark Radinovic] feels that he has a predisposition against using his turn signal due to the fact that he drives a BMW. To break him of that habit, one that cost him his first BMW, he attached Arduino Nano 33 BLEs to the steering wheel and the turn signal stalk. The IMUs sense the position of each and send that over Bluetooth to an Arduino Uno WiFi. That in turn talks over USB to a Raspberry Pi, which connects to the car’s stereo via Bluetooth to blare an alarm when the steering wheel is turned but the turn signal remains untouched. The video below shows it in use; while it clearly works, there are a lot of situations where it triggers even though a turn signal isn’t really called for — going around a roundabout, for example, or navigating a sinuous approach to a drive-through window.

While [Mark] clearly built this tongue firmly planted in cheek, we can’t help but think there’s a better way — sniffing the car’s CANbus to determine steering angle and turn signal status comes to mind. This great workshop on CANbus sniffing from last year’s Remoticon would be a great place to start if you’d like a more streamlined solution than [Mark]’s.

[via Tom’s Hardware]

Hack a Day 07 Nov 15:15

Custom Instrument Cluster for Aging Car

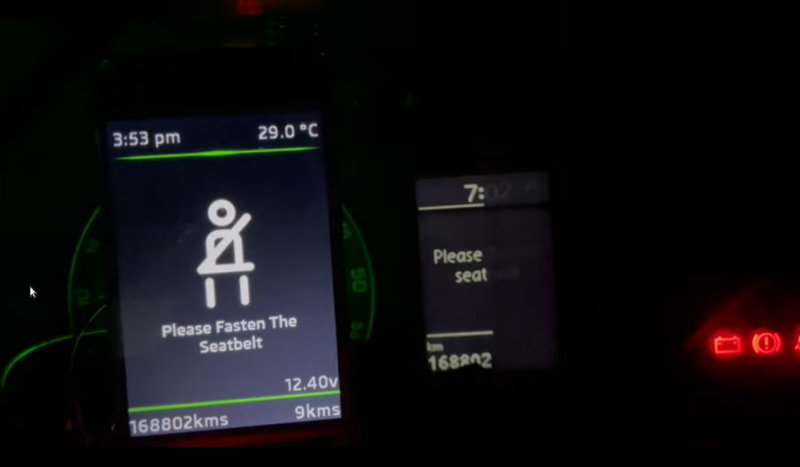
All of the technological improvements to vehicles over the past few decades have led to cars and trucks that would seem borderline magical to anyone driving something like a Ford Pinto in the 1970s. Not only are cars much safer due to things like crumple zones, anti-lock brakes, air bags, and compulsory seat belt use, but there’s a wide array of sensors, user interfaces, and computers that also improve the driving experience. At least, until it starts wearing out. The electronic technology in our modern cars can be tricky to replace, but [Aravind] at least was able to replace part of the instrument cluster on his aging (yet still modern) Skoda and improve upon it in the process.

These cars have a recurring problem with the central part of the cluster that includes an LCD display. If replacement parts can even be found, they tend to cost a significant fraction of the value of the car, making them uneconomical for most. [Aravind] found that a 3.5″ color LCD that was already available fit perfectly in the space once the old screen was removed, so from there the next steps were to interface it to the car. These have a CAN bus separated from the main control CAN bus, and the port was easily accessible, so an Arduino with a RTC was obtained to handle the heavy lifting of interfacing with it.

Now, [Aravind] has a new LCD screen in the console that’s fully programmable and potentially longer-lasting than the factory LCD was. There’s also full documentation of the process on the project page as well, for anyone else with a Volkswagen-adjacent car from this era. Either way, it’s a much more economical approach to replacing the module than shelling out the enormous cost of OEM replacement parts. Of course, CAN bus hacks like these are often gateway projects to doing more involved CAN bus projects like turning an entire vehicle into a video game controller.

Can the Solenoid Engine Power a Car?

[Emiel] aka [The Practical Engineer] makes all kinds of fun projects in his fully-featured shop, and one of his tangents has been building a series of solenoid engines. These engines mimic the function of an internal combustion engine, with each solenoid acting as a piston. The only problem with [Emiel]’s concept engines, though, was that he never actually put them into a vehicle to prove their effectiveness. This build finally proves that they can work at powering a vehicle.

The project starts with a new engine. [Emiel] chose a V4 design using four solenoids and an Arduino-based controller. After some trouble getting it to operate properly, he scavenged a small circuit board he built in his V8 solenoid engine to help with timing. With that installed, the solenoids click away and spin the crankshaft at a single constant speed. The vehicle itself was mostly 3D printed, with two aluminum tubes as support structures to mount the engine. Even the wheels were 3D printed with a special rubber coating applied to them. With a small drive train assembled, it’s off to the races for this tiny prototype.

While the small car doesn’t have steering and only goes at a constant speed, the proof of concept that these tiny electric engines actually work is a welcomed addition to [Emiel]’s collection of videos on these curious engines. Of course they’re not as efficient as driving the wheels directly with an electric motor, but we all know there’s no fun in that. If you haven’t seen his most intricate build, the V8 is certainly worth checking out, and also shows off the timing circuitry he repurposed for this car.

Open Source Electric Vehicle Charging

Electric vehicles are becoming more and more common on the road, but when they’re parked in the driveway or garage there are still some kinks to work out when getting them charged up. Sure, there are plenty of charging stations on the market, but they all have different features, capabilities, and even ports, so to really make sure that full control is maintained over charging a car’s batteries it might be necessary to reach into the parts bin and pull out a trusty Arduino.

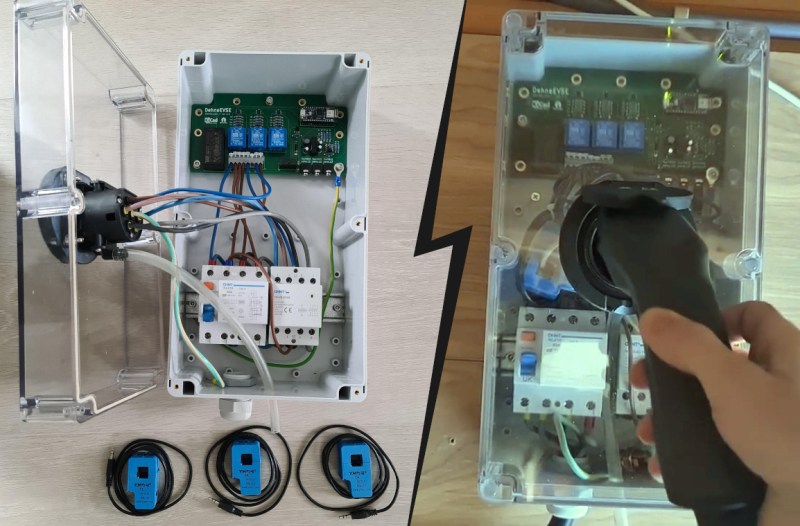
This project comes to us from [Sebastian] who needed this level of control over charging his Leaf, and who also has the skills to implement it from the large high voltage switching contactors to the software running its network connectivity and web app. This charging station has every available feature, too. It can tell the car to charge at different rates, and can restrict it to charging at different times (if energy is cheaper at night, for example). It is able to monitor the car’s charge state and other information over the communications bus to the vehicle, and even has a front-end web app for monitoring and controlling the device.

The project is based around an Arduino Nano 33 IoT with all of the code available on the project’s GitHub page. While we would advise using extreme caution when dealing with mains voltage and when interfacing with a high-ticket item like an EV, at first blush the build looks like it has crossed all its Ts and might even make a good prototype for a production unit in the future. If you don’t need all of the features that this charging station has, though, you can always hack the car itself to add some more advanced charging features.

Enforce Speed Limits with a Rusty Bike

They say you can’t manage what you can’t measure, and that certainly held true in the case of this bicycle that was used to measure the speed of cars in one Belgian neighborhood. If we understand the translation from Dutch correctly, the police were not enforcing the speed limit despite complaints. As a solution, the local citizenry built a bicycle with a radar gun that collected data which was then used to convince the police to enforce the speed limit on this road.

The bike isn’t the functional part of this build, as it doesn’t seem to have been intended to move. Rather, it was chosen because it is inconspicuous (read: rusty and not valuable) and simply housed the radar unit and electronics in a rear luggage case. The radar was specially calibrated to have less than 1% error, and ran on a deep cycle lead acid battery for around eight days. Fitting it with an Arduino-compatible shield and running some software (provided on the github page) is enough to get it up and running.

This is an impressive feat of citizen activism to provide the local police with accurate data to change a problem in a neighborhood. Not only was the technology put to good use, but the social engineering involved with hiding expensive electronics in plain sight with a rusty bicycle is a step beyond what we might have thought of as well.

Thanks to [Jo_elektro] for the tip!

Reverse Engineering the Smart ForTwo CAN Bus

The CAN bus has become a defacto standard in modern cars. Just about everything electronic in a car these days talks over this bus, which makes it fertile ground for aspiring hackers. [Daniel Velazquez] is striking out in this area, attempting to decode the messages on the CAN bus of his Smart ForTwo.

[Daniel] has had some pitfalls – first attempts with a Beaglebone Black were somewhat successful in reading messages, but led to strange activity of the car and indicators. This is par for the course in any hack that wires into an existing system – there’s a high chance of disrupting what’s going on leading to unintended consequences.

Further work using an Arduino with the MCP_CAN library netted [Daniel] better results, but  it would be great to understand precisely why the BeagleBone was causing a disturbance to the bus. Safety is highly important when you’re hacking on a speeding one-ton metal death cart, so it pays to double and triple check everything you’re doing.

Thus far, [Daniel] is part way through documenting the messages on the bus, finding registers that cover the ignition and turn signals, among others. Share your CAN hacking tips in the comments. For those interested in more on the CAN bus, check out [Eric]’s great primer on CAN hacking – and keep those car hacking projects flowing to the tip line!


Filed under: car hacks

Newsflash: A Bunch of Arduinos is Not an Autonomous Car

Nobody’s perfect. Sometimes you’re up late at night writing a blog post and you stumble upon an incredible story. You write it up, and it ends up being, well, incredible. IEEE Spectrum took the bait on this video (embedded below) where [Keran McKenzie] claims to have built a self-driving car for under $1,000 AUS with Arduinos.

The video is actually pretty funny, and we don’t think it’s intended to be a mass-media hoax as much as a YouTube joke. After letting the car “take over” for a few seconds, it swerves and [Keran] pretends to have hit something. (He’s using his knees people!) There are lots of takes with him under the car, and pointing at a single wire that supposedly makes the whole thing work. Yeah, right.


We were a bit bummed, though. We don’t think you can even reliably interface a sensor system with the steering wheel, accelerator, and brakes for as little as one grand, but we would have been entirely happy to see it done. We’re not saying that the software to run an autonomous car is the easy part, but we’d love to have a hack at it if the hardware were affordable.

Anyway, if you’re looking for a real autonomous driving experience, we recommend starting by hacking RC cars and giving them substantially bigger brains than an Arduino. Once you’ve got that working, making progress to a real car is doable, but expensive. And it helps to be [geohot].

And lest you think we’re all holier-than-thou, check out our most embarrassing post ever. We could just curl up and die. Feel better soon, IEEE Spectrum!

Thanks [jpiat] for the tip!


Filed under: Arduino Hacks
Hack a Day 19 Oct 18:00

Arduino + Software Defined Radio = Millions of Vulnerable Volkswagens

As we’ve mentioned previously, the integrity of your vehicle in an era where even your car can have a data connection could be a dubious bet at best. Speaking to these concerns, a soon-to-be published paper out of the University of Birmingham in the UK, states that virtually every Volkswagen sold since 1995 can be hacked and unlocked by cloning the vehicle’s keyfob via an Arduino and software defined radio (SDR).

The research team, led by [Flavio Garcia], have described two main vulnerabilities: the first requires combining a cyrptographic key from the vehicle with the signal from the owner’s fob to grant access, while the second takes advantage of the virtually ancient HiTag2 security system that was implemented in the 1990s. The former affects up to 100 million vehicles across the Volkswagen line, while the latter will work on models from Citroen, Peugeot, Opel, Nissan, Alfa Romero, Fiat, Mitsubishi and Ford.

The process isn’t exactly as simple as putting together $40 of electronics and walking away with a vehicle. The would-be thief must be close in order to detect the fob’s unique key — although they only need to do so once for that vehicle! — as well as reverse-engineer the other half of the code from the vehicle’s internal network. Exploiting HiTag2’s vulnerabilities to unlock the vehicle can be achieved within a minute by a well-prepared thief. [Garcia] and his team note that only the VW Golf 7 has been spared from this exploit.

If thievery is not your thing and you’re looking to white-hat hack your vehicle, Volkswagen still has the best option in the form of the loveable Beetle.

[Thanks for the tip therafman!]


Filed under: Arduino Hacks, hardware