Posts with «green hacks» label

Better Air Quality Sensing with CO2

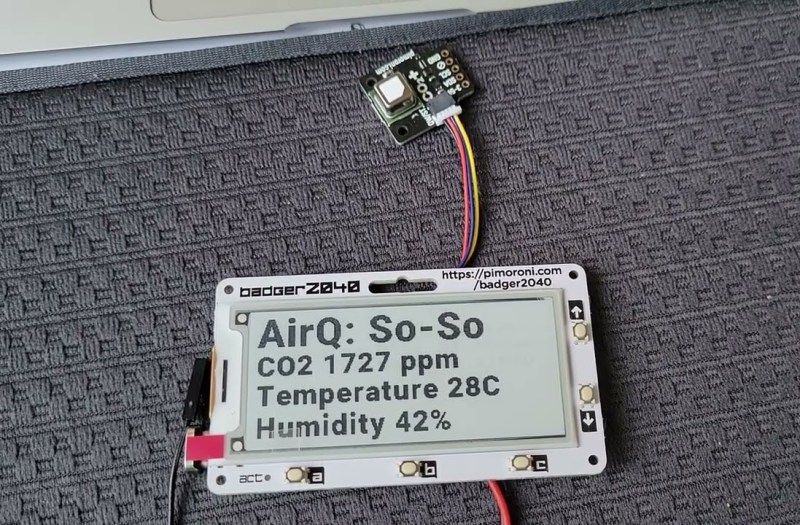
Measuring air quality, as anyone who has tried to tackle this problem can attest, is not as straightforward as it might seem. Even once the nebulous term “quality” is defined, most sensors use something as a proxy for overall air health. One common method is to use volatile organic compounds (VOCs) as this proxy but as [Larry Bank] found out, using these inside a home with a functional kitchen leads to a lot of inaccurate readings. In the search for a more reliable sensor, he built this project which uses CO2 to help gauge air quality.

Most of the reason that CO2 sensors aren’t used as air quality sensors is cost. They are much more expensive than VOC sensors, but [Larry] recently found one that was more affordable and decided to build this project around it. The prototype used an Arduino communicating over I2C to the sensor and an OLED screen, which he eventually put in a 3D printed case to carry around to sample CO2 concentration in various real-world locations. The final project uses a clever way of interfacing with the e-paper display that we featured earlier.

While CO2 concentration doesn’t tell the full story of air quality in a specific place, it does play a major role. [Larry] found concentrations as high as 3000 ppm in his home, which can cause a drop in cognitive function. He’s made some lifestyle changes as a result which he reports has had a beneficial impact. For human-occupied indoor spaces, CO2 can easily be the main contributor to poor air quality, and we’ve seen at least one other project to address this concern directly.

Hack a Day 22 Nov 03:00

Water Your Plants Just Four Times Per Year

While it’s true that some plants thrive on neglect, many of them do just fine with a few ounces of water once a week, as long as the light level is right. But even that is plenty to remember and actually do in our unprecedented times, so why bother trying? [Martin] has solved this problem for us, having given every aspect of automatic plant care a lot of thought. The result of his efforts is Flaura, a self-watering open-source plant pot, and a YouTube channel to go with it.

The 3D-printed pot can easily be scaled up or down to suit the size of the plant, and contains a water reservoir that holds about 0.7 L of water at the default size. Just pour it in through the little spout, and you’re good for about three months, depending on the plant, the light it’s in, and how much current water it draws. You can track the dryness level in the companion app.

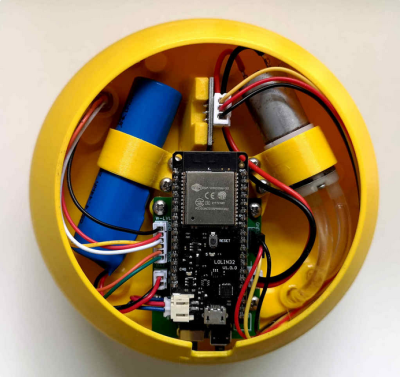
Whenever the capacitive soil moisture sensor hidden in the bottom of the dirt detects drought conditions, it sends a signal through the Wemos LOLIN32 and a MOSFET to a small pump, which sends up water from the reservoir.

The soil is watered uniformly by a small hose riddled with dozens of tiny holes that create little low-pressure water jets. This is definitely our favorite part of the project — not just because it’s cool looking, but also because a lot of these types of builds tend to release the water in the same spot all the time, which is. . . not how we water our plants. Be sure to check out the project overview video after the break.

No printer? No problem — you could always use an old Keurig machine to water a single plant, as long as the pump is still good.

Thanks for the tip, [Keith]!

Impressive Off-Grid Hydroelectric Plant Showcases The Hacker Spirit

We all know the story arc that so many projects take: Build. Fail. Improve. Fail. Repair. Improve. Fail. Rebuild. Success… Tweak! [Kris Harbour] is no stranger to the process, as his impressive YouTube channel testifies.

An IOT charge controller makes power management easier.

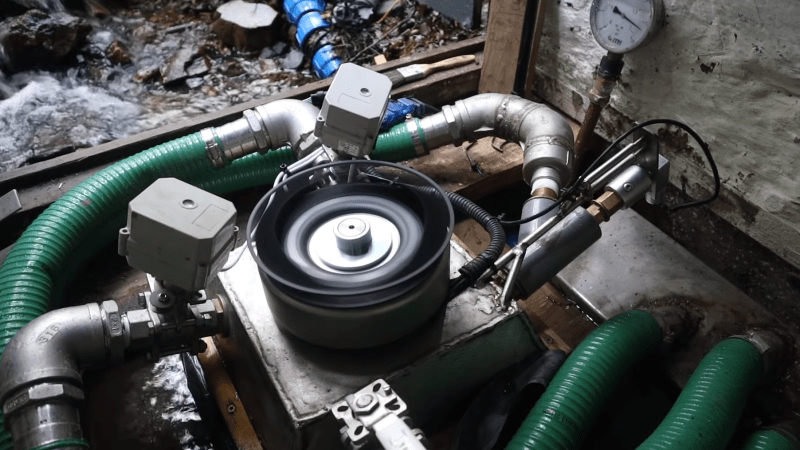
Among all of [Kris’] off-grid DIY adventures, his 500 W micro hydroelectric turbine has us really pumped up. The impressive feat of engineering features Arduino/IOT based controls, 3D printed components, and large number of custom-machined components, with large amounts of metal fabrication as well.

[Kris] Started the build with a Pelton wheel sourced from everyone’s favorite online auction site paired with an inexpensive MPPT charge controller designed for use with solar panels. Eventually the turbine was replaced with a custom built unit designed to produce more power. An Arduino based turbine valve controller and an IOT enabled charge controller give [Kris] everything he needs to manage the hydroelectric system without having to traipse down to the power house. Self-cleaning 3D printed screens keep intake maintenance to a minimum. Be sure to check out a demonstration of the control system in the video below the break.

As you watch the Hydro electric system playlist, you see the hacker spirit run strong throughout the initial build, the failures, the engineering, the successes, and then finally, the tweaking for more power. Because why stop at working when it can be made better, right? We highly recommend checking it out- but set aside some time. The whole series is oddly addictive, and This Hackaday Writer may have spent inordinate amounts of time watching it instead of writing dailies!

Of course, you don’t need to go full-tilt to get hydroelectric power up and running. Even at a low wattage, its always-on qualities mean that even a re-purposed washing machine can be efficient enough to be quite useful.

Thanks to [Mo] for alerting us to the great series via the Tip Line!

Arduino Powered Heat Pump Controller Helps Warm Your Toes

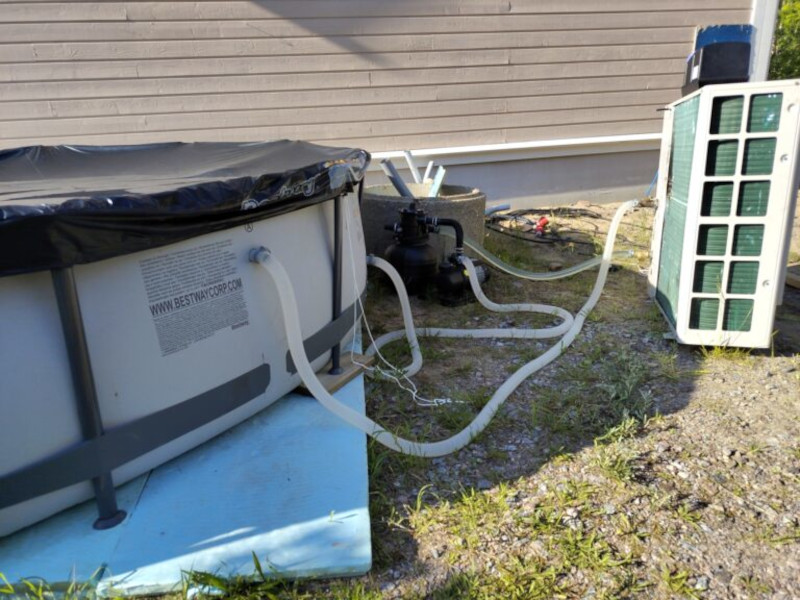
Heat pump heating technology is starting to pop up more and more lately, as the technology becomes cheaper and public awareness and acceptance improves. Touted as a greener residential heating system, they are rapidly gaining popularity, at least in part due to various government green policies and tax breaks.

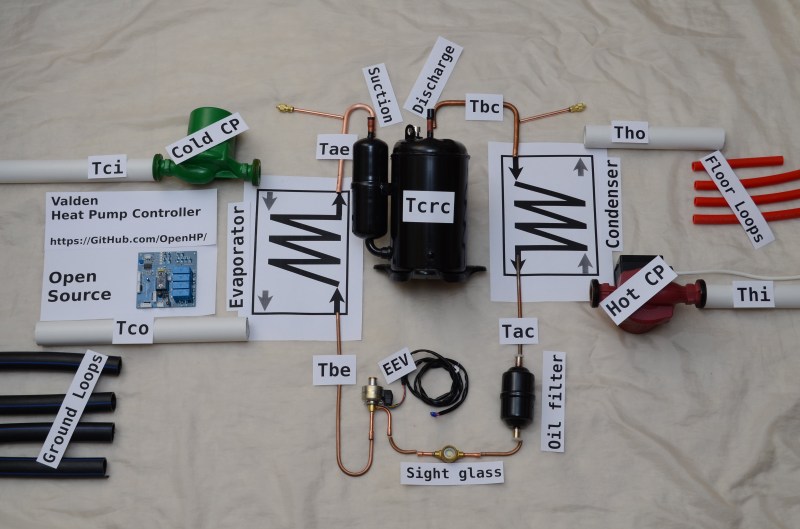
[Gonzho] has been busy the last few years working on his own Arduino Powered Open Source heat pump controller, and the project logs show some nice details of what it takes to start experimenting with heat pumps in general, if that’s your game. Or you could use this to give an old system a new lease of life with an Arduino brain transplant.

In essence they are very simple devices; some kind of refrigerant is passed through a source of heat, absorbing some of it, it then flows elsewhere, and is compressed, which increases its temperature, before that increased heat is lost where the increase in temperature is desired.

This heat source could be a river, a mass of pipes buried in the ground, or simply the air around you. The source and quality of the heat source as well as the desired system operating temperature dictate the overall efficiency, and with ground-source systems it’s even possible to dump excess heat directly into the ground and store it for when required later. This could be the result of a residential cooling system, or even directly sourced from a solar heated setup.

This heat pumping process is reversible, so it is possible to swap the hot and cold ends, just by flipping some valves, and turn your space heater into a space cooler. This whole process can trace its roots back to the super talented Scottish professor, William Cullen who in 1748 was the first person on record to demonstrate artificial refrigeration.

The power needed to run the compressor pump and control gear is usually electrically derived, at least in non-vehicular applications, but the total power required is significantly less than the effective heating (or cooling) power that results.

We’ve covered a few heat pump hacks before, like this guy who’s been heating his house geothermally for years, but not so many platforms designed for experimentation from the ground up.

The associated GitHub project provides the gerber files as well as the Arduino code, so you’ve got a great starting point for your own heat pumping builds.

Hack a Day 08 Sep 21:00

How an Engineer Designs a DIY Energy Recovery Ventilator

We have no idea whether [Nick Goodey] is a trained engineer or not. But given the detailed design of this DIY energy recovery ventilator for his home HVAC system, we’re going to go out on a limb and say he probably knows what he’s doing.

For those not in the know, an energy recovery ventilator (ERV) is an increasingly common piece of equipment in modern residential and commercial construction. As buildings have become progressively “tighter” to decrease heating and cooling energy losses to the environment, the air inside them has gotten increasingly stale. ERVs solve the problem by bringing fresh, unconditioned air in from the outside while venting stale but conditioned air to the outside. The two streams pass each other in a heat exchanger so that much of the energy put into the conditioned air is transferred to the incoming unconditioned air.

While ERV systems are readily available commercially, [Nick] decided to roll his own after a few experiments with Coroplast and some extensive calculations convinced him it would be a viable idea. One may scoff at the idea of corrugated plastic for the heat exchanger, but the smooth channels through the material make it a great choice. He built up a block of Coroplast squares with the channels in alternate layers oriented orthogonally, letting stale inside air pass very close to fresh outside air to exchange heat without every mixing directly. The entire system, including fans, an Arduino for control, sensors galore, and the Hubitat home automation hub, is powered by DC, so no electrician was needed. [Nick] has a ton of detail in his build log, including all the tools and calculators he used to design the system.

Given the expense of ERV systems, we’re surprised we haven’t seen more stories about DIY versions. We have talked about HVAC systems a lot, though — after all, HVAC techs are hackers who make housecalls.

RC Lawn Mower Keeps The Grass Greener On Your Side Of The Fence

For some people, mowing the lawn is a dreaded chore that leads to thoughts of pouring a concrete slab over the yard and painting it green. Others see it as the perfect occasion to spend a sunny afternoon outside. And then there are those without the luxury of having a preference on the subject in the first place. [elliotmade] for example has a friend who’s sitting in a wheelchair, and would normally have to rely on others to maintain his lawn and form an opinion on the enjoyability of the task. So to retain his friend’s independence, he decided to build him a remote-controlled lawn mower.

After putting together an initial proof of concept that’s been successfully in use for a few years now, [elliotmade] saw some room for improvement and thought it was time for an upgrade. Liberating the drive section of an electric wheelchair, he welded a frame around it to house the battery and the mower itself, and added an alternator to charge the battery directly from the mower’s engine. An RC receiver that connects to the motor driver is controlled by an Arduino, as well as a pair of relays to switch both the ignition and an electric starter that eliminates the need for cord pulling. Topping it off with a camera, the garden chores are now comfortably tackled from a distance, without any issues of depth perception.

Remote-controlling a sharp-bladed machine most certainly requires a few additional safety considerations, and it seems that [elliotmade] thought this out pretty well, so failure on any of the involved parts won’t have fatal consequences. However, judging from the demo video embedded after break, the garden in question might not be the best environment to turn this into a GPS-assisted, autonomous mower in the future. But then again, RC vehicles are fun as they are, regardless of their shape or size.

Simulate Climate With An Arduino

There are usually two ways to go about any task: the easy way and the hard way. Sometimes we might not know there are two options, but once we see someone else’s solution we might feel differently. When running a greenhouse or small farm, for example, we might decide to set up dozens of sensors to measure temperature, humidity, soil moisture, dew point, sunlight, or any number of other variables. That’s the hard way. The easy way is to use the Arduino-powered Norman climate simulator from [934Virginia].

Rather than relying on an array of sensors, any of which could fail or provide erroneous data for any number of reasons, Norman relies on a simple input of data about the current location – target coordinates, specified date ranges, and minimum/maximum values for temperature and humidity – in order to learn and predict the weather conditions in that location. It makes extensive use of the Dusk2Dawn library, and models other atmospheric conditions using mathematical modeling methods in order to make relatively accurate estimates of the climate it is installed in. There are some simulations on the project’s Plotly page which show its successes as well.

Presumably anyone using this device could run a greenhouse relatively well on only $10 worth of electronics rather than relying on a suite of sensors and input data, which is helpful for anyone strapped for cash (especially in developing areas of the world). The project is named after Norman Borlaug, a famous soil scientist and someone worth reading about. The first (and possibly only) sensor we might want to add to this project is a soil moisture sensor, since yearly estimates won’t tell us whether it has just rained or not.

Images courtesy of Wikimedia Commons.

Hack a Day 03 Aug 06:00

TerraDome Gives Plants And Dinosaurs A New Home

Housing exotic plants or animals offer a great opportunity to get into the world of electronic automation. When temperature, light, and humidity ranges are crucial, sensors are your best friend. And if woodworking and other types of crafts are your thing on top, why not build it all from scratch. [MagicManu] did so with his Jurassic Park themed octagonal dome built from MDF and transparent polystyrene.

With the intention to house some exotic plants of his own, [MagicManu] equipped the dome with an Arduino powered control system that regulates the temperature and light, and displays the current sensor states on a LCD, including the humidity. For reasons of simplicity regarding wiring and isolation, the humidity itself is not automated for the time being. A fan salvaged from an old PC power supply provides proper ventilation, and in case the temperature inside the dome ever gets too high, a servo controlled set of doors that match the Jurassic Park theme, will automatically open up.

[MagicManu] documented the whole build process in a video, which you can watch after the break — in French only though. We’ve seen a similar DIY indoor gardening project earlier this year, and considering its simple yet practical application to learn about sensors, plus a growing interest in indoor gardening itself (pun fully intended), this certainly won’t be the last one.

Smart Citizen Opens Eyes and Ears in Barcelona

More often than not, our coverage of projects here at Hackaday tends to be one-off sort of thing. We find something interesting, write it up for our beloved readers, and keep it moving. There’s an unending world of hacks and creations out there, and not a lot of time to cover them all. Still, it’s nice when we occasionally see a project we’ve previously covered “out in the wild” so to speak. A reminder that, while a project’s time on the Hackaday front page might be fleeting, their journey is far from finished.

A perfect example can be found in a recent article posted by the BBC about the battle with noise in Barcelona’s Plaza del Sol. The Plaza is a popular meeting place for tourists and residents alike, with loud parties continuing into the middle of the night, those with homes overlooking the Plaza were struggling to sleep. But to get any changes made, they needed a way to prove to the city council that the noise was beyond reasonable levels.

Enter the Smart Citizen, an open source Arduino-compatible sensor platform developed by Fab Lab Barcelona. We originally covered the Smart Citizen board back in 2013, right after it ran a successful funding campaign on Kickstarter. Armed with the data collected by Smart Citizen sensors deployed around the Plaza, the council has enacted measures to try to quiet things down before midnight.

Today people tend to approach crowdfunded projects with a healthy dose of apprehension, so it’s nice to see validation that they aren’t all flash in the pan ideas. Some of them really do end up making a positive impact, years after the campaign ends.

Of course, we can’t talk about distributed environmental monitoring without mentioning the fantastic work of [Radu Motisan], who’s made it his mission to put advanced sensors in the hands of citizen scientists.

[Thanks to muA for the tip.]

Sensing Soil Moisture: You’re Doing it Wrong!

If you compulsively search online for inexpensive microcontroller add-ons, you will see soil moisture measurement kits. [aka] built a greenhouse with a host of hacked hardware including lights and automatic watering. What caught our attention among all these was Step 5 in their instructions where [aka] explains why the cheap soil sensing probes aren’t worth their weight in potting soil. Even worse, they may leave vacationers with a mistaken sense of security over their unattended plants.

The sensing stakes, which come with a small amplifier, work splendidly out of the box, but if you recall, passing current through electrodes via moisture is the recipe for electrolysis and that has a pretty profound effect on metal. [Aka] shows us the effects of electrolysis on these probes and mentions that damaged probes will cease to give useful information which could lead to overworked pumps and flooded helpless plants.

There is an easy solution. Graphite probes are inexpensive to make yourself. Simply harvest them from pencils or buy woodless pencils from the art store. Add some wires and hold them with shrink tube, and you have probes which won’t fail you or your plants.

Here’s some garden automation if this only whet your whistle, and here’s a robotic friend who takes care of the weeds for you.


Filed under: green hacks