Posts with «fritzing» label

First Look at ABC: Basic Connections

[Alberto Piganti], aka [pighixxx] has been making circuit diagram art for a few years now, and has just come out with a book that’s available on Kickstarter. He sent us a copy to review, and we spent an hour or so with a refreshing beverage and a binder full of beautiful circuit diagrams. It doesn’t get better than that!

[pighixxx] started out making very pretty and functional pinout diagrams for a number of microcontrollers, and then branched out to modules and development boards like the Arduino and ESP8266. They’re great, and we’ll admit to having a printout of his SMD ATMega328 and the ESP-12 on our wall. His graphical style has been widely copied, which truly is the sincerest form of flattery.

But after pinouts, what’s next? Fully elaborated circuit diagrams, done in the same style, of course. “ABC: Basic Connections” started out life as a compendium of frequently used sub-circuits in Arduino projects. But you can take “Arduino” with a grain of salt — these are all useful for generic microcontroller-based projects. So whether you want to drive a 12 V solenoid from a low-voltage microcontroller, drive many LEDs with shift registers, or decode a rotary encoder, there is a circuit snippet here for you.

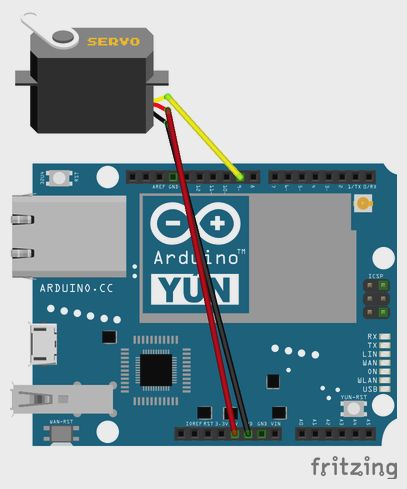
One of the things that we like most about the graphics in “ABC” is that they’re not dumbed down — they’re fundamentally just well-done circuit diagrams, but with graphic touches and extra detail where it actually helps to clarify things. This is a middle ground between the kind of schematic you use in a PCB layout program and the kind of diagram you get from Fritzing. In the former, every part has a symbol but multifunction parts like microcontrollers are just represented as squares bristling with pin numbers. In the latter, wiring up an IC is easy because the parts and pins are represented graphically, but you quickly run out of colors for the different wires, and the “breadboard” turns into a rat’s nest with a circuit of any complexity.

“ABC” takes the middle road, using standard circuit diagram style overall, but also the nice graphic representations of the ICs and modules that [pighixxx] is good at. Is a 2N2222 pinned EBC or BCE? You don’t have to look that up, because it’s sketched out for you here. We’d guess that this attractive, but information-rich, style is a great fit for the target audience — people with some electronics experience who do not yet have their favorite transistor symbol tattooed on their forearm. [pighixxx]’s diagrams are simple, easy to understand, easy to use, and pretty to boot.

There is a planned online counterpart to the book, with further elaborations of all of the circuit setups. They’re not finished yet, but they have a lot more of the flavor of the Fritzing-style, this-wire-goes-to-that-hole diagrams. This style does work better in an online format than in a physical book, because you can build up the rat’s nest in bite-sized steps, none of which are too overwhelming. But honestly, for an advanced beginner or intermediate electronics hacker, the book can be treated as stand-alone. The web content may help the rank newbie when they get stuck.

Tee-hee.

The breadth of circuits in “ABC” is fairly wide, covering most of the microcontroller-interfacing problems that we’ve ever encountered. None of the circuits are revolutionary — they’re the tried-and-true, correct solutions to the various problems, rather than anything too hacky or clever. We weren’t surprised by any of the circuits, but we didn’t find anything that we wouldn’t use ourselves either. These are basic connections after all, and a darn solid collection of them.

To sum up, “ABC” is an attractive book in a handy binder format that would make a great collection of solutions for anyone who’s just getting started in the whole “Arduino” scene but who gets hung up on interfacing the chips with the real world. It’s a handy reference for the pinouts of a number of frequently used parts, combined with the resistors, flyback diodes, level-shifting circuits, and whatever else that you’d need to make them work. It’s what we wish our simple circuit diagrams looked like. We like it.


Filed under: Hackaday Columns, reviews

Arduino Disco Ball Cake


Description

This is a fun project that will surely impress anyone you make this for. If you are having a "Disco" themed party, you cannot have a boring old cake. Let me tell you, this is probably the only Arduino project that my wife has ever been willing to be a part of. She did the hard work of putting the cake together, and I, well.... I was in charge of lighting. My biggest fear was that one of the wires would come loose and ruin the event at the most critical moment... While a wire did come loose, I managed to fix it in time before the guests arrived. Ok enough of my monologue, let me show you how to make one of these things.


Parts Required:

Note: powering this project using batteries is possible, but not recommended, and done at your own risk.

You will also need a Disco Ball Cake which you will have to make(or buy).My wife made this one. And as you will see shortly, the cake on the inside was Pink, because it was a strawberry cake.


Arduino Libraries and IDE

You can get the Arduino IDE from here: https://www.arduino.cc/en/Main/Software
I used version 1.6.4, which is probably way out of date... but works fine nonetheless.
 
You can get information about how to use the FastLED library here: http://fastled.io/
And you can download it from here: FastLED Library
I used version 3.0.3, which is also probably out of date.

ARDUINO CODE:

ARDUINO CODE DESCRIPTION:

  • FastLED Library: You need to make sure that you have downloaded and installed the FastLED library into your Arduino IDE. The library is included in this sketch otherwise the FastLED functions will not work.
  • The "NUM_LEDS" variable: tells the Arduino how many LEDS are in use. In this case, we have 4 LED rings, with each LED ring containing 16 LEDs, and therefore a total of 64 LEDs. If you define a lower number, for example 16, then the sketch would only illuminate the LEDs on the first LED ring.
  • The "DATA_PIN" variable: tells the Arduino which Digital Pin to use for data transmission to the LED ring. In this case, I am using Digital Pin 9.
  • Other variables: I have a couple of other variables which are used for LED randomisation and hue control. Hue is the colour of the LED. By incrementing the hue variable, you can get the LEDs to cycle in a rainbow-like pattern. The "hue" variable is a "byte", which means that it will only go up to a maximum value of 255, before it jumps back down to zero.
  • Initialisation Code: If you have a different LED ring to the one in this tutorial, you may have to modify the initialisation code. This LED ring has a WS2812-B chipset (according to the ICStation website), and so this line:
     
    FastLED.addLeds(leds, NUM_LEDS); Will tell the FastLED library which chipset is being used (NEOPIXEL), the pin used for data transmission (DATA_PIN), the LED array to be controlled (leds), and the number of LEDs to be controlled (NUM_LEDS).
  • In the "loop()": section of the code: the "hue" variable is incremented to create a rainbow effect, and a random LED is selected using the FastLED's random8() function.
  • The random8(x) function: will randomly choose a number from 0 to x.
  • The randomSeed() function: is there to help "truely randomise" the number. This is helped by reading the randomness of a floating analogPin (A0). It doesn't have to be analogPin 0, it can be any unused analog pin.
  • leds[rnd].setHSV(hue,255,255): This line sets the random LED to have a hue equal to the "hue" variable, saturation equal to 255, and brightness equal to 255. Saturation equal to zero will make the LED shine white.
    Brightness of zero essentially turns the LED OFF.
  • FastLED.show(): No physical changes will be made to the LED ring display until a message is sent from the Arduino to the Digital input pin of the LED ring. This message is transmitted when you call the FastLED.show(); function. This tells the LED rings to update their display with the information contained within the led array (leds). So if you set all LEDs to turn on, the board will not illuminate the LEDs until the FastLED.show(); function is called. This is important to know - especially when trying to design your own LED sequences.
  • The delay(50) line: will set the amount of time between flashes to 50 milliseconds. You can change the delay to increase or decrease the number of flashes per second.
  • The leds[i].fadeToBlackBy( 180 ) function: essentially fades the LEDS by 180 units. You can increase or decrease this number to achieve the desired fade speed. Be warned however, that if you forget to call this function or if you fail to fade the LEDs sufficiently, then you may end up with ALL LEDs turning on, which could potentially destroy your Arduino board - i.e. depending on the number of LED rings you have, and how you have chosen to power them.


The Cake


  • Slide 1 - Base Plate: It is important to create the base plate with all of the electronics fitted and in working order BEFORE you put the Cake onto it. Trying to fit wires/cables LEDs and circuits under the base plate while there is a Cake ontop is a recipe for disaster. So prepare the base plate first, and then move to the cake making part later.
  • Slide 2 - Bake Cake: You will need a couple of hemisphere cake pans to make the two sides of the ball. You have to make a relatively dense cake to withstand the overall weight of the cake, icing and fondant, and to maintain it's shape. Once cooled and chilled, you can place them ontop of each other to form a sphere. They are held together by a layer of icing between them.
  • Slide 3 - Fondant Icing: The fondant icing has to be rolled out on a special non-stick mat. We found that adding a bit of flour helped to reduce the stickiness. There are special rollers which ensure that the thickness of the fondant is consistent throughout. You then have to cut them into square pieces (about 1 cm squares worked well for us). The squares are then painted Silver with a special/edible silver fondant glaze. You may need to use a few coats, and allowing it to dry between coats.
  • Slide 4 - Iced Cake on Base: The cake can either be iced on or off the base plate... probably better to do it off the base plate. But if you decide to do it on the base plate, you will need to protect the LEDs from stray icing that may fall from the cake (in the process). Once the cake has been fully iced (with icing/frosting), you will need to place the cake into the central position on the board. There may be a chance that the cake may slide from the base... so do what you need to do to make it stay put.
  • Slides 5-7 - Place Fondant Squares: While the icing is still soft, you will then need to quickly, methodically and tirelessly place the fondant squares in a horizontal linear pattern around the cake. Work your way towards the north and south poles of the cake doing one row at a time. You can cut a fondant circle for the north pole of the cake. In slide 7, you will see a hole at the top of the cake. This was made to cold a plastic canister inside, which would be used later the hold the decorations in place at the top of the cake. Do this before placing the fondant circle at the top of the cake.
  • Slide 8 - Add Glitter: After placing all of the fondant squares onto the cake, it is very possible that some of the Silver glaze may have been wiped off some of the squares. This is where you go over it again with a few more coats of silver glaze, and on the last coat, before it dries, you can sprinkle some edible glitter all around the cake to give it that extra shine.
  • Slide 9 - The end product: The final step is to add some wire sparklers and some other decorations to the top of the cake. Push the wires through the fondant cap at the north pole into the canister within. This will hold the wires in place without ruining all of your hard work.


LED Ring pins

  • WS2812-B chipset: This LED ring uses the WS2812-B chipset, and has 4 break-out pins
    (GND, 5V, Din, Dout)
  • Power: To power this module, you need to provide 5V and up to 1A of current
  • Signals: To control the LED ring, you need to send signals to it via the Digital Input pin (Din).
    You can connect another LED ring to this one by utilising the Digital Output pin (Dout)


Power Usage Guide

  • General Rule: Each individual LED on the ring can transmit Red, Green and Blue light.The combinations of these colours can make up any other colour. White light is made up of all three of these colours at the same time. Each individual colour will draw approximately 20mA of current when showing that colour at maximum brightness. When shining white at maximum brightness, the single LED will draw approximately 60mA.
  • Power multiplier: If each LED can draw up to 60mA and there are 16 LEDs on a single LED ring, then 16x60mA = 960mA per LED ring. To be safe, and to make the maths easier, you need to make sure that you provide enough current to accommodate 1A per LED ring. So 4 LED rings will need a 5V 4A power supply if you want to get full functionality out of the modules.


Fritzing diagram

Connecting ONE LED Ring to the Arduino- (Click to enlarge)


  • 3 wires: You only need 3 wires to connect to the LED ring. If you only plan to light up a couple of LEDs at any one time this should be ok.
  • The SAFE WAY: A safer way to do this is to use an external power supply to power both the Arduino and the LED ring.
  • Electrolytic capacitor: By connecting a large 4700 uF 16V Electrolytic capacitor between the positive and negative terminals of power supply leads, with the negative leg of the capacitor attached to the negative terminal of the power supply, you will protect your LED rings from any initial onrush of current.


  • Protecting Resistor: It is also advisable to place a 300-400 ohm resistor between the Arduino's Digital Pin 9 (D9) and the LED Ring's Digital Input pin (Din). This protects the first LED from potential voltage spikes
  • Suitable wires: If you plan to chain a few of these LED rings together (see below), then you will probably want to keep the wires as short as possible and use a decent guage wire that can handle the current being drawn through them.


Connecting TWO LED Rings to the Arduino- (Click to enlarge)


  • Three extra wires:You only need 3 extra wires to connect an additional LED ring. A wire needs to connect the Digital output (Dout) of the first LED ring to the Digital Input (Din) of the 2nd LED ring.
  • Stay safe: Once again, a safer way to do this is to use an external power supply, a large electrolytic capacitor at the terminals, and a 300-400 ohm resistor between the Arduino and the first LED ring's digital input pin.


Connecting FOUR LED Ring to the Arduino- (Click to enlarge)


  • Sixty Four LEDs:You need 3 extra wires for each additional LED ring. 4 LED rings provides a total of 64 LEDs.
  • Watch the AMPS:At full brightness, this setup could potentially draw up to 4amps (or roughly 1 amp per LED ring)
  • External Supply essential: It is essential to use an external power supply to power these LEDs when there are so many of them. If you don't use an external power supply and you accidentally illuminate ALL of the LEDs, then you are likely to damage the microcontroller from excessive current draw.


Connection Tables

How to connect ONE LED Ring to the Arduino- (Click to enlarge)


How to connect TWO LED Rings to the Arduino- (Click to enlarge)


Concluding comments

In this tutorial I showed you how to go about decorating a Disco Ball cake and also showed you how to use the RGB LED rings from ICStation. If you look at the video you will see just how versatile these LED rings are. I would like to thank my wife for providing such an exciting project to work on, and ICStation for their collaborative efforts. Please make sure to share this project with all of your friends and family.


If you like this page, please do me a favour and show your appreciation :

 
Visit my ArduinoBasics Google + page.
Follow me on Twitter by looking for ScottC @ArduinoBasics.
I can also be found on Pinterest and Instagram.
Have a look at my videos on my YouTube channel.


ScottC 04 Jun 07:38

NS1 Nanosynth the hackable analog synthesizer is back!

We’ve been playing with NS1 Nanosynth in the last few weeks, when it first appeared under our radars on the Christmas’ Gift Guides (while going sold out in few days, after Synthopia blessed it with this interesting review).  It’s a hackable and customizable analog synthesizer coupled with an Arduino Micro platform.

Personally, it was one of my first steps into modular synthesizers. Nice sounds, easy approach. Peter Kirn is perfectly picturing this amazing compromise here!

Synths: they’re fun to tweak and play. Modulars: they’re fun to patch. Arduinos: they’re fun to hack. Small things: they’re fun to carry around.

But how to track patches? How to share sounds with friends? I was playing mainly with my son, and managed to print out a paper sketch depicting all the different pinout of the synth. I wasn’t satisfied with that, I needed more!

I started writing Sound Machines, about new patches, more sounds. It turned out I made a Fritzing part out of the Nanonsynth, and we started sharing each other patches. This repository holds them, and this is a short review of the best. Enjoy!


Here you can listen to the envelope Generator (ADSR) in action:


Want to add your very own sounds? You can either add it to their repository or comment here!

Build an IoT Gauge with Arduino Yún and IFTTT

Tomas Amberg shared with us the link to an Instructable he published on how to build a Web-enabled, Arduino-based IoT Gauge with a REST API, and connect it to the IFTTT mash-up platform, via the Yaler.net relay service he founded.

The cool thing about this project is the connection with the Maker Channel  of IFTTT which supports custom Webhooks, to integrate DIY IoT projects: 

Inspired by WhereDial, a DIY Internet of Things classic, the IoT Gauge shows the current location of its owner. A bit like the Weasley Clock in Harry Potter. The design and code of the IoT Gauge is generic and could be used as well to display e.g. weather conditions. The logic resides in the Cloud, the gauge is just a servo with an API.

Check out the five-step tutorial and the ingredients you need at this link.

Arduino Blog 05 Aug 18:00
arduino  featured  fritzing  gauge  ifttt  iot  lasercut  tutorial  uno  yún  

A “Draw it yourself” midi controller with a 3d-printed case

‘Draw It Yourself’ is a MIDI controller created by Dani Sanz which uses conductive ink as push-buttons. It is based on Arduino Uno and uses a capacitive sensor to determine whether the drawn buttons are being touched or not:

This was my second semester project for the Interactive Music Systems Design Course (CDSIM) at the Music Technology Group (MTG) at University Pompeu Fabra of Barcelona. I presented this project at Sonar+D, part of the Sonar festival of Barcelona, held between June 12th and 14th 2014.

It can be used for multiple applications, not only for music! You can download the Fritzing  and make it yourself on the Instructable and see it in action with this video:


Fritzing is out with a new release including Arduino Yún microcontroller!

Fritzing is an open-source hardware initiative that makes electronics accessible as a creative material for anyone. You can easily learn how to build a circuit for you project and also design your own PCB.

Last week, the Fritzing team announced the new release with a number of new parts, especially a number of popular microcontrollers, among which also Arduino Yún:

We have upgraded to their latest version Qt5, which brings stability and speed improvements (especially for Mac OS X users). This also enables us to port fritzing to Android, iOS, etc.

You can download Fritzing 0.9.0b at this link.


Arduino Blog 28 Jul 16:39

The Arcade Machine, by Timothy (15)

[Timothy], a 15 years old Arduino enthusiast has sent us his first Arduino Project, an arcade interface based on Arduino Leonardo.

The cabinet is made of 4mm HDF and were laser cut at “Fabriken” in Malmö. The red arcade sign in the top is produced in 5mm translucent acrylic. All design and construction drawings were made in Illustrator. I used an Arduino Leonardo to connect the joystick, buttons and the LED light.  The game installed, Superstar Chefs, is an old game developed by my dad’s cousins. My prototype board was made with Fritzing.

It includes:

- 6 green 3mm LED’s,

- 11 resistors (6 330 ohm, 4 10K ohm and one 100 ohm),

-1 dip8 socket with an ATtiny45,

- 1 potentiometer,

- 4 pushbutton and header sockets.

I created this prototype board to easily get started with Arduino.

Timonthy, welcome on board!

New Fritzing Parts Editor

Fritzing just announced version 0.7.9 of the new parts editor: "Blog: new parts editor released".

I've tried Fritzing a few times and get pretty far along quickly, only to get my nets tangled up-- not connected where I thought they were. Then I manage to crash it while I try to figure it out. This time, I'm going to try a tutorial and actually stick to it, and see how far I get!

Jeff's Arduino Blog 09 Oct 17:15
fritzing  

Simulate before you build.

I have found a somewhat "unique" way to simulate the electronics of a robot before I build one.

I like the program S4A (Scratch for Arduino) that connects a live, working Arduino to a ultra-simple block diagram programming language. How simple is it? Scratch is used by children! The Arduino becomes the I/O of the system.

read more

Let's Make Robots 11 Jun 17:06
arduino  avr  fritzing  s4a  scatch