Posts with «software hacks» label

Spice Up the Humble 16×2 LCD with Big Digits

The 16×2 LCD display is a classic in the microcontroller world, and for good reason. Add a couple of wires, download a library, mash out a few lines of code, and your project has a user interface. A utilitarian and somewhat boring UI, though, and one that can be hard to read at a distance. So why not spice it up with these large-type custom fonts?

As [Vaclav Krejci] explains, the trick to getting large fonts on a display that’s normally limited to two rows of 16 characters each lies in the eight custom characters the display allows to be added to its preprogrammed character set. These can store carefully crafted patterns that can then be assembled to make reasonable facsimiles of the ten numerals. Each custom pattern forms one-quarter of the finished numeral, which spans what would normally be a two-by-two character matrix on the display. Yes, there’s a one-pixel wide blank space running horizontally and vertically through each big character, but it’s not that distracting.

Composing the custom patterns, and making sure they’re usable across multiple characters, is the real hack here, and [Vaclav] put a lot of work into that. He started out in Illustrator, but quickly switched to a spreadsheet because it allowed him to easily generate the correct binary numbers to pass to the display for each pattern. It seems to have really let his creative juices flow, too — he came up with 24 different fonts! Out favorite is the one he calls “Tron,” which looks a bit like the magnetic character recognition font on the bottom of bank checks. Everyone remembers checks, right?

Hats off to [Vaclav] for a creative and fun way to spice up the humble 16×2 display. We’d love to see someone pick this up and try a complete alphanumeric character set, although that might be a tall order with only eight custom characters to work with. Then again, if Bad Apple on a 16×2 is possible…

Hack a Day 07 Apr 19:30

Arduino Brings A MicroPython IDE

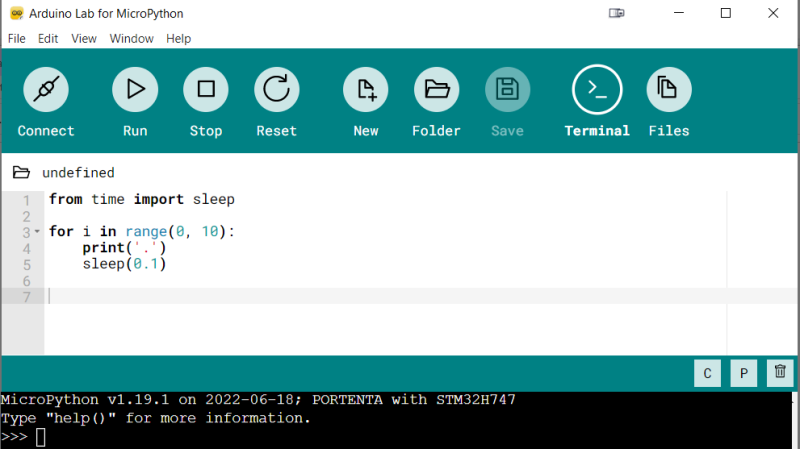
Both Arduino and MicroPython are giants when it comes to the electronics education area, and each one of them represents something you can’t pass up on as an educator. Arduino offers you a broad ecosystem of cheap hardware with a beginner-friendly IDE, helped by forum posts explaining every single problem that you could and will stumble upon. MicroPython, on the other hand, offers a powerful programming environment ripe for experimentation, and doesn’t unleash a machine gun fire of triangle brackets if you try to parse JSON slightly incorrectly. They look like a match made in heaven, and today, from heaven descends the Arduino Lab for MicroPython.

This is not an Arduino IDE extension – it’s a separate Arduino IDE-shaped app that does MicroPython editing and uploads code to your board from a friendly environment. It works over a serial port, and as such, the venerable ESP8266-based boards shouldn’t be be left out – it even offers file manager capabilities! Arduino states that this is an experimental effort – it doesn’t yet have syntax checks, for instance, and no promises are made. That said, it already is a wonderful MicroPython IDE for beginner purposes, and absolutely a move in the right direction. Want to try? Download it here, there’s even a Linux build!

High-level languages let you build projects faster – perfect fit for someone getting into microcontrollers. Hopefully, what follows is a MicroPython library manager and repository! We’ve first tried out MicroPython in 2016, and it’s come a long way since then – we’ve seen quite a few beginner-friendly MicroPython intros, from a gaming handheld programming course, to a bipedal robot programming MicroPython exploration. And, of course, you can bring your C libraries with you.

Blinking an Arduino LED, in Julia

The Julia programming language is a horrible fit for a no-frills microcontroller like the ATMega328p that lies within the classic Arduino, but that didn’t stop [Sukera] from trying, and succeeding.

All of the features that make Julia a cool programming language for your big computer make it an awful choice for the Arduino. It’s designed for interactivity, is dynamically typed, and leans heavily on its garbage collection; each of these features alone would tax the Mega to the breaking point. But in its favor, it is a compiled language that is based on LLVM, and LLVM has an AVR backend for C. Should just be a simple matter of stubbing out some of the overhead, recompiling LLVM to add an AVR target for Julia, and then fixing up all the other loose ends, right?

Well, it turns out it almost was. Leaning heavily on the flexibility of LLVM, [Sukera] manages to turn off all the language features that aren’t needed, and after some small hurdles like the usual problems with volatile and atomic variables, manages to blink an LED slowly. Huzzah. We love [Sukera’s] wry “Now THAT is what I call two days well spent!” after it’s all done, but seriously, this is the first time we’ve every seen even super-rudimentary Julia code running on an 8-bit microcontroller, so there are definitely some kudos due here.

By the time that Julia is wedged into the AVR, a lot of what makes it appealing on the big computers is missing on the micro, so we don’t really see people picking it over straight C, which has a much more developed ecosystem. But still, it’s great to see what it takes to get a language designed around a runtime and garbage collection up and running on our favorite mini micro.

Thanks [Joel] for the tip!

Arduino Nano Memory Upgrade with No Soldering

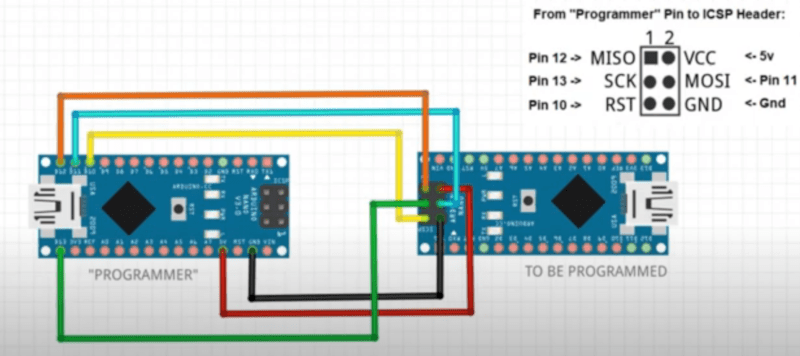
Ok, we’ll come clean. [Design Build Destroy] didn’t really add any memory to his Arduino Nano. But he did get about 1.5K more program space when compared to the stock setup. The trick? On some Nano boards and clones, the bootloader is set to use a large block of reserved memory, but Optiboot only requires a fraction of that reserved memory. By reprogramming the bootloader and changing the configuration fuses, you can reclaim that unused memory.

Of course, you can’t easily overwrite the bootloader and fuses over the serial port to prevent you from bricking your device. The video below shows how to connect another Arduino to do the programming. You could also use any dedicated AVR programmer you happen to have. Oddly, the Uno already uses Optiboot with the same processors, and is set correctly and the video shows the differences in the configuration between the two in their default state.

Of course, depending on where you get your Nano devices and their age, you may already have this set up at which point you won’t gain anything, but you should be able to easily tell if you need to go through the steps or not. The same trick will probably work with any older Arduino boards you have laying around if Optiboot supports them. What can you do with the extra memory? Maybe speech recognition?

Making an Arduino Ventilator? Read This First

Thanks to the virus crisis, lots of people are designing makeshift ventilator designs in the hopes of saving people’s lives. Many of these are based around some sort of Arduino-powered CPU. [Armstrong Subero] things that’s a great idea, but cautions that making an electronic pair of dice is a different proposition than creating a machine to breathe for someone. But he isn’t just complaining. He talks about considerations when building a real-time and safety-critical system.

[Armstrong] has a lot of good points, although we aren’t sure you need the complexity of a real-time operating system just to squeeze a bag. If anything, that seems like it might make it more susceptible to unexpected operation. However, we agree with his comments that you should have closed-loop control to make sure the device is working, alarming when the device isn’t working, and watchdog timers to guard against lockup.

One excellent point from the post:

For example a high availability system real time system may be specified as having an up time of around 99% in a 24 hour period. Which 1% of the day is it acceptable to have the ventilator not operational? Since we have 1440 minutes in a day, which 14.4 minutes of the day should the patient not be allowed to breathe?

However, he does have some solid suggestions such as using an IDE with debugging and adhering to a coding standard such as MISRA. Of course, he also points out you might choose a different CPU that has safety-critical certifications and corresponding libraries. One suggestion is to have multiple CPUs, and this is a common enough solution in many safety-critical systems. For example, imagine 3 CPUs driving a switching circuit that requires a low logic level to turn on.

You could make the outputs go to inputs if the CPU wants to not drive the switch, or pull the output to ground if it does. Then a pull-up resistor holds the state high if no CPU pulls it to ground. All CPUs could sense the state of the line and if they don’t think it looks right they sound their own alarm. Some systems vote so that two of three CPUs must agree (at least) or, in some cases, three out of five.

We’ve been talking about ventilators quite a bit lately. The kind of mechanical design [Armstrong] is probably thinking of is like the MIT design we talked about last week.

Counter-Strike Gets the RGB LED Treatment

Inspired by the over-the-top stage lighting and pyrotechnics used during e-sport events, [Hans Peter] set out to develop a scaled-down version (minus the flames) for his personal Counter-Strike: Global Offensive sessions. It might seem like pulling something like this off would involve hacking the game engine, but as it turns out, Valve was kind enough to implement a game state API that made it relatively easy.

According to the documentation, the CS:GO client can be configured to send out state information to a HTTP server at regular intervals. It even provided example code for implementing a simple state server in Node.js, which [Hans] adapted for this project by adding some conditional statements that analyze the status of the current game.

These functions fire off serial commands to the attached Arduino, which in turn controls the WS2812B LEDs. The Arduino code takes the information provided by the HTTP server and breaks that down into various lighting routines for different conditions such as wins and losses. But things really kick into gear when a bomb is active.

[Hans] wanted to synchronize the flashing LEDs with the beeping sound the bomb makes in the game, but the API doesn’t provide granular enough data. So he recorded the audio of the bomb arming sequence, used Audacity to precisely time the beeps, and implemented the sequence in his Arduino code. In the video after the break you can see that the synchronization isn’t perfect, but it’s certainly close enough to get the point across in the heat of battle.

With the special place that Counter-Strike occupies in the hearts of hackers and gamers alike, it’s little surprise people are still finding unique ways to experience the game.

Machine Learning on Tiny Platforms Like Raspberry Pi and Arduino

Machine learning is starting to come online in all kinds of arenas lately, and the trend is likely to continue for the forseeable future. What was once only available for operators of supercomputers has found use among anyone with a reasonably powerful desktop computer. The downsizing isn’t stopping there, though, as Microsoft is pushing development of machine learning for embedded systems now.

The Embedded Learning Library (ELL) is a set of tools for allowing Arduinos, Raspberry Pis, and the like to take advantage of machine learning algorithms despite their small size and reduced capability. Microsoft intended this library to be useful for anyone, and has examples available for things like computer vision, audio keyword recognition, and a small handful of other implementations. The library should be expandable to any application where machine learning would be beneficial for a small embedded system, though, so it’s not limited to these example applications.

There is one small speed bump to running a machine learning algorithm on your Raspberry Pi, though. The high processor load tends to cause small SoCs to overheat. But adding a heatsink and fan is something we’ve certainly seen before. Don’t let your lack of a supercomputer keep you from exploring machine learning if you see a benefit to it, and if you need more power than just one Raspberry Pi you can always build a cluster to get your task done just a little bit faster, too.

Thanks to [Baldpower] for the tip!

Push it to the Limit: SSD1306 at 150 FPS

A good deal of the projects we cover here at Hackaday are not, in the strictest sense, practical endeavors. If we required that everything which graced our digital pages had a clear end result, the site would be in a rather sad state of affairs. Sometimes it’s enough just to do something for the challenge of it. But more often than not, you’ll learn something in the process which you can use down the line.

That’s precisely what pushed [Laurence Bank] to see how well he could optimize the frame rate on the popular SSD1306 OLED display. After several iterations of his code, he was able to achieve a blistering 151.5 FPS, with apparently still some room for improvement if he’s feeling up to the challenge. But considering his first attempt was only running at 5.5 FPS, we’d say he’s already more than earned his hacker cred on this one.

A few different tricks were used to achieve such incredible performance gains. To start with, while the official I2C specification says you’re supposed to wait for an acknowledgment back from the device when communicating with it, [Laurence] realized the SSD1306 didn’t actually care. He could continuously blast commands at the display without bothering to wait for an acknowledgment. He admits there are problems with this method, but you can’t argue with the results.

To really wring all the performance out of the system he could, [Laurence] donned his Assembly Cap and examined how the Arduino IDE compiler was interpreting his code. He identified a few areas where changing his C code would force the compiler to generate faster output. He notes that this wouldn’t normally be required when working with more advanced compilers, but that the Arduino toolchain needs its hand held occasionally.

This isn’t the first time we’ve seen somebody try and push more pixels through the very same OLED display, and it’s interesting to see the two very different approaches to the same goal.

Real-Time Planet Tracker With Laser-Point Accuracy

Space. The final frontier. Unfortunately, the vast majority of us are planet-locked until further notice. If you are dedicated hobbyist astronomer, you probably already have the rough positions of the planets memorized. But what if you want to know them exactly from the comfort of your room and educate yourself at the same time? [Shubham Paul] has gone the extra parsec to build a Real-Time Planet Tracker that calculates their locations using Kepler’s Laws with exacting precision.

An Arduino Mega provides the brains, while 3.5-turn-pan and 180-degree-tilt servos are the brawn. A potentiometer and switch allow for for planet and mode selection, while a GPS module and an optional MPU9250 gyroscope/magnetometer let it know where you are. Finally a laser pointer shows the planet’s location in a closed room. And then there’s code: a lot of code.

The hardware side of things — as [Shubham Paul] clarifies — looks a little unfinished because the focus of the project is the software with the intent to instruct. They have included all the code they wrote for the RTPT, providing a breakdown in each section for those who are looking to build their own.

There is an extra step to auto-align the RTPT to north, otherwise you’ll have to do so manually. But [Shubham Paul] has designed it so that even if you move the tracker about, the RTPT will readjust its calculations in real time. Each part of the project includes a wealth of related information beyond simple instructions to adequately equip any prospective builders.

This hack gets the job done. If it’s looks you’re after, an artistic expression of maker skills and astronomy can be seen in this planetary map that relies on persistence of vision.


Filed under: Arduino Hacks, software hacks

Code Craft-Embedding C++: Hacking the Arduino Software Environment

The Arduino software environment, including the IDE, libraries, and general approach, are geared toward education. It’s meant as a way to introduce embedded development to newbies. This is a great concept but it falls short when more serious development or more advanced education is required. I keep wrestling with how to address this. One way is by using Eclipse with the Arduino Plug-in. That provides a professional development environment, at least.

The code base for the Arduino is another frustration. Bluntly, the use of setup() and loop() with main() being hidden really bugs me. The mixture of C and C++ in libraries and examples is another irritation. There is enough C++ being used that it makes sense it should be the standard. Plus a good portion of the library code could be a lot better. At this point fixing this would be a monumental task requiring many dedicated developers to do the rewrite. But there are a some things that can be done so let’s see a couple possibilities and how they would be used.

The Main Hack

As mentioned, hiding main() bugs me. It’s an inherent part of C++ which makes it an important to learning the language. Up until now I’d not considered how to address this. I knew that an Arduino main() existed from poking around in the code base – it had to be there because it is required by the C++ standard. The light dawned on me to try copying the code in the file main.cpp into my own code. It built, but how could I be sure that it was using my code and not the original from the Arduino libraries? I commented out setup() and it still built, so it had to be using my version otherwise there’d be an error about setup() being missing. You may wonder why it used my version.

When you build a program… Yes, it’s a “program” not a “sketch”, a “daughter board” not a “shield”, and a “linker” not a “combiner”! Why is everyone trying to change the language used for software development?

When you build a C++ program there are two main stages. You compile the code using the compiler. That generates a number of object files — one for each source file. The linker then combines the compiled objects to create an executable. The linker starts by looking for the C run time code (CRTC). This is the code that does some setup prior to main() being called. In the CRTC there will be external symbols, main() being one, whose code exists in other files.

The linker is going to look in two places for those missing symbols. First, it loads all the object files, sorts out the symbols from them, and builds a list of what is missing. Second, it looks through any included libraries of pre-compiled objects for the remaining symbols. If any symbols are still missing, it emits an error message.

If you look in the Arduino files you’ll find a main.cpp file that contains a main() function. That ends up in the library. When the linker starts, my version of main() is in a newly created object file. Since object files are processed first the linker uses my version of main(). The library version is ignored.

There is still something unusual about main(). Here’s the infinite for loop in main():

	for (;;) {
		loop();
		if (serialEventRun) serialEventRun();
	}

The call to loop() is as expected but why is there an if statement and serialEventRun? The function checks if serial input data is available. The if relies on a trick of the tool chain, not C++, which checks the existence of the symbol serialEventRun. When the symbol does not exist the if and its code are omitted.

Zapping setup() and loop()

Now that I have control over main() I can address my other pet peeve, the setup() and loop() functions. I can eliminate these two function by creating my own version of main(). I’m not saying the use of setup() and loop() were wrong, especially in light of the educational goal of Arduino. Using them makes it clear how to organize an embedded system. This is the same concept behind C++ constructors and member functions. Get the initialization done at the right time and place and a good chunk of software problems evaporate. But since C++ offers this automatically with classes, the next step is to utilize C++’s capabilities.

Global Instantiation

One issue with C++ is the cost of initialization of global, or file, scope class instances. There is some additional code executed before main() to handle this as we saw in the article that introduced classes. I think this overhead is small enough that it’s not a problem.

An issue that may be a problem is the order of initialization. The order is defined within a compilation unit (usually a file) from the first declaration to the last. But across compilation units the ordering is undefined. One time all the globals in file A may be initialized first and the next time those in file B might come first. The order is important when one class depends on another being initialized first. If they are in different compilation units this is impossible to ensure. One solution is to put all the globals in a single compilation unit. This may not work if a library contains global instances.

A related issue occurs on large embedded computer systems, such as a Raspberry Pi running Linux, when arguments from the command line are passed to main(). Environment variables are also a problem since they may not be available until main() executes. Global instance won’t have access to this information so cannot use it during their initialization. I ran into this problem with my robots whose control computer was a PC. I was using the robot’s network name to determine their initial behaviors. It wasn’t available until main() was entered, so it couldn’t be used to initialize global instances.

This is an issue with smaller embedded systems that don’t pass arguments or have environment values but I don’t want to focus only on them. I’m looking to address the general situation that would include larger systems so we’ll assume we don’t want global instances.

Program Class

The approach I’m taking and sharing with you is an experiment. I have done something similar in the past with a robotics project but the approach was not thoroughly analyzed. As often happens, I ran out of time so I implemented this as a quick solution. Whether this is useful in the long run we’ll have to see. If nothing else it will show you more about working with C++.

My approach is to create a Program class with a member run() function. The setup for the entire program occurs in the class constructor and the run() function handles all the processing. What would normally be global variables are data members.

Here is the declaration of a skeleton Program class and the implementation of run():

class Program {
public:
	void run();
	static Program& makeProgram() {
		static Program p;
		return p;
	}

private:
	Program() { }
	void checkSerialInput();
};

void Program::run() {
	for (;;) {
		// program code here
		checkSerialInput();
	}
}

We only want one instance of Program to exist so I’ve assured this by making the constructor private and providing the static makeProgram() function to return the static instance created the first time makeProgram() is called. The Program member function checkSerialInput() handles checking for the serial input as discussed above. In checkSerialInput() I introduced an #if block to eliminate the actual code if the program is not using serial input.

Here is how Program is used in main.cpp:


void arduino_init() {
	init();
	initVariant();
}

int main(void) {
	arduino_init();
	Program& p = Program::makeProgram();
	p.run();
	return 0;
}

The function initArduino() is inlined and handles the two initialization routines required to setup the Arduino environment.

One of the techniques for good software development is to hide complexity and provide a descriptive name for what it does. These functions hide not only the code but, in one case, the conditional compilation.

Redbot Line Follower Project

This code experiment uses a Sparkfun Redbot setup for line following. This is a two wheeled robot with 3 optical sensors to detect the line and an I2C accelerometer to sense bumping into objects. The computer is a Sparkfun Redbot Mainboard which is compatible with the Arduino Uno but provides a much different layout and includes a motor driver IC.

This robot is simple enough to make a manageable project but sufficiently complex to serve as a good test, especially when the project gets to the control system software. The basic code for handling these motors and sensors comes from Sparkfun and uses only the basic pin-level Arduino routines. I can’t possibly hack the entire Arduino code but using the Sparkfun code provides a manageable subset for experimenting.

For this article we’ll just look at the controlling the motors. Let’s start with the declaration of the Program class for testing the motor routines:

class Program {
public:
	void run();
	static Program& makeProgram() {
		static Program p;
		return p;
	}

private:
	Program() { }
	static constexpr int delay_time { 2000 };

	rm::Motor l_motor { l_motor_forward, l_motor_reverse, l_motor_pwm };
	rm::Motor r_motor { r_motor_forward, r_motor_reverse, r_motor_pwm };
	rm::Wheels wheels { l_motor, r_motor };

	void checkSerialInput();
};

There is a namespace rm enclosing the classes I’ve defined for the project, hence the rm:: prefacing the class names. On line 11 is something you may not have seen, a constexpr which is new in C++ 11 and expanded in C++14. It declares that delay_time is a true constant used during compilation and will not be allocated storage at run-time. There is a lot more to constexpr and we’ll see it more in the future. One other place I used it for this project is to define what pins to use. Here’s a sample:

constexpr int l_motor_forward = 2;
constexpr int l_motor_reverse = 4;
constexpr int l_motor_pwm = 5;
constexpr int r_motor_pwm = 6;
constexpr int r_motor_forward = 7;
constexpr int r_motor_reverse = 8;

The Motor class controls a motor. It requires two pins to control the direction and one pulse width modulation (PWM) pin to control the speed. The pins are passed via constructor and the names should be self-explanatory. The Wheels class provides coordinated movement of the robot using the Motor instances. The Motor instances are passed as references for the use of Wheels. Here are the two class declarations:

class Motor : public Device {
public:
	Motor(const int forward, const int reverse, const int pwm);

	void coast();
	void drive(const int speed);

	int speed() const {
		return mSpeed;
	}

private:
	void speed(const int speed);

	PinOut mForward;
	PinOut mReverse;
	PinOut mPwm;
	int mSpeed { };
};


class Wheels {
public:
	Wheels(Motor& left, Motor& right) :
			mLeft(left), mRight(right) {
	}

	void move(const int speed) {
		drive(speed, speed);
	}
	void pivot(const int speed) {
		drive(speed, -speed);
	}
	void stop() {
		mLeft.coast();
		mRight.coast();
	}

	void drive(const int left, const int right) {
		mLeft.drive(left);
		mRight.drive(right);
	}

private:
	Motor& mLeft;
	Motor& mRight;
};

The workhorse of Wheels is the function drive() which just calls the Motor drive() functions for each motor. Except for stop(), the other Wheels functions are utilities that use drive() and just make things easier for the developer. The compiler should convert those to a direct call to driver() since they are inline by being inside the class declaration. This is one of the interesting ways of using inline functions to enhance the utility of a class without incurring any cost in code or time.

The run() method in Program tests the motors by pivot()ing first in one direction and then the other at different speeds. A pivot() rotates the robot in place. Once the speed is set it continues until changed so the delay functions simply provide a little time for the robot to turn. Here’s the code:

void Program::run() {
	for (;;) {
		wheels.pivot(50);
		delay (delay_time);

		wheels.pivot(-100);
		delay(delay_time);

		checkSerialInput();
		if (serialEventRun) {
		}
	}
}

Wrap Up

The Redbot project is an interesting vehicle for demonstrating code techniques. The current test of the motor routines demonstrates how to override the existing Arduino main(). Even if you don’t like my approach with Program, the flexibility of using your own main() may come in handy for your own projects. The next article is going to revisit this program using templates.

THE EMBEDDING C++ PROJECT

Over at Hackaday.io, I’ve created an Embedding C++ project. The project will maintain a list of these articles in the project description as a form of Table of Contents. Each article will have a project log entry for additional discussion. Those interested can delve deeper into the topics, raise questions, and share additional findings.

The project also will serve as a place for supplementary material from myself or collaborators. For instance, someone might want to take the code and report the results for other Arduino boards or even other embedded systems. Stop by and see what’s happening.


Filed under: Arduino Hacks, Hackaday Columns, Software Development, software hacks