Posts with «arduino nano» label

Robot Pianist Runs on Arduino Nano

The piano has been around for a long time now. Not long after its invention, humans started contemplating how they could avoid playing it by getting a machine to do the job instead. [vicenzobit] is the latest to take on this task, building a “Robot Pianista” that uses a simple mechanism to play a tune under electronic command (Spanish language, Google Translate link).

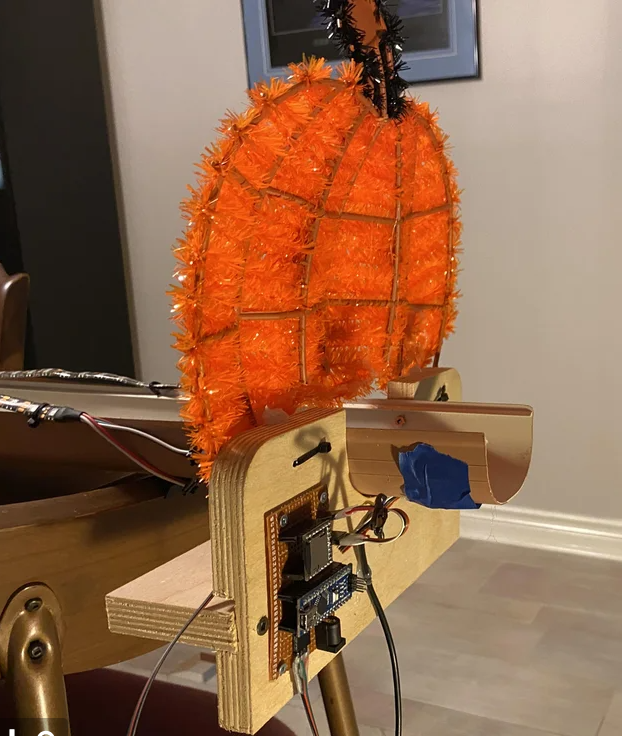
An Arduino Nano is the heart of the build, paired with a shield that lets it run a number of servo motors. The servos, one per key, are each assembled into a 3D-printed bracket with a cam-driven rod assembly. When the servo turns, the cam turns, and pushes down a rod that presses the piano key.

The build is limited in the sense that you can only play as many keys as you have servo channels, but nonetheless, it does the job. With eight servos, it’s able to play a decent rendition of Ode to Joy at a steady tempo, and that’s an excellent start.

We’ve featured some great mechanized instruments before, too. Video after the break.

Hack a Day 02 Dec 00:00

Arduino Sticker Dispenser Saves Time

What’s the worst part about packaging up a whole lot of the same basic thing? It might just be applying the various warning stickers to the outside of the shipping box. Luckily, [Mr Innovative] has built an open-source automatic sticker dispenser that does the peeling for you, while advancing the roll one at a time quite satisfyingly.

This tidy build is made primarily of 20×20 extruded aluminium and stainless steel smooth rod. All the yellow bits are 3D printed. The brains of this operation is an Arduino Nano, with an A4988 stepper motor driver controlling a NEMA17.

Our favorite part of this build is the IR sensor pair arranged below the ready sticker. It detects when a sticker is removed, then the stepper advances the roll by one sticker height. The waste is collected on a spool underneath.

Between the video and the instructions, [Mr Innovative] has made it quite simple to build one for yourself. Definitely check this one out after the break.

[Mr Innovative] may as well go by [Mr. Automation]. Check out this automated wire prep machine from a few years ago.

2023 Halloween Hackfest: Converted Proton Pack Lights Up the Night

It’s really quite unfortunate that Hackaday/Supplyframe employees and their families are not allowed to place in the 2023 Halloween Hackfest, because our own [Tom Nardi] has thrown down a costume gauntlet with his kids’ proton pack conversion.

Starting with an inert off-the-shelf toy from 2021, [Tom] set out to make the thing more awesome in every way possible. For one thing, it’s blue, and outside of the short-lived animated series The Real Ghostbusters, who ever heard of a blue proton pack? So one major change was to paint it matte black and age it with the old silver rub ‘n buff technique. And of course, add all the necessary stickers.

[Tom] added plenty of blinkenlights, all running off of an Arduino Nano clone and a pair of 18650s. He got lucky with the whole power cell thing, because an 8 x 5050 RGB LED stick fits there perfectly and looks great behind a PETG diffusing lens. He also drilled out and lit up the cyclotron, because what’s a proton pack without that? There’s even a 7-segment LED voltmeter so Dad can check the power level throughout the night.

Finally, he had to do a bit of engineering to make the thing actually wearable by his daughter. A frame made of square aluminium tubing adds strength, and a new pair of padded straps make it comfortable. Be sure to check it out in action after the break.

What’s a Ghostbusters costume without a PKE meter

2023 Halloween Hackfest: Treat Trough of Terror Is Actually Pretty Cute

Even though it seems the worst of COVID has passed, October generally kicks off cold and flu season, so why not continue to pass out Halloween treats in a socially-distanced fashion?

That is, of course the idea behind [Gord Payne]’s Halloween Treat Trough of Terror. Lay a treat at the top of the trough and it will activate the LED strips that follow the treat down to the end, as well as some spooky sounds. The treat in question is detected by an SR-04 ultrasonic distance sensor connected to an Arduino Nano.

All in all this was a highly successful build as far as neighborhood entertainment value goes. Toddlers stared in awe at the blinkenlights, teenagers proclaimed it ‘sick’, and we can only assume that the adults were likely happy to see something aimed at kids that’s not scary.

[Gord] has a nice how-to if you want to build your own, and of course, the Arduino sketch is available. Be sure to check it out in action after the break.

Don’t have room to build a treat slide? Here’s a socially-distanced dispenser that lets them stomp a giant button.


The Great Resistor Embiggens the Smallest Value

With surface-mount components quickly becoming the norm, even for homebrew hardware, the resistor color-code can sometimes feel a bit old-hat. However, anybody who has ever tried to identify a random through-hole resistor from a pile of assorted values will know that it’s still a handy skill to have up your sleeve. With this in mind, [j] decided to super-size the color-code with “The Great Resistor”.

How the resistor color-code bands work

At the heart of the project is an Arduino Nano clone and a potential divider that measures the resistance of the test resistor against a known fixed value. Using the 16-bit ADC, the range of measurable values is theoretically 0 Ω to 15 MΩ, but there are some remaining issues with electrical noise that currently limit the practical range to between 100 Ω and 2 MΩ.

[j] is measuring the supply voltage to help counteract the noise, but intends to move to an oversampling/averaging method to improve the results in the next iteration.

The measured value is shown on the OLED display at the front, and in resistor color-code on an enormous symbolic resistor lit by WS2812 RGB LEDs behind.

Inside The Great Resistor, the LEDs and baffle plates make the magic work

Precision aside, the project looks very impressive and we like the way the giant resistor has been constructed. It would look great at a science show or a demonstration. We’re sure that the noise issues can be ironed out, and we’d encourage any readers with experience in this area to offer [j] some tips in the comments below. There’s a video after the break of The Great Resistor being put through its paces!

If you want to know more about the history of the resistor color code bands, then we have you covered.  Alternatively, how about reading the color code directly with computer vision?

Bluetooth Record Player Puts a New Spin On Vinyl

You know, we were just discussing weird and/or obsolete audio formats in the writers’ dungeon the other day. (By the way, have you ever bought anything on DAT or MiniDisc?) While vinyl is hardly weird or (nowadays) obsolete, the fact that this Bluetooth record player by [JGJMatt] is so modern makes it all the more fantastic.

Not since the Audio-Technica Sound Burger, or Crosley’s semi-recent imitation, have we seen such a portable unit. But that’s not even the most notable part — this thing runs inversely to normal record players. Translation: the record stands still while the the player spins, and it sends the audio over Bluetooth to headphones or a speaker.

Inside this portable player is an Arduino Nano driving a 5 VDC motor with a worm gear box. There really isn’t too much more to this build — mostly power, a needle cartridge, and a Bluetooth audio transmitter. There’s a TTP223 touch module on the lid that allows [JGJMatt] to turn it off with the wave of a hand.

[JGJMatt] says this is a prototype/work-in-progress, and welcomes input from the community. Right now the drive system is good and the Bluetooth is stable and able, but the tone arm has some room for improvement — in tests, it only played a small section of the record and skidded and skittered across the innermost and outermost parts. Now, [JGJMatt] is trying two-part arm approach where the first bit extends and locks into position, and then a second arm extending from there and moves around freely.

Commercial record players can do more than just play records. If you’ve got an old one that isn’t even good enough for a thrift store copy of a Starship record, you could turn it into a pottery wheel or a guitar tremolo.

Focus Flower Motivates By Squirting Water In Your Face

When you need to get some tasks done and are short on attention, it’s hard to beat a timer. But whenever you do, it feels pretty darn good. The problem is that when you don’t finish in time, what’s the punishment? There are no consequences baked into the Pomodoro Technique other than good ol’ guilt. Wouldn’t it be better if there was a bit of negative reinforcement involved?

[Hardware Unknown]’s Focus Flower never needs watering, at least not in the normal horticultural way. You will have to fill a reservoir, because this flower provides liquid motivation. No, it’s not a spirit spritzer, though we suppose you could turn it into an avant-garde vodka fountain when the novelty of water wears off, making this Pomodoro with a twist into more of a Bloody Mary. It’s a natural next step, especially if you were already into the hot sauce idea.

Operation Focus Flower is simple: just push the easy button to start the task timer, and the Arduino Nano attached will begin a countdown. Push the button again when you’re done, but if you don’t do it before the countdown is over, the plant squirts you with a steady, skin-blasting stream of water from a solenoid-driven flosser tip. An air compressor nearby is required, which blows the minimalist vibe a bit, but you could always stow that part underneath your desk.

The Focus Flower sure looks to be effective at the whole negative reinforcement thing. And it doesn’t leave you totally clueless — there’s a ring of LEDs around the base that show how much time is left. Whenever you do successfully hit the button in time, it will say ‘that was easy’ in one of 12 languages, hence all the flags. Do not miss the totally free infomercial below.

Maybe you want a more friendly way to manage your time — we understand. Meet the Pomodachi productivity pet.

Via the Arduino Blog

World’s Cutest Pomodoro Timer Is Also a Clock

Student and hacker [prusteen] recently fell in love with the Pomodoro method of time management. That’s where you concentrate on your task for 25 minutes, then take a five-minute break, and repeat this four times with a longer break at the end. Initially, [prusteen] was keeping track on their phone, but hated having to change the timer value between Pomodoros and break times. In order to keep the flow mode engaged, [prusteen] came up with this darling little study buddy that does it all with the push of a button.

By default, this tomato shows the current time, which we think is a handy and often-overlooked feature of Pomodoro timer builds. Press that momentary switch on the front, and it starts counting upward to 25 minutes. Then it beeps in stereo through a pair of buzzers when the time is up, and automatically starts a five-minute break timer. Press it again and the display goes back to clock mode, although judging by the code, doing this will cancel the timer.

Inside the juicy enclosure is an Arduino Nano, an RTC, and a 7-segment display. We love the attention to detail here, from the little green leaves on top to the anatomically-correct dimple on the underside. And we always like to see lids that snap on with magnets. So satisfying. Check out the brief demo after the break, which unfortunately does not include any lid-snapping action.

Do you need more interaction with your Pomodoro timer? Build yourself a pomo-dachi instead.

Vektor Kollektor Inspector

With the world opening up again, [Niklas Roy] and [Kati Hyyppä] have been busy making a public and collaborative project. Meet the Vektor Kollektor, a portable drawing machine experience, complete with a chip-tune soundtrack. It’s great to see public art meet the maker community with zero pretension and a whole lot of fun!

The build started with an HP7475A pen plotter from the 80s, one that was DOA (or was fried during initial testing). [Niklas] and [Kati] kept the mechanism but rebuilt the controls allowing for easy integration with an Arduino Nano and to be powered with a motorcycle battery.

The magic seems to be less in the junk-bin build (which is great) and more in the way this team extended the project. Using a joystick with arcade buttons as an input, they carted Vektor Kollektor to public parks and streets where they invited others to make art. The Kollekted drawings are available on a gallery website in a very cool animated form, freely available for download, on t-shirts, 3D prints, and on coffee mugs because, why not?

Some select drawings are even spray-painted on walls using a large plotter, and we really hope [Niklas Roy] and [Kati Hyyppä] share details on that build soon. Of course this comes hot on the heels of the workshop window cyborg we saw from these two hardware artists.

RGB LED Matrix Helps Etch-a-Sketch Scratch Out a 21st Century Existence

We never did crack open our Etch-a-Sketch, but we did scrape out a window large enough to really check out the mechanism inside. [MrLangford] is bringing the Etch-a-Sketch into the 21st century while at the same time, bringing an even bigger air of mystery, at least for the normies.

Instead of scraping aluminum powder off of plastic by driving a stylus on an x-y gantry with a pair of knobs, this bad boy uses rotary encoders to move the cursor around and put down squares of colored light. The familiar movements are there — the left knob moves the cursor left and right, and the right knob moves it up and down. But this wouldn’t be a 21st century toy without newfangled features. Push the left encoder down and it cycles through eight color choices, or push the right one down to go through them backwards. We hope one of the colors is setting it back to darkness in case you screw up. And while we’re dreaming up improvements, it would be awesome to add an accelerometer so you could shake it clear like a standard Etch-a-Sketch.

Inside the requisite red enclosure with white knobs are an Arduino Nano and a 16×16 RGB LED matrix. The enclosure is four sheets of 6mm MDF glued together, and we like the use of protoboard to distribute GND and 5 V in the name of keeping the thing slim.

If you’re not much of an artist, here’s a TV-sized Etch-a-Sketch build that can draw by itself.