Posts with «printed circuit board» label

Hysteresis board

Now that we’re using a 74HC14 Schmitt trigger in the capacitive touch sensor for the hysteresis oscillator, that lab can be the first soldering project, in addition to learning about hysteresis.

I tried laying out a very compact PC board for the students to solder (still requiring them to do some design—they’ll have to breadboard their design first to get appropriate R and C values). I came up with one very compact design that could get 4 copies into the 50mm×50mm limit of the $1 boards from ITEAD, making the boards only 25¢ each.

Compact layout to get 4 hysteresis oscillator boards out of one 50mm×50mm board. The gutters are pretty narrow, though, and I’m not sure I’m skillful enough with the board shears to cut that accurately.  The yellow “airwires” are Eagle telling me that the Gnd and +5V wires are not connected between the different copies.

It seemed a little silly to try to squeeze the price down to 25¢, when the other parts cost 90¢: 59¢ for the screw terminals, 28¢ for the Schmitt trigger chip, 1¢ for the resistor, and 2¢ for the capacitor. With this layout it is also a little tricky for the students to properly wire the unused inputs high.

Given the high risk of ruining the boards trying to cute them with the board shears, I decided to redesign for a 50¢ board.
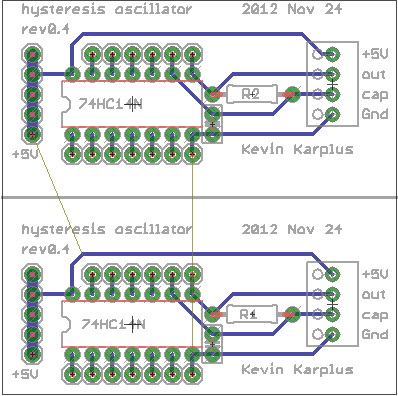
Much looser layout, having only two copies on the 50mm x 50mm board. This version makes it easier for the students to see how things are connected, and has lots of room for the board shears to make the cut.

The lab would now require that the students measure the thresholds of the Schmitt trigger, breadboard the hysteresis oscillator, make a touch pad out of foil and packing tape, measure the frequency of the oscillation to estimate the touch pad capacitance, adjust the parameters of the Arduino program to match the frequencies of their oscillator, solder up the board, and demonstrate it working to control an LED. I think that is plenty for a 3-hour lab.

When I set up the web pages for the course, I’ll try to make sure I put the Eagle design files (.brd and .sch) for each board the students use on the web, so that future instructors can easily order more copies of the board, even if my laptop gets run over by a beer truck.  That will also make it easier for instructors at other schools to try to duplicate the course.


Filed under: Circuits course, Printed Circuit Boards Tagged: Arduino, bioengineering, capacitive touch sensor, circuits, course design, Printed circuit board, Schmitt trigger, sensors, teaching

Sensor board for underwater ROV

Since I had bought the robotics club an I2C accelerometer and magnetometer, I decided to make a new PC board for them to mount the accelerometer, the magnetometer, and the pressure gauge on the same board.  I don’t have the SMD soldering skills to solder all the chips onto one board, and I already had breakout boards for the accelerometer and magnetometer from Sparkfun, so I decided just to put connectors for those breakout boards onto the back of the pressure sensor board.  (The back, because the pressure sensor on the front has to be stuck through a hole in the dry box and glued in place.

The new boards are tiny (1.05″ × 1.425″), so I decided to try BatchPCB (which has pricing by the square inch) rather than 4pcb.com (which has fixed pricing per board, up to a fairly large size).  The price from BatchPCB was $10 per order plus $2.50/square inch plus $0.90 for shipping, so ordering 3 copies of the board (though I only needed one), cost me $22.12, substantially less than a single board from 4pcb.com, which is $33 plus $17.30 shipping and handling per board (plus an extra $50 if your board has multiple boards on it).  The 4pcb price is lower if your board is bigger than about 15.76 square inches, so even my HexMotor boards (at 12.44 square inches) would be cheaper from BatchPCB.  If you get multiple boards from 4pcb.com on a single panel and cut them apart yourself, the breakeven point is about 35.76 square inches for a single design (so three HexMotor boards from a single 4pcb.com panel is cheaper than from BatchPCB). For multiple designs on a single panel, the 4pcb.com deal is better: for 3 different designs, a total of 27.04 square inches would make 4pcb.com the cheaper way to go.

If you want a copy of the board, you can order it from BatchPCB, or pick up the Eagle files from my web site and order copies from elsewhere.  I’ve put the HexMotor Eagle files on line also, but not put them on the BatchPCB site.  I should probably upload them there sometime.

Bottom line: BatchPCB is better for small numbers of tiny boards, but 4pcb.com is better for larger boards and multiple designs.

The BatchPCB orders came back quite quickly (12 days from order to delivery by mail), though I had been worried because their design-rule check, which they say takes minutes had taken about 8 hours.  The problem was that each check takes a few minutes, but they had hundreds in the queue over the weekend, and it took a full day to clear the queue.

I had less trouble soldering the pressure gauge this time (this was my second attempt at soldering surface mount devices).  You can see in the pictures above that the results are much cleaner than in my first attempt.

The robotics club has tested the pressure sensor on the new board (using their own code on the Arduino) and it seems to work ok,  have drilled the hole in the dry box for the port, and glued the sensor board in place using superglue.  It seems to be waterproof (at least down to 1 foot—we’ve not tested in deep water yet).

Related articles

Tagged: accelerometer, Arduino, BatchPCB, magnetometer, pressure sensor, Printed circuit board, ROV, SparkFun Electronics

HexMotor 2.3 and pressure-sensor boards

Top view of my second PC board. 3 copies of HexMotor 2.3 and 2 copies each of 3 different breakout boards for a pressure sensor.

I got the boards back from 4pcb.com about a week ago.

The HexMotor rev2.3 boards have several new features: LEDs for +5v and +6.25v, a reset button, 16-bit shift register instead of 8-bit, servo outputs connected to pins 13, 7, 2, 9, 10 (rather than to the pins used for PWM).  The new board should be able to do either 6 PWM motors or 4 PWM motors, 5 servos, and 2 non-modulated reversible motors.  I was going to have the robotics club solder the board today, but they did not have time.

[Note: as of 1March 2012, I have put the HexMotor Eagle design files on the web.]

I made some breakout boards for the MPXHZ6250A pressure sensors from Freescale Semiconductor,  which gave me my first taste of SMD soldering.  At least the design uses gull-wing pins, which can be hand soldered.  The breakout board that I think that the robotics club will end up using puts a pressure sensor on one side and headers for a piggyback ADXL335 breakout board on the back.  that way there only need to be one set of wires for connecting the analog inputs and power to the sensors.

That is the board I soldered a sensor to.

Top view of the breakout board with the sensor and headers soldered in place.

The pressure sensors are tiny! I found it fairly difficult to solder the  sensor to the boards, even holding it with clamping tweezers. I did eventually get everything to stick with no shorts between the 3 signal wires, but I did have some trouble with the unused copper pads delaminating from the board.  For future reference: all pads should have wires going to them (even the unused pads) to have enough surface area for good adherence and so that some of the pad is tucked under the solder mask.

Here are the solder connections on the side where none of the pins are used.

Here are the solder connections for the power and signal pins (and an SMD capacitor).

Despite the rather sloppy soldering, the pressure sensor does work.  It turns out that the port size is just the right size for Lego pneumatics components, so testing was pretty easy.

Sensor attached to Lego pump and gauge for testing.

Here are the results of calibration tests with the (probably not very accurate) Lego gauge, done by my son and me.

Pressure (psi) Arduino analogRead
0 367
5 518
6 542
7 576
8 599
9 632
10 657
11 683
12 710
13 734
14 775
15 801
16 832
17 861
18 887
19 915
20 941
21 967
22 1000

The range is about right, since 22 psi plus one atmosphere is about 250kPa, which is supposed to be the high end of the sensor’s range. Also, 600″ (50′) of water is 21.67 psi, so the range from 367 to 1000 corresponds to about 50′, so the sensor should give the robotics team a resolution of about 1″ for measuring depth, as expected from the spec sheet.

The data are well fit by The club members will have to recalibrate the pressure sensor in water, to get calibration as depth in cm. They’ll probably have to re-zero the sensor every day they use it, to compensate for atmospheric pressure, since it is an absolute pressure gauge.


Tagged: Arduino, Lego pneumatics, pressure sensor, Printed circuit board, SMD soldering

New board designed

I’ve just sent a new set of boards for fab.  The HexMotor rev2.3 boards have several new features: LEDs for +5v and +6.25v, a reset button, 16-bit shift register instead of 8-bit, servo outputs connected to pins 13, 7, 2, 9, 10 (rather than to the pins used for PWM).  The new board should be able to do either 6 PWM motors or 4 PWM motors, 5 servos, and 2 non-modulated reversible motors.

I’m also making some breakout boards for the MPXHZ6250A pressure sensors from Freescale Semiconductor, which will require doing some SMD soldering.  At least the design uses gull-wing pins, which can (supposedly) be hand soldered.  One of the breakout boards also has a place for mounting an ADXL335 accelerometer, which may be more difficult to solder.  I don’t think I want to spend the money for a hot-air rework station, and I’m a bit dubious about my ability to solder using a toaster oven.

The pressure sensors are tiny!  My original suggestion to the robotics club was to drill a hole in the dry box and superglue the pressure sensor to the inside of the box (after the pressure sensor had been attached to the breakout board, of course).  Now I’m not so sure that there will be enough glue area to hold firmly enough.  Perhaps a dab of some sealant on the outside of the box might help, if we can keep from plugging the hole in the sensor.

The breakout board that I think that the robotics club will end up using puts a pressure sensor on one side and headers for a piggyback ADXL335 breakout board on the back.  that way there only need to be one set of wires for connecting the analog inputs and power to the sensors.

One limitation of the Arduino for use with this combination of sensors is that the accelerometer is a 3v part and the pressure sensor is a 5v part. We’ll have to set up the analog-to-digital converter on the Arduino to have a 5v range, which reduces the precision of the acceleration readings.

I’ve also bought some other sensors (not for the underwater vehicle, but for physics class and dry robotics): a couple of ultrasonic rangefinders.  More on those in a separate post, after I’ve had a chance to play with them.


Tagged: accelerometer, Arduino, H-bridge, motor controller, pressure sensor, Printed circuit board

Makers Factory Meetup report

I went to the  Santa Cruz New Tech Meetup on Friday 12 Aug 2011 to find out more about the Makers Factory that is starting in Santa Cruz in November.  (I blogged about the Makers Factory already.)  Details about the event are on the meetup web page.

At the meetup they confirmed that they will not be getting the sort of expensive shop equipment that places like TechShop (over the hill) have.  The initial setup will be suitable for mechatronics work, similar to what Gabriel Elkaim teaches in the Mechatronics class at UCSC.  Gabriel was the fifth of five speakers at the MeetUp and provided a nice overview of the Mechatronics class.

What the Makers Factory will have are low-cost 3D printing machines (which I suspect will not be useful for much, but are fun toys), a laser cutter, a vinyl cutter, and some electronics equipment (soldering stations and some oscilloscopes, I guess).  They’ll probably also get some board shears.  I think I talked them out of trying to do their own PC board fabrication, in favor of ordering boards from some place like 4pcb.com.  You can probably do a class full of small boards as one $145 order from 4pcb.com (even without a .edu address) and give each person 4 copies of their board.  The 2-week turnaround time is fine for a class. It would probably take longer than that to make your own using low-cost tools in a classroom setting with only a few hours of class time a week, and the quality would be much worse.  I’d also hate to be the one in charge of getting rid of the hazardous waste produced by PC board etching.

I brought my HexMotor board with me to the MeetUp and showed it off to a few people, including Gabriel Elkaim, who was properly polite about it.  He also told me about the new PC boards he had just sent out for fab—they are redoing the electronic cockroaches that are used for the first lab in Mechatronics, since the old ones have started acquiring too much damage.  The problem is that students were much more inventive in discovering ways to damage the boards than originally expected, so the new design has a lot more protection circuitry.

I did get a chance to talk with Chris Yonge, who will be running Makers Factory.  It sounds like he is interested in having me teach an Arduino programming class and PC board design using free tools. I recommended Eagle for PC board design, even though it is not open-source, because it is fairly mature, the free version is enough for classes and hobbyists, it runs on both PCs and Macs, it has an adequate auto-router, and the licensed version is still fairly cheap.

There are open-source projects for PCB design, like FreePCB, which runs only on Windows and has no auto-router, KICAD which runs under Linux and Windows (but not Mac OS X, I believe), and many others.  There is a good list at http://www.olimex.com/pcb/dtools.html.  The general consensus of the hobbyist community seems to be that currently Eagle is most fully featured and robust free PCB editor, and that none of the open-source projects comes close yet.  Since I need Mac OS X software, and most of the open-source software is for Linux, my choices are more restricted still.  I don’t know what sort of computers Makers Factory is planning to get for classes—but they should choose software as much as possible that is platform independent.


Tagged: Arduino, Makers Factory, Meetup, open source, Printed circuit board

Board fully populated and tested

Top view of the HexMotor rev 1.3 board fully populated.

I got the board fully populated yesterday, plus I made a heat sink out of a piece of ¼” × ¾” aluminum bar stock.  The heat sink makes an enormous difference.  Before using it, running a small motor at low power for 20–30 seconds was enough to make the H-bridge uncomfortably hot.  Now running the same 12v motor stalled at full current (3A) for a full minute raises the temperature only to 100ºF.

The motor got warmer than that, and I think I burned it out, since it no longer runs and has a 400kΩ resistance.  I’m not really surprised—it was a cheap door-lock actuator, and only intended to be used with fraction of a second pulses.  Further testing will require a more robust motor.

As you can see from the photo, the screw terminal for motor 4 (second from the bottom) is a bit crooked—I’ll have to unsolder it and straighten it.  For the HexMotor 2 board, I’ll use slightly smaller holes so alignment is easier.

The thermal grease I used (Cooler Master IceFusion High Performance Thermal Compound 40G RG-ICF-CWR2-GP) was more liquid than I expected, especially since it comes with a little spatula for applying it.  I had to put on a fairly thick layer, because the aluminum extrusion was not very smooth, and when I tightened the bolts the stuff oozed out making a sticky mess. Next time, I’ll sand the aluminum smooth first and use much less thermal grease.

Closeup, showing the excess thermal grease puddling under the H-bridges, where it is very difficult to wipe off.

This closeup photo, in addition to showing the pooled excess thermal grease, shows the header pins with shorting jumpers to configure the H-bridges for either lock antiphase or sign-magnitude control.  (Because of the last-minute change from TLE-5205 to TLE-5206 chips, the silk-screen labeling of the header pins is wrong—this board is actually configured for sign-magnitude throughout not lock antiphase.

The photos also show that I did not leave room for the heat sink between the electrolytic capacitors.  The HexMotor 2.0 board will fix this problem also.

The HexMotor software now can handle 3 different boards: the HexMotor rev 1.3 board shown here, the Adafruit Motor Shield, and the HexMotor rev 2 board, which I am just about done fussing with the design for.  I’ve only tested with an Arduino Duemilanove board, but the software should work with an Arduino Mega as well.


Tagged: Arduino, H-bridge, heat sink, motor controller, Printed circuit board, thermal grease

Board (partially) populated and tested

My 4-up board about to be cut apart on the board shears. The adjustable railing for the back edge of the board and a railing along the bottom make it fairly easy to line up boards for repeated identical cuts (which I did not need). The bottom rail was useful for making sure that the cut was square, though.

Yesterday, I went to the basement shop where the support team for the enginineering teaching labs have their offices, and used their board shears to cut my PC board up. The shears are like a souped-up paper cutter. The noise they make when cutting through the PC board is a bit scary, though as it it sounds like you are crushing the board, rather than cutting. It makes a pretty clean cut, despite how it sounds.

HexMotor rev1.3 board with one H-bridge installed.

This morning I woke up early and decided to populate the board. I soldered in the switching power supply (and associated resistors and capacitors) first, and checked that there were no shorts and that it produced the correct output voltage. I then added the digital logic, the sockets for connecting to the Arduino, and the various headers.

It turned out that most of the headers did lock in place nicely with the Sparkfun offset-hole header design, making soldering much easier. A few of my 3-pin headers seem to have slightly smaller posts, and they did not lock in place as nicely. The hardest thing to solder in place were the 0.1″ jumper wires (which are not part of the next design). I may want to leave another 1–2 mm for the resistor, also, as I found it a bit difficult to fit the resistor I had into a 5mm spacing. Perhaps I should go with a 7mm spacing.

I only put in one H-bridge for testing, as I did not want to unsolder H-bridges if the board did not work.  If I’d been really careful, I would have waited on the switching regulator as well, since it is not really needed when there are no servos and the Arduino is powered over the USB line.

I spent most of the day writing driver code for the Arduino.  I came up with a pretty simple interface (much simpler than the AFMotor library for the Adafruit motor shield—I may want to extend the library to cover that board as well).

There is one global declaration of a HexMotorBoard to explain how the board is configured. As a minimum, you need to specify for each motor whether it is configured for Antiphase, Sign-Magnitude, or On-Off control. I suppose that if you connected the boards with ribbon cables, you could control several HexMotorBoards from a single Arduino Mega board, though with a standard Arduino there’s not  much point to having more than one HexMotorBoard, as there are only 6 PWM pins (unless you just need  full-on Forward/Backward and brake).

In the setup() procedure, you call the setup() member function of the HexMotorBoard.  To control a motor, you just use a single function: motor_name.run(speed).  The speed is always in the range -256 to 255, with a speed of 0 meaning brake. The software takes care of translating the speed into appropriate commands for the H-bridge, depending on how the H-bridge is jumpered.  (For convenience, I provided an inline function for motor_name.brake() that just expands to motor_name.run(0).)

I couldn’t come up with a much simpler user interface: declare the board, declare each motor, one setup() call for the board, and one function (run) to control each motor.  I suppose that I could get rid of the setup() function, since all it currently does is set the appropriate pins to be output pins and that could be folded into the run() function, but I’ll have to think about the value of keeping the HexMotorBoard::setup() function around to provide a place for consistency checks (like whether the configured pins are capable of PWM output).

Because I’m using the standard analogWrite() and digitalWrite() commands, and not fussing with the PWM frequency, very little code is needed to run on any Arduino.

I tested the board with its single H-bridge using a 12v door-lock actuator, and it worked in all three modes (antiphase, sign-magnitude, and on/off).  I did notice that the TLE-5206 got quite hot when the actuator was run for a few seconds, so I’m definitely going to need a heat sink.  I was planning on using a shared heat sink for the 6 H-bridges, but the electrolytic capacitors get in the way a little.  I’ll make sure to leave more clearance for heat sinks in the next revision.

I don’t have much time over the next few days, but on Sunday I hope to bring the board up to 4 or 6 H-bridges and make and  hook up the heat sink. Hmm—I don’t have any thermal grease—yet another thing to order.


Tagged: Arduino, board shears, motor controller, Printed circuit board, software

Boards arrived

The hexmotor rev 1.3 boards before cutting them apart.

The printed circuit boards for hexmotor rev1.3 came today from 4pcb.com. I ordered the boards on July 21, so the total turnaround time from order to delivery was only 12 days. No wonder the company is so popular for student projects—low prices and fast service will do that!

The boards looked pretty good, so the first thing I did was to check some crucial dimensions:

  • I put headers into the holes for the connection to the Arduino board and checked that it would plug in.  No problem!
  • I checked that I could spread the pins of the TLE-5206-2S chips to fit the holes where they were supposed to plug in.  No problem!  In fact, it was surprisingly easy to get the right spacing, by using the board itself as a tool for bending the pins.
  • I checked that I could put in both the MTR2 TLE-5206-2 chip and capacitor C5 without conflict (as I’d noticed that the silk screen outlines overlapped only after I’d sent in the order).  This also turned out not to be a problem
  • I checked that the mounting holes on the board lined up with those on the Arduino.  Only 2 out of 3 do.  What is going on???I got the hole placement from the Adafruit library for Eagle, and it has 3 holes, but they are not in the same places as the Arduino board.  It turns out that two of the holes correspond to holes on the Arduino board, and two to holes on the Arduino Mega board, which has holes in different locations.  Neither pair corresponds to the holes on the  Adafruit motor shield, which has only 2 diagonally opposite holes, the two holes that are actually in common between the Arduino and the Arduino Mega footprints.  For the next revision of the boards, I have to decide whether to use the 3-hole design of this board, or to go with the pair of diagonally opposite holes.  Or put in 4 holes, so that either Arduino or Arduino Mega can be securely attached with 3 screws. I think that there is room for the fourth hole, if I move one of the electrolytic capacitors.
  • I also did some continuity checks on the power lines.  The power and ground lines connect to the right pins on the TLE-5206-2 footprints, and they aren’t shorted.  The 6.25v and 5v lines also seem fine.
  • I had to make some Eagle library components for the screw terminal blocks I was using, and they seem to be fine, except for two little problems: I put a silkscreen mark for the bump on the side of the 5mm block on the wrong side, and the holes specified by the manufacturer seem a bit too big for the pins.  I’ll specify a smaller drill hole (closer to the spec for the pin size) in the next revision.  Neither of these little problems will interfere with functionality.
  • I checked out the Sparkfun header pattern, with the slightly staggered holes to hold the headers while soldering.  The holes must be a bit bigger than Sparkfun gets from their manufacturer, or my headers smaller, because the headers were not held by the staggered holes.  They fit fine, but the holes are loose enough that they aren’t held.

Tonight, I’ll fix up my Eagle library to have a 4-hole Arduino template and to have a better 5mm screw terminal component.

Here's a 12" board shear that costs $379 from Circuit Specialists.

Tomorrow I’ll go up to campus and see if I can cut the boards apart with the board shears.

I took a look at  printed circuit board shears on the web (you need to include “printed circuit” if you search, or you get book-binding equipment), and they range in price from $125 to $500, depending on size and quality.  I don’t plan to buy one for myself, but it seems like the sort of low-price, special-purpose tool that a place like Makers Factory ought to get.


Tagged: Adafruit Industries, Arduino, board shears, motor controller, Printed circuit board, robotics

Time to start doing software

The PC board for the hexmotor H-bridge is ordered and supposedly going to arrive soon, and I’ve ordered all the components from Digi-Key. The total coast of the project is looking like about $180 (including the PC board and shipping) for 2 fully populated boards (not counting an enormous amount of my time). I’ve already started designing a revised board (rev 2.0) that will be designed around the TLE-5206-2 from the beginning, and will have more versatility. I’m thinking that I’ll populate one rev 1.3 board for testing, finalize the rev 2.0 design, and send it out for fab, rather than populating a second rev 1.3 board.

Here is a preview of what my panel of 4 boards should look like.

In addition to the 6 TLE-5206-2 H-bridges, both boards have 74HC594 serial-to-parallel converters for control signals and 74HC86 XOR gates. The serial-to-parallel conversion is similar to that of the Adafruit Industries motor shield (which I have, but which does not have enough current capacity as it uses L293D H-bridges, which only support 0.6A per channel, and I need at least 2.5A per channel).

Copying the choices on the Adafruit board, I made the pin mapping LATCH=Arduino pin 12, DATA=Arduino pin 8, CLOCK=Arduino pin 4. I was wondering at first why they did not use the built-in SPI interface (which would simplify the programming of the serial output), but then realized that the output bit of the SPI interface (MOSI=pin 11) is also OC2A, one of the PWM outputs. Since there are only 6 PWM outputs (one per motor), and the serial interface does not need to be very fast, using software control of other pins is a good idea.

I’ve also brought out all the PWM signals to 3-wire servo connections, so that I can use each PWM signal as either a servo control or a motor speed control. All the connections to the Arduino digital pins are jumpered, so I can reconfigure the board if needed. For example, if I just want forward/backward/brake control of a motor, without speed control, I can rewire the input that would normally be to a PWM bit to be to a different digital pin, and free up that PWM bit for servo control.

On the hexmotor rev 2.0 board I added another 74HC594 chip (in series) so that I have 16 control bits available. Six of them are used for motor control, as on the rev 1.3 board. Another 6 are brought out to header pins adjacent to the speed control pins, so that those pins can be jumpered either to the Arduino PWM pins or to the shift register outputs, allowing 6 motors and 6 servos to be controlled by the board, as long as only 6 continuous values are needed, and the servos don’t exceed the 1.5A capacity of the switching regulator. The remaining 4 of the 16 parallel bits of the rev 2.0 will be brought out to individual header pins, so that they can be used as arbitrary digital outputs. (Also, the hexmotor 2.0 board will have an LED to indicate that 5v power is properly being provided—if the board is used as intended, with the Arduino powered from the switching regulator on the hexmotor board, this tests that all the power connections are made and the Arduino board plugged in.

I will have to start writing software for the hexmotor board soon. I’ll probably base some of the software on the Adafruit AFMotor package, to make it easier for the robotics club to switch between the Adafruit motor shield and the hexmotor board, but there will be some important differences. Since the hexmotor board has several jumpers that can customize it, but no way for the Arduino to read that configuration, I need an easy way to tell the software how the board is configured. I want software that will work with either revision of the hexmotor board. Since the rev 2.0 board has more possibilities for configuration than the rev 1.3 board (thanks to the 8 extra output bits), I’ll design the software for that, making sure that the rev 1.3 board is covered as a special case.

I’m going to have to dive into both the ATMega328 data sheet and the Arduino code to find out how to get access to all 6 PWM signals.  I already know that the Arduino initialization messes with the PWM frequencies, so the AFMotor.h control for the PWM frequencies doesn’t work.  It may turn out that using OC1A and OC2A (which the Adafruit board does not use, but which I use for motors 4 and 5) interacts in some unpleasant way with other Arduino functions.  I may have to put up with some constraints on PWM frequency, as I want to retain clock and analog input capabilities.


Filed under: Hexmotor H-bridge board, Printed Circuit Boards, Robotics Tagged: Adafruit Industries, Arduino, board shears, motor controller, Printed circuit board, robotics

Possibly salvage the boards

My son and I were looking together about whether we could salvage the board design by using the TLE-5206-2 parts that are available.

The pinout is identical, but the functionality is different.

In1 In2 5205 out1/out2 5206 out1/out2
0 0 1/0 0/0
0 1 0/1 0/1
1 0 0/0 1/0
1 1 Z/Z 1/1

The arrangements of signals that I have available to jumper to were S, PWM, and S+PWM.  The easy jumper arrangements I had were (IN1=S, IN2=PWM) and (IN1=PWM, IN2=S+PWM), which with the TLE-5205 were supposed to give me lock anti-phase drive and sign-magnitude drive.

With the 5206, lock anti-phase would require (IN1=PWM, IN2=not PWM), which I don’t have available, but the jumper setting (IN1=S, IN2=PWM) now almost makes sense as active collapse (run/brake) mode (except that it is not quite sign magnitude, since the interpretation of the pulse width is flipped depending which way the motor is supposed to turn).  The other jumper setting makes no sense.

So now I have choice:

  1. Populate a board with TLE-5206 chips and have only the run/brake mode (I could solder in jumpers, since there are no choices).  I could also omit the now-useless OR gates.
  2. Design a new board with the TLE-5206 chips in mind, with jumpering between two modes:
    • (IN1=S, IN2=S xor PWM)   run/brake with consistent magnitude interpretation
    • (IN1=PWM, IN2=S xor PWM)  lock anti-phase if S=1, brake if S=0

Wait a second!  I don’t need a new board for that! If I replace the 74HC32 quad nor-gate with a 74HC86 quad Xor, then the 5-pin headers will be

S IN1 PWM IN2 S xor PWM

I can solder the IN2 pin to S xor PWM, and just have a 3-pin header to connect IN1 to either S (for run/brake) or PWM (for lock anti-phase). The labeling on the silk screen will be wrong, but the board will be fully usable!

The interpretation of the pulse width modulation if  IN1 is set to PWM is that 0 means always on and 255 means always braking, which is kind of weird, but easily compensated for in the software. S determines the direction the motor turns.

If IN1 is set to S, then S is interpreted as RUN if it is high, STOP if it is low, and PWM gives the direction and magnitude when running (with 0 being full on in one direction and 255 being full on in the opposite direction).  PWM should probably be set to constant 0 when braking.

I think the board can be saved, and still have all the functions we needed, though we switched from sign-magnitude to active collapse as one of the modes.  The next revision of the board (if I need to make more) would fix the silk screen and replace the 5-pin header with a 3-pin header for each chip.


Filed under: Hexmotor H-bridge board, Printed Circuit Boards, Uncategorized Tagged: Arduino, design errors, motor controller, Printed circuit board, robotics