Posts with «uno» label

Hackaday Links: December 5, 2021

Sad news from Germany, with the recent passing of a legend in the crypto community: Mr. Goxx, the crypto-trading hamster. The rodent rose to fame in the crypto community for his trades, which were generated at random during his daily exercise routines — his exercise wheel being used like a roulette wheel to choose a currency, and a pair of tunnels determined whether the transaction would be a buy or sell. His trading career was short, having only started this past June, but he was up 20% over that time — that’s nothing to sneeze at. Our condolences to Mr. Goxx’s owners, and to the community which sprung up around the animal’s antics.

It might seem a little early to start planning which conferences you’d like to hit in 2022, but some require a little more lead time than others. One that you might not have heard of is DINACON, the Digital Naturalism Conference, which explores the intersection of technology and the natural world. The con is set for the entire month of July 2022 and will be held in Sri Lanka. It has a different structure than most cons, in that participants attend for a week or so on a rotating basis, much like a biology field station summer session. It sounds like a lot of fun, and the setting couldn’t be more idyllic.

If you haven’t already killed your holiday gift budget buying NFTs, here’s something you might want to consider: the Arduino Uno Mini Limited Edition. What makes it a Limited Edition, you ask? Practically, it’s the small footprint compared to the original Uno and the castellated edges, but there are a bunch of other extras. Each elegant black PCB with gold silk screening is individually numbered and comes in presentation-quality packaging. But the pièce de résistance, or perhaps we should say the cavallo di battaglia, is that each one comes with a hand-signed letter from the Arduino founders. They honestly look pretty sharp, and at $45, it’s really not a bad collector’s piece.

And finally, the YouTube algorithm giveth again, when this infrastructure gem popped up in our feed. You wouldn’t think there’d be much of interest to see in a water main repair, but you’d be wrong, especially when that main is 50′ (15 m) below the surface, and the repair location is 600′ (183 m) from the access hatch. Oh yeah, and the pipe is only 42″ (1 m) in diameter, and runs underneath a river. There’s just so much nope in this one, especially since the diver has to swim into a special turning elbow just to get pointed in the right direction; how he turns around to swim out is not worth thinking about. Fascinating tidbits include being able to see the gravel used to protect the pipe in the riverbed through the crack in the pipe, and learning that big water mains are not completely filled, at least judging by the small air space visible at the top of the pipe. Those with claustrophobia are probably best advised to avoid this one, but it’s still amazing to see how stuff like this is done.

Arduino Wannabe Should Have Used a 555. Oh Wait, It Does.

It’s a little known secret that when the Hackaday writers gather in their secret underground bunker to work on our plans for world domination, we often take breaks to play our version of the corporate “Buzzword Bingo”, where paradigms are leveraged and meetings circle back to loop in offline stakeholders, or something like that. Our version, however, is “Comment Line Bingo”, and right in the middle of the card is the seemingly most common comment of all: “You should have used a 555,” or variations thereof.

So it was with vicious glee that we came across the Trollduino V1.0 by the deliciously named [Mild Lee Interested]. It’s the hardware answer to the common complaint, which we’ll grant is often justified. The beautiful part of this is that Trollduino occupies the same footprint as an Arduino Uno and is even pin-compatible with the microcontroller board, or at least sort of. The familiar line of components and connectors sprout from the left edge of the board, and headers for shields line the top and bottom edges too. “Sketches” are implemented in hardware, with jumpers and resistors and capacitors of various values plugged in to achieve all the marvelous configurations the indispensable timer chip can be used for. And extra points for the deliberately provocative use of Comic Sans in the silkscreen.

Hats off to [Lee] for a thoroughly satisfying troll, and a nice look at what the 555 chip can really do. If you want a more serious look at the 555, check out this 555 modeled on a breadboard, or dive into the story of the chip’s development.

Hack a Day 17 Jan 09:00

KVM Uses Many Arduinos

The Arduino platform is one of the most versatile microcontroller boards available, coming in a wide variety of shapes and sizes perfect for everything from blinking a few LEDs to robotics to entire home automation systems. One of its more subtle features is the ability to use its serial libraries to handle keyboard and mouse duties. While this can be used for basic HID implementations, [Nathalis] takes it a step further by using a series of Arduinos as a KVM switch; although admittedly without the video and mouse functionality yet.

To start, an Arduino Uno accepts inputs from a keyboard which handles the incoming serial signals from the keyboard. From there, two Arduino Pro Micros are attached in parallel and receive signals from the Uno to send to their respective computers. The scroll lock key, which doesn’t do much of anything in modern times except upset Excel spreadsheeting, is the toggle switch between the two outputs. Everything is standard USB HID, so it should be compatible with pretty much everything out there. All of the source code and schematics are available in the project’s repository for anyone who wants to play along at home.

Using an Arduino to emulate a USB input device doesn’t have to be all work and no play, the same basic concept can also be used to build custom gaming controllers.

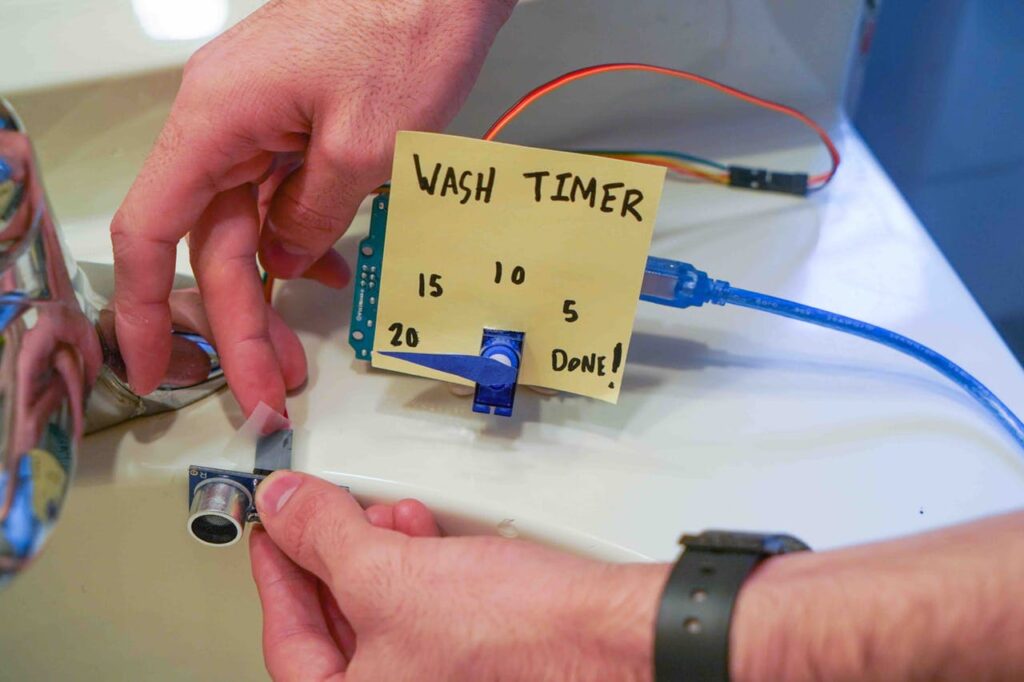
The Wash-A-Lot-Bot is a DIY handwashing timer

With the current coronavirus situation, we’ve been encouraged to wash our hands regularly for 20 seconds – or approximately how long it takes you to hum “Happy Birthday” from beginning to end twice. That sounds easy enough, but do you really do this every time? What you need is some sort of automatic timer, perhaps with a dial gauge for easy visual reference. 

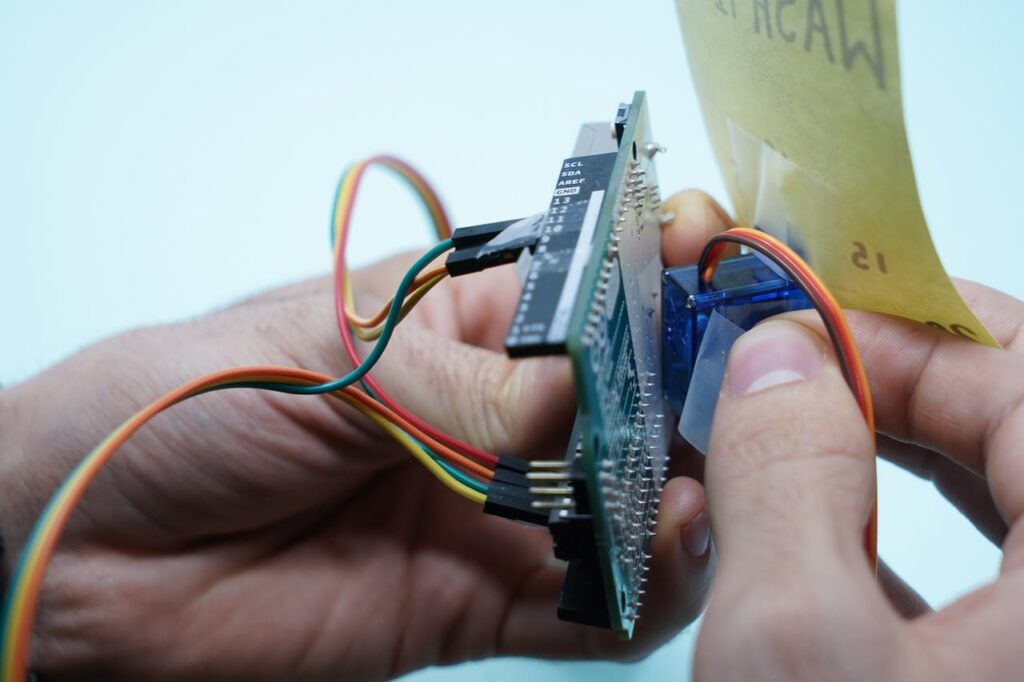
As it just so happens, Gautam Bose and Lucas Ochoa built such a device with an Arduino Uno. The aptly named Wash-A-Lot-Bot detects a person’s hands in front of it via an ultrasonic sensor, then ticks a dial timer from 0 to 20 (or rather 20 to DONE!) using a micro servo. 

This simple setup can be made with little more than scissors and tape, making it a great way to learn about Arduino and programming while you’re stuck indoors.

Arduino Blog 29 Mar 18:07
arduino  featured  uno  

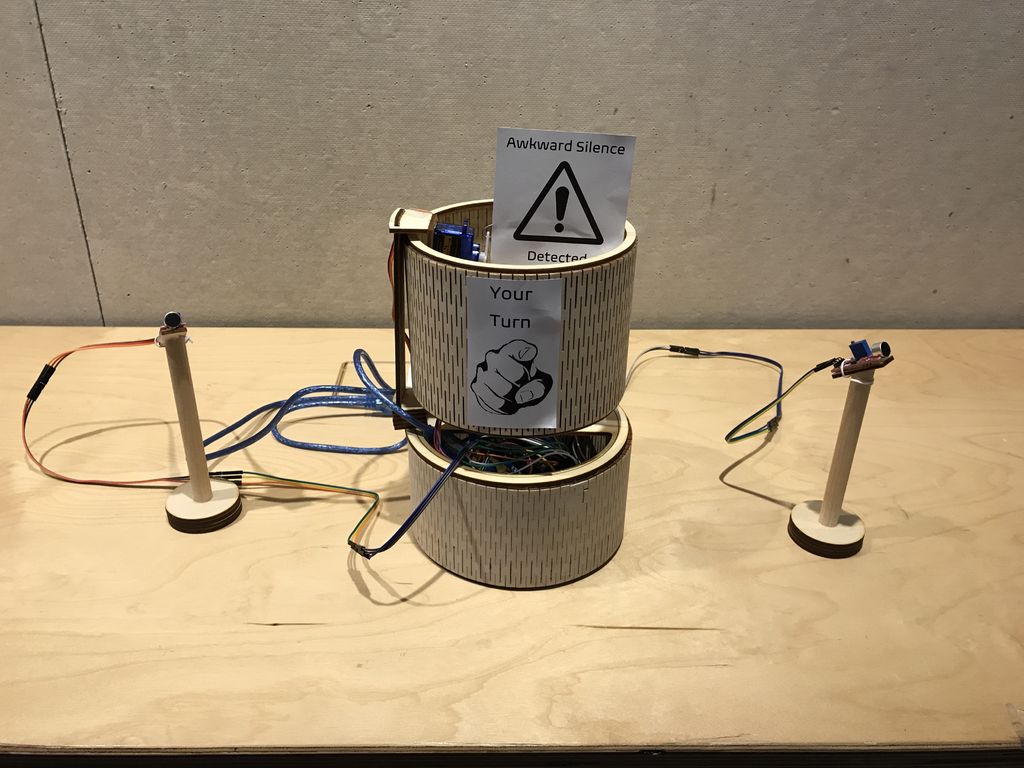
SASSIE helps prevent awkward gaps in conversation

Whether it’s with an old friend or new acquaintance, we’ve all had those awkward gaps in conversation. Do you speak next, or let the other person lead the discussion? If that’s not happening naturally, then SASSIE, or “System for Awkward Silence Solution and Interaction Enhancer,” is here to help.

The cylindrical device detects audio feedback via a pair of microphones positioned near each person in a conversation. When a sufficient silence is detected, SASSIE pops a flag out and rotates to indicate who needs to talk. If that wasn’t enough of a hint, it also audibly tells that person to say something. 

SASSIE is powered by dual Arduino Uno boards, one of which takes care of the bulk of the control functions, while the other actuates the stepper to spin the top indicator.

Arduino Blog 24 Mar 18:19
arduino  uno  

1,156 LEDs make up these dual acrylic light-up panels

What does one do with over 1,000 LEDs, white acrylic, and 288 IR sensors? If you’re Redditor “jordy_essen,” you create an interactive light panel.

In one mode, the user pull a reflective tool across the sensors to draw a paths, with potentiometers implemented to select the color. It can also be set up to play a sort of whack-a-mole game, where one has to activate the sensor in the same area where it illuminates.

For this amazing device, jordy_essen uses not one, or even two, but six Arduino Mega boards to drive the LEDs directly — in turn controlled by a webpage running on a Raspberry Pi. If that wasn’t enough hardware, an Uno is tasked with taking inputs from the color potentiometers. 

It’s a brilliant project in any sense of the word!

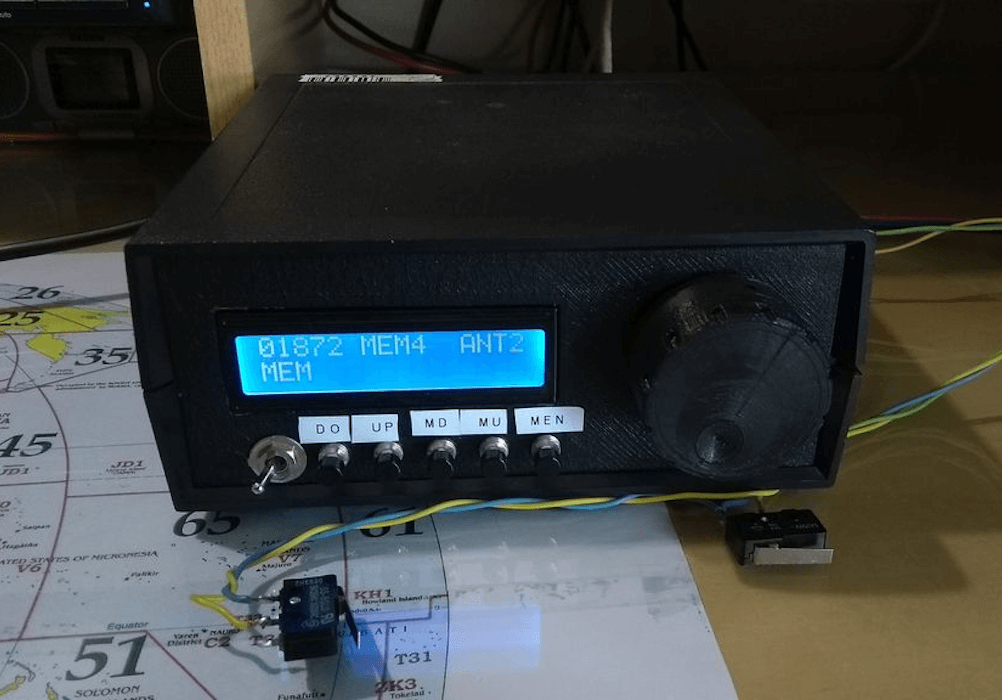
Using an Arduino/CNC shield setup for ham radio control

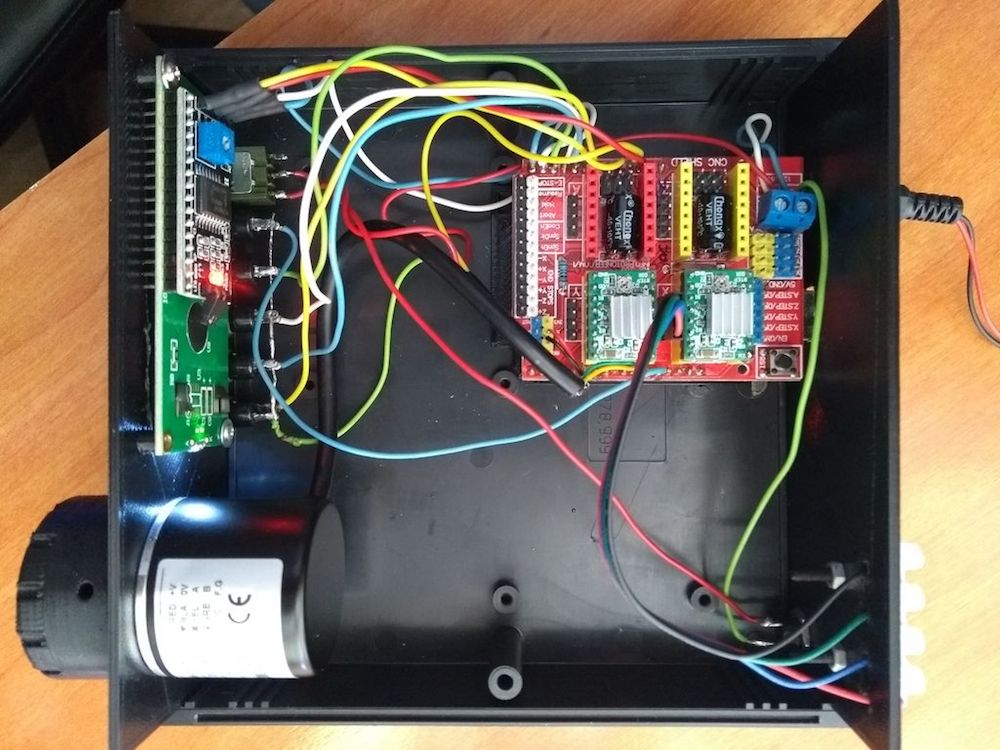
Loop antennas for ham radios use heavy duty variable capacitors for tuning. Since such capacitors need to be physically turned for adjustment, radio enthusiast Jose B.O. made his own remote rig using an Arduino Uno and CNC shield.

The CNC setup allows stepper motors to rotate through a range of angles for frequency selection, and three antennas can be controlled via separate Pololu A4988 driver modules. An optical encoder is used for control, along with buttons for preset frequencies, and a 16×2 I2C LCD display provides visual feedback. Microswitches are implemented to set the upper and lower bounds for the stepper motors.

More info is available in the project’s write-up and the videos below show the system in action.

Arduino Blog 16 Mar 21:13
arduino  ham radio  uno  

The Watchman is a 3D-printed robot head that follows your face with realistic eyeballs

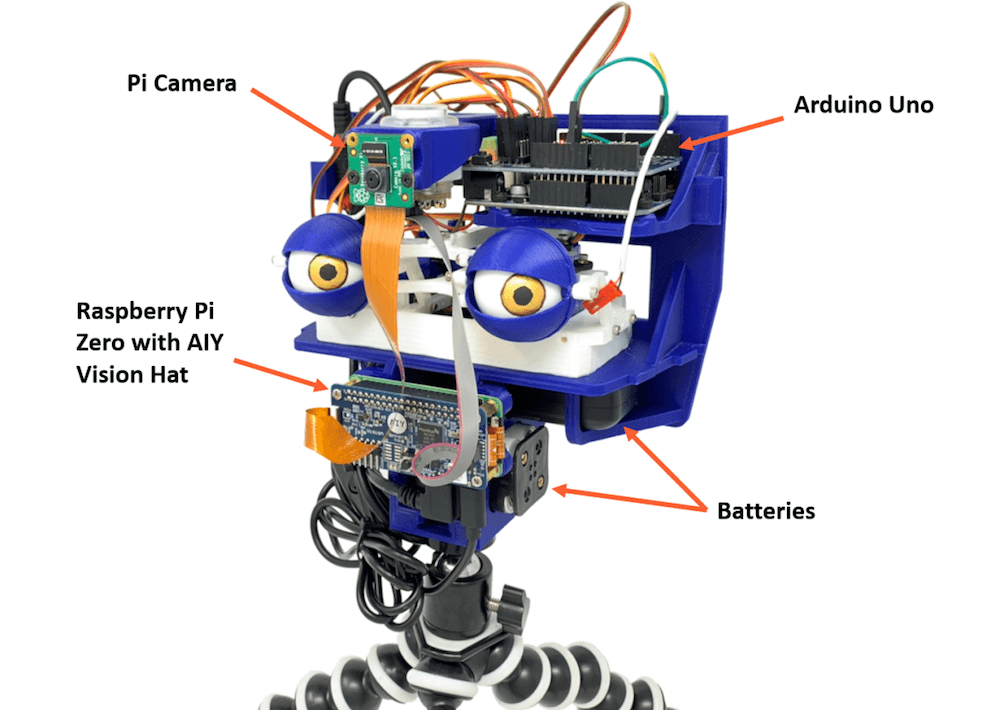
When you step out in public, you’ll often be filmed by a number of cameras and perhaps even be analyzed by tracking software of some kind. The Watchman robot head by Graham Jessup, however, makes this incredibly obvious as it detects and recognizes facial movements, then causes a pair of eyeballs to follow you around.

The 3D-printed system — which is a modified version of Tjhazi’s Doorman — uses a Raspberry Pi Camera to capture a live video feed, along with a Raspberry Pi Zero and a Google AIY HAT for analysis.

This setup passes info on to an Arduino Uno that actuates the eyeballs via a 16-channel servo shield and a number of servos. The device can follow Jessup up, down, left, and right, making for a very creepy robot indeed!

Start a 1976 Jeep with voice commands using a MacBook and an Arduino

After being given a 2009 MacBook, John Forsyth decided to use it to start a 1976 Jeep via voice control.

The build uses the laptop’s Enhanced Dictation functionality to convert text into speech, and when a Python program receives the proper keywords, it sends an “H” character over serial to an Arduino Uno to activate the vehicle.

The Uno uses a transistor to control a 12V relay, which passes current to the Jeep’s starter solenoid. After a short delay, the MacBook then transmits an “L” command to have it release the relay, ready to do the job again when needed!

As a fan of Iron Man, Forsyth channeled his inner Tony Stark and even programmed the system to respond to “JARVIS, let’s get things going!”

Matrix and Joystick

For the original tutorial, please visit: https://arduinobasics.blogspot.com


Project Description

In this project, we will use a little joystick to move a pixel around an 8x8 LED matrix. The joystick has a built-in button, such that when you press down onto the joystick, the colour of the pixel will change from red to blue to green. This is a very simple project, however, controlling the matrix adds a certain level of complexity. You will need to understand binary notation and bit-shifting techniques to grasp the concept of this tutorial.

All of the parts used in this project can be obtained from digitspace.com


Libraries

The SPI library is required for this project. However, this library is built into the current version of the Arduino IDE. No additional download is required. Just make sure to include it at the top of the sketch.


Arduino Code

The Arduino IDE can be downloaded from the official Arduino website: here.
Copy and paste the following code into your Arduino IDE and upload it to the Arduino UNO.


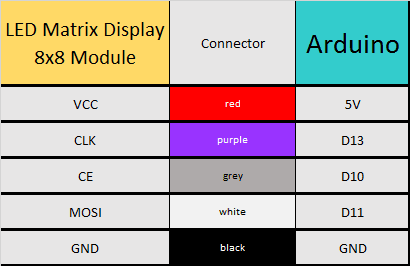
Connections


Project Video

As you can see from the video above, the pixel changes colour when the button is pressed. The position of the pixel relates to the position of the joystick. The lag between the joystick movement and pixel movement is minimal, and very satisfying.


Conclusion

This was a very fun and satisfying project that showcases the interaction between a joystick and a 8x8 LED matrix with the help of an Arduino UNO. This project was sponsored by the kind people at digitspace. Without their sponsorship, this tutorial would not have been possible. Please visit their website for some nice deals on Arduino related products.

If you found this tutorial helpful, please consider supporting me by buying me a virtual coffee/beer.

$3.00 AUD only

Social Media

You can find me on various social networks:

Follow me on Twitter: ScottC @ArduinoBasics.
I can also be found on Instagram, Pinterest, and YouTube.
And if all else fails, I have a server on Discord.


ScottC 09 Mar 07:41
8x8  arduino  ce  clk  fun  joystick  led  matrix  module  mosi  pixel  programming  spi  sw  tutorial  uno  x  y