Posts with «video hacks» label

Arduino Does SDI Video with FPGA Help

If you are running video around your home theater, you probably use HDMI. If you are running it in a professional studio, however, you are probably using SDI, Serial Digital Interface. [Chris Brown] looks at SDI and shows a cheap SDI signal generator for an Arduino.

On the face of it, SDI isn’t that hard. In fact, [Chris] calls it “dead simple.” The problem is the bit rate which can be as high as 1.485 Gbps for the HD-SDI standard. Even for a super fast processor, this is a bit much, so [Chris] turned to the Arduino MKR Vidor 4000. Why? Because it has an FPGA onboard. Alas, the FPGA can’t do more than about 200 MHz, but that’s fast enough to drive an external Semtech GS296t2 serializer which is made to drive SDI signals.

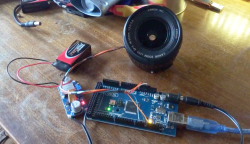
The resulting project contains the Arduino, the serializer, a custom PCB, and both FPGA and microcontroller code. While the total cost of the project was a little under $200, that’s still better than the $350 to $2000 for a commercial SDI signal generator.

If you want to play along, the files are out on GitHub. We used the Vidor back in 2018 when it first came out. If you need a quick start on FPGAs, there’s always our boot camp.

DIY Streamdeck Helps You Professionalize Your Twitch Show

The one thing that separates the pros on Twitch from the dilettantes is the production values. It’s all about the smooth transitions, and you’ll never catch the big names fiddling with dodgy software mid-stream. The key to achieving this is by having a streamdeck to help control your setup, like this straightforward design from [Electronoobs]. (Video, embedded below.)

The build relies on an Arduino Micro, which is a microcontroller board perfectly equipped to acting as a USB macro keyboard. It’s paired with a Nextion LCD touchscreen that displays buttons for various stream control features, like displaying a “Be Right Back” screen or cuing up video clips. The build also features bigger regular buttons for important quick-access features like muting a mic. It’s all wrapped up in a 3D printed housing, with some addressable RGB LEDs running off another Arduino to add some pizazz. The neat trick is that the build sends keycodes for F13-F24, which allows for the streamdeck’s hotkeys to avoid conflicting with any other software using conventional keyboard hotkeys.

It’s a useful tool that would be of use to anyone streaming on Twitch or other platforms. Alternatively, you could repurpose an old phone to do a similar job. Video after the break.

Gesture Controlled Filming Gear Works Super Intuitively

Shooting good video can be an arduous task if you’re working all by yourself. [Pave Workshop] developed a series of gesture-responsive tools to help out, with a focus on creating a simple intuitive interface.

The system is based around using a Kinect V2 to perceive gestures made by the user, which can then control various objects in the scene. For instance, a beckoning motion can instruct a camera slider to dolly forward or backwards, and a halting gesture will tell it to stop. Bringing the two hands together or apart in special gestures indicate that the camera should zoom in or out. Lights can also be controlled by pulling a fist towards or away from them to change their brightness.

The devil is in the details with a project that works this smoothly. [Pave Workshop] lays out the details on how everything Node.JS was used to knit together everything from the custom camera slider to Philips Hue bulbs and other Arduino components.

The project looks really impressive in the demo video on YouTube. We’ve seen some other impressive automated filming rigs before, too.

Big Spinning Disk Makes a Small Color Video Display

Believe it or not, the Mickey Mouse clip used for this demonstration is actually in the public domain.

The earliest televisions used a spinning disk technology called the Nipkow disk, which is exactly what [Science ‘n’ Stuff] recreated with their Arduino-based mechanical color television (video link, also embedded below.) The device reads video and audio from an SD card, and displays the video using a precisely-timed RGB LED visible through a perforated spinning disk. The persistence of vision effect results in a video that is small, relative to the size of the disk, but perfectly watchable. A twist is that the video is in color!

A Nipkow disk is a fairly simple and electromechanical device that relies on timing; something a modern microcontroller and RGB LED is perfectly capable of delivering. In this device, the holes in the disk create 32 vertical scanlines with 96 “pixels” making up each of those lines. Spinning disk technology was always limited to being monochromatic, but in this implementation, each “pixel” is given its own unique color by adjusting the RGB LED accordingly.

The first video shows off the device and demonstrates it working; note that it may look like there are multiple little screens, but the center one can be thought of as the “true” display with the others essentially being artifacts due to light leakage. If you’re interested in the nuts and bolts of exactly how a Nipkow disk works, then the second video is what you’ll be more interested in, because it goes through all the details of exactly how everything functions.

Another neat thing about Nipkow disks is that image acquisition is really not much more complex than image display.

[via Arduino Blog]


Eyecam is Watching You in Between Blinks

We will be the first to admit that it’s often hard to be productive while working from home, especially if no one’s ever really looking over your shoulder. Well, here is one creepy way to feel as though someone is keeping an eye on you, if that’s what gets you to straighten up and fly right. The Eyecam research project by [Marc Teyssier] et. al. is a realistic, motorized eyeball that includes a camera and hangs out on top of your computer monitor. It aims to spark conversation about the sensors that are all around us already in various cold and clinical forms. It’s an open source project with a paper and a repo and a how-to video in the works.

The eyebrow-raising design pulls no punches in the uncanny department: the eye behaves as you’d expect (if you could have expected this) — it blinks, looks around, and can even waggle its brow. The eyeball, brow, and eyelids are actuated by a total of six servos that are controlled by an Arduino Nano.

Inside the eyeball is a Raspberry Pi camera connected to a Raspi Zero for the web cam portion of this intriguing horror show. Keep an eye out after the break for the Eyecam infomercial.

Creepy or fascinating, it succeeds in making people think about the vast amount of sensors around us now, and what the future of them could look like. Would mimicking eye contact be an improvement over the standard black and gray oblong eye? Perhaps a pair of eyes would be less unsettling, we’re not really sure. But we are left to wonder what’s next, a microphone that looks like an ear? Probably. Will it have hair sprouting from it? Perhaps.

Yeah, it’s true; two eyes are more on the mesmerizing side, but still creepy, especially when they follow you around the room and can shoot frickin’ laser beams.

Thanks for the tip, [Sven, greg, and Itay]!

Learn Multirotors From First Principles

Multirotors, or drones as they’re popularly called, are so ubiquitous as to have become a $10 toy. They’re no less fun to fly for it though, and learning how they work is no less fascinating. It’s something [Science Buddies] has addressed in a series of videos examining them from first principles. They may be aimed at youngsters, but they’re still an entertaining enough watch for those of advancing years.

Instead of starting with a multirotor control board, the video takes four little DC motors and two popsicle sticks to make a rudimentary drone frame. Then with the help of dowels and springs it tethers the craft as the control mechanisms are explained bit by bit, from simple on-off motor control through proportional control to adding an Arduino and following through to how a multirotor stays in flight. It’s instructional and fun to watch, and maybe even for some of us, a chance to learn something.

We’ve had multirotor projects aplenty here over the years, but how about something completely different made from popsicle sticks?

Hack a Day 11 Apr 09:00

How To Time Drone Races Without Transponders

Drone racing is nifty as heck, and a need all races share is a way to track lap times. One way to do it is to use transponders attached to each racer, and use a receiver unit of some kind to clock them as they pass by. People have rolled their own transponder designs with some success, but the next step is ditching add-on transponders entirely, and that’s exactly what the Delta 5 Race Timer project does.

A sample Delta 5 Race Timer build (Source: ET Heli)

The open-sourced design has a clever approach. In drone racing, each aircraft is remotely piloted over a wireless video link. Since every drone in a race already requires a video transmitter and its own channel on which to broadcast, the idea is to use the video signal as the transponder. As a result, no external hardware needs to be added to the aircraft. The tradeoff is that using the video signal in this way is trickier than a purpose-made transponder, but the hardware to do it is economical, accessible, and the design is well documented on GitHub.

The hardware consists of RX508 video receiver PCBs modified slightly to enable them to communicate over SPI. Each RX508 is attached to its own Arduino, which takes care of low-level communications. The Arduinos are themselves connected to a Raspberry Pi over I2C, allowing the Pi high-level control over the receivers while it serves up a web-enabled user interface. As a bonus, the Pi can do much more than simply act as a fancy stopwatch. The races themselves can be entirely organized and run through the web interface. The system is useful enough that other projects using its framework have popped up, such as the RotorHazard project by [PropWashed] which uses the same hardware design.

While rolling one’s own transponders is a good solution for getting your race on, using the video transmission signal to avoid transponders entirely is super clever. The fact that it can be done with inexpensive, off the shelf hardware is just icing on the cake.

RGB Sensor’s New Job: Cryptocurrency Trade Advisor

[XenonJohn] dabbles in cryptocurrency trading, and when he saw an opportunity to buy an RGB color sensor, his immediate thought — which he admitted to us would probably not be the immediate thought of most normal people — was that he could point it to his laptop screen and have it analyze the ratio of green (buy) orders to red (sell) orders being made for crypto trading. In theory, if at a given moment there are more people looking to buy than there are people looking to sell, the value of a commodity could be expected to go up slightly in the short-term. The reverse is true if a lot of sell orders coming in relative to buy orders. Having this information and possibly acting on it could be useful, but then again it might not. Either way, as far as out-of-left-field project ideas go, promoting an RGB color sensor to Cryptocurrency Trading Advisor is a pretty good one.

Since the RGB sensor only sees what is directly in front of it, [XenonJohn] assembled a sort of simple light guide. By enclosing the area of the screen that contains orders in foil-lined cardboard, the sensor can get a general approximation of the amount of red (sell orders) versus green (buy orders). The data gets read by an Arduino which does a simple analysis and sends alerts when a threshold is crossed. He dubbed it the Crypto-Eye, and a video demo is embedded below.

Could this have been done purely in software? Certainly, but there’s a certain charm to the Crypto-Eye being a standalone device that uses a simple visual input to make buy and sell predictions like a Speak & Spell.

Inventive crypto trading is just a side project for [XenonJohn], he’s better known around these parts for his outstanding contributions to one-wheeled electric vehicles, like this 3000W Electric Unicycle, which also happens to feature an Arduino with 80’s-style voice feedback, just like the Crypto-Eye.

Arduino Video isn’t Quite 4K

Video resolution is always on the rise. The days of 640×480 video have given way to 720, 1080, and even 4K resolutions. There’s no end in sight. However, you need a lot of horsepower to process that many pixels. What if you have a small robot powered by a microcontroller (perhaps an Arduino) and you want it to have vision? You can’t realistically process HD video, or even low-grade video with a small processor. CORTEX systems has an open source solution: a 7 pixel camera with an I2C interface.

The files for SNAIL Vision include a bill of materials and the PCB layout. There’s software for the Vishay sensors used and provisions for mounting a lens holder to the PCB using glue. The design is fairly simple. In addition to the array of sensors, there’s an I2C multiplexer which also acts as a level shifter and a handful of resistors and connectors.

Is seven pixels enough to be useful? We don’t know, but we’d love to see some examples of using the SNAIL Vision board, or other low-resolution optical sensors with low-end microcontrollers. This seems like a cheaper mechanism than Pixy. If seven pixels are too much, you could always try one.

Thanks [Paul] for the tip.


Filed under: Arduino Hacks, video hacks

DIY Motion Control Camera Rig Produces Money-Shots On A Budget

Motion control photography allows for stunning imagery, although commercial robotic MoCo rigs are hardly affordable. But what is money? Scratch-built from what used to be mechatronic junk and a hacked Canon EF-S lens, [Howard’s] DIY motion control camera rig produces cinematic footage that just blows us away.

[Howard] started this project about a year ago by carrying out some targeted experiments. These would not only assess the suitability of components he gathered together from all directions, but also his own capacity in picking up enough knowledge on mechatronics to make the whole thing work. After making  himself accustomed to stepper motors, Teensies and Arduinos, he converted an old moving-head disco light into a pan and tilt mount for the camera. A linear axis was added, and with more degrees of freedom, more sophisticated means of control became necessary.

Using the Swift programming language, [Howard] wrote a host program automatically detects the numerous stepper and servo motor based axis and streams the position data to their individual Teensy LC based controllers. To the professional motion graphics artist , these shots aren’t just nice and steady footage: The real magic happens when he starts adding perfectly matched layers of CGI. Therefore, he also wrote some Python scripts that allow him to manually control his MoCo rig from a virtual rig in Blender, and also export camera trajectories directly from his 3D scenes.

On top of the 4-axis camera mount and a rotary stage, [Howard] also needed to find an electronic follow-focus mechanism to keep the now moving objects in focus. Since the Canon EF-S protocol had already been reverse engineered, he decided to tap into the SPI control bus between the camera and the lens to make use of its internal ring motor. Although the piezo motors in autofocus lenses aren’t actually built for absolute positioning, a series of tests revealed that a Canon EF-S 17-55mm IS USM lens can be refocused a few hundred times and still return to its starting position close enough. The caveat: [Howard] had to hack open the £600 lens and drill holes in it. In retrospect, he tells us, it’s a miracle that his wife didn’t leave him during the project.

After several iterations of mechanical improvements, the motion control rig is now finished, and the first clips have already been recorded and edited. They’re stunning. Only the 6-axis robot arm hiding in [Howard’s] basement tells us that he just warming up for the real game. Enjoy the video below, but don’t miss out on the full 3-part video documentary on how this project came to be.


Filed under: digital cameras hacks, video hacks