Posts with «rc» label

Ground Effect Drone Flies Autonomously

There are a number of famous (yet fictional) sea monsters in the lakes and oceans around the world, but in the Caspian Sea one turned out to be real. This is where the first vehicles specifically built to take advantage of the ground effect were built by the Soviet Union, and one of the first was known as the Caspian Sea Monster due to the mystery surrounding its discovery. While these unique airplane/boat hybrids were eventually abandoned after several were built for military use, the style of aircraft still has some niche uses and can even be used as a platform for autonomous drones.

This build from [Think Flight] started off as a simple foam model of just such a ground effect vehicle (or “ekranoplan”) in his driveway. With a few test flights the model was refined enough to attach a small propeller and battery. The location of the propeller changed from rear-mounted to front-mounted and then back to rear-mounted for the final version, with each configuration having different advantages and disadvantages. The final model includes an Arudino running an autopilot program called Ardupilot, and with an air speed sensor installed the drone is able to maintain flight in the ground effect and autonomously navigate pre-programmed waypoints around a lake at high speed.

For a Cold War technology that’s been largely abandoned by militaries in favor of other modes of transportation due to its limited use case and extremely narrow flight tolerances, ground effect vehicles are relatively popular as remote controlled vehicles. This RC ekranoplan used the same Ardupilot software but paired with a LIDAR system instead of GPS to navigate its way around its environment.

Thanks to [TTN] for the tip!

Remote Controlled Car Gets Active Suspension

Active suspensions are almost a holy grail for cars, adding so much performance gain that certain types have even been banned from Formula 1 racing. That doesn’t stop them from being used on a wide variety of luxury and performance cars, though, as they can easily be tuned on the fly for comfort or improved handling. They also can be fitted to remote controlled cars as [Indeterminate Design] shows with this electronic servo-operated active suspension system for his RC truck.

Each of the four servos used in this build is linked to the mounting point of the existing coilover suspension on the truck. This allows the servo to change the angle that the suspension is positioned while the truck is moving. As a result, the truck has a dramatic performance enhancement including a tighter turning radius, more stability, and the capability of doing donuts. The control system runs on an Arduino with an ESP32 to enable live streaming of data, and also includes an MPU6050 to monitor the position of the truck’s frame while it is in motion.

There’s a lot going on in this build especially with regard to the control system that handles all of the servos. Right now it’s only programmed to try to keep the truck’s body relatively level, but [Indeterminate Design] plans to program several additional control modes in the future. There’s a lot of considerations to make with a system like this, and even more if you want to accommodate for Rocket League-like jumps.

Hack a Day 15 Apr 00:00

RC Lawn Mower Keeps The Grass Greener On Your Side Of The Fence

For some people, mowing the lawn is a dreaded chore that leads to thoughts of pouring a concrete slab over the yard and painting it green. Others see it as the perfect occasion to spend a sunny afternoon outside. And then there are those without the luxury of having a preference on the subject in the first place. [elliotmade] for example has a friend who’s sitting in a wheelchair, and would normally have to rely on others to maintain his lawn and form an opinion on the enjoyability of the task. So to retain his friend’s independence, he decided to build him a remote-controlled lawn mower.

After putting together an initial proof of concept that’s been successfully in use for a few years now, [elliotmade] saw some room for improvement and thought it was time for an upgrade. Liberating the drive section of an electric wheelchair, he welded a frame around it to house the battery and the mower itself, and added an alternator to charge the battery directly from the mower’s engine. An RC receiver that connects to the motor driver is controlled by an Arduino, as well as a pair of relays to switch both the ignition and an electric starter that eliminates the need for cord pulling. Topping it off with a camera, the garden chores are now comfortably tackled from a distance, without any issues of depth perception.

Remote-controlling a sharp-bladed machine most certainly requires a few additional safety considerations, and it seems that [elliotmade] thought this out pretty well, so failure on any of the involved parts won’t have fatal consequences. However, judging from the demo video embedded after break, the garden in question might not be the best environment to turn this into a GPS-assisted, autonomous mower in the future. But then again, RC vehicles are fun as they are, regardless of their shape or size.

Glorious Body of Tracked ‘Mad Mech’ Started as Cardboard

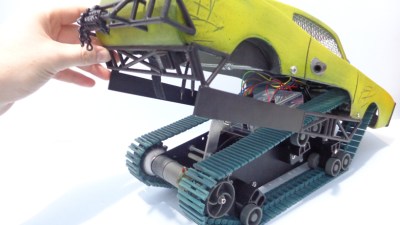
[Dickel] always liked tracked vehicles. Taking inspiration from the ‘Peacemaker’ tracked vehicle in Mad Max: Fury Road, he replicated it as the Mad Mech. The vehicle is remote-controlled and the tank treads are partly from a VEX robotics tank tread kit. Control is via a DIY wireless controller using an Arduino and NRF24L01 modules. The vehicle itself uses an Arduino UNO with an L298N motor driver. Power is from three Li-Po cells.

The real artistic work is in the body. [Dickel] used a papercraft tool called Pepakura (non-free software, but this Blender plugin is an alternative free approach) for the design to make the body out of thin cardboard. The cardboard design was then modified to make it match the body of the Peacemaker as much as possible. It was coated in fiberglass for strength, then the rest of the work was done with body filler and sanding for a smooth finish. After a few more details and a good paint job, it was ready to roll.

There’s a lot of great effort that went into this build, and [Dickel] shows his work and process on his project page and in the videos embedded below. The first video shows the finished Mad Mech being taken for some test drives. The second is a montage showing key parts of the build process.

Paper and cardboard are very versatile and accessible materials for making things. It’s what was used to do some target practice with this working paper and cardboard gun. With the right techniques foam core can be worked into an astonishing variety of shapes, and we also made a case for the value of a desktop vinyl cutter on any well-equipped hacker’s workbench.

Cheap Toy Airboat Gets a Cheap R/C Upgrade

[Markus Gritsch] and his son had a fun Sunday putting together a little toy airboat from a kit. They fired it up and it occurred to [Markus] that it was pretty lame. It went forward and sometimes sideward when a stray current influenced its trajectory, but it had no will of its own.

The boat was extracted from water before it could wander off and find itself lost forever. [Markus] did a mental inventory of his hacker bench and decided this was a quickly rectified design shortcoming. He applied a cheap knock-off arduino, equally cheap nRF24L01+ chip of dubious parentage, and their equivalent hobby servo to the problem.

Some quick coding later, assisted by prior work from other RC enthusiasts, the little boat was significantly upgraded. Now the boat could be brought back to shore using any R/C controller that supported the, “Bayang,” protocol. He wouldn’t have to face the future in which he’d have to explain to his son that the boat, like treacherous helium balloons, was just gone. Video after the break.


Filed under: Arduino Hacks, toy hacks
Hack a Day 07 Sep 09:01
airbot  arduino  arduino hacks  boat  hack  nrf24l01+  rc  servo  simple  toy  toy hacks  

Nerf-firing Rover

Primary image

What does it do?

Navigate via RC control, fires Nerf gun, supports autonomous control via Raspberry Pi

This rover makes use of the following:

CPPM RC radio input from openTx RC radio

Arduino Nano to handle communcations from RC, Raspberry Pi via USB (not attached  yet), I/O to servos via i2c, I/O to/from Roboclaw motor controller via serial (gets velocity from encoders on motors), and output to various DC-driven devices (headlight, gripper).

5.8ghz video transmitter for FPV roving

Cost to build

$600, 00

Embedded video

Finished project

Number

Time to build

50 hours

Type

wheels

URL to more information

Weight

read more

New Project: Build Your Own Android-Powered Self Driving R/C Car

Learn how a team of students created the first Google Android-based autonomous R/C car, able to detect lanes, avoid obstacles, self-park, and more.

Read more on MAKE

The post Build Your Own Android-Powered Self Driving R/C Car appeared first on Make: DIY Projects, How-Tos, Electronics, Crafts and Ideas for Makers.

Using RC Transmitters With Flight Simulators

It’s winter, and that means terrible weather and very few days where flying RC planes and helicopters is tolerable. [sjtrny] has been spending the season with RC flight simulators for some practice time. He had been using an old Xbox 360 controller, but that was really unsuitable for proper RC simulation – a much better solution would be to use his normal RC transmitter as a computer peripheral.

The usual way of using an RC transmitter with a computer is to buy a USB simulator adapter that emulates a USB game pad through a port on the transmitter. Buying one of these adapters would mean a week of waiting for shipping, so [sjtrny] did the logical thing and made his own.

Normally, a USB simulator adapter plugs in to a 3.5mm jack on the transmitter used for a ‘buddy box’, but [sjtrny] had an extra receiver sitting around. Since a receiver simply outputs signals to servos, this provides a vastly simpler interface for an Arduino to listen in on. After connecting the rudder, elevator, aileron, and throttle signals on the receiver to an Arduino, a simple bit of code and the UnoJoy library allows any Arduino and RC receiver to become a USB joystick.

[sjtrny] went through a second iteration of hardware for this project with a Teensy 3.1. This version has higher resolution on the joystick axes, and the layout of the code isn’t slightly terrible. It’s a great project for all the RC pilots out there that can’t get a break in the weather, and is also a great use for a spare receiver you might have sitting around.


Filed under: peripherals hacks, radio hacks

Controlling a Quadcopter with Gestures

[grassjelly] has been hard at work building a wearable device that uses gestures to control quadcopter motion. The goal of the project is to design a controller that allows the user to intuitively control the motion of a quadcopter. Based on the demonstration video below, we’d say they hit the nail on the head. The controller runs off an Arduino Pro Mini-5v powered by two small coin cell batteries. It contains an accelerometer and an ultrasonic distance sensor.

The controller allows the quadcopter to mimic the orientation of the user’s hand. The user holds their hand out in front of them, parallel to the floor. When the hand is tilted in any direction, the quadcopter copies the motion and will tilt the same way. The amount of pitch and roll is limited by software, likely preventing the user from over-correcting and crashing the machine. The user can also raise or lower their hand to control the altitude of the copter.

[grassjelly] has made all of the code and schematics available via github.


Filed under: Arduino Hacks, drone hacks

Reach Out and Touch Your Next Project with Long Range RC Controller

Long range wireless control of a project is always a challenge. [Mike] and his team were looking to extend the range of their current RC setup for a UAV project, and decided on a pair of Arduino mini’s and somewhat expensive Digi Xtend 900Mhz modems to do the trick. With a range of 40 miles, the 1 watt transceivers provide fantastic range. And paired with the all too familiar Arduino, you’ve got yourself an easy long range link.

[Mike] set the transmitter up so it can plug directly into any RC controller training port, decoding the incoming signal and converting it into a serial data package for transmitting. While they don’t provide the range of other RF transmitters we’ve seen, the 40 mile range of the modem’s are more than enough for most projects, including High Altitude Balloon missions.

The code for the Arduino transmitter and receiver sides is available at their github. Though there is no built-in error correction in the code, they have not had any issues.  Unfortunately, a schematic was not provided, but you should be able to get enough information from the images and datasheets to construct a working link.


Filed under: Arduino Hacks, drone hacks