Pinball machines have something for everyone. They’re engaging, fast-paced games available in a variety of sizes and difficulties, and legend has it that they can be played even while deaf and blind. Wizardry aside, pinball machines have a lot to offer those of us around here as well, as they’re a complex mix of analog and digital components, games, computers, and artistry. [Daniele Tartaglia] is showing off every one of his skills to build a tabletop pinball machine completely from the ground up.
This is the latest in a series of videos documenting [Daniele]’s project, so he already has the general arrangement of the game set up. He has some improved ball-counting devices to enhance the game’s ability to keep track of ball position. [Daniele] also builds a few chutes and chimneys for the ball to pass outside of the play field. Next up are flippers and some of the bumpers. The video is rounded out with conductive targets built completely from scratch using metal zip ties. With a machine as complex as this, there are many points during the build where he has to stop and redesign parts. Prototyping as he goes, [Daniele] adds to the distinctive flair of this unique game.
This build truly puts every tool in [Daniele]’s toolbox to work, from a laser cutter, lathe, and 3D printer to various microcontrollers, solenoids, and electronics. He seamlessly blends the analog world of steel ball bearings and rubber bumpers with the digital world of scoring, automation, lighting, and sound. Pinball machines are experiencing a bit of a resurgence, meaning many of the classic tables are expensive collector’s items. If you want to build your own, we featured a great resource for others like [Daniele] who want to build one of these intricate machines themselves.
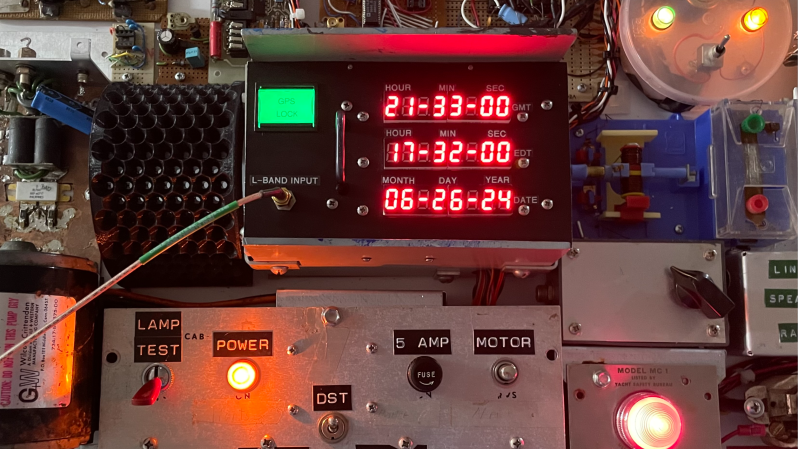
What does one do with old circuit boards and projects? Throwing them out doesn’t feel right, but storage space is at a premium for most of us. [Gregory Charvat] suggests doing what he did: combining them all into a wall-mountable panel in order to memorialize them, creating a functional digital clock in the process. As a side benefit, it frees up storage space!
Everything contributes. If it had lights, they light up. If it had a motor, it moves.
Memorializing and honoring his old hardware is a journey that involved more than just gluing components to a panel and hanging it on the wall. [Gregory] went through his old projects one by one, doing repairs where necessary and modifying as required to ensure that each unit could power up, and did something once it did. Composition-wise, earlier projects (some from childhood) are mounted near the bottom. The higher up on the panel, the more recent the project.
As mentioned, the whole panel is more than just a collage of vintage hardware — it functions as a digital clock, complete with seven-segment LED displays and a sheet metal panel festooned with salvaged controls. Behind it all, an Arduino MEGA takes care of running the show.
Creating it was clearly a nostalgic journey for [Gregory], resulting in a piece that celebrates and showcases his hardware work into something functional that seems to have a life of its own. You can get a closer look in the video embedded below the page break.
This really seems like a rewarding way to memorialize one’s old projects, and maybe even help let go of unfinished ones.
And of course, we’re also a fan of the way it frees up space. After all, many of us do not thrive in clutter and our own [Gerrit Coetzee] has some guidance and advice on controlling it.
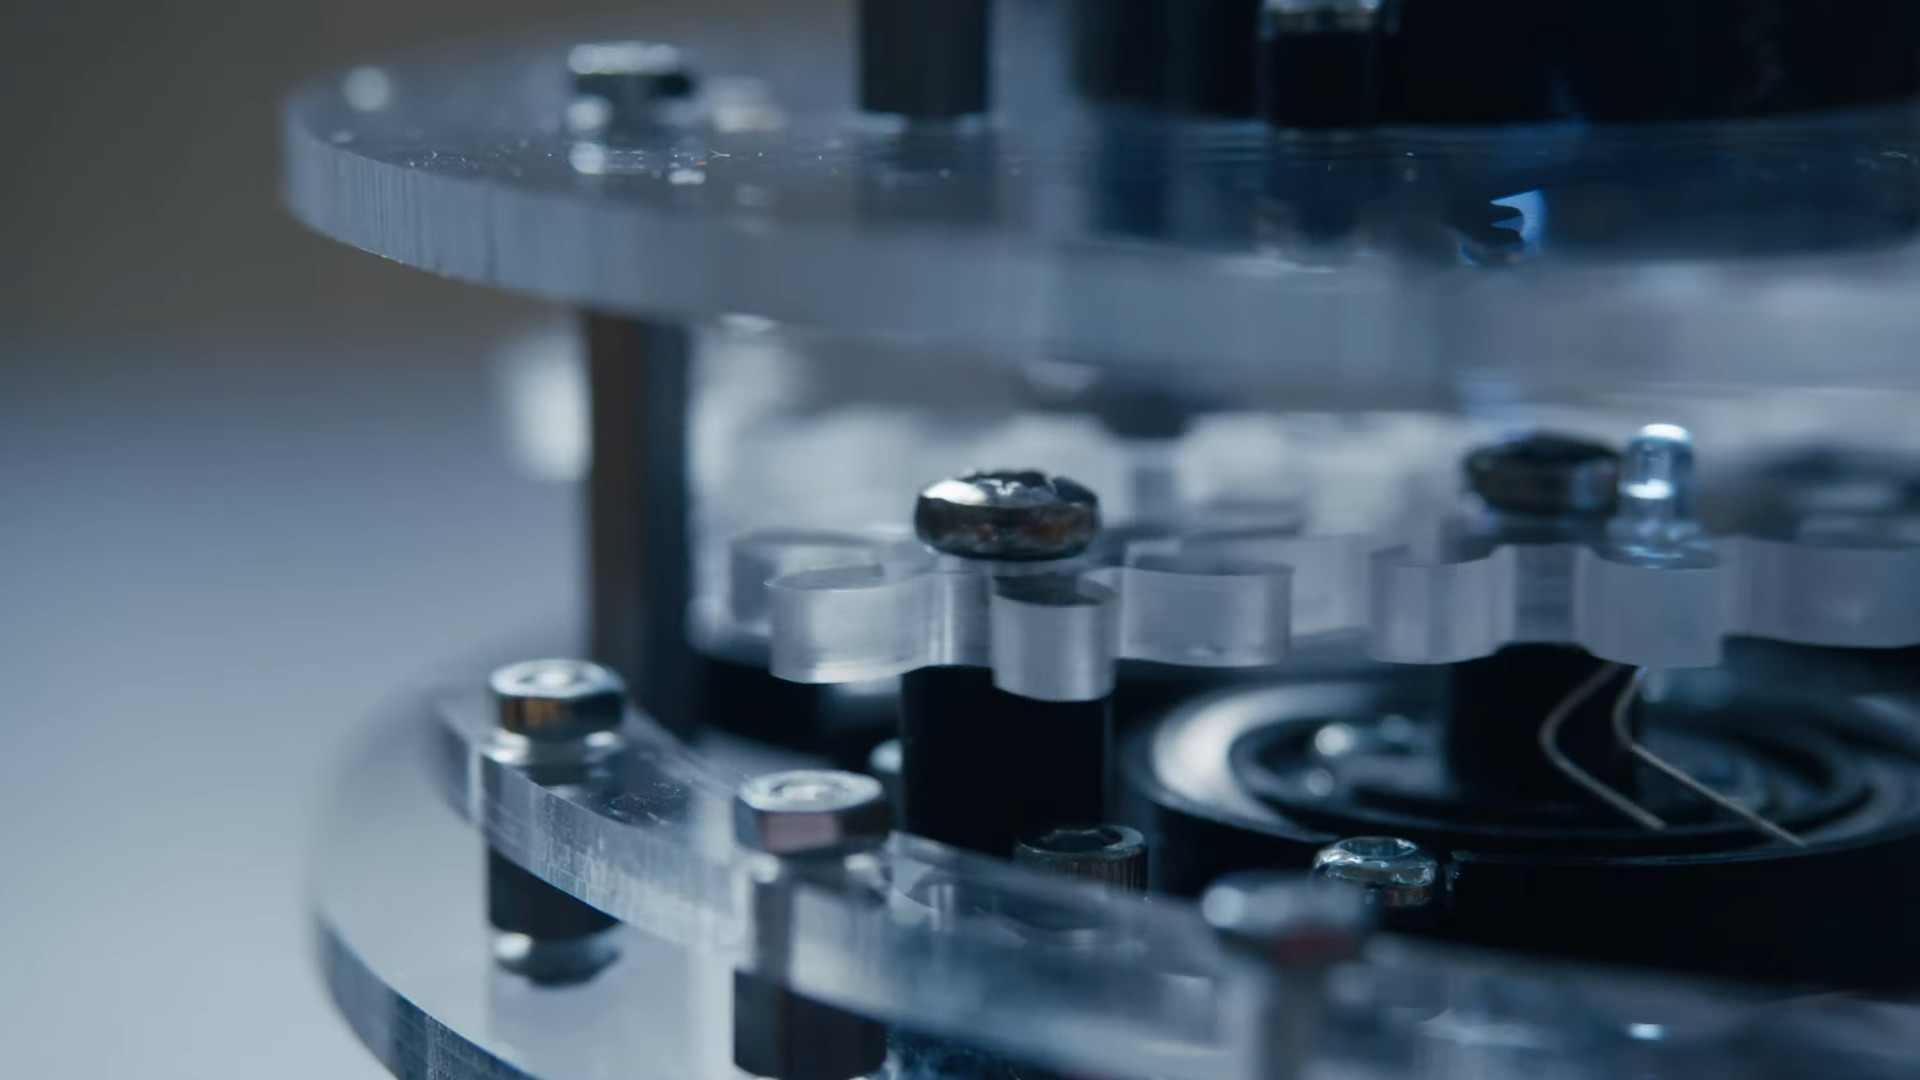
We absolutely love the impetus of this project, as it definitely sounds like something a Hackaday reader would go through. After finally deciding between a CNC router and a laser cutter, [Eirik Brandal] was planning to “Hello, World” the CNC with something quick and simple, like maybe a few acrylic plates with curves and some electronics. Instead, feature creep took over, “things escalated out of control”, and [Eirik] came up with this intriguing and complicated kinetic sculpture.
As you’ll see in the demo video below, this is a motor-driven sculpture with sound and intermittent light. It has an Arduino Nano Every, two motors, and eight gears with various cog counts to accommodate the project. The light comes from LEDs that are attached to the DIY gears with their legs bent and their little feet sliding around homemade slip rings in order to alight.
But what about the sound? There’s an affixed piezo disk that picks up the gears’ vibrations and chafing, and this gets amplified to augment the acoustic sounds of the sculpture. Be sure to check out the quite satisfying demo video after the break, and stick around for the build video.
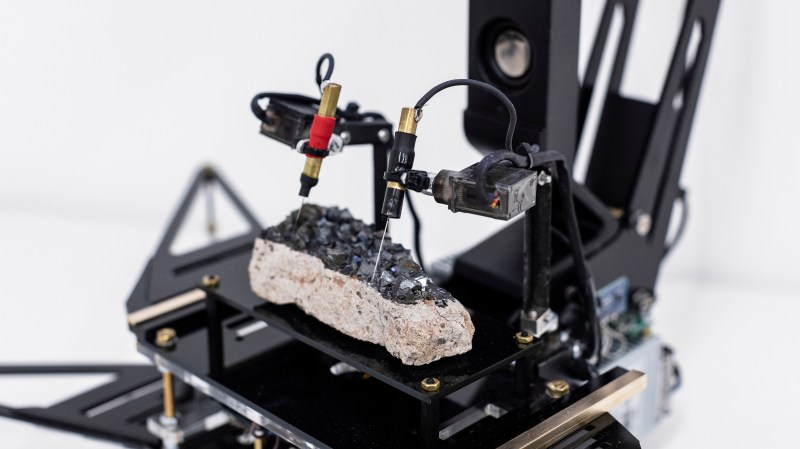
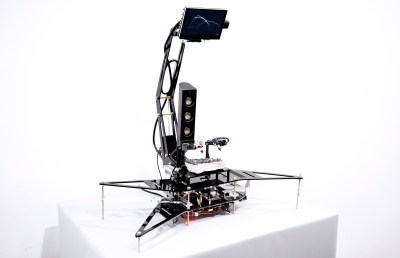
Well, noises anyway. [Dmitry Morozov] and [Alexandra Gavrilova] present an interesting electronics-based art installation, which probes a large chunk of crystalline magnetite, using a pair of servo-mounted probes, ‘measuring’ the surface conductivity and generating some sound and visuals.
It appears to have only one degree of freedom per probe, so we’re not so sure all that much of the surface gets probed per run, but however it works it produces some interesting, almost random results. The premise is that the point-to-point surface resistivity is unpredictable due to the chaotically formed crystals all jumbled up, but somehow uses these measured data to generate some waveshapes vaguely reminiscent of the resistivity profile of the sample, the output of which is then fed into a sound synthesis application and pumped out of a speaker. It certainly looks fun.
From a constructional perspective, hardware is based around a LattePanda fed samples by an ADS1115 ADC, which presumably is also responsible for driving the LCD monitor and the sound system. An Arduino is also wedged in there perhaps for servo-driving duty, maybe also as part of the signal chain from the probes, but that is just a guess on our part. The software uses the VVVV (Visual Live-programming suite) and the Pure Data environment.
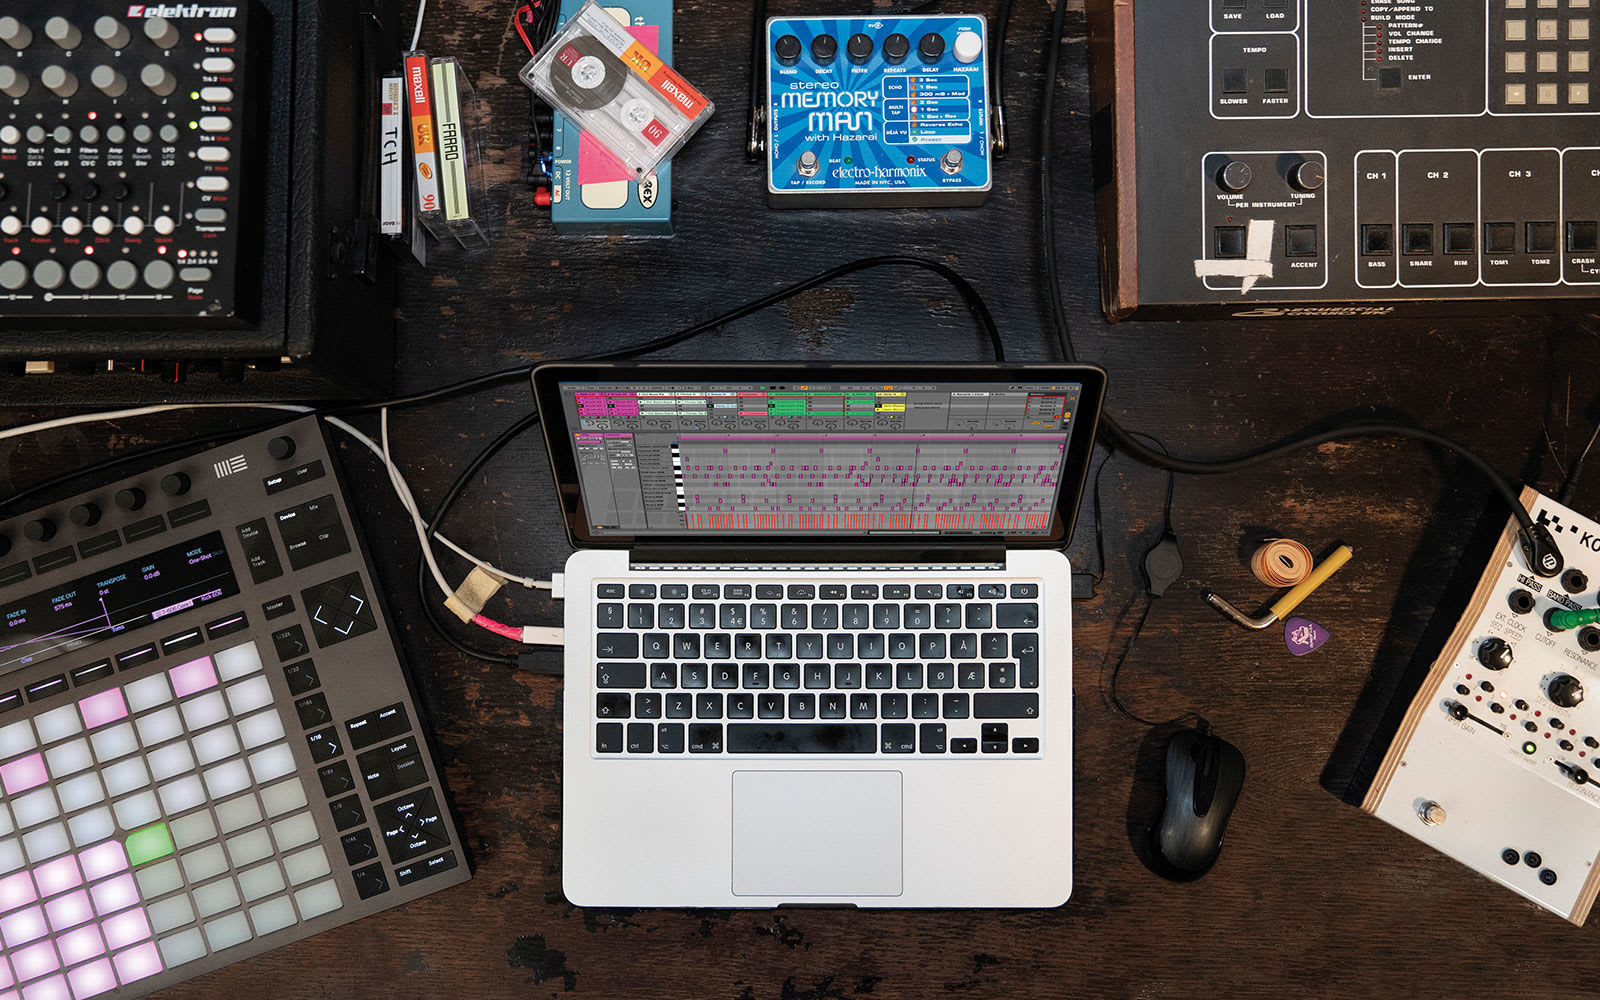
These days it’s not necessary to go to a giant studio with overpriced, pro-grade gear to record a Grammy-winning record. You can do it right from the comfort of your own bedroom in fact, using tools priced for even the most casual of hobbyists. It's not news that the tools of creation or the avenues for distributing art are accessible to more people than ever. But the cultural institutions that have dominated popular music for so long can no longer ignore the bedroom producer or budding Soundcloud star.
Maybe you've been inspired to build your own home recording studio. And maybe, you're not quite sure where to start. Well, an audio interface, a good mic and a decent set of headphones will get you pretty far. But the first thing you'll need is probably staring you right in the face: a computer.
Computer and a DAW
Justin DeLay, Director of Product and Category Marketing at Reverb, drives home just how important the computer is: "You can strip away everything else and as long as you have a computer you can still create music," he told me. He suggests you "spend the money on a good computer and get other gear — such as audio interfaces, mics, headphones, etc. — used or at reasonable price points."
But, truthfully, you can do quite a lot with whatever computer you have on hand. Joe Pecora, the engineer and producer at Red Room Studio, says your set up "could be as simple as an iPhone/iPad with Garage band." (I know someone who recorded an entire album this way.) While he agrees that the most important part is your computer, he argues it doesn't have to be super powerful. It doesn't even have to be a desktop. JDilla famously created many of his beats on a Roland SP303, and you can basically recreate that experience with an iPad and the $4 Koala Sampler for iOS. And don't forget that Gorillaz recorded an entire album on an iPad.
Which leads us to the next thing you'll need: a DAW, or digital audio workstation. If you're a Mac user, then you're lucky enough to have access to Garage Band, a surprisingly capable free option. And upgrading to Logic Pro X is only a $200 investment. If you're on Windows (or just don't like Logic), I often recommend Ableton Live (starting at $99). But honestly there are plenty of great options out there, like FL Studio, BitWig and Cubase all of which start at $99. And often, stripped down versions come free as part of a software bundle when you buy music-making hardware like MIDI controllers and audio interfaces.
Assuming you already have a computer and you just need the accessories to get recording, you can pick up everything you need for under $500 new. But, if you’re patient, you could build a well equipped bedroom studio with used gear for as little as $250.
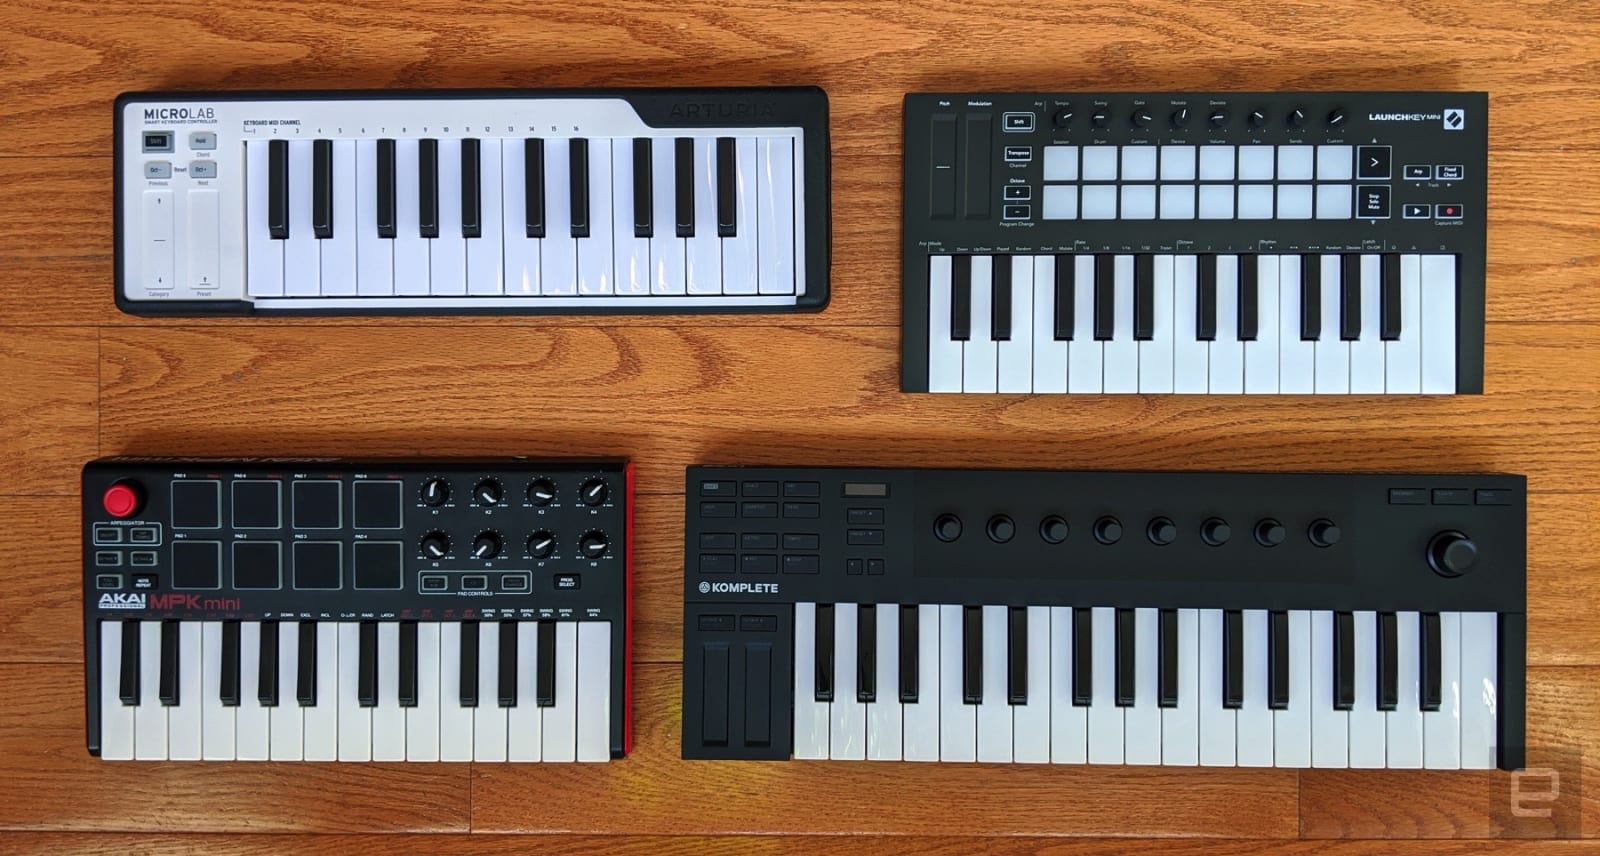
MIDI controller
Speaking of which, one of the first additions to your studio should be a MIDI controller. DeLay says this is a piece of gear often overlooked by beginners. "It's not just for playing keyboard sounds," he explained, "it can be used to write drums and percussion, to control mixes and more. It's the creative interface of music production, and you don't have to play the piano in order to harness its power."
Unfortunately there's no gear that will magically turn you into a breathy pop goddess, but a decent mic and audio interface can at least help you sound your best. Now, you could get a USB microphone, like Blue Microphones’ $130 Yeti, and it will certainly get the job done. Heck, that album I mentioned earlier was recorded using the wired headset that came with the iPhone.
But, honestly, your better bet is to get a regular XLR mic and an audio interface. Pecora specifically warns against splurging too much here. "People will look at their favorite artist and see that they use a certain mic or preamp or plugin and want to use the same thing thinking it will get them the same sound." On early singles like "Ocean Eyes" Billie Eilish used an Audio-Technica AT2020 condenser mic, which costs just $100. And I’ve stuck almost exclusively with cheap Shure SM58s and 57s ($100 new, $50-$75 used) whether I was recording demos with my band in college or voice over for review videos at Engadget.
If you fancy yourself a future pop sensation and want to make sure your vocals are the star of the show, you could consider using a significant chunk of your budget on something like the Rode NT1-A ($229) or Shure SM7B ($390). You will get better results with more flexibility for post production, but you can clearly get excellent results with more affordable options.
Audio interface
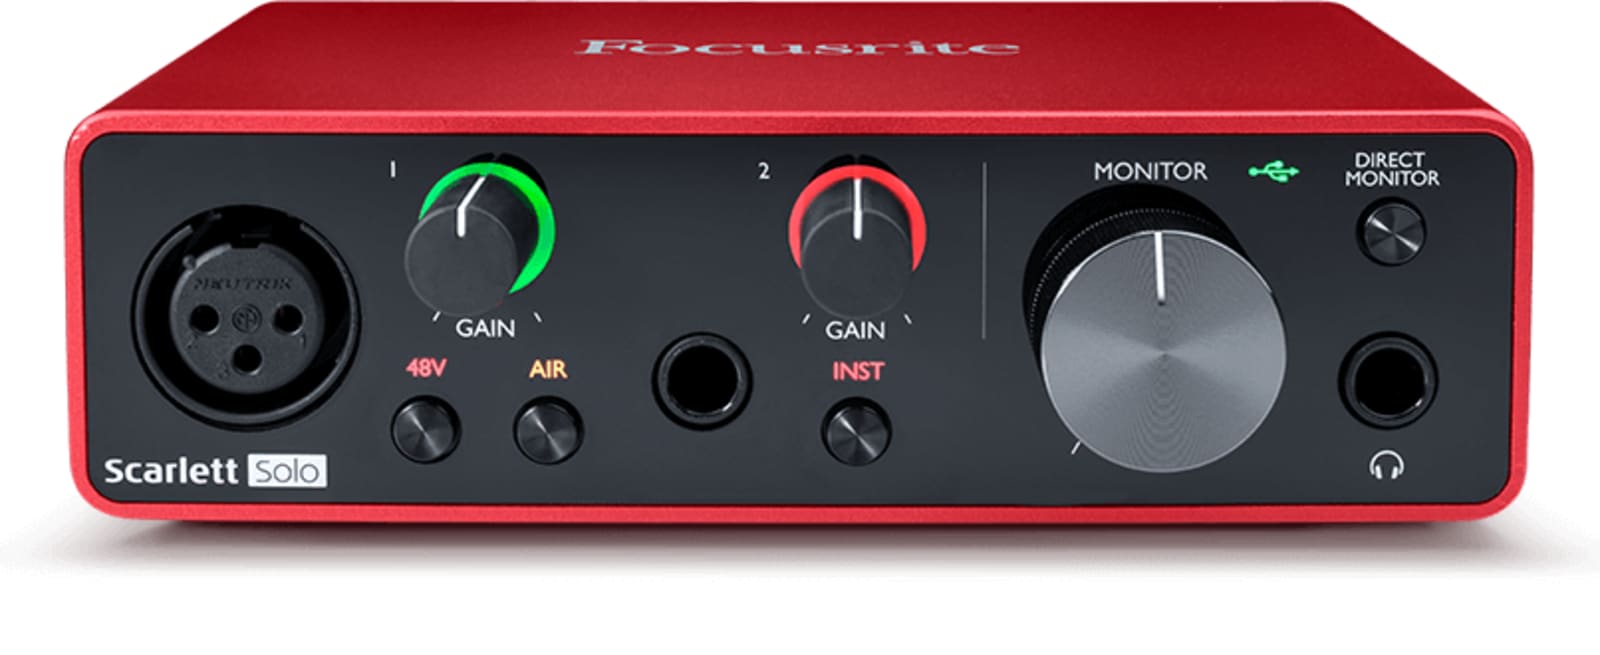
As for the interface, there are tons of great options out there. Companies like Focusrite, Arturia and Tascam make excellent ones. But our new favorites in the budget interface space are Universal Audio’s Volt series. If your budget allows for it we strongly recommend the $299 Volt 276. Though, the $189 Volt 2 is also excellent, it just doesn’t standout from the crowd quite as much.
If you’re trying to save a few bucks, it's hard to beat the Scarlett series from Focusrite (just make sure to get the second- or third-gen models). You can get the latest Scarlett 2i2 for around $130 used, but it's just $180 new (and includes a huge bundle of very useful software).
The reason to opt for an audio interface instead of a simple USB mic is because it offers you a lot more flexibility and room to grow. For one, it offloads a lot of the audio processing from the CPU. Second, it will allow you to connect not just mics (and swap in different ones for different purposes), but also instruments, turntables or anything with an audio-out jack. An audio interface is also necessary if you plan to connect a pair of studio monitors.
Studio monitors and headphones
This is an area that DeLay advises caution. While a good set of studio monitors will obviously be better than the speakers on your laptop and will result in a better mix, it's too easy to get caught up in what he calls monitor envy. "The reality is that monitors at a $300 price point are going to work just fine in most spaces," he says. Plus, your bedroom probably doesn't have the space to really make the most of large, powerful monitors. So, save your money.
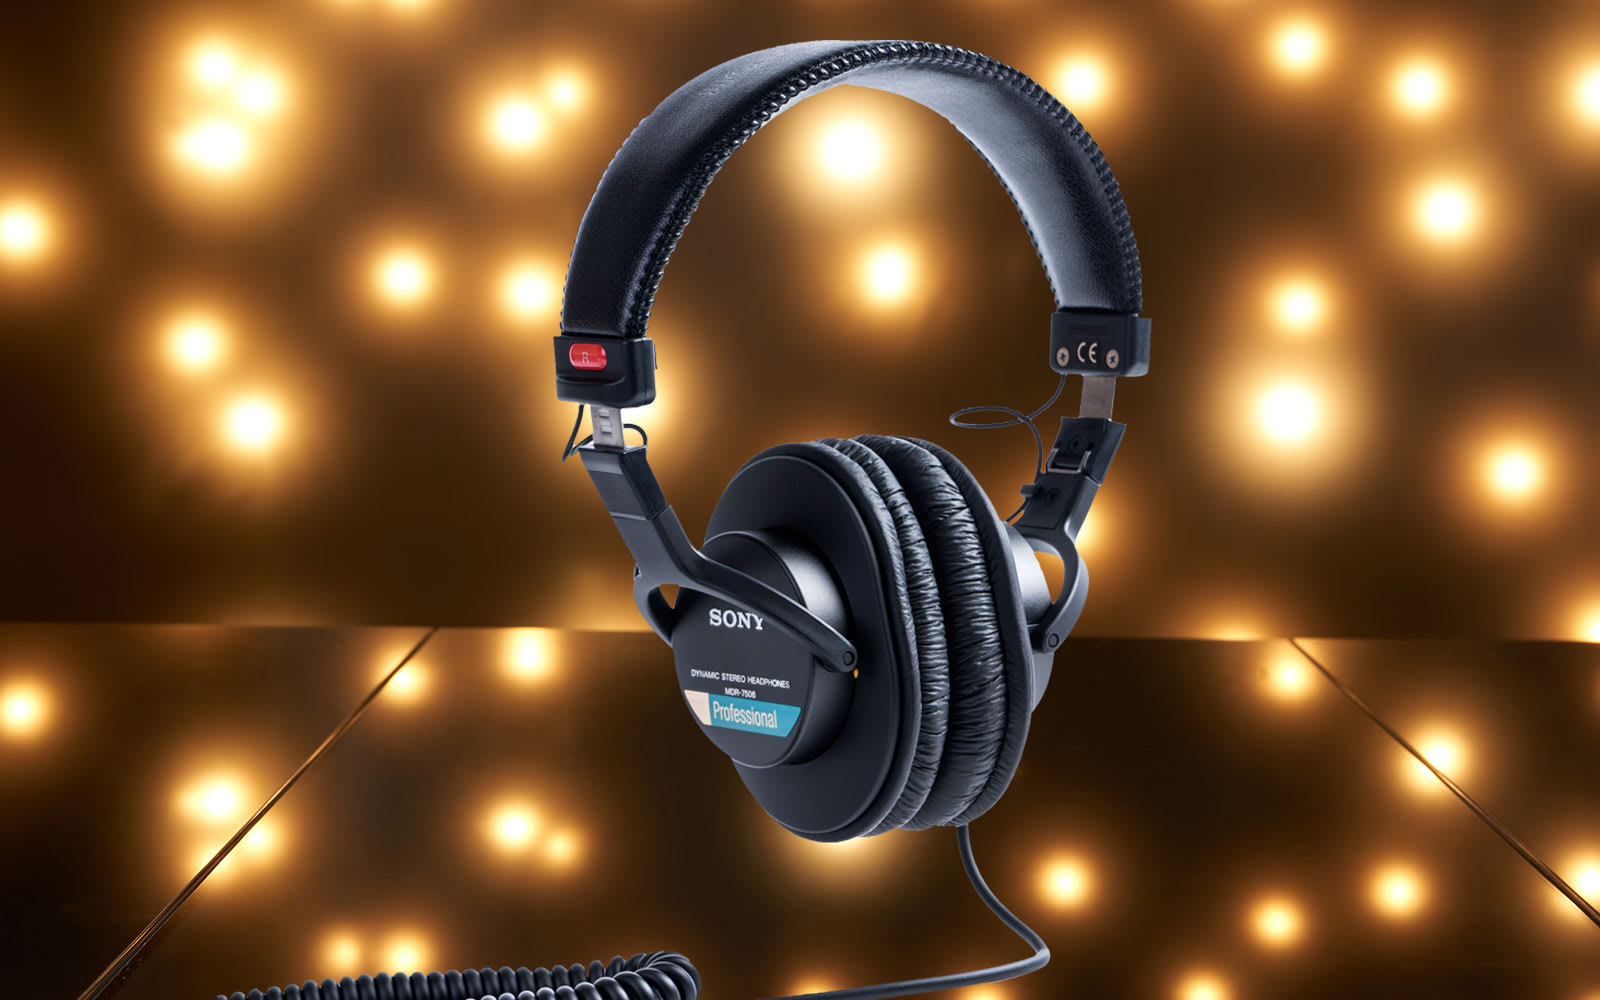
And if you're just starting out, you're probably better off getting a decent set of headphones. There're tons of amazing and affordable studio quality headphones out there for under $200, like the $179 Beyerdynamic DT990PRO (currently down to just $179 on Amazon). But one of our favorites is an old workhorse from Sony, the MDR-7506. They're well under $100 and actual pros have used them for decades to mix music.
One tip DeLay offers for novices: Double check your mixes in the real world. Headphones can over emphasize bass, while smaller studio monitors can have trouble delivering accurate bass response. So make sure to listen to your track on laptop speakers or in a car to get a sense of how it will sound in the wild.
And that's really the key — have the patience to develop your skills and make the most of the gear you have. It's really easy to catch a bad case of GAS (gear acquisition syndrome) when you're first starting out — trust me, I know. But there's no need to shell out thousands of dollars for high-end gear to start making music. You don't even need to buy new gear. Pecora suggests the only thing you absolutely should buy new are headphones. And, presumably, that's just because you don't want to be wearing years worth of someone else's sweat on your ears.
Images: Getty Creative (home studio); Ableton (Ableton Live running on laptop); Focusrite (Scarlett Solo); Will Lipman / Engadget (Arturia KeyStep, Sony MDR-7506)
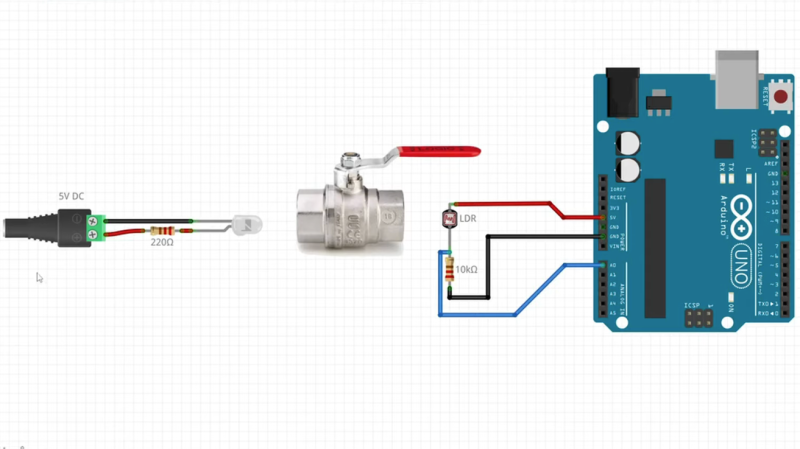
Input devices that can handle rough and tumble environments aren’t nearly as varied as their more fragile siblings. [Alastair Aitchison] has devised a brilliant way of detecting inputs from plumbing valves that opens up another option. (YouTube) [via Arduino Blog]
While [Aitchison] could’ve run the plumbing valves with water inside and detected flow, he decided the more elegant solution would be to use photosensors and an LED to simplify the system. This avoids the added cost of a pump and flow sensors as well as the questionable proposition of mixing electronics and water. By analyzing the change in light intensity as the valve closes or opens, you can take input for a range of values or set a threshold for an on/off condition.
[Aitchison] designed these for an escape room, but we can see them being great for museums, amusement parks, or even for (train) simulators. He says one of the main reasons he picked plumbing valves was for their aesthetics. Industrial switches and arcade buttons have their place, but certainly aren’t the best fit in some situations, especially if you’re going for a period feel. Plus, since the sensor itself doesn’t have any moving parts, these analog inputs will be easy to repair should anything happen to the valve itself.
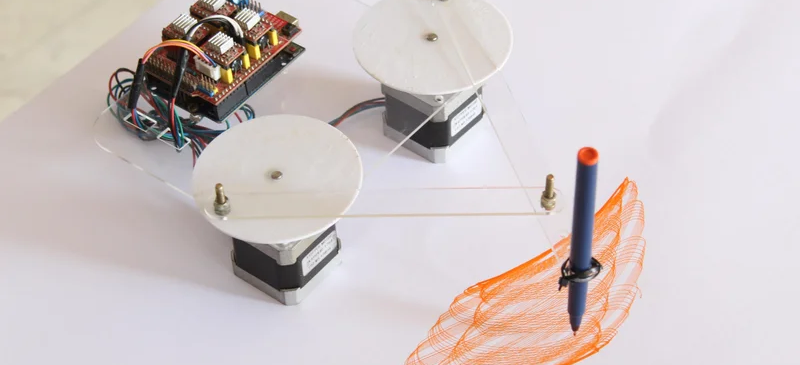
The holidays always remind us of our favorite toys from when we were kids. Johnny Astro, an Erector set, and — of course — a Spirograph. [CraftDiaries] has an Arduino machine that isn’t quite a Spirograph, but it sure reminds us of one. The Arduino drives two stepper motors that connect to a pen that can create some interesting patterns.
The build uses a few parts that were laser cut, but they don’t look like they’d be hard to fabricate using conventional means or even 3D printing. The author even mentions you could make them out of cardboard or foamboard if you wanted to.
The electronics are straightforward with two stepper drivers. We couldn’t help but think that some of the old 3D printer motherboards we have laying around here could handle this very easily. However, in this project, the CPU is an ordinary UNO with a CNC shield to drive the motors.
Of course, the real trick is the software. Apparently, the different patterns come from the relationship between the delay between steps of the right motor and that of the left motor. There’s got to be some math behind that, but the patterns are certainly pretty.
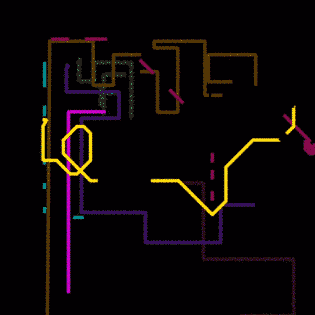
With the world opening up again, [Niklas Roy] and [Kati Hyyppä] have been busy making a public and collaborative project. Meet the Vektor Kollektor, a portable drawing machine experience, complete with a chip-tune soundtrack. It’s great to see public art meet the maker community with zero pretension and a whole lot of fun!
The build started with an HP7475A pen plotter from the 80s, one that was DOA (or was fried during initial testing). [Niklas] and [Kati] kept the mechanism but rebuilt the controls allowing for easy integration with an Arduino Nano and to be powered with a motorcycle battery.
The magic seems to be less in the junk-bin build (which is great) and more in the way this team extended the project. Using a joystick with arcade buttons as an input, they carted Vektor Kollektor to public parks and streets where they invited others to make art. The Kollekted drawings are available on a gallery website in a very cool animated form, freely available for download, on t-shirts, 3D prints, and on coffee mugs because, why not?
Some select drawings are even spray-painted on walls using a large plotter, and we really hope [Niklas Roy] and [Kati Hyyppä] share details on that build soon. Of course this comes hot on the heels of the workshop window cyborg we saw from these two hardware artists.
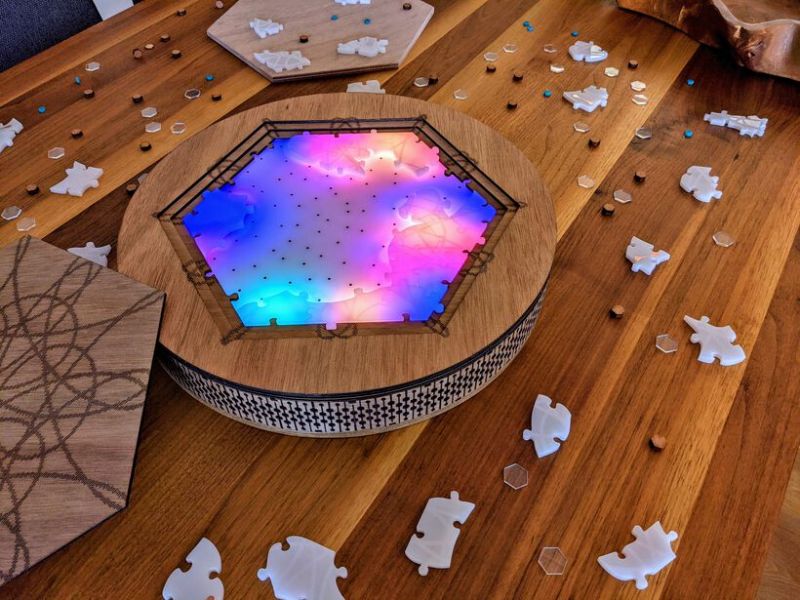
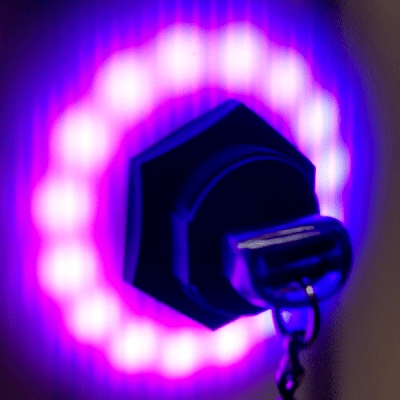
Putting the last piece of a project together and finally finishing it up is a satisfying feeling. When the last piece of a puzzle like that is a literal puzzle, though, it’s even better. [Nadieh] has been working on this jigsaw puzzle that displays a fireworks-like effect whenever a piece is placed correctly, using a lot of familiar electronics and some unique, well-polished design.
The puzzle is a hexagonal shape and based on a hexagonally symmetric spirograph, with the puzzle board placed into an enclosure which houses all of the electronics. Each puzzle piece has a piece of copper embedded in a unique location so when it is placed on the board, the device can tell if it was placed properly or not. If it was, an array of color LEDs mounted beneath a translucent diffuser creates a lighting effect that branches across the entire board like an explosion. The large number of pieces requires a multiplexer for the microcontroller, an ATtiny3216.
This project came out of a FabAcademy, so the documentation is incredibly thorough. In fact, everything on this project is open sourced and available on the project page from the code to the files required for cutting out the puzzle pieces and the enclosure. It’s an impressive build with a polish we would expect from a commercial product, and reminds us of an electrified jigsaw puzzle we saw in a previous build.
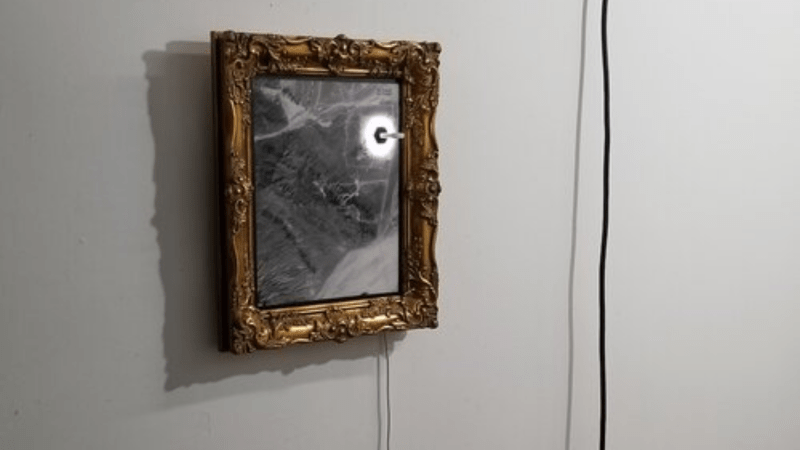
Over the years, artists have been creating art depicting weapons of mass destruction, war and human conflict. But the weapons of war, and the theatres of operation are changing in the 21st century. The outcome of many future conflicts will surely depend on digital warriors, huddled over their computer screens, punching on their keyboards and maneuvering joysticks, or using devious methods to infect computers to disable or destroy infrastructure. How does an artist give physical form to an unseen, virtual digital weapon? That is the question which inspired [Mac Pierce] to create his latest Portrait of a Digital Weapon.
[Mac]’s art piece is a physical depiction of a virtual digital weapon, a nation-state cyber attack. When activated, this piece displays the full code of the Stuxnet virus, a worm that partially disabled Iran’s nuclear fuel production facility at Natanz around 2008.
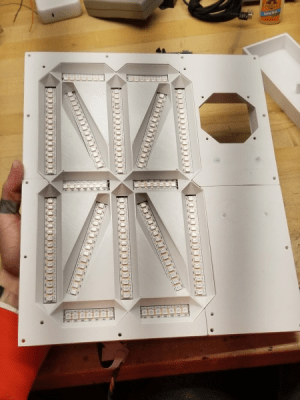
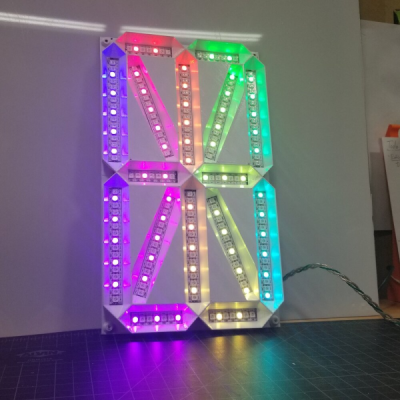
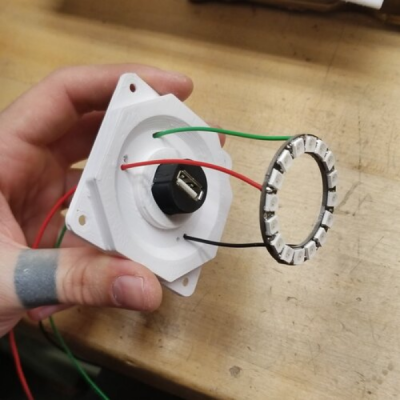
It took a while for [Mac] to finalize the plan for his design. He obtained a high resolution satellite image of the Iranian Natanz facility via the Sentinel Hub satellite imagery service. This was printed on a transparent vinyl and glued to a translucent poly-carbonate sheet. Behind the poly-carbonate layer, he built a large, single digit 16-segment display using WS2812 addressable LED strips, which would be used to display the Stuxnet code. A bulkhead USB socket was added over the centrifuge facility, with a ring of WS2812 LEDs surrounding the main complex. When a USB stick is plugged in, the Stuxnet code is displayed on the 16-segment display, one character at a time. At random intervals, the LED ring around the centrifuge building lights up spinning in a red color to indicate centrifuge failure.
The 16-segment display was built on an aluminum base plate, with 3D printed baffles to hold the LED strips. To hold the rest of the electronics, he built a separate 3D printed frame which could be added to the main art frame. Since this was too large to be printed in one piece on the 3D printer, it was split in parts, which were then joined together using embedded metal stud reinforcement to hold the parts together. Quite a nice trick to make large, rigid parts.
An Adafruit Feather M0 micro-controller board, with micro SD-card slot was the brains of the project. To derive the 5 V logic data signal from the 3.3 V GPIO output of the Feather, [Mac] used two extra WS2812 LEDs as level shifters before sending the data to the LED strips. Driving all the LEDs required almost 20 W, so he powered it using USB-C, adding a power delivery negotiation board to derive the required juice.
The Arduino code is straightforward. It reads the characters stored on the SD-card, and sends them sequentially to the 16-segment display. The circular ring around the USB bulkhead also lights up white, but at random intervals it turns red to simulate the speeding up of the centrifuges. Detecting when the USB stick gets plugged in is another nice hack that [Mac] figured out. When a USB stick is plugged in, the continuity between the shell (shield) and the GND terminal was used to trigger a GPIO input.
Cyber warfare is here to stay. We are already seeing increasing attacks on key infrastructure installations by state as well as non-state actors around the world. Stuxnet was one of the first in this growing category of malicious, weaponized code. Acknowledging its presence using such a physical representation can offer a reminder on how a few lines of software can wreak havoc just as much as any other physical weapon. Check out the brief project video after the break.


 probed per run, but however it works it produces some interesting, almost random results. The premise is that the point-to-point surface resistivity is unpredictable due to the chaotically formed crystals all jumbled up, but somehow uses these measured data to generate some waveshapes vaguely reminiscent of the resistivity profile of the sample, the output of which is then fed into a sound synthesis application and pumped out of a speaker. It certainly looks fun.