Posts with «medical hacks» label

Pill Dispenser To Keep You On Track

When forgetting to take medication on time can lead to a bad day or night, having a helper to keep you on track can greatly improve your life. [M. Bindhammer] faces this scenario every day, so he built his own robotic pill dispenser.

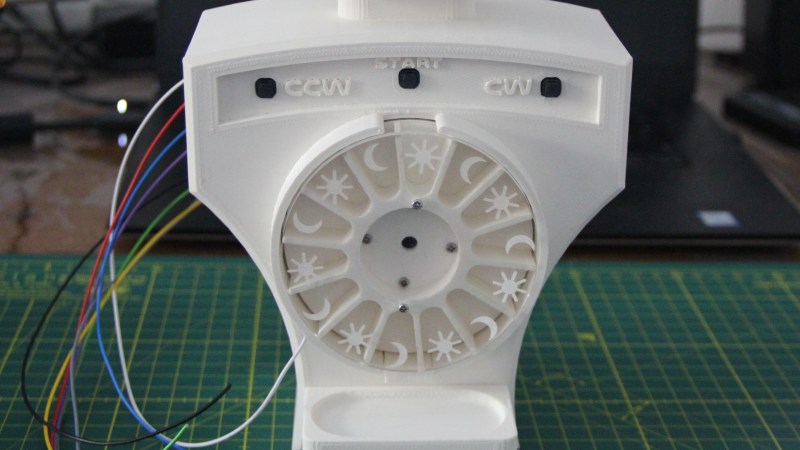
The core of the project is a 3D printed dispensing drum with individual pockets for morning and evening medication. It is mounted directly to a 360° winch servo, normally used for RC sailboats, while a second conventional servo opens a small sliding door to drop the pills onto the dispensing tray. The tray integrates a sensitive touch sensor which can detect when [M] picks up the pills, without being triggered by the pills themselves.

[M. Bindhammer] also included a small but loud speaker, connected to a speech synthesis module for audio reminders. The main controller is a Arduino Due with a custom breakout shield that also integrates a DS3231 real time clock. All the electronics are enclosed in a 80’s style humanoid robot-shaped body, with dispensing drum on its chest, and an OLED screen as it’s face.

The end result is a very polished build, which should make [M. Bindhammer]’s life with bipolar disorder a little bit easier, and he hopes it might help others as well.

For more medication related gadgets, take a peek at another pill dispenser and a 3D printed dosing spoon to replace an essential but discontinued commercial version.

Wearable Sensor Trained to Count Coughs

There are plenty of problems that are easy for humans to solve, but are almost impossibly difficult for computers. Even though it seems that with modern computing power being what it is we should be able to solve a lot of these problems, things like identifying objects in images remains fairly difficult. Similarly, identifying specific sounds within audio samples remains problematic, and as [Eivind] found, is holding up a lot of medical research to boot. To solve one specific problem he created a system for counting coughs of medical patients.

This was built with the idea of helping people with chronic obstructive pulmonary disease (COPD). Most of the existing methods for studying the disease and treating patients with it involves manually counting the number of coughs on an audio recording. While there are some software solutions to this problem to save some time, this device seeks to identify coughs in real time as they happen. It does this by training a model using tinyML to identify coughs and reject cough-like sounds. Everything runs on an Arduino Nano with BLE for communication.

While the only data the model has been trained on are sounds from [Eivind], the existing prototypes do seem to show promise. With more sound data this could be a powerful tool for patients with this disease. And, even though this uses machine learning on a small platform, we have seen before that Arudinos are plenty capable of being effective machine learning solutions with the right tools on board.

Hack a Day 16 Nov 00:00

DIY Arduino Hearing Test Device

Hearing loss is a common problem for many – especially those who may have attended too many loud concerts in their youth. [mircemk] had recently been for a hearing test, and noticed that the procedure was actually quite straightforward. Armed with this knowledge, he decided to build his own test system and document it for others to use.

Resultant audiogram from the device showing each ear in a different color

By using an Arduino to produce tones of various stepped frequencies, and gradually increasing the volume until the test subject can detect the tone, it is possible to plot an audiogram of hearing threshold sensitivity.  Testing each ear individually allows a comparison between one side and the other.

[mircemk] has built a nice miniature cabinet that holds an 8×8 matrix of WS2812 addressable RGB LEDs.  A 128×64 pixel OLED display provides user instructions, and a rotary encoder with push-button serves as the user input.

Of course, this is not a calibrated professional piece of test equipment, and a lot will depend on the quality of the earpiece used.  However, as a way to check for gross hearing issues, and as an interesting experiment, it holds a lot of promise.

There is even an extension, including a Class D audio amplifier, that allows the use of bone-conduction earpieces to help narrow down the cause of hearing loss further.

There’s some more information on bone conduction here, and we’ve covered an intriguing optical stimulation cochlear implant, too.

HDD Centrifuge Puts COVID-19 Testing Lab in a Backpack

Throughout this two-year global COVID-19 nightmare, one thing that has been sorely lacking is access to testing. “Flu-like symptoms” covers a lot of ground, and knowing if a sore throat is just a sore throat or something more is important enough that we’ve collectively plowed billions into testing. Unfortunately, the testing infrastructure remains unevenly distributed, which is a problem this backpack SARS-CoV-2 testing lab aims to address.

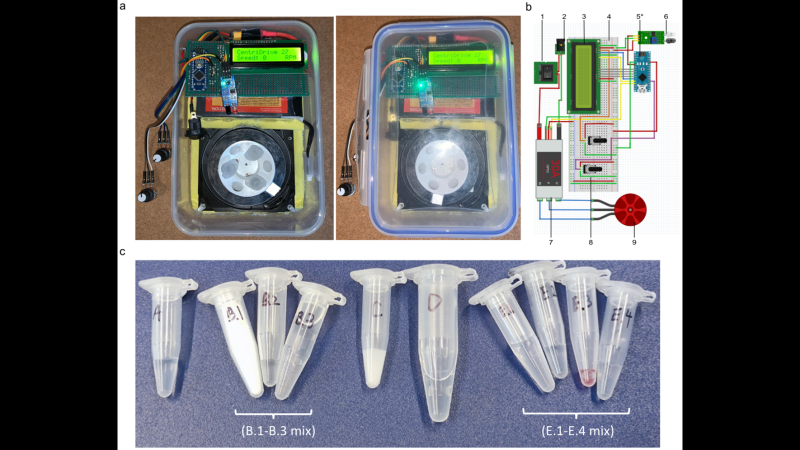
The portable lab, developed by [E. Emily Lin] and colleagues at the Queen Mary University of London, uses a technique called LAMP, for loop-mediated isothermal amplification. LAMP probably deserves an article of its own to explain the process, but suffice it to say that like PCR, LAMP amplifies nucleic acid sequences, but does so without the need for expensive thermal cycling equipment. The kit contains a microcentrifuge that’s fashioned from an e-waste hard drive, a 3D printed rotor, and an Arduino to drive the motor and control the speed. The centrifuge is designed to run on any 12 VDC source, meaning the lab can be powered by a car battery or solar panel if necessary. Readout relies on the trusty Mark I eyeball and a pH-indicating buffer that changes color depending on how much SARS-CoV-2 virus was in the sample.

Granted, the method used here still requires more skill to perform than a simple “spit on a stick” rapid antigen test, and it’s somewhat more subjective than the “gold standard” quantitative polymerase chain reaction (qPCR) assay. But the method is easily learned, and the kit’s portability, simple design, and low-cost construction could make it an important tool in attacking this pandemic, or the next one.

Thanks to [Christian Himmler] for the tip.

PsyLink An Open Source Neural Interface For Non-Invasive EMG

We don’t see many EMG (electromyography) projects, despite how cool the applications can be. This may be because of technical difficulties with seeing the tiny muscular electrical signals amongst the noise, it could be the difficulty of interpreting any signal you do find. Regardless, [hut] has been striving forwards with a stream of prototypes, culminating in the aptly named ‘Prototype 8’

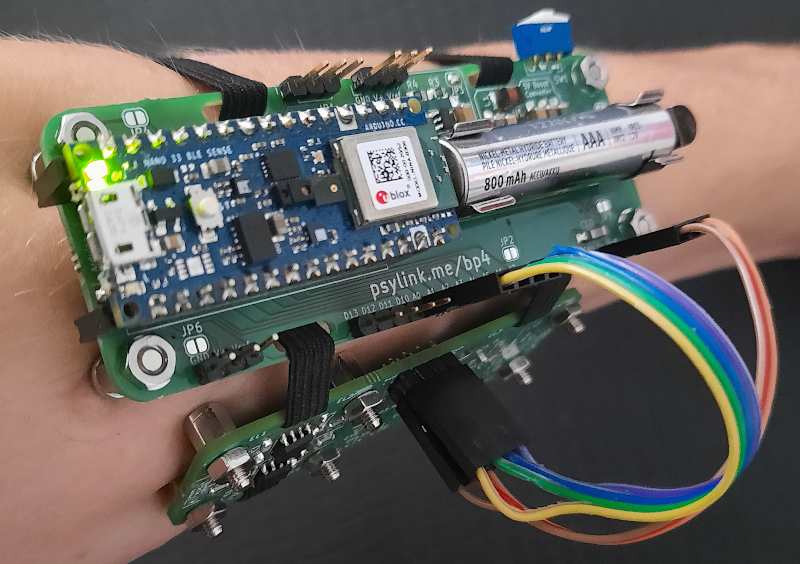
The current prototype uses a main power board hosting an Arduino Nano 33 BLE Sense, as well as a boost converter to pump up the AAA battery to provide 5 volts for the Arduino and a selection of connected EMG amplifier units. The EMG sensor is based around the INA128 instrumentation amplifier, in a pretty straightforward configuration. The EMG samples along with data from the IMU on the Nano 33 BLE Sense, are passed along to a connected PC via Bluetooth, running the PsyLink software stack. This is based on Python, using the BLE-GATT library for BT comms, PynPut handing the PC input devices (to emit keyboard and mouse events) and tensorflow for the machine learning side of things. The idea is to use machine learning from the EMG data to associate with a specific user interface event (such as a keypress) and with a little training, be able to play games on the PC with just hand/arm gestures. IMU data are used to augment this, but in this demo, that’s not totally clear.

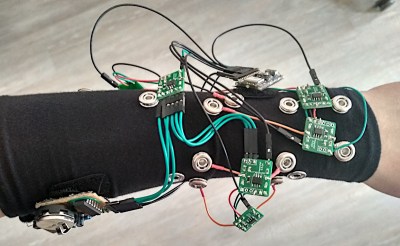
An earlier prototype of the PsyLink.

All hardware and software can be found on the project codeberg page, which did make us double-take as to why GnuRadio was being used, but thinking about it, it’s really good for signal processing and visualization. What a good idea!

Obviously there are many other use cases for such a EMG controlled input device, but who doesn’t want to play Mario Kart, you know, for science?

Checkout the demo video (embedded below) and you can see for yourself, just be aware that this is streaming from peertube, so the video might be a little choppy depending on your local peers. Finally, if Mastodon is your cup of tea, here’s the link for that. Earlier projects have attempted to dip into EMG before, like this Bioamp board from Upside Down Labs. Also we dug out an earlier tutorial on the subject by our own [Bil Herd.]

ECG Project With All the Messy Safety Details

We’ve seen a number of heart rate monitoring projects on Hackaday, but [Peter’s] electrocardiography (ECG) Instructable really caught out attention.

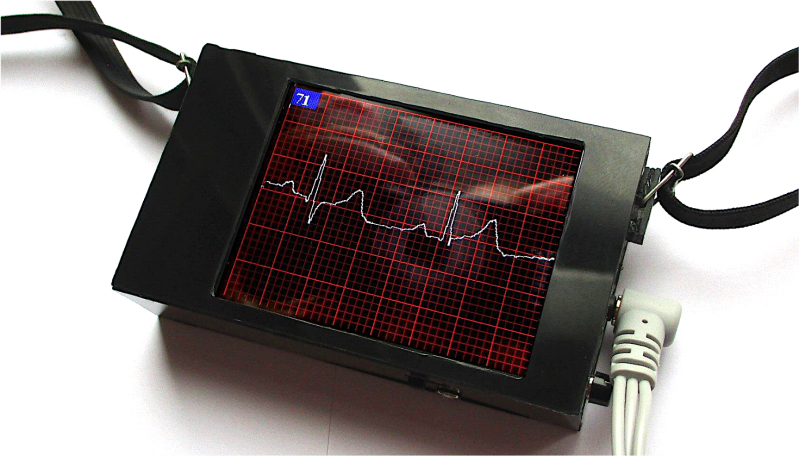
If you’ve followed Hackaday for any period of time, you’re probably already somewhat familiar with the hardware needed to record the ECG. First, you need a high input impedance instrumentation amplifier to pick up the millivolt signal from electrical leads carefully placed on the willing subject’s body. To accomplish this, he used an AD8232 single-lead ECG module (we’ve actually seen this part used to make a soundcard-based ECG). This chip has a built-in instrumentation amplifier as well as an optional secondary amplifier for additional gain and low-pass filtering. The ECG signal is riddled with noise from mains that can be partially attenuated with a simple low-pass filter. Then, [Peter] uses an Arduino Nano to sample the output of the AD8232, implement a digital notch filter for added mains noise reduction, and display the output on a 2.8″ TFT display.
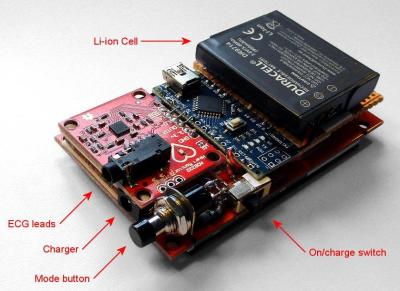
Other than the circuit itself, two things about his project really caught our attention. [Peter] walks the reader through all the different safety considerations for a commercial ECG device and applies these principles to his simple DIY setup to ensure his own safety. As [Peter] put it, professional medical electronics should follow IEC 60601. It’s a pretty bulky document, but the main tenets quoted from [Peter’s] write-up are:

  1. limiting how much current can pass through the patient
  2. how much current can I pass through the patient?
  3. what electrical isolation is required?
  4. what happens if a “component” fails?
  5. how much electromagnetic interference can I produce?
  6. what about a defibrillator?

[Peter] mentions that his circuit itself does not fully conform to the standard (though he makes some honest attempts), but lays out a crude plan for doing so. These include using high-valued input resistors for the connections to the electrodes and also adding a few protection diodes to the electrode inputs so that the device can withstand a defibrillator. And of course, two simple strategies you always want to follow are using battery power and placing the device in a properly shielded enclosure.

[Peter] also does a great job breaking down the electrophysiology of the heart and relates it to terms maybe a bit more familiar to non-medical professionals. Understanding the human heart might be a little less intimidating if we relate the heart to a simple voltage source like a battery or maybe even a function generator. You can imagine the ions in our cells as charger carriers that generate electrical potential energy and nerve fibers as electrical wires along which electrical pulses travel through the body.

Honestly, [Peter] has a wealth of information and tools presented in his project that are sure to help you in your next build. You might also find his ECG simulator code really handy and his low-memory display driver code helpful as well. Cool project, [Peter]!

Measuring ECG is something that is near and dear to my heart (sorry, couldn’t resist). Two of my own projects that were featured on Hackaday before I became a writer here include a biomedical sensor suite in Arduino shield form factor, and a simple ECG built around an AD623 instrumentation amplifier.
Handwashing Timer Makes Sure the Suds Stay On Long Enough

“Twinkle, Twinkle, Little Star”? How we wonder why you’d resort to singing a ditty to time your handwashing when you can use your social isolation time to build a touch-free electronic handwash timer that the kids — and you — might actually use.

Over the last few months, pretty much everyone on the planet has been thrust into strange, new, and oftentimes scary practices to limit the spread of the SARS-CoV-2virus and the disease it causes, COVID-19. Judging by the number of people we’ve seen leaving public restrooms without a visit to the washbasin before the outbreak began — and sadly all too often since — we collectively have a lot of work to do in tightening up our handwashing regimens. Time on target and plenty of friction are the keys to that, and [Denis Hennessy]’s “WashTimer” aims to at least help you out with the former. His build is as simple as can be: an Arduino driving an LED matrix when a proximity sensor fires. Wave your dirty paws in front of the unit as you start to scrub up, and the display goes through a nicely animated 20-second countdown, at which time it’s safe to rinse off.

[Denis] purposely made this design as simple and as customizable as possible. Perhaps you’ve got a Neopixel ring lying about rather than the LED matrix, or maybe an ultrasonic sensor would work better for you. Be creative and take this design where it needs to go to suit your needs. We can’t stress enough that handwashing is your number one defense; if you don’t need to moisturize your hands at least three times a day, you’re probably not washing often or long enough. And 20 seconds is way longer than you think it is without a prompt.

Alma The Talking Dog Might Win Some Bar Bets

Students at the University of Illinois at Urbana-Champaign have a brain-computer interface that can measure brainwaves. What did they do with it? They gave it to Alma, a golden labrador, as you can see in the video below. The code and enough info to duplicate the electronics are on GitHub.

Of course, the dog doesn’t directly generate speech. Instead, the circuit watches her brainwaves via an Arduino and feeds the raw data to a Raspberry Pi. A machine learning algorithm determines Alma’s brainwave state and plays prerecorded audio expressing Alma’s thoughts.

Alma’s collar duplicates — to some degree — the fictional collar from the movie Up. Of course, Dug was a bit more loquacious. It isn’t very clear from the video how many states the program classifies. A quick peek at the code reveals five audio clips but only one appears to be wired to the recognizer — the one for a treat. We think it might be a harder problem to figure out when the dog does not want a treat.

The last time we saw a talking dog collar it was phone-controlled. If you really want to probe a brain — canine or human — you could do worse than to check out OpenHardwareExG.

Oh. By the way. Good dog! Very good dog!

Adaptive Spoon Helps Those With Parkinson’s

There are a lot of side effects of living with medical conditions, and not all of them are obvious. For Parkinson’s disease, one of the conditions is a constant hand tremor. This can obviously lead to frustration with anything that involves fine motor skills, but also includes eating, which can be even more troublesome than other day-to-day tasks. There are some products available that help with the tremors, but at such a high price [Rupin] decided to build a tremor-compensating utensil with off the shelf components instead.

The main source of inspiration for this project was the Liftware Steady, but at around $200 this can be out of reach for a lot of people. The core of this assistive spoon has a bill of material that most of us will have lying around already, in order to keep costs down. It’s built around an Arduino and an MPU6050 inertial measurement unit with two generic servo motors. It did take some 3D printing and a lot of math to get the utensil to behave properly, but the code is available on the project site for anyone who wants to take a look.

This project tackles a problem that we see all the time: a cost-effective, open-source solution to a medical issue where the only alternatives are much more expensive. Usually this comes up around prosthetics, but can also help out by making biological compounds like insulin directly for less than a medical company can provide it.

Retractable Console Allows Wheelchair User to Get up Close and Personal

[Rhonda] has multiple sclerosis (MS), a disease that limits her ability to walk and use her arms. She and the other residents of The Boston Home, an extended care facility for people with MS and other neuromuscular diseases, rely on their wheelchairs for mobility. [Rhonda]’s chair comes with a control console that swings out of the way to allow her to come up close to tables and counters, but she has problems applying enough force to manually position it.

Sadly, [Rhonda]’s insurance doesn’t cover a commercial solution to her problem. But The Boston Home has a fully equipped shop to extend and enhance residents’ wheelchairs, and they got together with students from MIT’s Principles and Practices of Assistive Technology (PPAT) course to hack a solution that’s not only useful for [Rhonda] but should be generally applicable to other chairs. The students analyzed the problem, measured the forces needed and the clearances required, and built a prototype pantograph mount for the control console. They’ve made the device simple to replicate and kept the BOM as inexpensive as possible since patients are often out-of-pocket for enhancements like these. The video below shows a little about the problem and the solution.

Wheelchair hacks are pretty common, like the 2015 Hackaday Prize-winning Eyedrivomatic. We’ve also covered totally open-source wheelchairs, both manual and electric.


Filed under: Medical Hacks