Introduction
Over the last year or two the rise of the single-board computer has captured the imagination and energy of many people, to the point where popular opinion has been that the Arduino world had been left behind. However this is far from the truth – there’s Arduino-compatible SBCs such as the pcDuino and now we have one from Intel – the Intel Galileo.

Apparently the Galileo has been available in limited distribution for a few months, and now that the marketing machine has started up – we finally had the chance to order an Intel Galileo last week and now have one as the subject for this review. It’s our first look, based on information we could find at the time and some experimenting.
What’s in the box?
In the retail package we found the Intel Galileo itself:


… a diagram of what to do in the lid:

… and a universal AC to 5V 2A DC power supply with various fittings for different regions:

The only paper documentation was a safety and regulatory information booklet which gets recycled. We didn’t find a USB cable nor some stand-offs to lift the board off the bench a little.
Specifications
The Galileo is based a new chipset from Intel, the Quark SoC X1000 Application Processor, a 32-bit Intel Pentium-class system on a chip. For the uninitiated, the Galileo is a single-board computer running a small version of Linux that can somewhat emulate an Arduino Uno R3 in software. The hardware specifications are as such (from the Arduino website):
- 400MHz 32-bit Intel® Pentium instruction set architecture (ISA)-compatible processor o 16 KBytes on-die L1 cache
- 512 KBytes of on-die embedded SRAM
- Simple to program: Single thread, single core, constant speed
- ACPI compatible CPU sleep states supported
- An integrated Real Time Clock (RTC), with an optional 3V “coin cell” battery for operation between turn on cycles.
- 10/100 Ethernet connector
- Full PCI Express* mini-card slot, with PCIe 2.0 compliant features
- Works with half mini-PCIe cards with optional converter plate
- Provides USB 2.0 Host Port at mini-PCIe connector
- USB 2.0 Host connector
- Support up to 128 USB end point devices
- USB Device connector, used for programming
- Beyond just a programming port – a fully compliant USB 2.0 Device controller
- 10-pin Standard JTAG header for debugging
- Reboot button to reboot the processor
- Reset button to reset the sketch and any attached shields
- Storage options:
- Default – 8 MByte Legacy SPI Flash main purpose is to store the firmware (or bootloader) and the latest sketch. Between 256KByte and 512KByte is dedicated for sketch storage. The download will happen automatically from the development PC, so no action is required unless there is an upgrade that is being added to the firmware.
- Default 512 KByte embedded SRAM, enabled by the firmware by default. No action required to use this feature.
- Default 256 MByte DRAM, enabled by the firmware by default.
- Optional micro SD card offers up to 32GByte of storage
- USB storage works with any USB 2.0 compatible drive
- 11 KByte EEPROM can be programmed via the EEPROM library.
However unlike other SBCs on the market – you don’t get any video or audio output.
Let’s have a quick look around the board. Here you can see the DC socket and microSD card socket:

From the view below you can see the Arduino shield stacking headers and flash memory:

… more jumpers for settings, a USB host socket, USB connection (client) socket, RS232 via 3.5mm socket (!) and 10/100 Ethernet:

… and some nifty jumpers to select 3.3 or 5V operation for shields and IOREF:

… this jumper pair is to add a 3V battery to keep the real-time clock ticking over when the main supply is removed:

Perhaps a CR2032 button cell holder would be preferable, there’s plenty of room on the PCB. Finally – the two reset buttons:

If you want to reset your emulated Arduino, press the one on the left (labelled I). If you want to reboot the entire computer, press the one on the right (labelled X). This seems a little counter-intuitive, as you would imagine the button closer to the stacking headers would reset the Arduino. Note that if you reboot the computer, the last sketch you’ve uploaded will be removed and need to be uploaded again. Furthermore, more often than not rebooting the Galileo wasn’t entirely successful – and required a full removal of USB, power then replacing the power and USB to get another connection.
Turning the Galileo over reveals some fascinating PCB track patterns, and the mini-PCIe connector:

Getting Started
Having a slight bent towards Arduino, the first thing we like to do is get the blink sketch running. The documentation is scattered all over the place, so start from maker.intel.com and follow the links listed in the “Explore Intel makers” column. The closest thing to a quick setup guide can be downloaded here. There’s a video by what sounds to be a ten year old explaining the board – who signs off by telling us it’s ok to break something (hopefully not the Galileo at $77 a pop). Marketing FTW. Eventually we found the official Intel support page for the Galileo, so bookmark that for future reference.
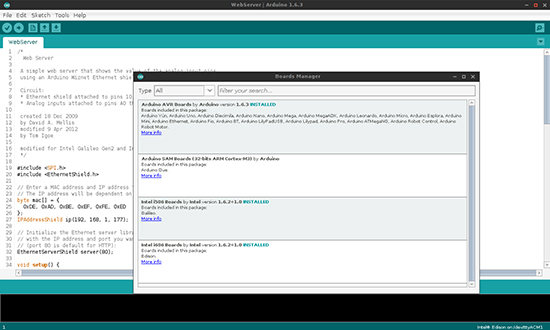
However if you just want to get started as quickly as possible, keep reading. First, download the Arduino IDE for Galileo from here. Next, extract the IDE folder to your root directory – and don’t have any spaces in the folder name. For example, use:
c:\GalileoIDE
and not:
C:\Arduino IDEs\galileo IDE\
Now plug in your Galileo – and always plug the 5V power into the Galileo before the USB (use the “USB client” socket). For Windows the USB driver (for “Gadget Serial v2.4”) is in the IDE folder, just point Windows to the top Galileo Arduino IDE folder.
Note that it takes around twenty seconds for the PC to recognise the Galileo via USB (as the Galileo needs time to boot up – it’s running Linux). For Windows users – after loading the IDE, check which COM port has been allocated. For some reason the Galileo can’t deal with COM10 or higher. To change this, head over to the Device Manager. Open Ports (COM & LPT) then right-click the Galileo and click properties:

Next, click the Port Settings tab, then Advanced:

Then select a free COM port number that’s under 10, close all the dialogue boxes and restart the computer. After the reboot, load the IDE, select the right board and serial port in the Tools menu – then select Firmware Update in the Help Menu. If for some reason you put a memory card in the microSD card slot – remove it before this process.

A confirmation box will appear, so move forward and wait for the process to finish. Don’t touch the IDE, board or anything near the Galileo until this finishes. Read some kit reviews. The update process took eight minutes for us, however will depend on the speed of your Internet connection.

Finally, try the ubiquitous blink sketch. Once uploaded, the tiny LED next to the coin cell jumpers will blink as requested. Now we’ll explore more about using the Galileo as an Arduino-compatible board.
How Arduino-compatible is the Galileo?
The first thing we like to do with new boards that differ from the classic Uno is to run a speed test, and for this we use the following sketch by Steve Curd from the Arduino forum:
//
// Pi_2
//
// Steve Curd
// December 2012
//
// This program approximates pi utilizing the Newton's approximation.  It quickly
// converges on the first 5-6 digits of precision, but converges verrrry slowly
// after that.  For example, it takes over a million iterations to get to 7-8
// significant digits.
//
// I wrote this to evaluate the performance difference between the 8-bit Arduino Mega,
// and the 32-bit Arduino Due.
//

#define ITERATIONS 100000L    // number of iterations
#define FLASH 1000            // blink LED every 1000 iterations

void setup() {
  pinMode(13, OUTPUT);        // set the LED up to blink every 1000 iterations
  Serial.begin(57600);
}

void loop() {

  unsigned long start, time;
  unsigned long niter=ITERATIONS;
  int LEDcounter = 0;
  boolean alternate = false;
  unsigned long i, count=0;
  float x = 1.0;
  float temp, pi=1.0;

  Serial.print("Beginning ");
  Serial.print(niter);
  Serial.println(" iterations...");
  Serial.println();

  start = millis();
  for ( i = 2; i < niter; i++) {
    x *= -1.0;
    pi += x / (2.0f*(float)i-1.0f);
    if (LEDcounter++ > FLASH) {
      LEDcounter = 0;
      if (alternate) {
        digitalWrite(13, HIGH);
        alternate = false;
      } else {
        digitalWrite(13, LOW);
        alternate = true;
      }
      temp = 40000000.0 * pi;
    }
  }
  time = millis() - start;

  pi = pi * 4.0;

  Serial.print("# of trials = ");
  Serial.println(niter);
  Serial.print("Estimate of pi = ");
  Serial.println(pi, 10);

  Serial.print("Time: "); Serial.print(time); Serial.println(" ms");

  delay(10000);
}
It calculates Newton Approximation for pi using an infinite series. For comparison an Arduino Due takes 690 ms, an Arduino Mega 2560 takes 5765 ms, and a pcDuino v2 can do it in 9 to 43 ms (depending on what else is running on Linux). So out of the box, the Galileo takes 279 ms:

Out of the box there is 262144 bytes available for sketches. As the Arduino is emulated, the hardware for I/O is a little different than you may have expected, and provided by a variety of I2C port expanders, MUXs and so on. For example I2C can only run at 100 kHz in master mode, no slave mode, and similar restrictions on SPI as well. Again, review this page to learn more about the internal hardware differences between an Arduino Uno and Intel Galileo.
Visit this page and scroll down to the block diagram for a visual representation, and while you’re there – review the entire page to learn more about the specific Arduino Uno R3 implementation on the Galileo. A lot of work has been done to allow successful emulation of the Arduino using the Quark CPU and internal OS. For example the EEPROM library just works, and has 11264 bytes of storage.
You can get an idea of what is supported “out of the box” by reviewing the libraries included with the Galileo’s IDE installation, for example:

So most of the basic requirements are covered at the time of writing. And unlike some other SBCs emulating Arduino, the onboard Ethernet “just works” as it should with the Ethernet library – and the USBHost library can take advantage of the matching socket on the board. Again – research is the key, so spend some time determining if the Galileo can solve your problems.
One interesting example of the limitations of the “emulated” Arduino is the speed, and this has been highlighted by Al Williams of Dr Dobb’s journal – who ran a simple sketch to see how fast a digital output pin could be set. As GPIO is provided by external SPI- and I2C-based interface ICs, there will be a speed hit. But how much? Naturally we can’t use port manipulation so we’re back to simple digitalWrite functions with the following sketch:
int pin = 2;
boolean a = false;
void setup()
{
  pinMode(pin, OUTPUT);
}

void loop()
{
  digitalWrite(pin, a=!a);
}
An Arduino Uno running the sketch was clocked at 96.34 kHz:

… and the Intel Galileo was clocked at … 225.2 Hz:

This test isn’t a criticism of the Galileo, just an example of what you need to keep in mind when using it. If you’re curious about the real-time clock it’s accessed via Linux. Finally, there’s a list of known issues on the Intel forum – so check this out to get a grip on what is and is not working in terms of Arduino compatibility. One more thing – you will need a memory card installed if you want the Galileo to remember sketches after power-off.
Update – thanks to our friends (!) at reddit, you can push some I/O faster – see this post in the Intel forum.
Linux – internal
The Galileo arrived pre-loaded with a very light version of Linux, however due to the lack of video output you need to access the “computer” via some old-school methods. And thus one method is via Telnet over Ethernet. If you don’t have a Telnet client, try PuTTY. To get started, ensure you have your Galileo connected to power, client USB to PCm and to your LAN. Then upload the following sketch to your Galileo:
// https://communities.intel.com/message/213624
void setup()
{
  system("telnetd -l /bin/sh");
}

void loop()
{
  system("ifconfig eth0 > /dev/ttyGS0");
  sleep(10);
}
The observant will notice by using the system function you can send instructions to the Linux command line from your Arduino sketch. And any resulting output text can be sent to the serial monitor by directing it to ttyGS0.
Anyhow, the above sketch will run the ifconfig command and return relevant networking data about your Galileo – including its IP address:

Once you have the IP address, you can Telnet in and command your Galileo just like it’s 1992:

Don’t get too excited, there isn’t that much installed (e.g. no gcc or make). For more information on the Poky linux, visit the project page. Apart from running vi my *nix memory is a bit vague, however the onboard system is quite minimal. If you want to do anything serious, such as use a WiFi or other PCIe card – you’ll need to boot your Galileo with an external OS stored on a microSD card. Another way of looking at the Galileo is that it’s a board not for development with, but for running code built on a different system and then loaded onto the Galileo.
Linux – external
As I haven’t been a *nix user for a very long time, it didn’t seem worthwhile to spend a whole day preparing for an installing the external OS on the Galileo for review. However from what I can tell you’ll need to do this to run anything substantial including WiFi adaptors, python, node.js and so on. Which in my personal opinion sort of ruins the Galileo for me. Other SBCs can do all of this a lot easier, cheaper and with better documentation.
Arduino Support
As the Galileo is from Intel and not Arduino, you need to ask for support in the Intel forum. This will be an interesting test for Intel, will they invest in a substantial support effort or just stand back and say it’s all open source? Time will tell. In the meanwhile there is a gallery hosted by Intel with links to different projects.
Conclusion
Once again – remember that the Galileo is a limited single-board computer that emulates (to a certain, varying degree) an Arduino Uno R3. It is a contender if you need to integrate some Arduino-based control with software running on a light Linux machine, and all in a compact board. Or if you want to experiment with USB host and Ethernet on the Arduino platform at the same time, this could be a cheaper and more powerful option. Support is there if you can use Google, however this is not the idea beginners’ Arduino board. So don’t be a sheep and rush out and buy one after reading the marketing blurb – do your own research first.
Personally I would say that if you have a need for the specific hardware interfaces of the Galileo, and have a full understanding of the board limitations – then it’s the board for you. Otherwise if you want to experiment with a full single-board computer with Arduino compatibility, get a pcDuino. Full-sized images are available on flickr.
And if you enjoyed this article, or want to introduce someone else to the interesting world of Arduino – check out my book (now in a third printing!) “Arduino Workshop”.

Have fun and keep checking into
tronixstuff.com. Why not follow things on
twitter,
Google+, subscribe for email updates or RSS using the links on the right-hand column, or join our
forum – dedicated to the projects and related items on this website.
Sign up – it’s free, helpful to each other – and we can all learn something.
[Note – Intel Galileo purchased for review by tronixstuff.com and not a promotional consideration]
The post Review – Intel Galileo Arduino-compatible Development Board appeared first on tronixstuff.
