Posts with «ldr» label

Simple Hack Lets Smartphone Take Resin Printer Time-Lapses

With how cheap they’re getting, everyone seems to be jumping on the resin printer bandwagon. They may not be able to fully replace your trusty old FDM printer, but for certain jobs, they just can’t be beaten. Sadly though, creating those smooth time-lapse videos of your prints isn’t quite as easy to do as it is on their filament-based counterparts.

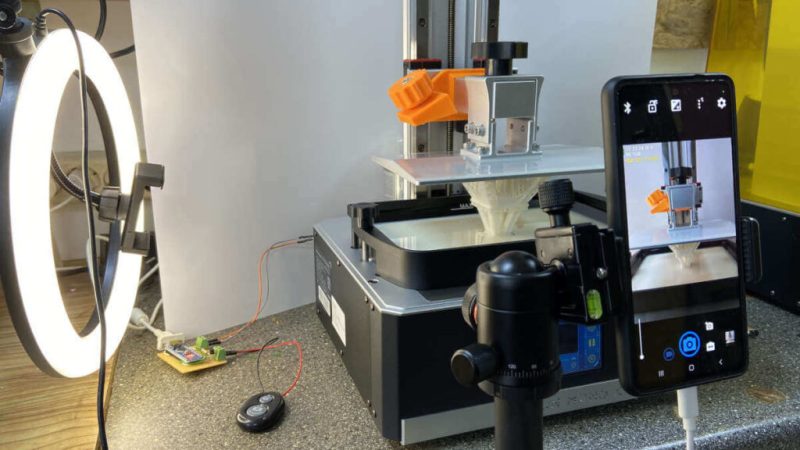
Not as easy, perhaps, but not impossible. [Fraens] found a way to make time-lapses on any resin printer, and in a wonderfully hacky way. First, you need to find a smartphone, which shouldn’t be too hard, given how often we all tend to upgrade. [Fraens] recommends replacing the standard camera app on the phone with Open Camera, to prevent it from closing during the long intervals with nothing happening. The camera is triggered by any readily available Bluetooth dongle, which is connected via a simple transistor circuit to an Arduino output. To trigger the shutter, a light-dependent resistor (LDR) is connected to one of the microcontroller’s inputs. The LDR is placed inside the bed of the resin printer — an Anycubic Photon in this case — where light from the UV panel used to cross-link the resin can fall on it. A simple bit of Arduino code triggers the Bluetooth dongle at the right moment, capturing a series of stills which are later stitched together using DaVinci Resolve.

The short video below shows the results, which look pretty good to us. There are other ways to do this, of course, but we find the simplicity of this method pleasing.

Four Servo Fingers Play Simon Better Than You Ever Could

Remember Simon? We sure do. Simon — as in “Simon says…” — from the leading edge of electronic games in the 1970s, which used four buttons, colored lights, and simple tones as the basis for a memory game. Players had to remember the specific sequence of lights and replay the pattern in order to advance to the next round. It was surprisingly addictive, at least for the era.

For those who never quite got into the Simon groove, fear not — the classic game has now been fully automated. While there were plenty of approaches that could have taken to interfacing to the game, [ido roseman] went with the obvious — and best, in our opinion — technique and simulated a human player’s finger presses with servo-controlled arms. Each arm carries a light-dependent resistor that registers the light coming from the key it’s poised above; the sequence of lights is sensed and recorded by an Arduino, which then drives the servo fingers’ replay attack. The fingers aren’t exactly snappy in their response, which might cause problems — if we recall correctly, Simon is somewhat picky about the speed with which the keys are pressed, at least at higher levels of play.

On the whole, we really like this one, not least for the nostalgia factor. We’ve had a lot of recreations of Simon over the years, including a Dance Dance Revolution version, but few attempts to automate it. And a crazy idea: wouldn’t it be fun to replace the replay attack with a machine learning system that figures out how to play Simon by randomly pressing keys and observing the results?

Hack a Day 11 May 00:00
arduino  cds  game  games  ldr  memory  replay  simon  

Score Big Against Boredom with Tabletop Bowling

Bowling has been around since ancient Egypt and continues to entertain people of all ages, especially once they roll out the fog machine and hit the blacklights. But why pay all that money to don used shoes and drink watered-down beer? Just build a tabletop bowling alley in your spare time and you can bowl barefoot if you want.

Those glowing pins aren’t just for looks — the LEDs underneath them are part of the scoring system. Whenever a pin is knocked out of its countersunk hole, the LED underneath is exposed and shines its light on a corresponding light-dependent resistor positioned overhead. An Arduino Uno keeps track of of the frame, ball number, and score, and displays it on an LCD.

The lane is nearly six feet long, so this is more like medium-format bowling or maybe even skee-bowling. There are probably a number of things one could use for balls, but [lainealison] is using large ball bearings. Roll past the break to see it in action, but don’t go over the line!

Can’t keep your balls out of the gutter? Build a magic ball and make all wishful leaning more meaningful as you steer it down the lane with your body.

Weather Station Can Rock You Like A Hurricane

People love to talk about the weather. It’s the perfect small talk, whether you’re trying to start a conversation or keep one going by avoiding an awkward silence. In the same fashion, weather stations are an ideal starting point for any sort of sensor-related project ideas. You get to familiarizing yourself with communication buses, ADCs, general data acquisition, and you learn a lot in figuring out how to visualize it all.

What if your weather station didn’t visualize anything? [OttoNL] is answering that question with a MIDI-generating Weather Station that uses the mood of the music to convey the condition of the elements outside.

Using an ESP8266 programmed via the Arduino IDE, [OttoNL] hooked up a light dependent resistor, a rain sensor, and the all-round workhorse BME280 for temperature, barometric pressure, and humidity to it. Reading the sensors, the ESP will generate MIDI notes that are sent to a connected synthesizer, with each sensor influencing a different aspect of the generated MIDI signals. A sadder, slow tune will play during rain and a fast upbeat one during sunshine. While it doesn’t use the ESP’s WiFi functionality at all at this point, a future version could easily retrieve some weather forecast data from the internet and add it into the mix as well.

Connect this to your alarm clock, and you can start your day off in the appropriate mood. You can even customize your breakfast toast to really immerse your morning routine in abstract weather cues.

Homemade E-Drums Hit All The Right Notes

In our eyes, there isn’t a much higher calling for Arduinos than using them to make musical instruments. [victorh88] has elevated them to rock star status with his homemade electronic drum kit.

The kit uses an Arduino Mega because of the number of inputs [victorh88] included. It’s not quite Neil Peart-level, but it does have a kick drum, a pair of rack toms, a floor tom, a snare, a crash, a ride, and a hi-hat. With the exception of the hi-hat, all the pieces in the kit use a piezo element to detect the hit and play the appropriate sample based on [Evan Kale]’s code, which was built to turn a Rock Band controller into a MIDI drum kit. The hi-hat uses an LDR embedded in a flip-flop to properly mimic the range of an actual acoustic hi-hat. This is a good idea that we have seen before.

[victorh88] made all the drums and pads out of MDF with four layers of pet screen sandwiched in between. In theory, this kit should be able to take anything he can throw at it, including YYZ. The crash and ride cymbals are MDF with a layer of EVA foam on top. This serves two purposes: it absorbs the shock from the sticks and mutes the sound of wood against wood. After that, it was just a matter of attaching everything to a standard e-drum frame using the existing interfaces. Watch [victorh88] beat a tattoo after the break.

If you hate Arduinos but are still reading for some reason, here’s a kit made with a Pi.


Filed under: Arduino Hacks, musical hacks

Solar Panel System Monitoring Device Using Arduino

[Carl] recently upgraded his home with a solar panel system. This system compliments the electricity he gets from the grid by filling up a battery bank using free (as in beer) energy from the sun. The system came with a basic meter which really only shows the total amount of electricity the panels produce. [Carl] wanted to get more data out of his system. He managed to build his own monitor using an Arduino.

The trick of this build has to do with how the system works. The panel includes an LED light that blinks 1000 times for each kWh of electricity. [Carl] realized that if he could monitor the rate at which the LED is flashing, he could determine approximately how much energy is being generated at any given moment. We’ve seen similar projects in the past.

Like most people new to a technology, [Carl] built his project up by cobbling together other examples he found online. He started off by using a sketch that was originally designed to calculate the speed of a vehicle by measuring the time it took for the vehicle to pass between two points. [Carl] took this code and modified it to use a single photo resistor to detect the LED. He also built a sort of VU meter using several LEDs. The meter would increase and decrease proportionally to the reading on the electrical meter.

[Carl] continued improving on his system over time. He added an LCD panel so he could not only see the exact current measurement, but also the top measurement from the day. He put all of the electronics in a plastic tub and used a ribbon cable to move the LCD panel to a more convenient location. He also had his friend [Andy] clean up the Arduino code to make it easier for others to use as desired.


Filed under: Arduino Hacks

Pair of musical hacks use sensor arrays as keyboards

This pair of musical keyboard hacks both use light to detect inputs. The pair of tips came in on the same day, which sparks talk of consipiracy theory here at Hackaday. Something in the weather must influence what types of projects people take on because we frequently see trends like this one. Video of both projects is embedded after the jump.

On the left is a light-sensitive keyboard which [Kaziem] is showing off. In this image he’s rolling a marble around on the surface. As it passes over the Cadmium Sulfide sensors (which are arranged in the pattern of white and black keys from a piano keyboard) the instrument plays pitches based on the changing light levels. [Thanks Michael via Make]

To the right is [Lex's] proximity sensor keyboard. It uses a half-dozen Infrared proximity sensor which pick up reflected light. He calls it a ‘quantised theremin’ and after seeing it in action we understand why. The overclocked Raspberry Pi playing the tones reacts differently based on distance from the keyboard itself, and hand alignment with the different sensors.


Filed under: musical hacks

3D Printed Binary Clock

Let's Make Robots 03 Aug 21:43
2  3d  3mm  arduino  binary  clock  cube  inches  ldr  powered  print  printed  teensy  usb  

Sensing Light Variations using LDR

Today, I’m going to show how easy it is to read data from an accessory to your android device. In this example, we are going to use a special kind of resistor whose resistance is dependent on the amount of light falling on its surface. It is called Light-Dependent-Resistor or LDR or also known [...]

Android + Arduino 26 Mar 16:03
adk  android  arduino  ldr  photocell  red pill  

n/a
Let's Make Robots 01 Jan 00:00
arduino  arduino uno  c  ir remote  ldr  leds  sr04