Posts with «meter» label

Mini Meters Monitor Microprocessor Maximization
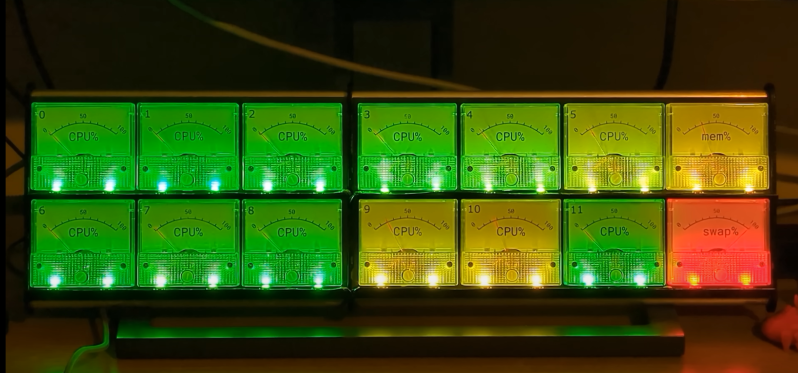
[Lex] over at Computing: The Details loves to make fun projects. Recently, he’s created a hardware CPU monitor that allows him to see how well his PC is parallelizing compile tasks at a glance. The monitor is built from 14 analog meters, along with some WS2812 RGB LEDs.

Each meter represents a core on [Lex]’s CPU, while the final two meters show memory and swap usage. The meters themselves are low-cost 5 mA devices. Of course, the original milliamps legends wouldn’t do much good, so [Lex] designed and printed graduations that glue over the top. The RGB LED strip is positioned so two LEDs fit under each meter. The LEDs allow a splash of color to draw attention to the current state of the machine. The whole bank going red would sure get our attention!

The system is controlled by an Arduino Mega, with the meters driven using the PWM pins. The only extra part is a 1 K resistor. The Arduino wrangles the LEDs as well. Sadly [Lex] did not include his software. He did describe it though. Basically he’s using a Rust program to call systemstat, obtaining the current CPU utilization data in Linux. A bit of math converts this into pointer values and LED colors. The data is then sent via USB-serial to the Arduino Mega. The software savvy will say it’s pretty easy to replicate, but the hardware only hackers among us might need a bit of help.

This isn’t the first custom meter we’ve seen on Hackaday. Your author’s first project covered by Hackaday was for a meter created using an automotive gauge stepper motor. I didn’t include source code either – but only because [Guy Carpenter]’s Switec X25 library had me covered.

Thanks for the tip, [TubeTime]!

Supersized Weather Station Uses Antique Analog Meters

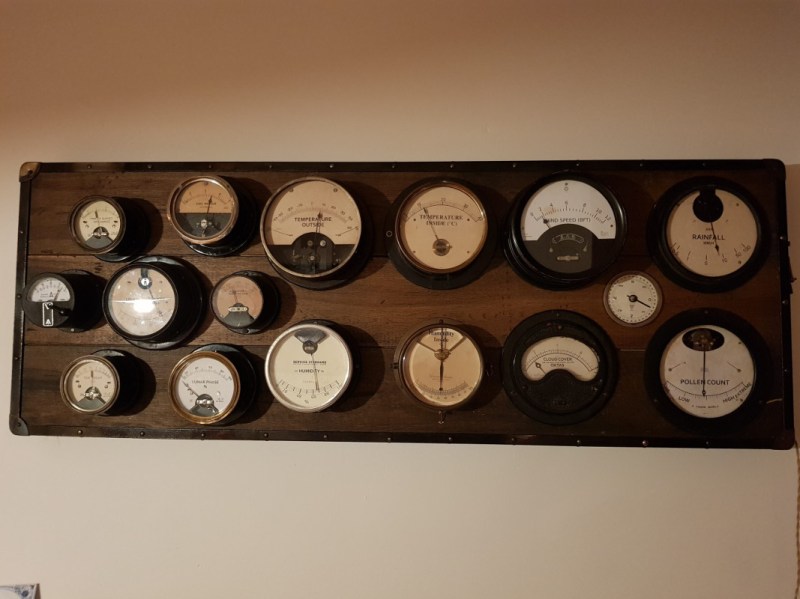
For most of us, getting weather information is as trivial as unlocking a smartphone or turning on a computer and pointing an app or browser at one’s weather site of choice. This is all well and good, but it lacks a certain panache that old weather stations had with their analog dials and stained wood cases. The weather station that [BuildComics] created marries both this antique aesthetic with modern weather data availability, and then dials it up a notch for this enormous analog weather station build.

The weather station uses 16 discrete dials, each modified with a different label for the specific type of data displayed. Some of them needed new glass, and others also needed coils to be modified to be driven with a lower current than they were designed as well, since each would be driven by one of two Arduinos in this project. Each are tied to a microcontroller output via a potentiometer which controls the needle’s position for the wildly different designs of meter. The microcontrollers themselves get weather information via the internet, which allows for about as up-to-date information about the weather as one could gather first-hand.

The amount of customization of these old meters is impressive, and what’s even more impressive is the project’s final weight. [BuildComics] reports that it took two people just to lift it onto the wall mount, which is not surprising given the amount of iron in some of these old analog meters. And, although not as common in the real world anymore, these old antique meters have plenty of repurposed uses beyond weather stations as well.

A Clock From An Electricity Meter

Electric utilities across the world have been transitioning their meters from the induction analog style with a distinctive spinning disc to digital “smart” meters which aren’t as aesthetically pleasing but do have a lot of benefits for utilities and customers alike. For one, meter readers don’t need to visit each meter every month because they are all networked together and can download usage data remotely. For another, it means a lot of analog meters are now available for projects such as this clock from [Monta].

The analog meters worked by passing any electricity used through a small induction motor which spun at a rate proportional to the amount of energy passing through it. This small motor spun a set of dials via gearing in order to keep track of the energy usage in the home or business. To run the clock, [Monta] connected a stepper motor with a custom transmission to those dials for the clock face because it wasn’t possible to spin the induction motor fast enough to drive the dials. An Arduino controls that stepper motor, but can’t simply drive the system in a linear fashion because it needs to skip a large portion of the “minutes” dials every hour. A similar problem arises for the “hours” dials, but a little bit of extra code solves this problem as well.

Once the actual clock is finished, [Monta] put some finishing touches on it such as backlighting in the glass cover and a second motor to spin the induction motor wheel to make the meter look like it’s running. It’s a well-polished build that makes excellent use of some antique hardware, much like one of his other builds we’ve seen which draws its power from a Stirling engine.

Hack a Day 29 Oct 21:00

Hackaday Prize Entry: Safety Glasses Are Also Hands-Free Multimeter

It seems like the multimeter is never easy to see during a project. Whether it’s troubleshooting a vehicle’s electrical system and awkwardly balancing the meter on some vacuum lines and the intake manifold, or installing a new solar panel and hoping the meter doesn’t fall on the ground while the leads are in both hands, it seems like there’s never a good way to see the meter while actually using it. Some meters have a small magnet and strap that can be used to hang them temporarily, but this will only get you so far.

[Alain Mauer]’s entry into the Hackaday Prize looks to solve this glaring problem. Using a heads-up Bluetooth display mounted to a pair of safety glasses, a multimeter can be connected to the device in order to display its information directly to its user. Based on his original idea which used a normal pair of prescription glasses as its foundation, [Alain]’s goal is to reduce safety hazards that might arise when using a multimeter in an awkward or dangerous manner that might not otherwise be possible.

The device uses an Arduino Pro Micro to connect to the multimeter and drive the display. [Alain] notes that the real challenge is with the optical system, however. Either way though, this would be a welcome addition to any lab, workspace, or electrician’s toolbox. Be sure to check out the video of it in action after the break.


Filed under: The Hackaday Prize, tool hacks

Disassembled Mouse Keeps Track Of Gas Meter

After building devices that can read his home’s electricity usage, [Dave] set out to build something that could measure the other energy source to his house: his gas line. Rather than tapping into the line and measuring the gas directly, his (much safer) method was to simply monitor the gas meter itself.

The major hurdle that [Dave] had to jump was dealing with an ancient meter with absolutely no modern electronics like some other meters have that make this job a little easier. The meter has “1985” stamped on it which might be the manufacturing date, but for this meter even assuming that it’s that new might be too generous. In any event, the only option was to build something that could physically watch the spinning dial. To accomplish this, [Dave] used the sensor from an optical mouse.

The sensor is surrounded by LEDs which illuminate the dial. When the dial passes a certain point, the sensor alerts an Arduino that one revolution has occurred. Once the Arduino has this information, the rest is a piece of cake. [Dave] used KiCad to design the PCB and also had access to a laser cutter for the enclosure. It’s a great piece of modern technology that helps integrate old analog technology into the modern world. This wasn’t [Dave]’s first energy monitoring system either; be sure to check out his electricity meter that we featured a few years ago.


Filed under: peripherals hacks

Solar Panel System Monitoring Device Using Arduino

[Carl] recently upgraded his home with a solar panel system. This system compliments the electricity he gets from the grid by filling up a battery bank using free (as in beer) energy from the sun. The system came with a basic meter which really only shows the total amount of electricity the panels produce. [Carl] wanted to get more data out of his system. He managed to build his own monitor using an Arduino.

The trick of this build has to do with how the system works. The panel includes an LED light that blinks 1000 times for each kWh of electricity. [Carl] realized that if he could monitor the rate at which the LED is flashing, he could determine approximately how much energy is being generated at any given moment. We’ve seen similar projects in the past.

Like most people new to a technology, [Carl] built his project up by cobbling together other examples he found online. He started off by using a sketch that was originally designed to calculate the speed of a vehicle by measuring the time it took for the vehicle to pass between two points. [Carl] took this code and modified it to use a single photo resistor to detect the LED. He also built a sort of VU meter using several LEDs. The meter would increase and decrease proportionally to the reading on the electrical meter.

[Carl] continued improving on his system over time. He added an LCD panel so he could not only see the exact current measurement, but also the top measurement from the day. He put all of the electronics in a plastic tub and used a ribbon cable to move the LCD panel to a more convenient location. He also had his friend [Andy] clean up the Arduino code to make it easier for others to use as desired.


Filed under: Arduino Hacks

Water Tank Monitoring System Is Now Slug-Proof

[Peter] is doing his part toward protecting the environment and conserving water. He’s built a rainwater collection system complete with an underground storage tank. Since he wanted to monitor the water level in the tank, he made a level indicating system. Everything was going well until one day out of nowhere it stopped working, only returning 0’s as the level. [Peter] took a look and found that I slug had made its way into the electronics enclosure and slimed up the traces on the PCB, causing short circuits.To fix the problem [Peter] decided to redesigned the system. This time it would be built into an all-weather electrical box. The system uses a standard hobby ultrasonic range finder to measure the distance from the top of the tank to the level of the water. Two holes cut into the electrical box allow the sender/receiver components to peek outside of the enclosure. Any gaps were then filled with sealant. [Peter] also added a thermistor to measure the temperature inside the tank.The sensor values are read by an Arduino and sent wirelessly to [Peter]’s computer via a pair of XBee’s and a second Arduino with an ethernet shield. The data are sent in 3 minute intervals and automatically stored in a MySQL database for quick reference of level and temperature trends. Now [Peter] can monitor his rain water remotely and adjust his usage habits accordingly. Want to read more about water tanks? Check out this overflow monitor system.

Filed under: green hacks

NaNoWriMo progress meter uses Arduino to fight writer's block, may be its own distraction (video)

We've all had that moment where we sit in front of the keyboard and have trouble just getting started. It can be an especially dire problem when the 30-day deadline of National Novel Writing Month (NaNoWriMo) looms overhead, and that was enough for inventor Steve Hoefer to craft his own USB progress meter. The Arduino-based contraption advances a real-world dial or gauge as the word count reaches the NaNoWriMo servers, giving that extra incentive to meet a daily goal or hit the ultimate 50,000-word mark on time. Hoefer characterizes it as a simple project for those who know their way around an Arduino controller; the toughest part for them may just be constructing the box that keeps the meter presentable. Full instructions are available after the break, although we'd hurry to build the meter before November starts. It could all too easily be the source of the very procrastination we're trying to avoid.

Continue reading NaNoWriMo progress meter uses Arduino to fight writer's block, may be its own distraction (video)

Filed under: Peripherals, Alt

NaNoWriMo progress meter uses Arduino to fight writer's block, may be its own distraction (video) originally appeared on Engadget on Thu, 25 Oct 2012 14:34:00 EST. Please see our terms for use of feeds.

Permalink | Email this | Comments