Posts with «gps» label

Captivating Clock Puts Endangered Displays On Display

The DT-1704 VFD as seen the 1976 Radio Shack Catalog. The “A” version has no substrate, making the VFD fully clear for added effect.

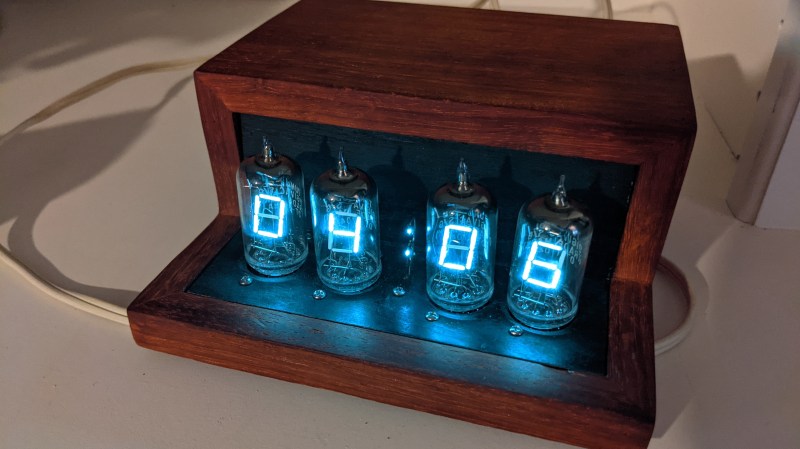
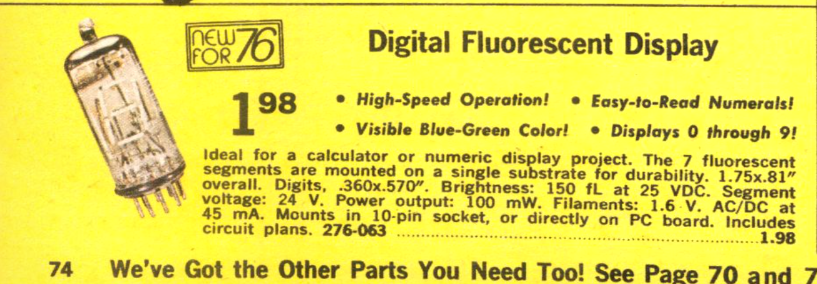
When you have a small stock of vacuum fluorescent displays (VFDs) straight out of the 1976 Radio Shack catalog, you might sit around wondering what to do with them. When [stepawayfromthegirls] found out that his stash of seven DT-1704A tubes may be the last in existence, there was no question. They must be displayed! [stepawayfromthegirls]’ mode of display is this captivating clock build. Four VFDs with their aqua colored elements are set against a black background in a bespoke wooden case. Looking under the hood, the beauty only increases.

VFD Clock Wiring is nearly as stunning as the clock itself.

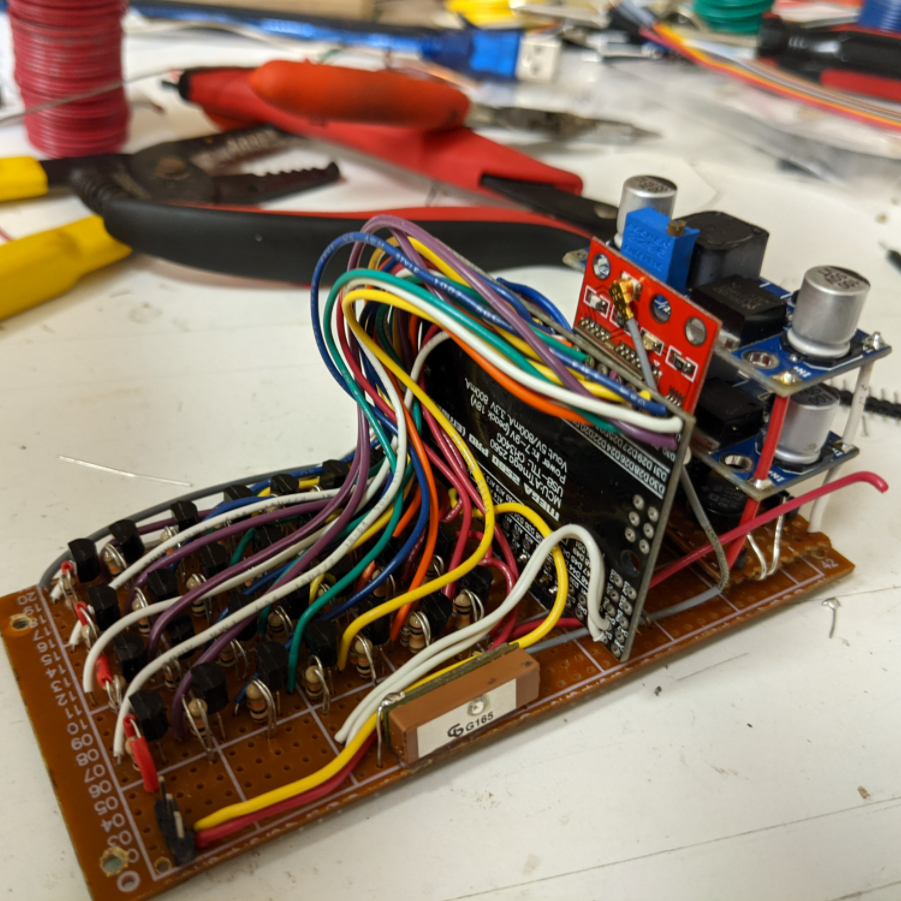
Keeping the build organized was not an easy task because the tubes are designed in such a way that each segment must be individually controlled. The needed I/O duties are provided by an Arduino Mega 2560 Pro (Embed). 28 2n3904’s each with their two resistors serve as drivers for each VFD segment.

The output of a  24 V AC transformer left over from the 1980s is rectified to 34 V of DC power which is then regulated to 27 V to power the tubes. Switching power supplies provide 6 V to the Arduino and 1.3 V to the filaments. If you look closely, you’ll also see a GPS module so that the clock doesn’t need to be set. To future-proof the clock against daylight savings time adjustments, a potentiometer on the back of the case allows the user to set custom hour offsets without editing any code.

We think the end result is a remarkably clean, simple, and elegant clock that he will be proud of for many years to come!

If VFD clock builds are your thing, then you’ll enjoy this Network Attached VFD Clock and a Mini VFD Clock with floating display.  And while not VFD based, we’d be silly to leave out the Boat Anchor Nixie Clock with enough knobs, switches, and buttons to delight even the fussiest of hacker.


V12 Corvette Gets Electronic Gauge Mod

[Wesley Kagan] is building a Corvette with a V12 engine swap. Much of the driveline will be entirely replaced, which means the components to drive the mechanical speedometer and tachometer will no longer be present in the final car. Instead, [Wesley] came up with his own electronic gauge conversion to do the job.

It’s a build that respects the original aesthetic of the car, reusing the original gauges but driving them differently. In place of the original mechanical drives from the transmission and distributor respectively, the speedometer and tach instead get servos installed in the back with a 3D printed gear train. The odometer gets its own continuous rotation servo, too. An Arduino Nano is used to drive the servos, using data from a GPS module and the car’s ignition system.

Files are available for anyone wishing to 3D print parts to modify their own gauges. We can’t wait to see how the gauges look when finally installed. We can imagine some teething problems with slew rate or update speed, but we’re sure it’s nothing [Wesley] can’t engineer out with a few revisions. Custom gauges are something we’ve seen a few times around these parts; this digital setup is particularly useful for engine data. Video after the break.

Hack a Day 23 Dec 00:00
arduino  car hacks  gauge  gauges  gps  

Capture the Flag, Along with the Game Data

With events of all sizes on hold and live sports mostly up in the air, it’s a great time to think of new ways to entertain ourselves within our local circles. Bonus points if the activity involves running around outside, and/or secretly doubles as a team-building exercise, like [KarelBousson]’s modernized version of Capture the Flag.

Much like the original, the point of this game is to capture the case and keep it for as long as possible before the other team steals it away. Here, the approach is much more scientific: the box knows exactly who has it and for how long, and the teams get points based on the time the case spends in any player’s possession.

Each player carries an RFID tag to distinguish them from each other. Inside the case is an Arduino Mega with a LoRa shield and a GPS unit. Whenever the game is afoot, the case communicates its position to an external Raspi running the game server.

If you haven’t met LoRa yet, check out this seven-part introductory tutorial.

Sun-Seeking Sundial Self-Calibrates in No Time

Sundials, one of humanity’s oldest ways of telling time, are typically permanent installations. The very good reason for this is that telling time by the sun with any degree of accuracy requires two-dimensional calibration — once for cardinal direction, and the other for local latitude.

[poblocki1982] is an amateur astronomer and semi-professional sundial enthusiast who took the time to make a self-calibrating equatorial ‘dial that can be used anywhere the sun shines. All this solar beauty needs is a level surface and a few seconds to find its bearings.

Switch it on, set it down, and the sundial spins around on a continuous-rotation servo until the HMC5883L compass module finds the north-south orientation. Then the GPS module determines the latitude, and a 180° servo pans the plate until it finds the ideal position. Everything is controlled with an Arduino Nano and runs on a 9V battery, although we’d love to see it run on solar power someday. Or would that be flying too close to the sun? Check out how fast this thing calibrates itself in the short demo after the break.

Not quite portable enough for you? Here’s a reverse sundial you wear on your wrist.

Faux Walkie-Talkie for Comedy Walking Tour is a Rapid Prototyping Win

Chances are good that a fair number of us have been roped into “one of those” projects before. You know the type: vague specs, limited budget, and of course they need it yesterday. But you know 3D-printers and Raspberduinos and whatnot; surely you can wizard something together quickly. Pretty please?

He might not have been quite that constrained, but when [Sean Hodgins] got tapped to help a friend out with an unusual project, rapid prototyping skills helped him create this GPS-enabled faux-walkie talkie audio player. It’s an unusual device with an unusual purpose: a comedic walking tour of Vancouver “haunted houses” where his friend’s funny ghost stories are prompted by location. The hardware to support this is based around [Sean]’s useful HCC module, an Arduino-compatible development board. With a GPS module for localization and a VS1053 codec, SD card reader, and a small power amp for the audio end, the device can recognize when the user is within 50 meters of a location and play the right audio clip. The housing is a 3D-printed replica of an old toy walkie-talkie, complete with non-functional rubber ducky antenna.

[Sean]’s build looks great and does the job, although we don’t get to hear any of the funny stuff in the video below; guess we’ll have to head up to BC for that. That it only took two weeks start to finish is impressive, but watch out – once they know you’re a wizard, they’ll keep coming back.

Handheld GPS Tracks All The Things

With a GPS on every smartphone, one would be forgiven for forgetting that handheld GPS units still exist. Seeking to keep accurate data on a few upcoming trips, [_Traveler] took on a custom-build that resulted in this GPS data logger.

Keeping tabs on [_Traveler] is a Ublox M8N GPS which is on full-time, logging data every 30 seconds, for up  to 2.5 days. All data is saved to an SD card, with an ESP32 to act as a brain and make downloading the info more accessible via WiFi . While tracking the obvious — like position, speed, and time — this data logger also displays temperature, elevation, dawn and dusk, on an ePaper screen which is a great choice for conserving battery.

The prototyping process is neat on this one. The first complete build used point-to-point soldering on a protoboard to link several breakout modules together. After that, a PCB design embraces the same modules, with a footprint for the ESP’s castellated edges and header footprints for USB charing board, SD card board, ePaper, etc. All of this finds a hope in a 3D printed enclosure. After a fair chunk of time coding in the Arduino IDE the logger is ready for [_Traveler]’s next excursion!

As far as power consumption in the field, [_Traveler] says the GPS takes a few moments to get a proper location — with the ESP chewing through battery life all the while — and plans to tinker with it in shorter order.

Not all GPS trackers are created equal: sometimes all you need is a stripped-down tracker for your jog, or to know exactly where every pothole is along your route.

[Via /r/electronics]

Hack a Day 19 Feb 19:31
arduino  esp32  gps  gps hacks  handheld  travel  

GPS Tracker Gets SMS Upgrade

In May of 2000, then-President Bill Clinton signed a directive that would improve the accuracy of GPS for anyone. Before this switch was flipped, this ability was only available to the military. What followed was an onslaught of GPS devices most noticeable in everyday navigation systems. The large amount of new devices on the market also drove the price down to the point where almost anyone can build their own GPS tracking device from scratch.

The GPS tracker that [Vadim] created makes use not just of GPS, but of the GSM network as well. He uses a Neoway M590 GSM module for access to the cellular network and a NEO-6 GPS module. The cell network is used to send SMS messages that detail the location of the unit itself. Everything is controlled with an ATmega328P, and a lithium-ion battery and some capacitors round out the fully integrated build.

[Vadim] goes into great detail about how all of the modules operate, and has step-by-step instructions on their use that go beyond what one would typically find in a mundane datasheet. The pairing of the GSM and GPS modules seems to go match up well together, much like we have seen GPS and APRS pair for a similar purpose: tracking weather balloons.


Filed under: gps hacks
Hack a Day 07 Jul 06:00
arduino  atmega328  atmega328p  cell  gps  gps hacks  gsm  sms  tracker  

Hackaday Prize Entry: USB GSM GPS 9DOF SD TinyTracker Has All the Acronyms

[Paul] has put together an insanely small yet powerful tracker for monitoring all the things. The USB TinyTracker is a device that packages a 48MHz processor, 2G modem, GPS receiver, 9DOF motion sensor, barometer, microphone, and micro-SD slot for data storage. He managed to get it all to fit into a USB thumb drive enclosure, meaning that you can program it however you want in the Arduino IDE, then plug it into any USB port and let it run. This enables things like remote monitoring, asset tracking, and all kinds of spy-like activity.

One of the most unusual aspects of his project, though, is this line: “Everything came together very nicely and the height of parts and PCBs is exactly as I planned.” [Paul] had picked out an enclosure that was only supposed to fit a single PCB, but with some careful calculations, and picky component selection, he managed to fit everything onto two 2-layer boards that snap together with a connector and fit inside the enclosure.

We’ve followed [Paul’s] progress on this project with an earlier iteration of his GSM GPS Tracker, which used a Teensy and fit snugly into a handlebar, but this one is much more versatile.


Filed under: The Hackaday Prize

A Beacon Suitable for Tracking Santa’s sleigh?

High-altitude ballooning is becoming a popular activity for many universities, schools and hacker spaces. The balloons, which can climb up to 40 km in the stratosphere, usually have recovery parachutes to help get the payload, with its precious data, back to solid ground safely. But when you live in areas where the balloon is likely to be flying over the sea most of the time, recovery of the payload becomes tricky business. [Paul Clark] and his team from Durham University’s Centre for Advanced Instrumentation are working on building a small, autonomous glider – essentially a flying hard drive – to navigate from 30 km up in the stratosphere to a drop zone somewhere near a major road. An important element of such a system is the locator beacon to help find it. They have now shared their design for an “Iridium 9603 Beacon” — a small Arduino-compatible unit which can transmit its location and other data from anywhere via the Iridium satellite network.

The beacon uses the Short Burst Data service which sends email to a designated mail box with its date, time, location, altitude, speed, heading, temperature, pressure and battery voltage. To do all of this, it incorporates a SAMD21G18 M0 processor; FGPMMOPA6H GPS module; MPL3115A2 altitude sensor; Iridium 9603 Short Burst Data module + antenna and an LTC3225 supercapacitor charger. Including the batteries and antenna, the whole thing weighs in at 72.6 g, making it perfectly suited for high altitude ballooning. The whole package is powered by three ‘AAA’ Energizer Ultimate Lithium batteries which ought to be able to withstand the -56° C encountered during the flight. The supercapacitors are required to provide the high current needed when the beacon transmits data.

The team have tested individual components up to 35 km on a balloon flight from NASA’s Columbia Scientific Balloon Facility and the first production unit will be flown on a much smaller balloon, launched from the UK around Christmas. The GitHub repository contains detailed information about the project along with the EagleCAD hardware files and the Arduino code. Now, if only Santa carried this on his Sleigh, it would be easy for NORAD to track his progress in real time.


Filed under: gps hacks, hardware

Personal Compass Points to Your Spawn Point

A conventional compass points north (well, to magnetic north, anyway). [Videoschmideo]  wanted to make a compass that pointed somewhere specific. In particular, the compass — a wedding gift — was to point to a park where the newlywed couple got engaged. Like waking up in a fresh new Minecraft world, this is their spawn point and now they can always find their way back from the wilderness.

The device uses an Arduino, a GPS module, a compass, and a servo motor. Being a wedding gift, it also needs to meet certain aesthetic sensibilities. The device is in an attractive wooden box and uses stylish brass gears. The gears allow the servo motor to turn more than 360 degrees (and the software limits the rotation to 360 degrees). You can see a video of the device in operation, below.

The compass module may be hard to find, but you should be able to modify it to work with more readily available boards. Since you may not be able to find the exact gears used, your build will probably be a little different anyway.

The brass and wood are decidedly steampunk looking. It reminded us of this GPS project. If you have too much street cred to buy an off-the-shelf GPS, you could always roll your own.


Filed under: Arduino Hacks, gps hacks
Hack a Day 05 Nov 12:00