Posts with «servo» label

Making Music By Probing Magnetite Crystals

Well, noises anyway. [Dmitry Morozov] and [Alexandra Gavrilova] present an interesting electronics-based art installation, which probes a large chunk of crystalline magnetite, using a pair of servo-mounted probes, ‘measuring’ the surface conductivity and generating some sound and visuals.

It appears to have only one degree of freedom per probe, so we’re not so sure all that much of the surface gets probed per run, but however it works it produces some interesting, almost random results. The premise is that the point-to-point surface resistivity is unpredictable due to the chaotically formed crystals all jumbled up, but somehow uses these measured data to generate some waveshapes vaguely reminiscent of the resistivity profile of the sample, the output of which is then fed into a sound synthesis application and pumped out of a speaker. It certainly looks fun.

From a constructional perspective, hardware is based around a LattePanda fed samples by an ADS1115 ADC, which presumably is also responsible for driving the LCD monitor and the sound system. An Arduino is also wedged in there perhaps for servo-driving duty, maybe also as part of the signal chain from the probes, but that is just a guess on our part. The software uses the VVVV (Visual Live-programming suite) and the Pure Data environment.

We haven’t seen magnetite used for this type of application before, we tend to see it as a source of Iron for DIY knifemaking, as a medium to help separate DNA or just to make nanoparticles, for erm, reasons.

Hack a Day 09 May 21:00

Servo Plotter Needs Nothing Exotic

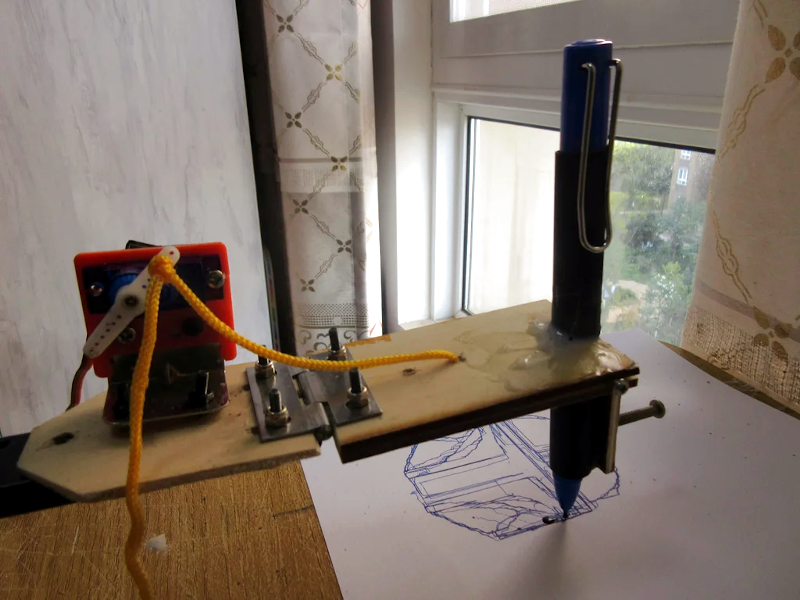
Although the widespread use of 3D printers has made things like linear bearings and leadscrews more common, you still can’t run down to your local big-box hardware store and get them. However, you can get drawer slides and any hobby shop can sell you some RC servos. That and an Arduino can make a simple and easy plotter. Just ask [JimRD]. You can also watch it do its thing in the video below.

Of course, servos aren’t usually what you use in a plotter. But the slides convert the rotation of the servo into linear motion. One servo for X and one for Y is all you need. Another microservo lifts the pen up and down using a hinge you could also get from a hardware store.

Is it pretty? No. Does it do amazing artwork? No, again. But it is the kind of thing you could probably throw together from things you happen to have hanging around, especially if you are about to trash an old desk or cabinet with slides in it.

This would make a great rainy day project. We are suckers for simple plotter projects even though you could just mate a pen to your 3D printer or CNC machine. Those won’t fit your whiteboard, though.

Quit Hunching Over Your Screen With A Little Robotic Help

[Norbert Zare] has identified a problem many of us suffer from – chronically bad posture. Its very common to see computer users hunched forwards over a screen, which eventually will lead to back problems. He mentions that most posture correction devices are pretty boring, so the obvious solution to [Norbert] was to build a simple robot to give you a friendly nudge into the correct position.

This simple Arduino-based build uses the ubiquitous MPU-6050 which provides 3-axis acceleration and 3-axis gyro data all processed on-chip, so it can measure where you’re going, which way you are orientated and how fast you are rotating. This is communicated via the I2C bus, so hooking into an Arduino or Raspberry Pi is a simple affair. There are plenty of Open Source libraries to work with this very common device, which helps reduce the learning curve for those unfamiliar with programming a fairly complex device.

At the moment, he is mounting the sensor on his body, and hard-wiring it, so there’s already some scope for improvement there. The operating premise is simple, if the body angle is more than 55 degrees off vertical, move the servos and shove the body back in to the correct position.

The project GitHub has the code needed, and the project page over on Hackaday.io shows the wiring diagram.

We have seen quite a few projects on this subject over the years, like this one that sends you mobile notifications, an ultrasonic rangefinder-based device, and one that even uses a webcam to keep an eye on you. This one has the silliness-factor, and we like that round these parts. Keep an eye on [Norbert] we’re sure there more good stuff to come!

Hack a Day 21 Oct 00:00

Smooth Servo Motion For Lifelike Animatronics

Building an animatronic robot is one thing, but animating it in a lifelike fashion is a completely different challenge. Hobby servos are cheap and popular for animatronics, but just letting it move at max speed isn’t particularly lifelike. In the video after the break, [James Bruton] demonstrates how to achieve natural motion with a simple animatronic head and a few extra lines of code.

Very little natural body movement happens at a constant speed, it’s always accelerating or decelerating. When we move our heads to look at something around us, our neck muscles accelerate our head sharply in the chosen direction and then slows down gradually as it reaches its endpoint. To do this in Arduino/C code, a new intermediate position for the servo is specified for each main loop until it reaches the final position. The intermediate value is the sum of 95% of the current position, and 5% of the target position. This gives the effect of the natural motion described above. The ratios can be changed to suit the desired speed.

The delay function is usually one of the first timing mechanisms that new Arduino programmers learn about, but it’s not suited for this application, especially when you’re controlling multiple servos simultaneously. Instead, the millis function is used to keep track of the system clock in the main loop, which fires the position update commands at the specified intervals. Adafruit wrote an excellent tutorial on this method of multitasking, which [James] based his code on. Of course, this should be old news to anyone who has been doing embedded programming for a while, but it’s an excellent introduction for newcomers.

Like most of [James]’s projects, all the code and CAD files are open source and available on GitHub. His projects make regular appearances here on Hackaday, like his mono-wheel balancing robot and mechanically multiplexed flip-dot display.

Hack a Day 04 Sep 03:00

Home Automation for Fans of Quick-and-Dirty Solutions

At Hackaday, we celebrate all kinds of projects, but we’ll have to admit that the polished and professional-looking builds tend to catch our eye a lot more than perhaps they should. There’s plenty of love to be had for the rougher builds, though, of which this quick-and-dirty home automation system is a perfect example.

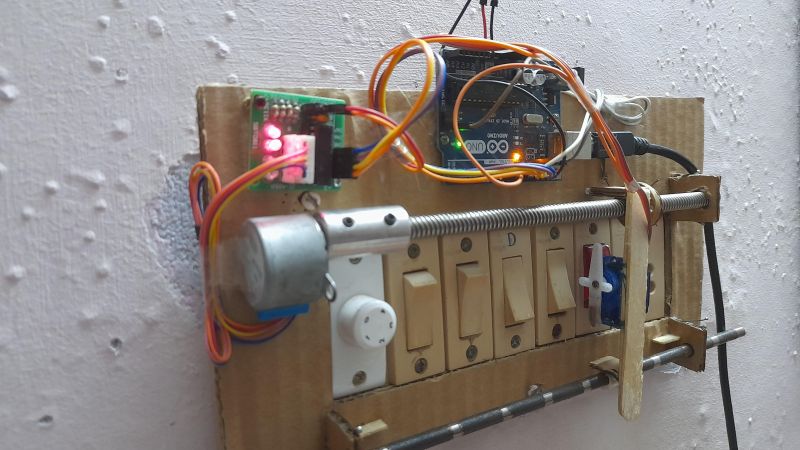
Before anyone rushes to state the obvious with, “Should have used some relays,” consider that [MAKE_IT_WITH_ME]’s stated goal was to get the basics of a home automation system built with pretty much nothing but what can be found in one of those Arduino starter kits. And further, consider that landlords might not look kindly on tenants who wire a bunch of SSRs or Sonoff switches into the walls of their building. So this minimalist build is perfect for certain use cases. Its interface to the building’s electrical system is 100% mechanical, via a servo that travels along the bank of switches on a stepper-driven leadscrew. The servo has a modified horn to properly flick the rocker-style switches, and although changing from switch to switch is a bit slow, it works surprisingly well. The video below shows it in action.

While we can see it possibly working as-is for Decora-style switches that are seen in some markets, we’d think some mods would be in order for the more standard toggle-style switch — perhaps a finger extending out from the horn, along with a second servo to tilt the whole assembly away from the wall to allow it to clear the switch bats.


Compact M&M Sorter Goes Anywhere

Let’s face it — eating different colored candy like M&Ms or Skittles is just a little more fun if you sort your pile by color first. The not-fun part is having to do it by hand. [Jackofalltrades_] decided to tackle this time-worn problem for engineering class because it’s awesome and it satisfies the project’s requirement for sensing, actuation, and autonomous sequencing. We’d venture to guess that it satisfies [Jackofalltrades_]’ need for chocolate, too.

Here’s how it works: one by one, M&Ms are selected, pulled into a dark chamber for color inspection, and then dispensed into the proper cubby based on the result. [Jackofalltrades_] lived up to their handle and built a color-detecting setup out of an RGB LED and light-dependent resistor. The RGB LED shines red, then, green, then blue at full brightness, and takes a voltage reading from the photocell to figure out the candy’s color. At the beginning, the machine needs one of each color to read in and store as references. Then it can sort the whole bag, comparing each M&M to the reference values and updating them with each new M&M to create a sort of rolling average.

We love the beautiful and compact design of this machine, which was built to maximize the 3D printer as one of the few available tools. The mechanical design is particularly elegant. It cleverly uses stepper-driven rotation and only needs one part to do most of the entire process of isolating each one, passing it into the darkness chamber for color inspection, and then dispensing it into the right section of the jar below. Be sure to check out the demo after the break.

Need a next-level sorter? Here’s one that locates and separates the holy grail of candy-coated chocolate — peanut M&Ms that didn’t get a peanut.

Remote Controlled Car Gets Active Suspension

Active suspensions are almost a holy grail for cars, adding so much performance gain that certain types have even been banned from Formula 1 racing. That doesn’t stop them from being used on a wide variety of luxury and performance cars, though, as they can easily be tuned on the fly for comfort or improved handling. They also can be fitted to remote controlled cars as [Indeterminate Design] shows with this electronic servo-operated active suspension system for his RC truck.

Each of the four servos used in this build is linked to the mounting point of the existing coilover suspension on the truck. This allows the servo to change the angle that the suspension is positioned while the truck is moving. As a result, the truck has a dramatic performance enhancement including a tighter turning radius, more stability, and the capability of doing donuts. The control system runs on an Arduino with an ESP32 to enable live streaming of data, and also includes an MPU6050 to monitor the position of the truck’s frame while it is in motion.

There’s a lot going on in this build especially with regard to the control system that handles all of the servos. Right now it’s only programmed to try to keep the truck’s body relatively level, but [Indeterminate Design] plans to program several additional control modes in the future. There’s a lot of considerations to make with a system like this, and even more if you want to accommodate for Rocket League-like jumps.

Hack a Day 15 Apr 00:00

Eyecam is Watching You in Between Blinks

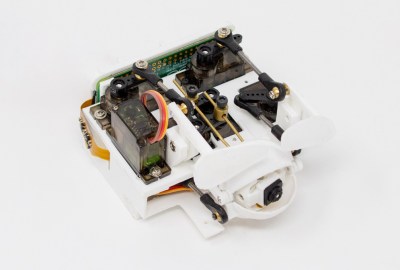
We will be the first to admit that it’s often hard to be productive while working from home, especially if no one’s ever really looking over your shoulder. Well, here is one creepy way to feel as though someone is keeping an eye on you, if that’s what gets you to straighten up and fly right. The Eyecam research project by [Marc Teyssier] et. al. is a realistic, motorized eyeball that includes a camera and hangs out on top of your computer monitor. It aims to spark conversation about the sensors that are all around us already in various cold and clinical forms. It’s an open source project with a paper and a repo and a how-to video in the works.

The eyebrow-raising design pulls no punches in the uncanny department: the eye behaves as you’d expect (if you could have expected this) — it blinks, looks around, and can even waggle its brow. The eyeball, brow, and eyelids are actuated by a total of six servos that are controlled by an Arduino Nano.

Inside the eyeball is a Raspberry Pi camera connected to a Raspi Zero for the web cam portion of this intriguing horror show. Keep an eye out after the break for the Eyecam infomercial.

Creepy or fascinating, it succeeds in making people think about the vast amount of sensors around us now, and what the future of them could look like. Would mimicking eye contact be an improvement over the standard black and gray oblong eye? Perhaps a pair of eyes would be less unsettling, we’re not really sure. But we are left to wonder what’s next, a microphone that looks like an ear? Probably. Will it have hair sprouting from it? Perhaps.

Yeah, it’s true; two eyes are more on the mesmerizing side, but still creepy, especially when they follow you around the room and can shoot frickin’ laser beams.

Thanks for the tip, [Sven, greg, and Itay]!

Remote Control Robot Deals Dominoes

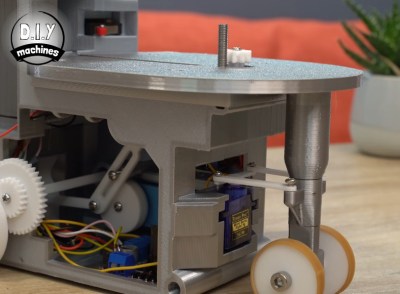
Oh, dominoes — the fun of knocking them down is inversely proportional to the pain of setting them all up again. [DIY Machines] is saving loads of time by automating the boring part with a remote control domino-laying machine. If only it could pick them back up.

This machine can be driven directly over Bluetooth like an R/C car, or programmed to follow a predetermined path via Arduino code. Here’s how it works: an Arduino Uno drives two servos and one motor. The 1:90 geared motor drives the robot around using a 180° servo to steer. A continuous servo turns the carousel, which holds nearly 140 dominoes. We love that the carousel is designed to be hot-swappable, so you can keep a spare ready to go.

[DIY Machines] really thought of everything. Every dozen or so dominoes, the machine leaves a gap in case one of the dominoes is tipped prematurely. There are also a couple of accessories for it, like a speedy domino loading stick and a fun little staircase bridge to add to your domino creations. Though all the machine files are freely available, [DIY Machines] requests a small donation for the accessories files. Check out the complete build video after the break, followed by a bonus video that focuses on upgrading the machine with an HM10 Bluetooth module for controlling it directly with a phone.

This certainly isn’t the first domino-laying device we’ve seen, though it might be the most accessorized. [Matthias Wandel]’s version uses only one motor to move and deal the dominoes.

Useless Box with Attitude Isn’t Entirely Useless

What is it about useless machines that makes them so attractive to build? After all, they’re meant to be low-key enraging. At this point, the name of the game is more about giving that faceless enemy inside the machine a personality more than anything else. How about making it more of a bully with laughter and teasing? That’s the idea behind [alexpikkert]’s useless machine with attitude — every time you flip a switch, the creature of uselessness inside gets a little more annoyed.

In this case the creature is Arduino-based and features two sound boards that hold the giggles and other sounds. There are three servos total: one for each of the two switch-flipping fingers, and a third that flaps the box lid at you. This build is wide open, and [alexpikkert] even explains how to repurpose a key holder box for the enclosure. Check out the demo after the break.

We love a good useless machine around here, especially when they take a new tack. This one looks like any other useless machine, but what’s happening inside may surprise you.