Posts with «robotic arm» label

Robot Arm Adds Freedom to 3D Printer

3D printers are an excellent tool to have on hand, largely because they can print other tools and parts rapidly without needing to have them machined or custom-ordered. 3D printers have dropped in price as well, so it’s possible to have a fairly capable machine in your own home for only a few hundred dollars. With that being said, there are some limitations to their function but some of them can be mitigated by placing the printer head on a robot arm rather than on a traditional fixed frame.

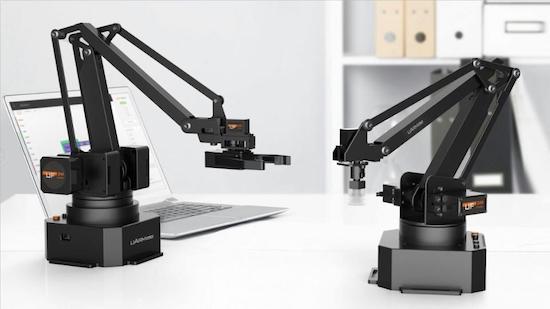
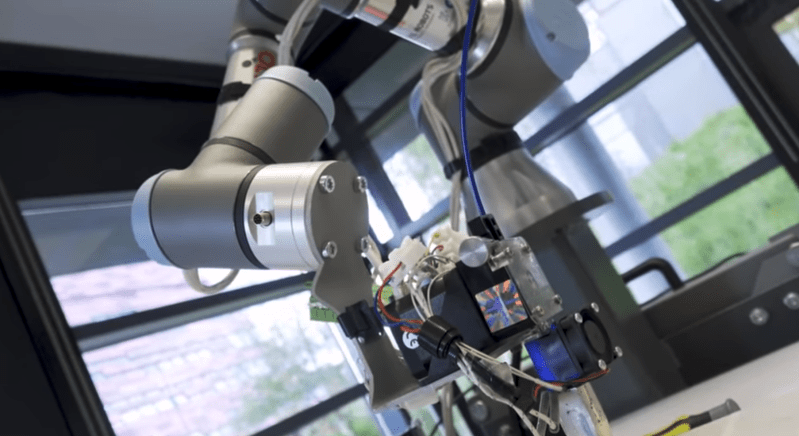
The experimental 3D printer at the University of Nottingham adds a six-axis robotic arm to their printer head, which allows for a few interesting enhancements. Since the printer head can print in any direction, it allows material to be laid down in ways which enhance the strength of the material by ensuring the printed surface is always correctly positioned with respect to new material from the printer head. Compared to traditional 3D printers which can only print on a single plane, this method also allows for carbon fiber-reinforced prints since the printer head can follow non-planar paths.

Of course, the control of this printer is much more complicated than a traditional three-axis printer, but it is still within the realm of possibility with readily-available robotics and microcontrollers. And this is a hot topic right now: we’ve seen five-axis 3D printers, four-axis 3D printers, and even some clever slicer hacks that do much the same thing. Things are finally heating up in non-planar 3D printing!

Thanks to [Feinfinger] for the tip!

3D Printed Gesture-Controlled Robot Arm is a Ton of Tutorials

Ever wanted your own gesture-controlled robot arm? [EbenKouao]’s DIY Arduino Robot Arm project covers all the bases involved, but even if a robot arm isn’t your jam, his project has plenty to learn from. Every part is carefully explained, complete with source code and a list of required hardware. This approach to documenting a project is great because it not only makes it easy to replicate the results, but it makes it simple to remix, modify, and reuse separate pieces as a reference for other work.

[EbenKouao] uses a 3D-printable robotic gripper, base, and arm design as the foundation of his build. Hobby servos and a single NEMA 17 stepper take care of the moving, and the wiring and motor driving is all carefully explained. Gesture control is done by wearing an articulated glove upon which is mounted flex sensors and MPU6050 accelerometers. These sensors detect the wearer’s movements and turn them into motion commands, which in turn get sent wirelessly from the glove to the robotic arm with HC-05 Bluetooth modules. We really dig [EbenKouao]’s idea of mounting the glove sensors to this slick 3D-printed articulated gauntlet frame, but using a regular glove would work, too. The latest version of the Arduino code can be found on the project’s GitHub repository.

Most of the parts can be 3D printed, how every part works together is carefully explained, and all of the hardware is easily sourced online, making this a very accessible project. Check out the full tutorial video and demonstration, embedded below.

3D printing has been a boon for many projects, especially those involving robotic arms. All kinds of robotic arm projects benefit from the advantages of 3D printing, from designs that focus on utility and function, to clever mechanical designs that reduce part count in unexpected ways.

Store and replay this robot’s movements from your phone

Robotic arms can be interesting, as are robots that roll around—especially on a semi-exotic Mecanum wheel setup. Dejan Nedelkovski’s latest How To Mechatronics build, however, combines both into one package.

This project actually starts out in a previous post, where he constructs the moving base with Mecanum wheels, enabling it to slide and rotate in any direction.

In this final(?) stage, he adds a five-axis robot arm mounted on top of its boxy frame, or six-axis if you count the gripper. Either way, the arm uses a total of six servos for actuation, and the base of the bot travels around under the power of four stepper motors. Each motor is controlled by an Arduino Mega, using a custom shield, allowing repeatable movements in any direction. These can be stored and replayed via the robot’s custom Android app as desired.

A Robotic Arm For Those Who Like Their Kinematics Both Ways

A robotic arm is an excellent idea if you’re looking to get started with electromechanical projects. There’s linkages to design, and motors to drive, but there’s also the matter of control. This is referred to as “kinematics”, and can be considered in both the forward and inverse sense. [aerdronix] built a robotic arm build that works in both ways.

The brains of the build is an Arduino Yun, which receives commands over the USB interface. Control is realised through the Blynk app, which allows IoT projects to easily build apps for smartphones that can be published to the usual platforms.

The arm’s position is controlled in two fashions. When configured to use inverse kinematics, the user commands an end effector position, and the arm figures out the necessary position of the linkages to make it happen. However, the arm can also be used in a forward kinematics mode, where the individual joint positions are commanded, which then determine the end effector’s final position.

Overall, it’s a well-documented build that lays out everything from the basic mechanical design to the software and source code required to control the system. It’s an excellent learning resource for the newcomer, and such an arm could readily be used in more complex projects.

We see plenty of robotic arms around these parts, like this fantastic build based on an IKEA lamp. If you’ve got one, be sure to hit up the tip line. Video after the break.

Hack a Day 19 Oct 12:00

Project Aslan is a 3D-printed robotic sign language translator

With the lack of people capable of turning written or spoken words into sign language in Belgium, University of Antwerp masters students Guy Fierens, Stijn Huys, and Jasper Slaets have decided to do something about it. They built a robot known as Aslan, or Antwerp’s Sign Language Actuating Node, that can translate text into finger-spelled letters and numbers.

Project Aslan–now in the form of a single robotic arm and hand–is made from 25 3D-printed parts and uses an Arduino Due, 16 servos, and three motor controllers. Because of its 3D-printed nature and the availability of other components used, the low-cost design will be able to be produced locally.

The robot works by receiving information from a local network, and checking for updated sign languages from all over the world. Users connected to the network can send messages, which then activate the hand, elbow, and finger joints to process the messages.

Although it is one arm now, work will continue with future masters students, focusing on expanding to a two-arm design, implementing a face, and even integrating a webcam into the system. For more info, you can visit the project’s website here as well as its write-up on 3D Hubs.

WinchBot is a robotic arm composed of 3 winches and 5 servos

Using an Arduino Uno along with a Raspberry Pi for control, hacker “HomoFaciens” came up with this clever delta-style robot.

If you were going to make a robot with five servos, many Makers would make a robot arm with them and call it a day. HomoFaciens, however, who is known for making amazing machines with minimal tools and improvised materials, instead made something that seems to be a cross between a delta robot and a Skycam.

His device, called “WinchBot,” uses three winches attached to an equilateral triangle frame to move a slider on a central pivoting square rod. This allows the robot’s 5-axis “hand” to be positioned within the robot’s work area. The servos are then tasked with keeping everything in the correct orientation, as well as opening and closing the gripper as needed.

If you’d like more details than given in the very entertaining video seen here, be sure to check out the project’s write-up.

uArm Swift is an open-source robotic assistant for your desktop

Need a hand? The UFACTORY team has got you covered with the uArm Swift, an open-source robotic assistant for your desktop.

The four-axis uArm Swift is a smaller and sleeker version of the company’s original device from 2014. Based on an Arduino Mega, the robot is capable of lifting 500 grams (1.1 pounds) with a working range of 5 to 32 centimeters (2 to 12.6 inches).

UFACTORY has launched two different models of the consumer-friendly arm on Indiegogo. Whereas the basic model is perfect for beginners and those looking to tinker around with robotics, the Swift Pro is designed for a more experienced Maker crowd with a stronger motor, more precision, and greater versatility. It also boasts position repeatability down to 0.2mm.

With a little programming, the Pro can perform a wide range of tasks from 3D printing to laser engraving to picking up and moving game pieces. You can even create your own actions through the team’s Blockly-based graphical software, uArm Studio, as well as control your Swift either directly from a keyboard-and-mouse setup, by making gestures, or over Bluetooth from the uArm Play mobile app.

The Swift is extendable with three different end-effectors (suction cup, metallic gripper, and universal holder) and a built-in socket for selected Seeed Grove modules. But that’s not all. Attach an OpenMV Cam and the robotic arm can detect faces, colors, and markers.

If you’re looking for an affordable and portable robotic arm, be sure to check out UFACTORY’s Indiegogo campaign.

These Makers built a gesture-controlled robotic arm

Using a Kinect sensor with MATLAB/Simulink and an Arduino, B.Avinash and J.Karthikeyan made a robotic arm to mimic their every move.

If you need a robotic arm to follow your movements, the Kinect sensor is a great place to start. On the other hand, it’s a long leap programming-wise to go from sensor input to coordinated movement of servo motors. Through a toolchain stretching from the sensor itself, to a computer, and finally to an Arduino Mega controlling the servos directly, Avinash and Karthikeyan did just that.

For their process, the computer takes data from the Kinect sensor, then translates it into servo angles using the MATLAB and Simulink computer programs. Resulting data is then fed into the Arduino via a serial connection, which controls the robot’s movements appropriately with a slight delay.

Be sure to check out the project’s Instructables page to learn more about this awesome build!

Sandwich bot gets peanut butter everywhere but the bread

What do you do when you’re the Queen of S****y Robots and you’re in the mood for a peanut butter and jelly sandwich? You have a remote-controlled bot make one for you, of course. This is exactly what Simone Giertz set out to do in her latest hilarious project using a pair of robotic arms: one holds a plastic knife for spreading, while the other is puppeteered by her friend, Fiona.

Although this sandwich robot may not be making any PB&Js anytime soon, Giertz’s video will surely have you LOL-ing. Enjoy!

Simple Robotic Arm Made out Of Cardboard Pieces

Primary image

What does it do?

Just a simple robotic arm that is controlled by potentiometers.

This is another project that I have done so far at my internship at the Boca Bearing Company. I was having some extra time waiting for some parts to arrive in the mail so I decided to do a quick simple project. As with the other projects that I have done here at Boca Bearings, I was to document everything about the project. So the following instuctions is taken from a post on the company's blog at http://bocabearingsworkshop.blogspot.com/2015/10/simple-robotic-arm-made-out-of.html

Cost to build

Embedded video

Finished project

Complete

Number

Time to build

Type

URL to more information

Weight

read more

Let's Make Robots 26 Oct 20:55