Posts with «stepper» label

An Atomic Pendulum Clock Accurate Enough for CERN

That big grandfather clock in the library might be an impressive piece of mechanical ingenuity, and an even better example of fine cabinetry, but we’d expect that the accuracy of a pendulum timepiece would be limited to a sizable fraction of a minute per day. Unless, of course, you work at CERN and built  “the most accurate pendulum clock on the planet.”

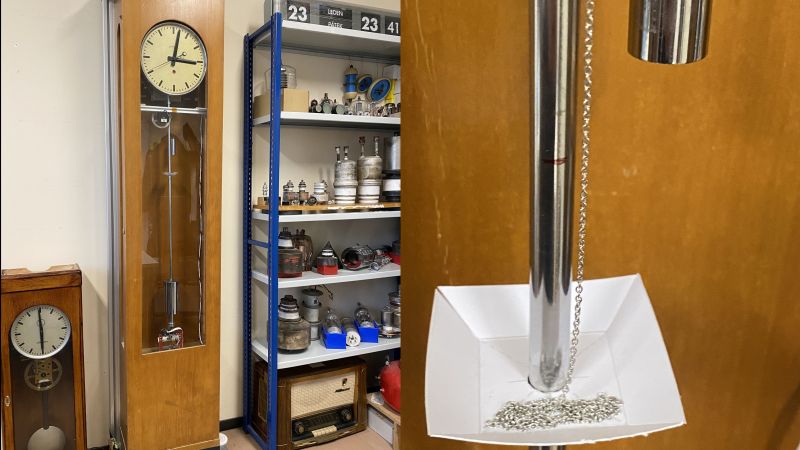
While we’re in no position to judge [Daniel Valuch]’s claim, we’re certainly inclined to believe him, mainly because the 1950s-era Czechoslovakian pendulum clock his project was based on, the Elektročas HH3, was built specifically as a master clock for labs, power plants, and broadcast use. The pendulum of this mid-century beauty is made of the alloy invar, selected for its exceptionally low coefficient of thermal expansion. This ensures the pendulum doesn’t change length with temperature, but it still only brings the clock into the 0.1 second/day range.

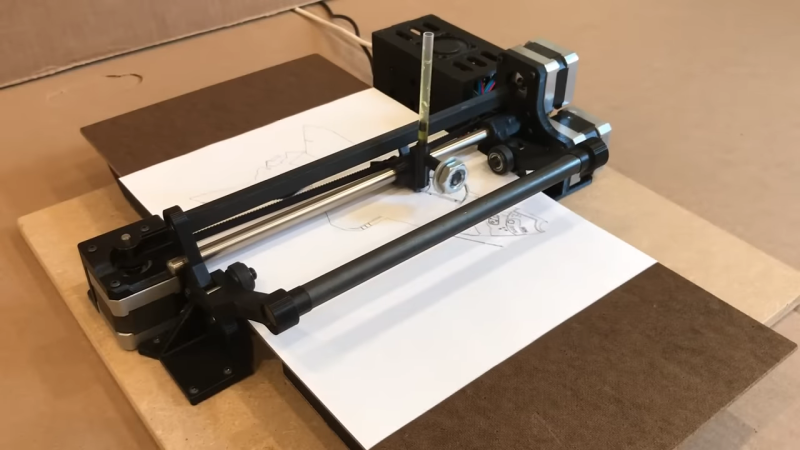
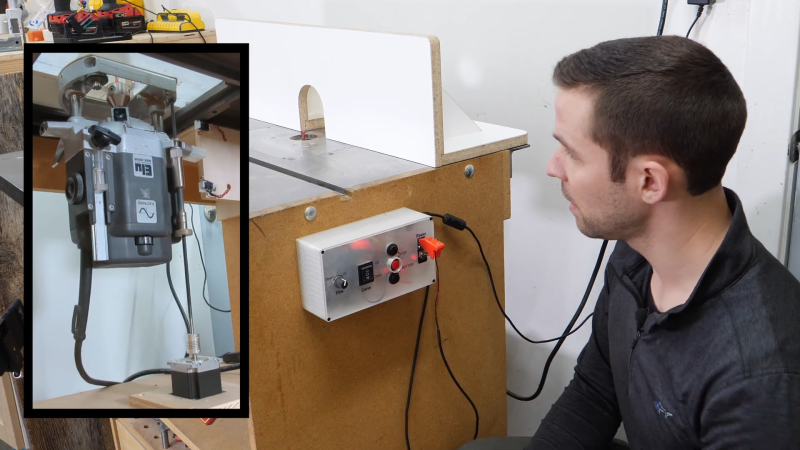
Clearly that’s not good enough for a clock at CERN, the European Laboratory for Nuclear Research, where [Daniel] works as an RF engineer. With access to a 10-MHz timebase from a cesium fountain atomic clock — no less a clock than the one that’s used to define the SI second, by the way — [Daniel] looked for ways to sync the clock up to it. Now, we know what you’re thinking — he must have used some kind of PLL to give an electromagnetic “kick” to the bob to trim the pendulum’s period. Good guess on the PLL, but the trimming method is a little cruder — [Daniel] uses a stepper motor attached to the clock’s frame to pay out or retract a length of fine chain into a cardboard dish attached to the pendulum’s rod. The change in mass changes the pendulum’s center of gravity, which changes its effective length, and allows the clock to be tuned a couple of seconds per day.

It seems like [Daniel] is claiming that his chain-corrected clock won’t drift more than a second from the cesium clock for 158 million years. Again, we’ll take his word for it, but it’s a wonderfully ad hoc approach to tuning the clock, and we appreciate its simplicity.

Hack a Day 28 Jan 21:00

This Arduino Pen Plotter Is Built for Speed

We see a lot of simple pen plotter projects around here, and while we appreciate them one and all, most of them are a little on the slow side. That’s OK — a glacial pace is sometimes all that’s needed, as long as it gets the job done. But there’s nothing wrong with putting the pedal to the metal, so to speak. And that’s exactly what this super-fast Arduino-based plotter is all about.

As the story goes, [IV Projects] felt the need for speed after building an earlier pen plotter project that worked, but failed to excite. With the additional goal of keeping the plotter easy to build with cheap parts, the design centers on a “grit roller drive” for the Y-axis — the one that actually moves the paper back and forth. And move it does, using Dremel tool sanding drums on a lightweight shaft to maximize acceleration. In fact, all the moving parts are kept as lightweight as possible, and the results really show — the three steppers really sing when this plotter is in action.

There are some really clever details in [IV Projects]’ design. We particularly like the way the pen lift mechanism works, and the surprise appearance of a clothespin spring as a belt tensioner was a real treat. Judging by the pile of rejected prototype parts, it took quite a bit of work to get this design right. If you’d like to build your own, STLs are available for the printed parts.

If you’re interested in what the other end of the speed scale looks like, check out this bare-minimum pen plotter.

Hack a Day 20 Jun 06:00
arduino  misc hacks  pen  plotter  stepper  x-y  

Bring Precision to the Woodshop with an Electronic Router Lift

One of the knocks that woodworkers get from the metalworking crowd is that their chosen material is a bit… compliant. Measurements only need to be within a 1/16th of an inch or so, or about a millimeter, depending on which side of the Atlantic you’re on. And if you’re off a bit? No worries, that’s what sandpaper is for.

This electronic router lift is intended to close the precision gap and make woodworking a bit less subjective. [GavinL]’s build instructions are clearly aimed at woodworkers who haven’t dabbled in the world of Arduinos and stepper motors, and he does an admirable job of addressing the hesitancy this group might feel when tackling such a build. Luckily, a lot of the mechanical side of this project can be addressed with a commercially available router lift, which attaches to a table-mounted plunge router and allows fine adjustment of the cutting tool’s height from above the table.

What’s left is to add a NEMA 23 stepper to drive the router lift, plus an Arduino to control it. [GavinL] came up with some nice features, like a rapid jog control, a fine adjustment encoder, and the ability to send the tool all the way up or all the way down quickly. Another really nice touch is the contact sensor, which is a pair of magnetic probes that attach temporarily to the tool and a height gauge to indicate touch-off. Check the video below to see it all in action.

One quibble we have with [GavinL]’s setup is the amount of dust that the stepper will be subjected to. He might need to switch out to a dustproof stepper sooner rather than later. Even so, we think he did a great job bridging the gap between mechatronics and woodworking — something that [Matthias Wandel] has been doing great work on, too.

Home Automation for Fans of Quick-and-Dirty Solutions

At Hackaday, we celebrate all kinds of projects, but we’ll have to admit that the polished and professional-looking builds tend to catch our eye a lot more than perhaps they should. There’s plenty of love to be had for the rougher builds, though, of which this quick-and-dirty home automation system is a perfect example.

Before anyone rushes to state the obvious with, “Should have used some relays,” consider that [MAKE_IT_WITH_ME]’s stated goal was to get the basics of a home automation system built with pretty much nothing but what can be found in one of those Arduino starter kits. And further, consider that landlords might not look kindly on tenants who wire a bunch of SSRs or Sonoff switches into the walls of their building. So this minimalist build is perfect for certain use cases. Its interface to the building’s electrical system is 100% mechanical, via a servo that travels along the bank of switches on a stepper-driven leadscrew. The servo has a modified horn to properly flick the rocker-style switches, and although changing from switch to switch is a bit slow, it works surprisingly well. The video below shows it in action.

While we can see it possibly working as-is for Decora-style switches that are seen in some markets, we’d think some mods would be in order for the more standard toggle-style switch — perhaps a finger extending out from the horn, along with a second servo to tilt the whole assembly away from the wall to allow it to clear the switch bats.


This Automated Wire Prep Machine Cuts and Strips the Wire

We’ve seen a fair number of automated wire cutting builds before, and with good reason: cutting lots of wires by hand is repetitive and carries the risk of injury. What’s common to all these automated wire cutters is a comment asking, “Yeah, but can you make it strip too?” As it turns out, yes you can.

The key to making this automated wire cutter and stripper is [Mr Innovative]’s choice of tooling, and accepting a simple compromise. (Video, embedded below.) Using just about the simplest wire strippers around — the kind with a diamond-shaped opening that adjusts to different wire gauges by how far the jaws are closed — makes it so that the tool can both cut and strip, and adapt to different wire sizes. The wire is fed from a spool to a custom attachment sitting atop a stepper motor, which looks very much like an extruder from a 3D-printer. The wire is fed through a stiff plastic tube into the jaws of the cutter. Choosing between cutting and stripping is a matter of aiming the wire for different areas on the cutter’s jaws, which is done with a hobby servo that bends the guide tube. The throw of the cutter is controlled by a stepper motor — partial closure nicks the insulation, while a full stroke cuts the wire off. The video below shows the build and the finished product in action.

Yes, the insulation bits at the end still need to be pinched off, but it’s a lot better than doing the whole job yourself. [Mr Innovative] has a knack for automating tedious manual tasks like this. Check out his label dispenser, a motor rotor maker, and thread bobbin winder.

Hack a Day 09 Dec 09:00
arduino  cut  stepper  strip  stripper  tool hacks  wire  

A Clock From An Electricity Meter

Electric utilities across the world have been transitioning their meters from the induction analog style with a distinctive spinning disc to digital “smart” meters which aren’t as aesthetically pleasing but do have a lot of benefits for utilities and customers alike. For one, meter readers don’t need to visit each meter every month because they are all networked together and can download usage data remotely. For another, it means a lot of analog meters are now available for projects such as this clock from [Monta].

The analog meters worked by passing any electricity used through a small induction motor which spun at a rate proportional to the amount of energy passing through it. This small motor spun a set of dials via gearing in order to keep track of the energy usage in the home or business. To run the clock, [Monta] connected a stepper motor with a custom transmission to those dials for the clock face because it wasn’t possible to spin the induction motor fast enough to drive the dials. An Arduino controls that stepper motor, but can’t simply drive the system in a linear fashion because it needs to skip a large portion of the “minutes” dials every hour. A similar problem arises for the “hours” dials, but a little bit of extra code solves this problem as well.

Once the actual clock is finished, [Monta] put some finishing touches on it such as backlighting in the glass cover and a second motor to spin the induction motor wheel to make the meter look like it’s running. It’s a well-polished build that makes excellent use of some antique hardware, much like one of his other builds we’ve seen which draws its power from a Stirling engine.

Hack a Day 29 Oct 21:00

A Linear Stencil Clock Built for Quiet Operation

We around the Hackaday shop never get tired of seeing new ways to mark the passage of time. Hackers come up with all manner of interesting timekeeping modalities using every imaginable material and method of moving the mechanism once per whatever minimum time unit the hacker chooses to mark.

But honestly, there are only so many ways to make a clock, and while we’re bound to see some repeats, it’s still nice to go over old ground with a fresh approach. Take this linear sliding stencil clock for instance. [Luuk Esselbrugge] has included some cool design elements that bear a closer look. The video below shows that the display is made up of four separate stepper motors, each driving a vertical stencil via a rack-and-pinion mechanism. There a simple microswitch for homing the display, and a Neopixel for lighting things up.

The video below shows that the stencils move very, very slowly; [Luuk] says that this is to keep the steppers as quiet as possible. Still, this means that some time changes take more than a minute to accomplish, which is a minor problem. The Neopixel also doesn’t quite light up just one digit, which should be a pretty easy fix for version 2. Still, even with these issues, we like the stately movements of this clock, and appreciate [Luuk]’s attempts to make it easier to live with.

Don’t let the number of clocks you see on these pages dissuade you from trying something new, or from putting your twist on an old design. Start with fridge magnets, an old oscilloscope, or even a bevy of steel balls, and let your imagination run wild. Just make sure to tell us all about it when you’re done.

[via r/Arduino]

Concentric Rings Keep this Calendar Perpetually Up to Date

The variety of ways that people find to show the passage of time never ceases to amaze us. Just when you think you’ve seen them all, someone comes up with something new and unusual, like the concentric rings of this automated perpetual calendar.

What we really like about the design that [tomatoskins] came up with is both its simplicity and its mystery. By hiding the mechanism, which is just a 3D-printed internal ring gear attached to the back of each ring, it invites people in to check it out closely and discover more. Doing so reveals that each ring is hanging from a pinion gear on a small stepper motor, which rotates it to the right point once a day or once a month. Most of the clock is made from wood, with the rings themselves made using the same technique that woodturners use to create blanks for turning bowls — or a Death Star. We love the look the method yields, although it could be even cooler with contrasting colors and grains for each segment. And there’s nothing stopping someone from reproducing this with laser-cut parts, or adding rings to display the time too.

Another nice tip in this write up is the trick [tomatoskins] used to label the rings, by transferring laser-printed characters from paper to wood using nothing but water-based polyurethane wood finish. That’s one to file away for another day.

Control a Motor With a Touchpad

There are a surprising wealth of parts inside of old laptops that can be easily scavenged, but often these proprietary tidbits of electronics will need a substantial amount of work to make them useful again. Obviously things such as hard drives and memory can easily be used again, but it’s also possible to get things like screens or batteries to work with other devices with some effort. Now, there’s also a way to reuse the trackpad as well.

This build uses a PS/2 touchpad with a Synaptics chip in it, which integrates pretty smoothly with an Arduino after a few pins on the touchpad are soldered to. Most of the work is done on the touchpad’s built in chip, so once the Arduino receives the input from the touchpad it’s free to do virtually anything with it. In this case, [Kushagra] used it to operate a stepper motor in a few different implementations.

If you have this type of touchpad lying around, all of the code and schematics to make it useful again are available on the project page. An old laptop in the parts bin is sure to have a lot of uses even after you take the screen off, but don’t forget that your old beige PS/2 mouse from 1995 is sure to have some uses like this as well.

Hack a Day 11 Jun 06:00

Rock ‘n Roll With 3D-Printed Tonewheels

What can you do with ferromagnetic PLA? [TheMixedSignal] used it to give new meaning to the term ‘musicians’ gear’. He’s made a proof of concept for a DIY tone generator, which is the same revolutionary system that made the Hammond organ sing.

Whereas the Hammond has one tonewheel per note, this project uses an Arduino to drive a stepper at varying speeds to produce different notes. Like we said, it’s a proof of concept. [TheMixedSignal] is proving that tonewheels can be printed, pickups can be wound at home, and together they will produce audible frequencies. The principle is otherwise the same — the protruding teeth of the gear induce changes in the magnetic field of the pickup.

[TheMixedSignal] fully intends to expand on this project by adding more tone wheels, trying different gear profiles, and replacing the stepper with a brushless motor. We can’t wait to hear him play “Karn Evil 9”. In the meantime, put on those cans and check out the demo/build video after the break.

We don’t have to tell you how great Hammond organs are for making music. But did you know they can also encode secret messages?

Via the Arduino blog.