Posts with «animation» label

Studio Ghibli Fest will bring 14 movies back to theaters this year, so start planning

GKIDS and Fathom Events have announced the lineup for Studio Ghibli Fest 2024, and it’s absolutely stacked with gems. This year’s run includes 14 films and isn’t limited only to the works of Hayao Miyazaki, also featuring movies directed by Isao Takahata, Yoshifumi Kondo, Hiroyuki Morita and Hiromasa Yonebayashi. Studio Ghibli Fest 2024 will start with Spirited Away on April 27 and continue through December, when it ends with My Neighbor Totoro. The movies are playing in select AMC and Regal theaters across the US, with a few dates for each title in both Japanese and English dubbed.

The full list is: Spirited Away (April 27-May 1), Nausicaä of the Valley of the Wind (May 19 and 21), Castle in the Sky (May 20 and 22), The Secret World of Arrietty (June 9 and 11), When Marnie Was There (June 10 and 12), Princess Mononoke (July 13-17), Ponyo (August 3-7), Whisper of the Heart (August 25 and 27), The Cat Returns (August 26 and 28), Howl’s Moving Castle (September 26-October 3), Kiki’s Delivery Service (October 26-30), Pom Poko (November 24 and 26), The Tale of the Princess Kaguya (November 25 and 27), and My Neighbor Totoro (December 7-11).

I’m already crying thinking about watching Nausicaä and Princess Kaguya on the big screen. Actually, you can apply that sentiment to pretty much all of these titles. It’s going to be great. According to the announcement, there will also be “surprise special extra content.”

This article originally appeared on Engadget at https://www.engadget.com/studio-ghibli-fest-will-bring-14-movies-back-to-theaters-this-year-so-start-planning-201908784.html?src=rss

Funimation will stream its last anime on April 2

Sony's Funimation purchased Crunchyroll from WarnerMedia for $1.175 billion in 2020, and they kicked off their transformation into a unified anime subscription service under the latter's name a year after the deal was announced. By 2022, Crunchyroll has already added more than 50 shows that were either exclusive to Funimation and weren't available with dubs to its library. Now, it sounds like they're almost done unifying their services: Funimation has revealed that it's going to shut down its old app and website on April 2. 

In Funimation's End of Services' page, it said most of its content has already been migrated to Crunchyroll. Those who've yet to leave Funimation, will automatically be transferred — all they need to do is use their existing credentials to log into Crunchyroll's website. After they do log in, they'll get a prompt telling them that their Watch and History lists are being migrated, as well. 

Viewers who have a Funimation and a Crunchyroll account will be prompted to merge their data from both services or to choose to use their data from one of them. And after April 2, their billing will go through Crunchyroll's and will follow its pricing, which starts at $8 a month. Unfortunately, Funimation customers who own digital copies complementing the DVDs or Blu-rays they purchased will lose access to them because Crunchyroll does not support them. "[W]e are continuously working to enhance our content offerings and provide you with an exceptional anime streaming experience," Funimation said. "We appreciate your understanding and encourage you to explore the extensive anime library available on Crunchyroll."

This article originally appeared on Engadget at https://www.engadget.com/funimation-will-stream-its-last-anime-on-april-2-131526671.html?src=rss

Hulu debuts hub for adult animation and anime

Animation is big business for Hulu, as the streamer’s roster of cartoons regularly rank in the top ten for hours watched on the platform, thanks to shows like Bob’s Burgers, Futurama, King of the Hill and many more. Seeking to capitalize on the popularity of adult animation, Hulu’s launching a sub-brand to house all of its animated and anime-based content, as originally reported by Variety. Animayhem is now the home for legacy content like the above titles and original content like Solar Opposites and Koala Man.

All told, the hub/sub-brand allows access to 2,600 episodes of traditional animated programming, spread across 46 series, and a whopping 18,400 episodes of anime, spread across 435 series. That’s over 20,000 episodes of cartoon goodness, for those keeping count. As such, Hulu is advertising the platform as the streamer’s “Animation Destination.”

The surprise-launch of Animayhem comes just two weeks before the latest Futurama reboot, and that’s just the start of the streamer’s plans for animation domination. Hulu’s ordered new episodes of Mike Judge’s King of the Hill and it plans on having a heavy presence at this year’s San Diego Comic-Con, promising an immersive experience called “Hulu Animayhem: Into the Second Dimension.”

In the meantime, the hub’s already available as part of the standard Hulu subscription, so go ahead and binge Archer, Family Guy and all the hundreds upon hundreds of available anime series like One Piece and Naruto.

This article originally appeared on Engadget at https://www.engadget.com/hulu-debuts-hub-for-adult-animation-and-anime-182929897.html?src=rss

Smooth Animations, Slick Bar Graphs, but No Custom Characters on This 16×2 OLED

Sometimes, finding new ways to use old hardware requires awesome feats of reverse engineering, software sleight of hand, and a healthy dose of good fortune. Other times, though, it’s just as simple as reading the data sheet and paying attention to details.

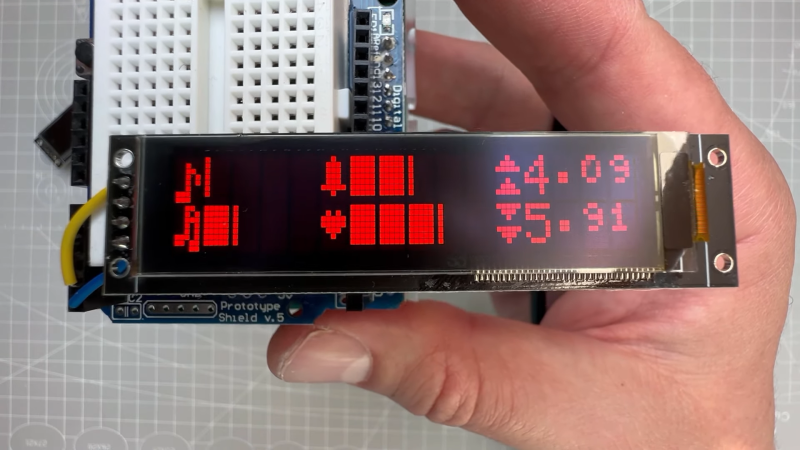
Not that we’re knocking [upir]’s accomplishment with these tricked-out 16×2 OLED displays. Far from it, in fact — the smoothly animated bar graph displays alphanumerics look fantastic. What’s cool about this is that he accomplished all this without resorting to custom characters. We’ve seen him use this approach before; this time around, the hack involves carefully shopping for a 16×2 OLED display with the right driver chip — a US2066 chip. You’ll still need a few tricks to get things working, like extra pull-up resistors to get the I2C display talking to an Arduino, plus a little luck that you got a display with the right character ROM.

Once all that is taken care of, getting the display to do what you want is mainly a matter of coding. In the video below, [upir] does a great job of walking through the finer points, and the results look great. The bar graphs in particular look fantastic, with silky-smooth animations.

Hack a Day 27 Apr 21:00
16x2  animation  arduino  display  led hacks  oled  rom  us2066  

Digital Rain Cloud


Description

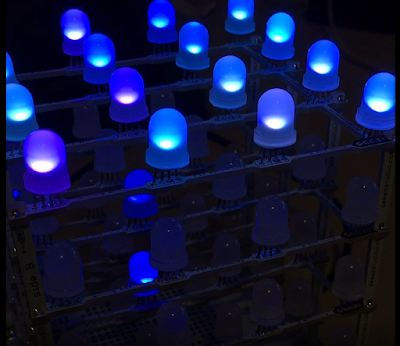
This is a very simple project that turns a Rainbow Cube Kit from Seeedstudio, into a digital rain cloud. It features a relaxing rain animation which is ruined by a not-so-relaxing yet somewhat realistic lightning effect. The animation has a very random pattern, and is quite satisfying to watch. The strategically placed cotton wool on the top of the cube makes all the difference to the project, and is sure to impress all of your friends. Luckily, I have done all of the hard work for you. You will find the full source code for the animation sequence below. You just have to provide the Rainbow Cube Kit and the cotton wool. Have fun !!


Light Painting Animations Directly From Blender

Light painting: there’s something that never gets old about waving lights around in a long exposure photo. Whilst most light paintings are single shots, some artists painstakingly create frame-by-frame animations. This is pretty hard to do when moving a light around by hand: it’s mostly guesswork, as it’s difficult to see the results of your efforts until after the photo has been taken. But what if you could make the patterns really precise? What if you could model them in 3D?

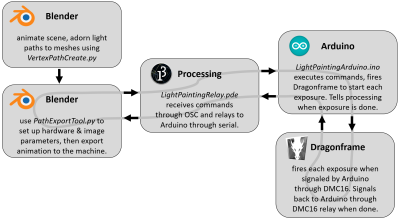
[Josh Sheldon] has done just that, by creating a process which allows animations formed in Blender to be traced out in 3D as light paintings. An animation is created in Blender then each frame is automatically exported and traced out by an RGB LED on a 3D gantry. This project is the culmination of a lot of software, electronic and mechanical work, all coming together under tight tolerances, and [Josh]’s skill really shines.

The first step was to export the animations out of Blender. Thanks to its open source nature, Python Blender add-ons were written to create light paths and convert them into an efficient sequence that could be executed by the hardware. To accommodate smooth sliding camera movements during the animation, a motion controller add-on was also written.

The gantry which carried the main LED was hand-made. We’d have been tempted to buy a 3D printer and hack it for this purpose, but [Josh] did a fantastic job on the mechanical build, gaining a solidly constructed gantry with a large range. The driver electronics were also slickly executed, with custom rack-mount units created to integrate with the DragonFrame controller used for the animation.

The video ends on a call to action: due to moving out, [Josh] was unable to continue the project but has done much of the necessary legwork. We’d love to see this project continued, and it has been documented for anyone who wishes to do so. If you want to check out more of [Josh]’s work, we’ve previously written about that time he made an automatic hole puncher for music box spools.

Thanks for the tip, [Nick].

Stop motion short filmed with the help of Arduino

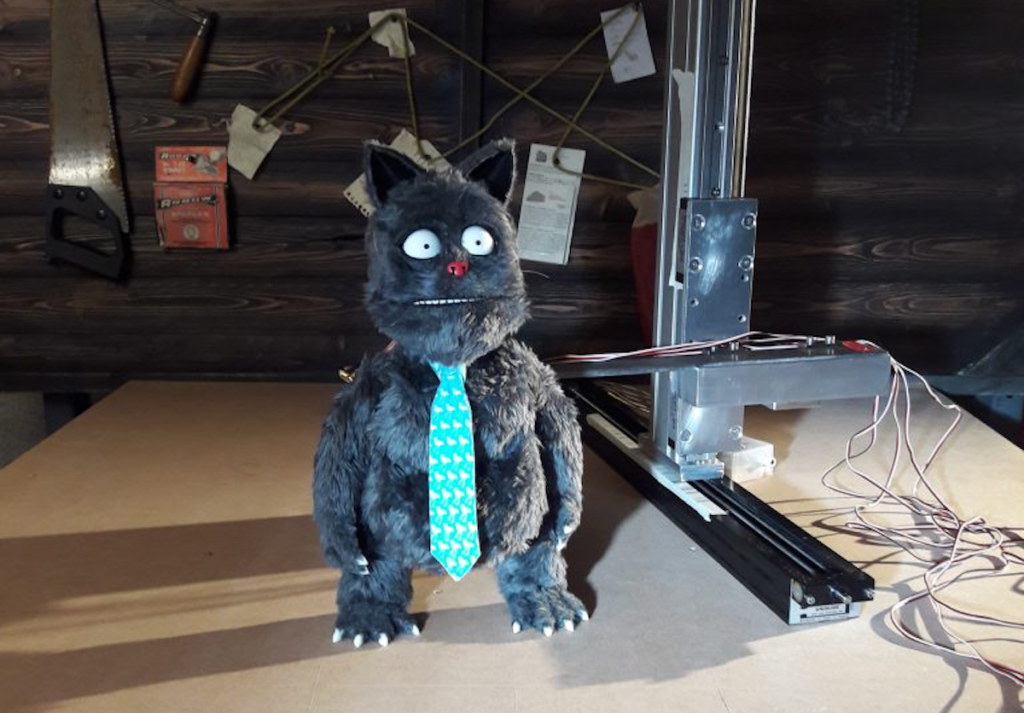
One can imagine that making a stop motion animation film is a lot of work, but if you’ve ever wondered what one involves, James Wilkinson decided to document the process of making Billy Whiskers: The Mystery of the Misplaced Trowel. 

The main character of this film is a mystery-solving feline, who is animated with the help of five servos that control mouth movements under Arduino control.

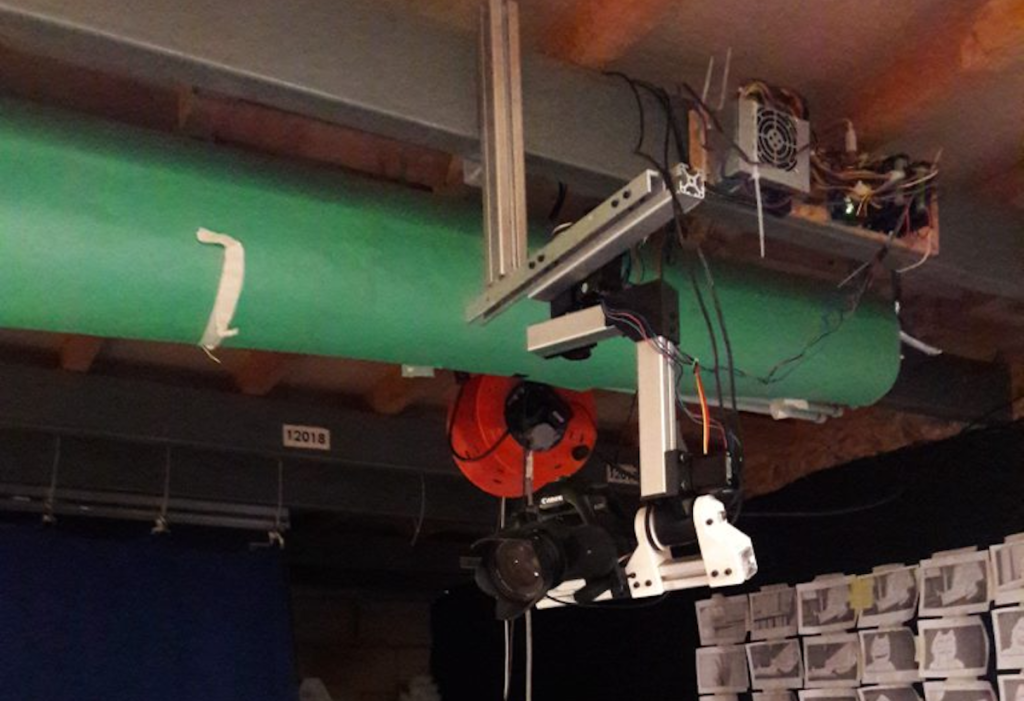
In order to get shots that move properly, Wilkinson also came up with his own motion capture rig, moved by a number of stepper motors via an Arduino Mega. His documentation is certainly worth checking out if you’re interested in animatronics or advanced filming techniques, and you can see a trailer for the film below.

Animatronic Puppet Takes Cues From Animation Software

Lip syncing for computer animated characters has long been simplified. You draw a set of lip shapes for vowels and other sounds your character makes and let the computer interpolate how to go from one shape to the next. But with physical, real world puppets, all those movements have to be done manually, frame-by-frame. Or do they?

Billy Whiskers: animatronic puppet

Stop motion animator and maker/hacker [James Wilkinson] is working on a project involving a real-world furry cat character called Billy Whiskers and decided that Billy’s lips would be moved one frame at a time using servo motors under computer control while [James] moves the rest of the body manually.

He toyed around with a number of approaches for making the lip mechanism before coming up with one that worked the way he wanted. The lips are shaped using guitar wire soldered to other wires going to servos further back in the head. Altogether there are four servos for the lips and one more for the jaw. There isn’t much sideways movement but it does enough and lets the brain fill in the rest.

On the software side, he borrows heavily from the tools used for lip syncing computer-drawn characters. He created virtual versions of the five servo motors in Adobe Animate and manipulates them to define the different lip shapes. Animate then does the interpolation between the different shapes, producing the servo positions needed for each frame. He uses an AS3 script to send those positions off to an Arduino. An Arduino sketch then uses the Firmata library to receive the positions and move the servos. The result is entirely convincing as you can see in the trailer below. We’ve also included a video which summarizes the iterations he went through to get to the finished Billy Whiskers or just check out his detailed website.

[Jame’s] work shows that there many ways to do stop motion animation, perhaps a part of what makes it so much fun. One of those ways is to 3D print a separate object for each character shape. Another is to make paper cutouts and move them around, which is what [Terry Gilliam] did for the Monty Python movies. And then there’s what many of us did when we first got our hands on a camera, move random objects around on our parent’s kitchen table and shoot them one frame at a time.

Arduino Stroboscope Animation


UPDATE: Magzor has just started a Kickstarter campaign. Please check it out to get a good package deal on many of their components. Many of which were used in this tutorial.
 
This tutorial will show you how to build your own Stroboscopic Animator using Magzor's Mechanotronic Design Portal as a starting point. Magzor Corporation is a business in California that is trying really hard to simplify robotic design. They want to enable users with little to no engineering experience to design and manufacture a custom robot by themselves in a matter of hours.
What is a stroboscope? A stroboscope is an instrument that uses a strobe light to make a moving object look stationary… We will use this feature to create an interesting 4 picture animation on a rotating disk.


Have a look at the video below to see the project in action, and the MDP process walk-through:


Video


Parts Required:


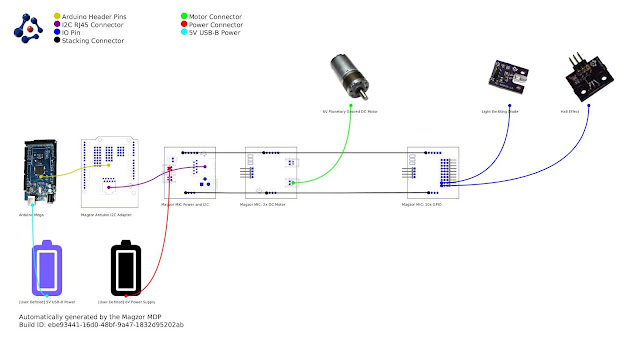
Magzor Schematic Diagram

Click to zoom ...

 
Further build instructions can be obtained by selecting the components in the Mechanotronics Design Portal within the Magzor website. Generating the build, and then selecting "Setup Instructions" tab at the top of the page. See video above to see this process in action.


Arduino Sketch


Make sure to copy and paste the following code into your Arduino IDE. It doesn't seem to work directly from the browser. You also need to install the Arduino Magzor I2C library ( http://magzor.com/downloads/ )


Putting it together


Arduino MEGA


Magzor I2C board


MIC Boards


MIC Boards Assembled


Sensors, Modules and Shields - all put together


Motor with Bracket and Wire


Picture lined up with magnet on disk


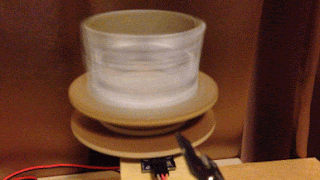
Stroboscopic Animation


The Arduino MEGA microcontroller listens for the hall effect sensor to be triggered by the south facing side of the magnet on the underside of the rotating disk. As the magnet moves over the hall effect sensor, the sensor is triggered and the Arduino instructs the LED to blink for a fraction of a second. By manipulating the delay after the trigger time, we can get the LED to blink when one of the four images on the rotating disk is towards the front position. And if we get the timing right, we can make a simple animation.
 
If you watch the video above, you will see that the image bounces around a little bit. The duration of each frame is determined by the speed of the rotating disk (or motor), and the number of LED flashes per frame. Any changes in rotation speed will affect the position of the picture when the LED blinks. My rotating disk is not completely semetrical or centred correctly, and therefore a bit jumpy… but you get the idea. Bold images with high contrast seem to work best… Precision is key for this type of project. And if you can get the disk to rotate at a constant speed, you could probably do away with the hall effect sensors and magnets… however, in my case, these were essential in getting the project to work as intended.
 
This project is a lot of fun. You can really get creative by making your own pictures or 3 dimensional models (for a stop motion effect). Try different colours. It really is quite cool.


Concluding Comments


I would like to thank Magzor for supplying the components used in this tutorial, and letting me try out their MDP process. I really like the concept, the one stop shop which looks after you from beginning to end. Providing everything I needed to get the project off the ground. The point of this exercise was to go through the entire process of selecting the parts, build the project, and get it up and running. And I have done that in no time at all.
 
There is only one library to download and install, and the good thing is that you don't have to go hunting for it. The latest "correct" working version of the library is easy to find, right there on the Magzor website… Speaking of the Magzor website, please make sure to take a quick look around. It is quite impressive.
 
  UPDATE: Magzor has just started a Kickstarter campaign. Please check it out to get a good package deal on many of their components. Many of which were used in this tutorial.


If you like this page, please do me a favour and show your appreciation :

 
Visit my ArduinoBasics Google + page.
Follow me on Twitter by looking for ScottC @ArduinoBasics.
I can also be found on Pinterest and Instagram.
Have a look at my videos on my YouTube channel.


This project would not have been possible without the collaborative effort from Magzor Corporation.
Please visit their site and check out the MDP.


However, if you do not have a google profile...
Feel free to share this page with your friends in any way you see fit.

Arduino Stroboscope Animation


This tutorial will show you how to build your own Stroboscopic Animator using Magzor's Mechanotronic Design Portal as a starting point. Magzor Corporation is a business in California that is trying really hard to simplify robotic design. They want to enable users with little to no engineering experience to design and manufacture a custom robot by themselves in a matter of hours.

What is a stroboscope? A stroboscope is an instrument that uses a strobe light to make a moving object look stationary… We will use this feature to create an interesting 4 picture animation on a rotating disk.


Have a look at the video below to see the project in action, and the MDP process walk-through:


Video


Parts Required:


Magzor Schematic Diagram

Click to zoom ...


Further build instructions can be obtained by selecting the components in the Mechanotronics Design Portal within the Magzor website. Generating the build, and then selecting "Setup Instructions" tab at the top of the page. See video above to see this process in action.


Arduino Sketch


Make sure to copy and paste the following code into your Arduino IDE. It doesn't seem to work directly from the browser. You also need to install the Arduino Magzor I2C library ( http://magzor.com/downloads/ )


Putting it together


Arduino MEGA


Magzor I2C board


MIC Boards


MIC Boards Assembled


Sensors, Modules and Shields - all put together


Motor with Bracket and Wire


Picture lined up with magnet on disk


Stroboscopic Animation


The Arduino MEGA microcontroller listens for the hall effect sensor to be triggered by the south facing side of the magnet on the underside of the rotating disk. As the magnet moves over the hall effect sensor, the sensor is triggered and the Arduino instructs the LED to blink for a fraction of a second. By manipulating the delay after the trigger time, we can get the LED to blink when one of the four images on the rotating disk is towards the front position. And if we get the timing right, we can make a simple animation.
 
If you watch the video above, you will see that the image bounces around a little bit. The duration of each frame is determined by the speed of the rotating disk (or motor), and the number of LED flashes per frame. Any changes in rotation speed will affect the position of the picture when the LED blinks. My rotating disk is not completely semetrical or centred correctly, and therefore a bit jumpy… but you get the idea. Bold images with high contrast seem to work best… Precision is key for this type of project. And if you can get the disk to rotate at a constant speed, you could probably do away with the hall effect sensors and magnets… however, in my case, these were essential in getting the project to work as intended.
 
This project is a lot of fun. You can really get creative by making your own pictures or 3 dimensional models (for a stop motion effect). Try different colours. It really is quite cool.


Concluding Comments


I would like to thank Magzor for supplying the components used in this tutorial, and letting me try out their MDP process. I really like the concept, the one stop shop which looks after you from beginning to end. Providing everything I needed to get the project off the ground. The point of this exercise was to go through the entire process of selecting the parts, build the project, and get it up and running. And I have done that in no time at all.
 
There is only one library to download and install, and the good thing is that you don't have to go hunting for it. The latest "correct" working version of the library is easy to find, right there on the Magzor website… Speaking of the Magzor website, please make sure to take a quick look around. It is quite impressive.


If you like this page, please do me a favour and show your appreciation :

 
Visit my ArduinoBasics Google + page.
Follow me on Twitter by looking for ScottC @ArduinoBasics.
I can also be found on Pinterest and Instagram.
Have a look at my videos on my YouTube channel.


This project would not have been possible without the collaborative effort from Magzor Corporation.
Please visit their site and check out the MDP.


However, if you do not have a google profile...
Feel free to share this page with your friends in any way you see fit.