Posts with «capacitive» label

For $19, this USB stick turns almost anything into a button

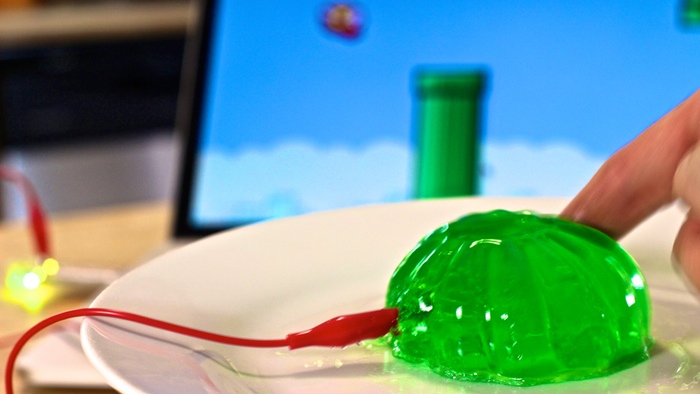
Makey Makey Go is a super-cheap invention kit. For $19, you get a USB stick and an alligator clip; use the two in tandem and you can turn (almost) anything into a keyboard or mouse button. Examples of potential uses include a Slip'N Slide that takes a photo as you zoom past, a donut spacebar, a dog bed that initiates a Skype call and a foil sword game that counts the number of times you hit an opponent. If you have an idea that requires more than one button, you just plug in another stick.

Source: Jay Silver (Kickstarter)

For $19, this USB stick turns almost anything into a button

Makey Makey Go is a super-cheap invention kit. For $19, you get a USB stick and an alligator clip; use the two in tandem and you can turn (almost) anything into a keyboard or mouse button. Examples of potential uses include a Slip'N Slide that takes a photo as you zoom past, a donut spacebar, a dog bed that initiates a Skype call and a foil sword game that counts the number of times you hit an opponent. If you have an idea that requires more than one button, you just plug in another stick.

Comments

Source: Jay Silver (Kickstarter)

Arduino BeatBox

Create your very own Arduino BeatBox !

Home-made capacitive touch sensors are used to trigger the MP3 drum sounds stored on the Grove Serial MP3 player. I have used a number of tricks to get the most out of this module, and I was quite impressed on how well it did. Over 130 sounds were loaded onto the SDHC card. Most were drum sounds, but I added some farm animal noises to provide an extra element of surprise and entertainment. You can put any sounds you want on the module and play them back quickly. We'll put the Grove Serial MP3 module through it's paces and make it into a neat little BeatBox !!


Key learning objectives

  • How to make your own beatbox
  • How to make capacitive drum pad sensors without using resistors
  • How to speed up Arduino's Analog readings for better performance
  • How to generate random numbers on your Arduino


Parts Required:

Making the drum pads


Fritzing Sketch


Grove Connections


Grove Connections (without base shield)


Arduino Sketch


  1
2
3
4
5
6
7
8
9
10
11
12
13
14
15
16
17
18
19
20
21
22
23
24
25
26
27
28
29
30
31
32
33
34
35
36
37
38
39
40
41
42
43
44
45
46
47
48
49
50
51
52
53
54
55
56
57
58
59
60
61
62
63
64
65
66
67
68
69
70
71
72
73
74
75
76
77
78
79
80
81
82
83
84
85
86
87
88
89
90
91
92
93
94
95
96
97
98
99
100
101
102
103
104
105
106
107
108
109
110
111
112
113
114
115
116
117
118
119
120
121
122
123
124
125
126
127
128
129
130
131
132
133
134
135
136
137
138
139
140
141
142
143
144
145
146
147
148
149
150
151
152
153
154
155
156
157
158
159
160
161
162
163
164
165
166
167
168
169
170
171
172
173
174
175
176
177
178
179
180
181
182
183
184
185
186
187
188
189
190
191
192
193
194
195
196
197
198
199
200
201
202
203
204
205
206
207
208
209
210
211
212
213
214
215
216
217
218
219
220
221
222
223
224
225
226
227
228
229
230
231
232
233
234
235
236
237
238
239

/* =================================================================================================
      Project: Arduino Beatbox
       Author: Scott C
      Created: 9th April 2015
  Arduino IDE: 1.6.2
      Website: http://arduinobasics.blogspot.com/p/arduino-basics-projects-page.html
  Description: This project uses home made capacitive sensors to trigger over 130 MP3 sounds
               on the Grove Serial MP3 player. 
               
               The ADCTouch library is used to eliminate the resistors from the Capacitive sensing circuit. 
               The code used for capacitive sensing was adapted from the ADCTouch library example sketches. 
               You can find the ADCTouch library and relevant example code here:
               http://playground.arduino.cc/Code/ADCTouch
               
               "Advanced Arduino ADC" is used to improve the analogRead() speed, and enhance the
               drum pad or capacitive sensor response time. The Advanced Arduino ADC code 
               was adapted from this site:
               http://www.microsmart.co.za/technical/2014/03/01/advanced-arduino-adc/
               
               
=================================================================================================== */
  #include <ADCTouch.h>
  #include <SoftwareSerial.h>
  
  
  //Global variables
  //===================================================================================================
  int potPin = A4; //Grove Sliding potentiometer is connected to Analog Pin 4
  int potVal = 0;
  byte mp3Vol = 0; //Variable used to control the volume of the MP3 player
  byte oldVol = 0;
  
  int buttonPin = 5; //Grove Button is connected to Digital Pin 5
  int buttonStatus = 0;
  
  byte SongNum[4] = {0x01,0x02,0x03,0x04}; //The first 4 songs will be assigned to the drum pads upon initialisation
  byte numOfSongs = 130; //Total number of MP3 songs/sounds loaded onto the SDHC card
  
  long randNumber; //Variable used to hold the random number - used to randomise the sounds.
  
  int ledState[4]; //Used to keep track of the status of all LEDs (on or off)
  int counter = 0;
  
  SoftwareSerial mp3(3, 4); // The Grove MP3 Player is connected to Arduino digital Pin 3 and 4 (Serial communication)
       
  int ref0, ref1, ref2, ref3; //reference values to remove offset
  int threshold = 100;
      
  // Define the ADC prescalers
  const unsigned char PS_64 = (1 << ADPS2) | (1 << ADPS1);
  const unsigned char PS_128 = (1 << ADPS2) | (1 << ADPS1) | (1 << ADPS0);


  //Setup()
  //===================================================================================================
  void setup(){
    //Initialise the Grove MP3 Module
    delay(2500); //Allow the MP3 module to power up
    mp3.begin(9600); //Begin Serial communication with the MP3 module
    setPlayMode(0x00);                        //0x00 = Single song - played once ie. not repeated. (default)
    
    //Define the Grove Button as an INPUT
    pinMode(buttonPin, INPUT);
    
    //Define the 4 LED Pins as OUTPUTs
    pinMode(8, OUTPUT); //Green LED
    pinMode(9, OUTPUT); //Blue LED
    pinMode(10, OUTPUT); //Red LED
    pinMode(11, OUTPUT); //Yellow LED
    
    //Make sure each LED is OFF, and store the state of the LED into a variable.
    for(int i=8;i<12;i++){
      digitalWrite(i, LOW);
      ledState[i-8]=0;
    } 
    
    //Double our clock speed from 125 kHz to 250 kHz
    ADCSRA &= ~PS_128;   // set up the ADC
    ADCSRA |= PS_64;    // set our own prescaler to 64
    
    //Create reference values to account for the capacitance of each pad.
    ref0 = ADCTouch.read(A0, 500);
    ref1 = ADCTouch.read(A1, 500); //Take 500 readings
    ref2 = ADCTouch.read(A2, 500);
    ref3 = ADCTouch.read(A3, 500);
    
     //This helps to randomise the drum pads.
     randomSeed(analogRead(0));
  }


  // Loop()
  //===================================================================================================
  void loop(){
     
    //Take a reading from the Grove Sliding Potentiometer, and set volume accordingly
    potVal = analogRead(potPin);
    mp3Vol = map(potVal, 0, 1023, 0,31); // Convert the potentometer reading (0 - 1023) to fit within the MP3 player's Volume range (0 - 31)
    if((mp3Vol>(oldVol+1))|(mp3Vol<(oldVol-1))){ // Only make a change to the Volume on the Grove MP3 player when the potentiometer value changes
      oldVol = mp3Vol;
      setVolume(mp3Vol);
      delay(10); // This delay is necessary with Serial communication to MP3 player
    }
    
    //Take a reading from the Pin attached to the Grove Button. If pressed, randomise the MP3 songs/sounds for each drum pad, and make the LEDs blink randomly.
    buttonStatus = digitalRead(buttonPin);
    if(buttonStatus==HIGH){
      SongNum[0]=randomSongChooser(1, 30);
      SongNum[1]=randomSongChooser(31, 60);
      SongNum[2]=randomSongChooser(61, 86);
      SongNum[3]=randomSongChooser(87, (int)numOfSongs);
      randomLEDBlink();
    }
    
    //Get the capacitive readings from each drum pad: 50 readings are taken from each pad. (default is 100)
    int value0 = ADCTouch.read(A0,50); // Green drum pad
    int value1 = ADCTouch.read(A1,50); // Blue drum pad
    int value2 = ADCTouch.read(A2,50); // Red drum pad
    int value3 = ADCTouch.read(A3,50); // Yellow drum pad
    
    //Remove the offset to account for the baseline capacitance of each pad.
    value0 -= ref0;       
    value1 -= ref1;
    value2 -= ref2;
    value3 -= ref3;
    
    
    //If any of the values exceed the designated threshold, then play the song/sound associated with that drum pad.
    //The associated LED will stay on for the whole time the drum pad is pressed, providing the value remains above the threshold.
    //The LED will turn off when the pad is not being touched or pressed.
    if(value0>threshold){
      digitalWrite(8, HIGH);
      playSong(00,SongNum[0]);
    }else{
      digitalWrite(8,LOW);
    }
    
    if(value1>threshold){
      digitalWrite(9, HIGH);
      playSong(00,SongNum[1]);
    }else{
      digitalWrite(9,LOW);
    }
    
    if(value2>threshold){
      digitalWrite(10, HIGH);
      playSong(00,SongNum[2]);
    }else{
      digitalWrite(10,LOW);
    }
    
    if(value3>threshold){
      digitalWrite(11, HIGH);
      playSong(00,SongNum[3]);
    }else{
      digitalWrite(11,LOW);
    }
  }
      
   
  // writeToMP3:
  // a generic function that simplifies each of the methods used to control the Grove MP3 Player
  //===================================================================================================
  void writeToMP3(byte MsgLEN, byte A, byte B, byte C, byte D, byte E, byte F){
    byte codeMsg[] = {MsgLEN, A,B,C,D,E,F};
    mp3.write(0x7E); //Start Code for every command = 0x7E
    for(byte i = 0; i<MsgLEN+1; i++){
      mp3.write(codeMsg[i]); //Send the rest of the command to the GROVE MP3 player
    }
  }
  
  
  //setPlayMode: defines how each song is to be played
  //===================================================================================================
  void setPlayMode(byte playMode){
    /* playMode options:
          0x00 = Single song - played only once ie. not repeated.  (default)
          0x01 = Single song - cycled ie. repeats over and over.
          0x02 = All songs - cycled 
          0x03 = play songs randomly                                           */
    writeToMP3(0x03, 0xA9, playMode, 0x7E, 0x00, 0x00, 0x00);  
  }
  
  
  //playSong: tells the Grove MP3 player to play the song/sound, and also which song/sound to play
  //===================================================================================================
  void playSong(byte songHbyte, byte songLbyte){
    writeToMP3(0x04, 0xA0, songHbyte, songLbyte, 0x7E, 0x00, 0x00);            
    delay(100);
  }
  
  
  //setVolume: changes the Grove MP3 player's volume to the designated level (0 to 31)
  //===================================================================================================
  void setVolume(byte Volume){
    byte tempVol = constrain(Volume, 0, 31); //Volume range = 00 (muted) to 31 (max volume)
    writeToMP3(0x03, 0xA7, tempVol, 0x7E, 0x00, 0x00, 0x00); 
  }
  
  
  //randomSongChooser: chooses a random song to play. The range of songs to choose from
  //is limited and defined by the startSong and endSong parameters.
  //===================================================================================================
  byte randomSongChooser(int startSong, int endSong){
    randNumber = random(startSong, endSong);
    return((byte) randNumber);
  }
  
  
  //randomLEDBlink: makes each LED blink randomly. The LEDs are attached to digital pins 8 to 12.
  //===================================================================================================
  void randomLEDBlink(){
   counter=8;
   for(int i=0; i<40; i++){
     int x = constrain((int)random(8,12),8,12);
     toggleLED(x);
     delay(random(50,100-i));
   }
     
    for(int i=8;i<12;i++){
      digitalWrite(i, HIGH);
    }
    delay(1000);
    for(int i=8;i<12;i++){
      digitalWrite(i, LOW);
      ledState[i-8]=0;
    }
  }
  
  
  //toggleLED: is used by the randomLEDBlink method to turn each LED on and off (randomly).
  //===================================================================================================
  void toggleLED(int pinNum){
    ledState[pinNum-8]= !ledState[pinNum-8];
    digitalWrite(pinNum, ledState[pinNum-8]);
  }


Arduino Code Discussion

You can see from the Arduino code above, that it uses the ADCTouch library. This library was chosen over the Capacitive Sensing Library to eliminate the need for a high value resistor which are commonly found in Capacitive Sensing projects).
 
To increase the speed of the Analog readings, I utilised one of the "Advanced Arduino ADC" techniques described by Guy van den Berg on this Microsmart website.
 
The readings are increased by modifying the Arduino's ADC clock speed from 125kHz to 250 kHz. I did notice an overall better response time with this modification. However, the Grove Serial MP3 player is limited by it's inability to play more than one song or sound at a time. This means that if you hit another drum pad while the current sound is playing, it will stop playing the current sound, and then play the selected sound. The speed at which it can perform this task was quite impressive. In fact it was much better than I thought it would be. But if you are looking for polyphonic playability, you will be dissapointed.
 
This Serial MP3 module makes use of a high quality MP3 audio chip known as the "WT5001". Therefore, you should be able to get some additional features and functionality from this document. Plus you may find some extra useful info from the Seeedstudio wiki. I have re-used some code from the Arduino Boombox tutorial... you will find extra Grove Serial MP3 functions on that page.
 
I will warn you... the Grove Serial MP3 player can play WAV files, however for some reason it would not play many of the sound files in this format. Once the sounds were converted to the MP3 format, I did not look back. So if you decide to take on this project, make sure your sound files are in MP3 format, you'll have a much better outcome.
 
I decided to introduce a random sound selection for each drum pad to extend the novelty of this instrument, which meant that I had to come up with a fancy way to illuminate the LEDs. I demonstrated some of my other LED sequences on my instagram account. I sometimes use instagram to show my work in progress.
 
Have a look at the video below to see this project in action, and putting the Grove Serial MP3 player through it's paces.
 

The Video


First there was the Arduino Boombox, and now we have the Arduino Beatbox..... who knows what will come next !
 
Whenever I create a new project, I like to improve my Arduino knowledge. Sometimes it takes me into some rather complicated topics. There is a lot I do not know about Arduino, but I am enjoying the journey. I hope you are too !! Please Google plus one this post if it helped you in any way. These tutorials are free, which means I survive on feedback and plus ones... all you have to do is just scroll a little bit more and click that button :)


If you like this page, please do me a favour and show your appreciation :

 
Visit my ArduinoBasics Google + page.
Follow me on Twitter by looking for ScottC @ArduinoBasics.
I can also be found on Pinterest and Instagram.
Have a look at my videos on my YouTube channel.


However, if you do not have a google profile...
Feel free to share this page with your friends in any way you see fit.

Arduino Plays White Tiles On Your Mobile Touchscreen

Like many mobile gamers, [Daniel] has found himself caught up by the addictive “White Tiles” game. Rather than play the game himself though,  [Daniel] decided to write his own automatic White Tiles player. While this hack has been pulled off before, it’s never been well documented. [Daniel] used knowledge he gleaned on Hackaday and Hackaday.io to achieve his hack.

The basic problem is sensing white vs black tiles and activating the iPad’s capacitive touch screen. On the sensing end, [Daniel] could have used phototransistors, but it turned out that simple CdS cells, or photoresistors, were fast enough in this application. Activating the screen proved to be a bit harder. [Daniel] initially tried copper tape tied to transistors, but found they wouldn’t reliably trigger the screen. He switched over to relays, and that worked perfectly. We’re guessing that changing the wire length causes enough of a capacitance change to cause the screen to detect a touch.

The final result is a huge success, as [Daniel’s] Arduino-based player tears through the classic game in only 3.9 seconds! Nice work [Daniel]!

Click past the break to see [Daniel’s] device at work, and to see a video of him explaining his creation.


Filed under: Arduino Hacks

Sleek Desk Lamp Changes Colors Based on Sun Position

[Connor] was working on a project for his college manufacturing class when he came up with the idea for this sleek desk lamp. As a college student, he’s not fond of having his papers glowing brightly in front of him at night. This lamp takes care of the problem by adjusting the color temperature based on the position of the sun. It also contains a capacities touch sensor to adjust the brightness without the need for buttons with moving parts.

The base is made from two sheets of aluminum and a bar of aluminum. These were cut and milled to the final shape. [Connor] found a nice DC barrel jack from Jameco that fits nicely with this design. The head of the lamp was made from another piece of aluminum bar stock. All of the aluminum pieces are held together with brass screws.

A slot was milled out of the bottom of the head-piece to make room for an LED strip and a piece of 1/8″ acrylic. This piece of acrylic acts as a light diffuser.  Another piece of acrylic was cut and added to the bottom of the base of the lamp. This makes for a nice glowing outline around the bottom that gives it an almost futuristic look.

The capacitive touch sensor is a pretty simple circuit. [Connor] used the Arduino capacitive touch sensor library to make his life a bit easier. The electronic circuit really only requires a single resistor between two Arduino pins. One of the pins is also attached to the aluminum body of the lamp. Now simply touching the lamp body allows [Connor] to adjust the brightness of the lamp.

[Connor] ended up using an Electric Imp to track the sun. The Imp uses the wunderground API to connect to the weather site and track the sun’s location. In the earlier parts of the day, the LED colors are cooler and have more blues. In the evening when the sun is setting or has already set, the lights turn more red and warm. This is easier on the eyes when you are hunched over your desk studying for your next exam. The end result is not only functional, but also looks like something you might find at that fancy gadget store in your local shopping mall.


Filed under: Arduino Hacks

Fruit piano uses a different circuit than the Makey Makey

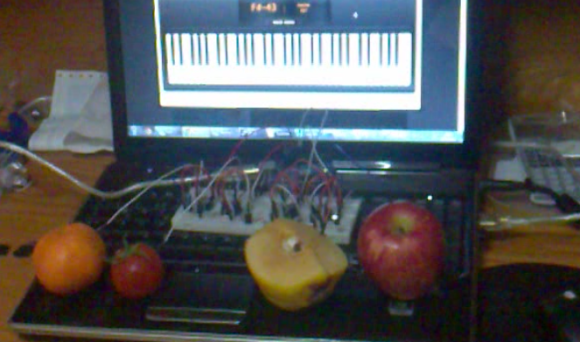
[Hasbi Sevinç] is using perishable goods in his electronics project. The orange, tomato, and two apples seen above act as keys for the virtual piano. The concept is the same as the Makey Makey which is often demonstrated as a banana piano. This implementation uses an Arduino to read the sensors and to connect to the computer running the piano program.

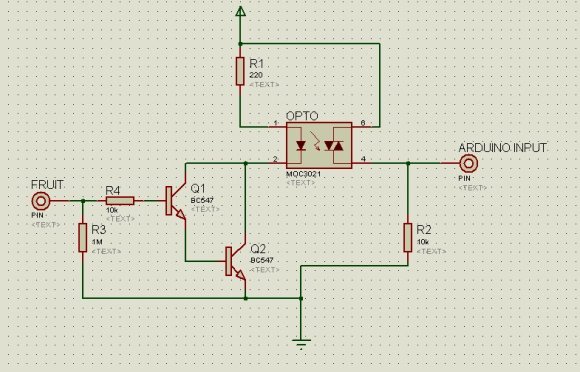
You can see there’s a fair amount of circuitry built on the breadboard. Each piece of fruit has its own channel to make it into a touch sensor. The signal produced when your finger contacts the food is amplified by transistors connected in a Darlington pair. That circuit drives the low side of a optoisolator transmitter. The receiving side of it is connected the I/O pin of the Arduino. You can see the schematic as well as a demo clip after the break.

This use of hardware frees up a lot of your microcontroller cycles. That’s because projects like this banana piano use the timers to measure RC decay. [Hasbi's] setup provides a digital signal that at most only needs to be debounced.


Filed under: arduino hacks, peripherals hacks

Control a Virtual World Using Music

Arboration controls a projected landscape based on the musical input of the user.

Read the full article on MAKE

MAKE » Arduino 11 Jan 20:00
ableton  arduino  capacitive  itp  max  msp  music  projection  unity3d  

BeetBox drops a beat with a side of Raspberry Pi, and other plant puns (video)

Sometimes the plays on words are unavoidable -- in fact, they form the very heart of Scott Garner's recent musical creation. His BeetBox turns six of its namesake root vegetables into drum pads through SparkFun capacitive touch sensors, all of which are controlled by (what else?) a Raspberry Pi. Cleverness goes beyond the core technology and food jokes, as well. All of the circuitry and audio equipment is hidden within the wood box, making it look more like a horticultural project than machinery. We don't mind the lack of production plans when there's source code available; we're mostly curious as to what in our garden would make for a good rhythm section.

[Image credit: Scott Garner, Flickr]

Continue reading BeetBox drops a beat with a side of Raspberry Pi, and other plant puns (video)

Filed under: Misc, Alt

Comments

Via: Gizmag

Source: Scott Made This

Engadget 20 Dec 05:58