Posts with «hc-05» label

3D Printed Gesture-Controlled Robot Arm is a Ton of Tutorials

Ever wanted your own gesture-controlled robot arm? [EbenKouao]’s DIY Arduino Robot Arm project covers all the bases involved, but even if a robot arm isn’t your jam, his project has plenty to learn from. Every part is carefully explained, complete with source code and a list of required hardware. This approach to documenting a project is great because it not only makes it easy to replicate the results, but it makes it simple to remix, modify, and reuse separate pieces as a reference for other work.

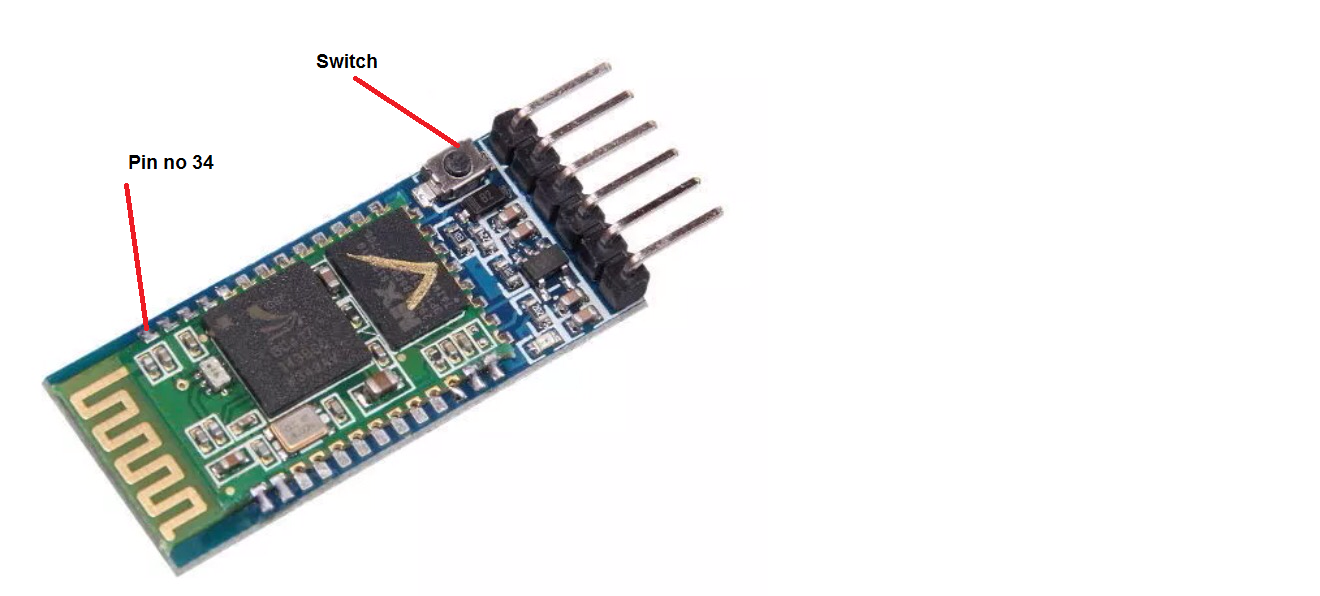
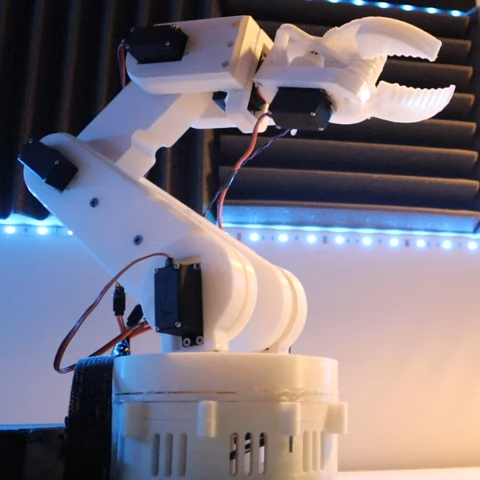
[EbenKouao] uses a 3D-printable robotic gripper, base, and arm design as the foundation of his build. Hobby servos and a single NEMA 17 stepper take care of the moving, and the wiring and motor driving is all carefully explained. Gesture control is done by wearing an articulated glove upon which is mounted flex sensors and MPU6050 accelerometers. These sensors detect the wearer’s movements and turn them into motion commands, which in turn get sent wirelessly from the glove to the robotic arm with HC-05 Bluetooth modules. We really dig [EbenKouao]’s idea of mounting the glove sensors to this slick 3D-printed articulated gauntlet frame, but using a regular glove would work, too. The latest version of the Arduino code can be found on the project’s GitHub repository.

Most of the parts can be 3D printed, how every part works together is carefully explained, and all of the hardware is easily sourced online, making this a very accessible project. Check out the full tutorial video and demonstration, embedded below.

3D printing has been a boon for many projects, especially those involving robotic arms. All kinds of robotic arm projects benefit from the advantages of 3D printing, from designs that focus on utility and function, to clever mechanical designs that reduce part count in unexpected ways.

DIY Baby MIT Cheetah Robot

3D printers have become a staple in most makerspaces these days, enabling hackers to rapidly produce simple mechanical prototypes without the need for a dedicated machine shop. We’ve seen many creative 3D designs here on Hackaday and [jegatheesan.soundarapandian’s] Baby MIT Cheetah Robot is no exception. You’ve undoubtedly seen MIT’s cheetah robot. Well, [jegatheesan’s] hack takes a personal spin on the cheetah robot and his results are pretty cool.

The body of the robot is 3D printed making it easy to customize the design and replace broken parts as you go. The legs are designed in a five-bar linkage with two servo motors controlling each of the four legs. An additional servo motor is used to rotate an HC-SR04, a popular ultrasonic distance sensor, used in the autonomous mode’s obstacle avoidance mechanism. The robot can also be controlled over Bluetooth using an app [jegatheesan] developed in MIT App Inventor.

Overall, the mechanics could use a bit of work — [jegatheesan’s] baby cheetah probably won’t outpace MIT’s robot any time soon — but it’s a cool hack and we’re looking forward to a version 3. Maybe the cheetah would make a cool companion bot?

Light Up the Night with a Tetrahedral LED Hat

People get into electronics for all kinds of reasons, but we would guess that the ability to blink the blinkenlights is probably pretty high on the survey results. [Kuchbert] has been going to Deichkind shows for the last decade and has wanted to build one of the German techno-rap band’s signature tetrahedral LED hats for about as long.

Up inside the hat is an Arduino Nano driving WS2812B LEDs and a portable battery to power everything. Thanks to an HC-05 Bluetooth module, the show can be controlled with an Android app. The many, many holes in the acrylic panels were milled out, but they could just as easily be laser-cut, or if you have infinite patience, drilled by hand. The code is coming once it has been cleaned up a bit. Everything else you’d need is already there waiting. This helmet even has its own lil’ music video, which we’ve carefully beat-matched in after the break.

Naturally, this makes us think of all the Daft Punk helms that have blinked by on this blog over the years. This hand-soldered one might be the most meticulously made.

RGB Disk Goes Interactive with Bluetooth; Shows Impressive Plastic Work

[smash_hand] had a clear goal: a big, featureless, white plastic disk with RGB LEDs concealed around its edge. So what is it? A big ornament that could glow any color or trippy mixture of colors one desires. It’s an object whose sole purpose is to be a frame for soft, glowing light patterns to admire. The disk can be controlled with a simple smartphone app that communicates over Bluetooth, allowing anyone (or in theory anything) to play with the display.

The disk is made from 1/4″ clear plastic, which [smash_hand] describes as plexiglass, but might be acrylic or polycarbonate. [smash_hands] describes some trial and error in the process of cutting the circle; it was saw-cut with some 3-in-1 oil as cutting fluid first, then the final shape cut with a bandsaw.

The saw left the edge very rough, so it was polished with glass polishing compound. This restores the optical properties required for the edge-lighting technique. The back of the disc was sanded then painted white, and the RGB LEDs spaced evenly around the edge, pointing inwards.

The physical build is almost always the difficult part in a project like this — achieving good diffusion of LEDs is a topic we talk about often. [smash_hands] did an impressive job and there are never any “hot spots” where an LED sticks out to your eye. With this taken care of, the electronics came together with much less effort. An Arduino with an HC-05 Bluetooth adapter took care of driving the LEDs and wireless communications, respectively. A wooden frame later, and the whole thing is ready to go.

[smash_hands] provides details like a wiring diagram as well as the smartphone app for anyone who is interested. There’s the Arduino program as well, but interestingly it’s only available in assembly or as a raw .hex file. A video of the disk in action is embedded below.

Making LED lighting interactive comes in many different shapes and forms, and as the disk above shows, shifting color patterns can be pleasantly relaxing.

This 3D-Printed Robotic Vacuum Sucks

After you’ve taken a moment to ponder the turn of phrase used in the title, take a look at this scratch-built robotic vacuum created by [theking3737]. The entire body of the vacuum was 3D printed, and all of the internal electronics are off-the-shelf modular components. We can’t say how well it stacks up against the commercial equivalents from iRobot and the like, but it doesn’t look like it would be too hard to build one yourself to find out.

The body of this rather concerned-looking robot was printed on a DMS DP5 printer, which is a neat trick as it only has a build platform of 200 mm x 200 mm. Once all the pieces were printed, a 3D pen was used to “weld” the sections together. The final result looks a bit rough, but should give a bond that’s just as strong as the printed parts themselves.

The robot has four sets of ultrasonic range finders to detect walls and obstacles, though probably not in the positions you would expect. The right side of the robot has two sets of sensors, while the left side only gets one. We aren’t sure the reasoning behind the asymmetrical layout, but presumably the machine prefers making right turns.

Control is provided by an Arduino Mega and the ever-reliable HC-05 Bluetooth module. A companion Android application was written which allows configuring the robot without having to plug into the Arduino every time you want to tweak a setting.

We can’t say we’ve seen that many DIY robotic vacuums here at Hackaday, but we’ve certainly featured our fair share of hacks for the commercially available models.

Convert Any USB Keyboard to Bluetooth

[DastardlyLabs] saw a video about converting a PS/2 keyboard to Bluetooth and realized he didn’t have any PS/2 keyboards anymore. So he pulled the same trick with a USB keyboard. Along the way, he made three videos explaining how it all works.

The project uses a stock DuinoFun USB mini host shield with a modification to allow it to work on 5V. An Arduino mini pro provides the brains. A FT-232 USB to serial board is used to program the Arduino. A standard Bluetooth module has to have HID firmware installed. [Dastardly] makes a homemade daughterboard–er, shield–to connect it to the Arduino.

The result is a nice little sandwich with a USB plug, a Bluetooth antenna, and some pins for reprogramming if necessary. Resist the urge to solder the Bluetooth board in–since it talks on the same port as the Arduino uses for programming, you’ll have to remove it before uploading new code.

If you need help reprogramming the HC-05 Bluetooth module, we’ve covered that before. This project drew inspiration from [Evan’s] similar project for PS/2 keyboards.


Filed under: Arduino Hacks
Hack a Day 04 Sep 18:01

How to enter AT mode in HC-05 bluetooth module

Using HC-05 in AT mode

Hello guys, In this post we will cover how to change password, name or mode (master or slave) in HC-05 module. 

Things required:

1. Arduino Uno board
2. Jumper wires
3. HC-05
4. Little bit patience :p

Note: Use can USB-TTL instead of arduino uno board. In this case, arduino uno board is simply used as USB-TTL converter.

Steps to follow:

First of all, upload a blank program to arduino.

/* Arduino Program */

void  setup(){

}


void  loop(){

}

Connections should be a follows:

Arduino                              HC-05
TX              ====>             TX
RX              ====>             RX
VCC            ====>             VCC
GND           ====>              GND
HC-05


Note: Before powering up the arduino, the button should be pressed and it should be released after some time after powering up the arduino.  

If there is no switch on your module,  you have to apply 3.3 volt to pin number 34 of HC-05 before power up. After power remove the 3.3 volt.

Now, if the HC-05 in at mode led will blink after every 2 seconds.

After connection, open serial monitor. The baud rate should be selected to 38400 and both nl and cr should be selected.

After this, you have to pass AT commands:

AT and press enter
The response is OK


AT+ROLE? and press enter
The response is 0 or 1
0- Slave
1- Master


AT+UART? and press enter
The response is Baud rate


AT+PSWD? and press enter
The response is 1234    // it's your password.

For changing the password, command is AT+PSWD=1587  
This commannd will set the password to 1587.

Check out the video:


Thanks for viewing this post.

Stay tuned for more updates.


OK Google, Open Sesame

There are a myriad of modern ways to lock and unlock doors. Keypads, Fingerprint scanners, smart card readers, to name just a few. Quite often, adding any of these methods to an old door may require replacing the existing locking mechanism. Donning his Bollé sunglasses allowed [Dheera] to come up with a slightly novel idea to unlock doors without having to change his door latch. Using simple, off the shelf hardware, a Smartwatch, some code crunching and a Google Now app, he was able to yell “OK Google, Open Sesame” at his Android Wear smartwatch to get his apartment  door to open up.

The hardware, in his own words, is trivial. An Arduino, an HC-05 bluetooth module and a servo. The servo is attached to his door latch using simple hardware that looks sourced from the closest hardware store. The code is split in to two parts. The HC-05 listens for a trigger signal, and informs the Arduino over serial. The Arduino in turn activates the servo to open the door. The other part is the Google Now app. Do note that the code, as he clearly points out, is “barebones”. If you really want to implement this technique, it would be wise to add in authentication to prevent all and sundry from opening up your apartment door and stealing your precious funky Sunglasses. Watch a video of how he put it all together after the break. And if you’re interested, here are a few other door lock hacks we’ve featured in the past.


Filed under: Android Hacks, hardware

New Project: DIY Arduino Bluetooth Programming Shield

Upload sketches to your Arduino wirelessly with a DIY Arduino Bluetooth Programming Shield.

Read more on MAKE

Processing communicating with Arduino via Bluetooth problems

I am at my wits end! Ive spent the last three or so hours trying to get this to work with no avail.

read more

Let's Make Robots 05 Feb 09:29
arduino  avr  bluetooth  com  hc-05  processing  serial