Posts with «printer» label

Robotic Melodica Student Is Enthusuastic But Terrible

Anyone who has through the process of learning to play a musical instrument for the first time, or listening to someone attempting to do so will know that it can be a rather painful and frustrating experience. [Alessandro Perini] apparently couldn’t get enough of the sound of a first-time musician, so he created a robot to play the melodica badly for hours on end, as demonstrated in the video after the break.

The project is appropriately named “AI’ve just started to learn to play”, and attempts to copy every melody it hears in real-time. The robot consists of the cartridge carriage from an old printer, mounted on a wooden frame to hold the melodica. The original carriage used a DC motor with an encoder for accurate movement, but since position accuracy was not desirable, [Alessandro] ditched the encoder. Two small trolley wheels are mounted on the cartridge holder to push down on the melodica’s key. A bistable solenoid valve controls airflow to the melodica from an air compressor. The DC motor and solenoid valve is controlled by an Arduino via a pair of LM298 motor drivers.

A host computer running software written in Cycling ’74 MAX listens to the melody it’s trying to imitate, and send serial commands to the Arduino to move the carriage and open the solenoid to try and match the notes. Of course, it keeps hitting a series of wrong notes in the process. The Arduino code and build instructions have been published, but the main Max software is only described briefly. [Alessandro] demonstrated the robot at a local festival, where it played YouTube tutorial snippets and jammed with a local band for a full 24 hours. You have to respect that level of endurance.

If listening to less error-prone electronically controlled instruments is more to your taste, listen to this building-sized pipe organ play MIDI files.

Hack a Day 01 Jan 03:00

Vintage IBM Daisywheel Prints Again after Reverse Engineering

Just before the dawn of the PC era, IBM typewriters reached their technical zenith with the Wheelwriter line. A daisy-wheel printer with interchangeable print heads, memory features, and the beginnings of word processing capabilities, the Wheelwriters never got much time to shine before they were eclipsed by PCs. Wheelwriters are available dirt cheap now, and like many IBM products are very hackable, as shown by this simple Arduino interface to make a Wheelwriter into a printer.

[Chris Gregg] likes playing with typewriters – he even got an old Smith Corona to play [Leroy Anderson]’s The Typewriter – and he’s gotten pretty good with these largely obsolete but lovable electromechanical relics. Interfacing a PC to the Wheelwriter could have been as simple as scrounging up an original interface card for the machine, but those are like hen’s teeth, and besides, where’s the sport in that? So [Chris] hooked a logic analyzer to the well-labeled port that would have connected to the interface card and reverse engineered the somewhat odd serial protocol by banging on keys. The interface he came up with for the Wheelwriter is pretty simple – just a Light Blue Bean Plus and a MOSFET to drive the bus high and low for the correct amount of time. The result is what amounts to an alphanumeric printer, but with a little extra code some dot-matrix graphics are possible too.

Having spent a lot of time reverse engineering serial comms, we can appreciate the amount of work this took to accomplish. Looking to do something similar but don’t have the dough for a logic analyzer? Maybe you can free up $22 and get cracking on a similarly impressive hack.

[via r/arduino]


Filed under: Arduino Hacks, misc hacks

3D Printing Pen and CNC Machine Yields Cheap 3D Printer

3D printers are ubiquitous now, but they’re still prohibitively expensive for some people. Some printers cost thousands, but even more inexpensive options aren’t exactly cheap. [Daniel] decided that this was unacceptable, and set out to make a basic 3D printer for under $100 by including only the bare essentials needed for creating anything out of melted plastic.

3D printers are essentially four parts: a bed, filament, and a hot end and extruder. In a previous project, [Daniel] used parts from old CD drives to create a three-axis CNC machine which he uses for the bed. To take care of the hot end and extruder, he is using a 3D printing pen which he mounts to the CNC machine and voila: a 3D printer!

It’s not quite as simple as just strapping a 3D printing pen to a CNC machine, though. The pen and the CNC machine have to communicate with each other so that the pen knows when to place filament and the CNC machine knows when to move. For that, [Daniel] went with a trusty Arduino in order to switch the pen on and off. Once it’s working, it’s time to start printing!

[Daniel] does note that this is a design that’s relatively limited in terms of print size and resolution, but for the price it can’t be beat. If you’re interested in getting started with 3D printing, a setup like this would be perfect. 3D pens are a pretty new idea too, and it’s interesting to see them used in different ways like this.


Filed under: 3d Printer hacks

New Project: Build a Reddit Shower Thoughts Printer

Use some simple electronics to build an IoT printer, like this "Thinking Man" who prints titles from Reddit's Shower Thoughts subreddit.

Read more on MAKE

The post Build a Reddit Shower Thoughts Printer appeared first on Make: DIY Projects, How-Tos, Electronics, Crafts and Ideas for Makers.

Game Boy camera gun prints when you shoot

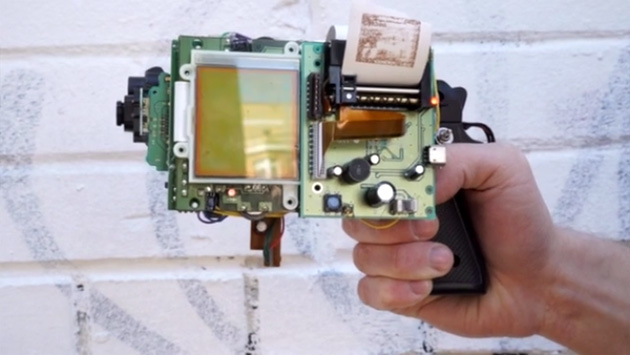
If you had a spare Game Boy Camera and the printer to match, what would you do with them? If you're media artist Dmitry Morozov, you'd make a one-of-a-kind firearm. His GBG-8 gun uses Nintendo's photographic peripherals and an Arduino board to shoot photos (almost literally) and print them on the spot -- effectively, it's a low-resolution Polaroid cam with a trigger. We can't imagine that this would go down well with security officials, but it could be a blast if you want to capture 8-bit memories with more flair than the original Game Boy gear allows. Let's just hope that Morozov offers some instructions so that his picture pistol is easy to reproduce at home.

Filed under: Misc, Gaming, Peripherals, Nintendo

Comments

Via: Geek

Source: Vtol

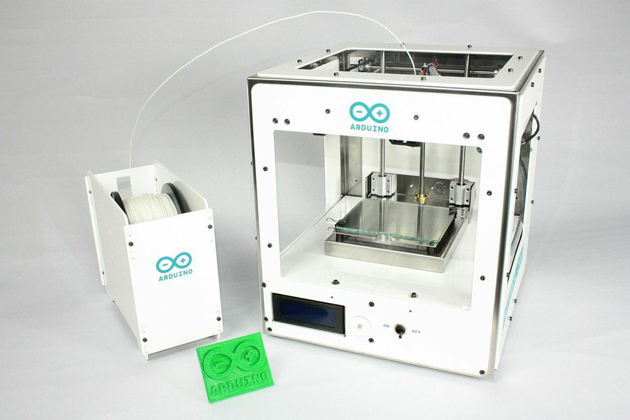
Arduino's new 3D printer lets you modify just about everything

If you're a fan of Arduino's tinker-friendly approach to computing, you'll be glad to hear that it's now extending that open philosophy to 3D printers. The company has teamed up with Sharebot to unveil the Materia 101, a small (5.5 inches by 4 inches) printer that's built to be both friendly to beginners and very accessible. You can modify the code on the underlying Arduino Mega mini-PC, of course, but you also have access to the full schematics of the printer -- you can upgrade it or even make your own, if you have the know-how and parts. Arduino hasn't said when it plans to ship the Materia, but it'll be available both as a build-it-yourself kit (priced under $800) and fully assembled (under $1,000).

Filed under: Peripherals

Comments

Source: Arduino

Printing Text with a Chart Recorder

Chart recorders are vintage devices that were used to plot analog values on paper. They’re similar to old seismometers which plot seismic waves from earthquakes. The device has a heated pen which moves across a piece of thermally sensitive paper. This paper is fed through the machine at a specified rate, which gives two dimensions of plotting.

[Marv] ended up getting a couple of discontinued chart recorders and figured out the interface. Five parallel signals control the feed rate of the paper, and an analog voltage controls the pen location. The next logical step was to hook up an Arduino to control the plotter.

However, once the device could plot analog values, [Marv] quickly looked for a new challenge. He wanted to write characters and bitmaps using the device, but this would require non-continuous lines. By adding a solenoid to lift the pen, he built a chart recorder printer.

After the break, check out a video of the chart recorder doing something it was never intended to do. If you happen to have one of these chart recorders, [Marv] included all of the code in his writeup to help you build your own.


Filed under: classic hacks

Learning to Reverse Engineer on a Broken Printer

When a Lexmark inkjet printer stopped working, [Mojobobo] was able to claim it as his own. He quickly realized that the machine was flooded with ink and not worth repairing, but that didn’t mean he couldn’t still find a use for it. When he learned that the printer’s firmware was not only upgradable but also unprotected, he knew he should be able to get the printer to do his own bidding.

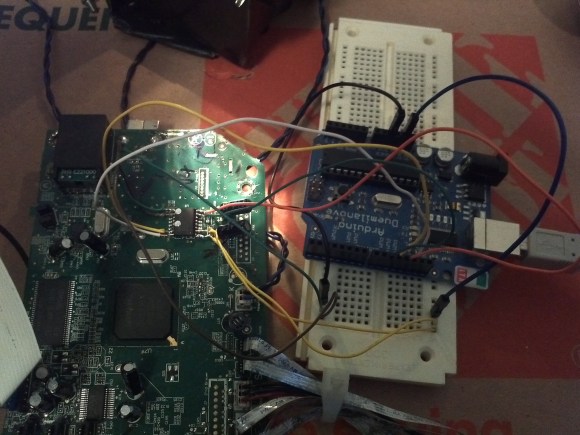
[Mojobobo] started his journey with the motherboard. The unit still powered up, but it was asking to insert a “duplex module” before it would boot any further. [Mojobobo] first tried to find a way to trick the duplex module sensor, but was unsuccessful. His next step was to search for some kind of serial communications port. He didn’t have an oscilloscope, so instead he used a speaker with a wire probe. In theory, if the wire was pressed against an active serial port, he would be able to hear varying tones through the speaker. Sure enough, he found some interesting tones after probing around some ports next to a “JTAG” label. He looked up some information about the nearby chip and found that it included an SPI bus.

After some internet research, [Mojobobo] learned enough about SPI to have a rough idea of how to use it. Having limited tools available to him, he decided to use his Arduino to try to communicate with the motherboard. After wiring up a simple circuit, (and then re-wiring it) he was able to dump the first 4096 bytes of the motherboard’s boot loader to the Arduino via the SPI interface.

[Mojobobo's] next steps will be to find a faster way to dump the boot loader. At 9600 baud, he grew tired of waiting after three hours. Once he has the full boot loader he intends to search for a way to bypass the duplex sensor and get the board to finish booting. Then he may just use the printer for its scanning functions, or he might find other interesting uses for it.


Filed under: peripherals hacks

Handwriting suck? Build a machine to do it for you

Children of the information age are doomed to have the worst handwriting just for lack of use if nothing more. But some students at Olin College harnessed technology to find a solution to that problem. Meet Herald, a CNC machine that can produce beautiful calligraphy.

The machine uses a gantry to move the writing tip along the X and Y axes. The flexible-nib calligraphy pen is mounted on a sprocket which rotates the tip onto the writing surface, taking care of the third axis. The rig was beautifully rendered from their CAD drawings, then tweaked to ensure the smoothest motion possible before the quintet of Sophomores began the physical build.

The drive hardware is very simple yet it produces great results. It uses an Arduino along with three stepper motor drivers. There are also limiting switches to protect the hardware from runaway code. The software interface designed by the team lets the user cut and paste their text, and select a font, font size, alignment, etc. It then converts the text to G-code and pushes it to the Arduino where the GRBL package takes care of business.

Don’t miss the device in action, writing out a [Langston Hughes] work in the clip after the break.


Filed under: cnc hacks
Hack a Day 08 Mar 11:01

Print broadway discount stickers using Arduino

A weekend project by Adafruit to print announcements and discount coupons from the internet.

This project uses an Arduino Uno, an ethernet shield, a thermal printer (aka receipt printer) and a Staples easy button to print out the current discount percentages available at the tkts times square booth for Broadway shows.

A beautiful tutorial accompanies the project.

Via:[Adafruit]

Arduino Blog 24 Apr 16:28