Posts with «photodiode» label

IR Translator Makes Truly Universal Remote

Universal remotes are a handy tool to have around if you have many devices that would all otherwise have their own remote controls. Merging them all into a single device leads to less clutter and less frustration, but they are often not truly “universal” as some of them may not support every infrared device that has ever been built. If you’re in a situation like that it’s possible to build a truly universal remote instead, provided you have a microcontroller and a few infrared LEDs on hand.

This was the situation that [Matt] found himself in when his Amazon Fire TV equipment control feature didn’t support his model of speakers. To get around this he programmed an Arduino to essentially translate the IR codes from the remote and output a compatible set of codes to the speakers.This requires both an IR photodiode and an IR LED but little else other than the codes for the remote and the equipment in question. With that all set up and programmed into the Aruino, [Matt]’s remote is one step closer to being truly “universal”.

While [Matt] was able to make use of existing codes in the Arduino library, it is also possible to capture the codes required manually by pointing a remote at a photodiode and programming a microcontroller to capture the codes that you need. [Matt] used a Raspberry Pi to do this when debugging this project, but we’ve also seen this method used with a similar build which uses an ESP8266 to control an air conditioner via its infrared remote control capabilities.

Color Sensor Demystified

When [millerman4487] bought a TCS230-based color sensor, he was expecting a bit more documentation. Since he didn’t get it, he did a little research and some experimentation and wrote it up to help the rest of us.

The TCS3200 uses an 8×8 array of photodiodes. The 64 diodes come in four groups of 16. One group has a blue filter, one has green and the other has a red filter. The final set of diodes has no filter at all. You can select which group of diodes is active at any given time.

Sixteen photodiodes have blue filters, 16 photodiodes have green filters, 16 photodiodes have red filters, and 16 photodiodes are clear with no filters. The four types (colors) of photodiodes are interdigitated to minimize the effect of non-uniformity of incident irradiance. All photodiodes of the same color are connected in parallel. Pins S2 and S3 are used to select which group of photodiodes (red, green, blue, clear) are active.

The output of the array is a frequency that corresponds to the light intensity measured by one bank of photodiodes. You’ll need to make several pulse input measurements to compute the color and [millernam4487] provides code for it. You may, however, need to calibrate the device before you get good results.

We’ve looked at color sensors before, of course. They can even unlock doors.

Hack a Day 23 Jan 19:30

Energy Harvesting Design Doesn’t Need Sleep

Every scrap of power is precious when it comes to power harvesting, and working with such designs usually means getting cozy with a microcontroller’s low-power tricks and sleep modes. But in the case of the Ultra Low Power Energy Harvester design by [bobricius], the attached microcontroller doesn’t need to worry about managing power at all — as long as it can finish its job fast enough.

The idea is to use solar energy to fill a capacitor, then turn on the microcontroller and let it run normally until the power runs out. As a result, a microcontroller may only have a runtime in the range of dozens of microseconds, but that’s just fine if it’s enough time to, for example, read a sensor and transmit a packet. In early tests, [bobricius] was able to reliably transmit a 16-bit value wirelessly every 30 minutes using a small array of photodiodes as the power supply. That’s the other interesting thing; [bobricius] uses an array of BPW34 photodiodes to gather solar power. The datasheet describes them as silicon photodiodes, but they can be effectively used as tiny plastic-enclosed solar cells. They are readily available and can be arranged in a variety of configurations, while also being fairly durable.

Charging a capacitor then running a load for a short amount of time is one of the simplest ways to manage solar energy, and it requires no unusual components or fancy charge controllers. As long as the load doesn’t mind a short runtime, it can be an effective way to turn even indoor light into a figuratively free power source.

Optical Tach Addresses the Need for Spindle Speed Control

With CNC machines, getting the best results depends on knowing how fast your tool is moving relative to the workpiece. But entry-level CNC routers don’t often include a spindle tachometer, forcing the operator to basically guess at the speed. This DIY optical spindle tach aims to fix that, and has a few nice construction tips to boot.

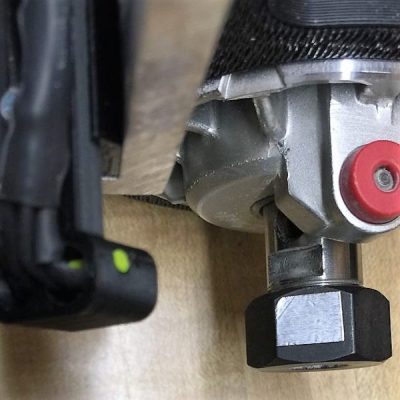
The CNC router in question is the popular Sienci, and the 3D-printed brackets for the photodiode and LED are somewhat specific for that machine. But [tmbarbour] has included STL files in his exhaustively detailed write-up, so modifying them to fit another machine should be easy. The sensor hangs down just far enough to watch a reflector on one of the flats of the collet nut; we’d worry about the reflector surviving tool changes, but it’s just a piece of shiny tape that’s easily replaced.  The sensor feeds into a DIO pin on a Nano, and a small OLED display shows a digital readout along with an analog gauge. The display update speed is decent — not too laggy. Impressive build overall, and we like the idea of using a piece of PLA filament as a rivet to hold the diodes into the sensor arm.

Want to measure machine speed but don’t have a 3D printer? No worries — a 2D-printed color-shifting tach can work too.

Hack a Day 28 Jan 09:01

WALTER - The Arduino Photovore Insect Robot

Primary image

What does it do?

Navigate around and seeking light

[Please excuse my English]

Cost to build

Embedded video

Finished project

Complete

Number

Time to build

Type

URL to more information

Weight

read more

WALTER - The Arduino Photovore Insect Robot

Primary image

What does it do?

Navigate around and seeking light

[Please excuse my English]

Cost to build

Embedded video

Finished project

Complete

Number

Time to build

Type

URL to more information

Weight

read more

WALTER - The Arduino Photovore Insect Robot

Primary image

What does it do?

Navigate around and seeking light

[Please excuse my English]

Cost to build

Embedded video

Finished project

Complete

Number

Time to build

Type

URL to more information

Weight

read more

WALTER - The Arduino Photovore Insect Robot

Primary image

What does it do?

Navigate around and seeking light

[Please excuse my English]

Cost to build

Embedded video

Finished project

Complete

Number

Time to build

Type

URL to more information

Weight

read more

A Single Pixel Digital Camera with Arduino

[Jordan] managed to cobble together his own version of a low resolution digital camera using just a few components. The image generated is pretty low resolution and is only in grey scale, but it’s pretty impressive what can be done with some basic hardware.

The heart of the camera is the image sensor. Most consumer digital cameras have tons of tiny receptors all jammed into the sensor. This allows for a larger resolution image, capturing more detail in a smaller space. Unfortunately this also usually means a higher price tag. [Jordan’s] sensor includes just a single pixel. The sensor is really just an infrared photodiode inside of a tube. The diode is connected to an analog input pin on an Arduino. The sensor can be pointed at an object, and the Arduino can sense the brightness of that one point.

In order to compile an actual image, [Jordan] needs to obtain readings of multiple points. Most cameras do this using the large array of pixels. Since [Jordan’s] camera only has a single pixel, he has to move it around and take each reading one at a time. To accomplish this, the Arduino is hooked up to two servo motors. This allows the sensor to be aimed horizontally and vertically. The Arduino slowly scans the sensor in a grid, taking readings along the way. A Processing application then takes each reading and compiles the final image.

Since this camera compiles an image so slowly, it sometimes has a problem with varying brightness. [Jordan] noticed this issue when clouds would pass over while he was taking an image. To fix this problem, he added an ambient light sensor. The Arduino can detect the amount of overall ambient light and then adjust each reading to compensate. He says it’s not perfect but the results are still an improvement. Maybe next time he can try it in color.


Filed under: Arduino Hacks

Simple and Inexpensive Heartbeat Detector

There are many ways to detect a heartbeat electronically. One of the simpler ways is to take [Orlando’s] approach. He’s built a finger-mounted pulse detector using a few simple components and an Arduino.

This circuit uses a method known as photoplethysmography. As blood is pumped through your body, the volume of blood in your extremities increases and decreases with each heartbeat. This method uses a light source and a detector to determine changes in the amount of blood in your extremities. In this case, [Orlando] is using the finger.

[Orlando] built a finger cuff containing an infrared LED and a photodiode. These components reside on opposite sides of the finger. The IR LED shines light through the finger while the photodiode detects it on the other side. The photodiode detects changes in the amount of light as blood pumps in and out of the finger.

The sensor is hooked up to an op amp circuit in order to convert the varying current into a varying voltage. The signal is then filtered and amplified. An Arduino detects the voltage changes and transmits the information to a computer via serial. [Orlando] has written both a LabVIEW program as well as a Processing program to plot the data as a waveform. If you’d rather ditch the PC altogether, you might want to check out this standalone heartbeat sensor instead.


Filed under: Arduino Hacks