Posts with «library» label

A Usable Arduino Debugging Tool

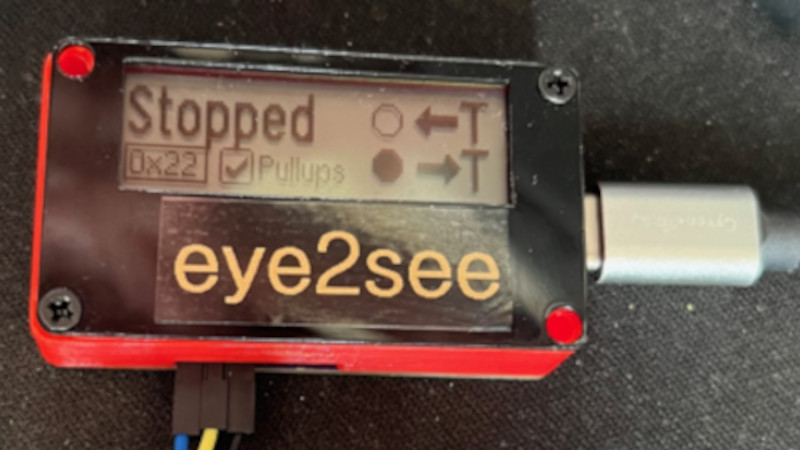
For as popular as the Arduino platform is, it’s not without its problems. Among those is the fact that most practical debugging is often done by placing various print statements throughout the code and watching for them in the serial monitor. There’s not really a great way of placing breakpoints or stepping through code, either. But this project, known as eye2see, hopes to change that by using the i2c bus found in most Arduinos to provide a more robust set of debugging tools.

The eye2see software is set up to run on an Arduino or other compatible microcontroller, called the “probe”, which is connected to the i2c bus on another Arduino whose code needs to be debugged. Code running on this Arduino, which is part of the eye2see library, allows it to send debugging information to the eye2see probe. With a screen, the probe can act as a much more powerful debugger than would otherwise typically be available, being able to keep track of variables in the main program, setting up breakpoints, and outputting various messages on its screen.

The tool is not without its downsides, though. The library that needs to run on the host Arduino slows down the original program significantly. But for more complex programs, the tradeoff with powerful debugging tools may be worth it until these pieces of code can be removed and the program allowed to run unencumbered. If you’d like to skip needing to use a second Arduino, we’ve seen some other tools available for debugging Arduino code that can run straight from a connected PC instead.

Hack a Day 31 Jul 19:30

Mini Library for Kids Gets Blinky Lights and Solar Upgrade

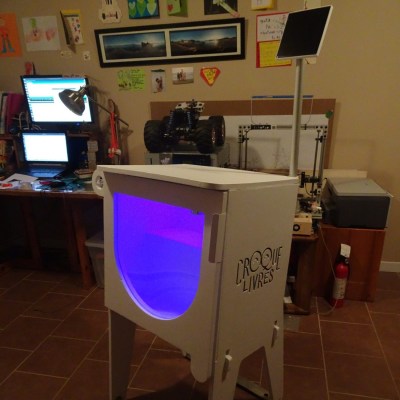
Reading is big in Québec, and [pepelepoisson]’s young children have access to a free mini library nook that had seen better days and was in dire need of maintenance and refurbishing. In the process of repairing and repainting the little outdoor book nook, he took the opportunity to install a few experimental upgrades (link in French, English translation here.)

The mini library pods are called Croque-Livres, part of a program of free little book nooks for children across Québec (the name is a bit tricky to translate into English, but think of it as “snack shack, but for books” because books are things to be happily devoured.)

After sanding and repairs and a few coats of new paint, the Croque-Livres was enhanced with a strip of WS2812B LEDs, rechargeable battery with solar panel, magnet and reed switch as door sensor, and a 3.3 V Arduino to drive it all. [pepelepoisson]’s GitHub repository for the project contains the code and CAD files for the 3D printed pieces.

The WS2812B LED strip technically requires 5 V, but as [pepelepoisson] found in his earlier project Stecchino, the LED strip works fine when driven directly from a 3.7 V lithium-polymer cell. It’s not until around 3 V that it starts to get unreliable, so a single 3.7 V cell powers everything nicely.

When the door is opened, the LED strip lights up with a brief animation, then displays the battery voltage as a bar graph. After that, the number of times the door as been opened is shown on the LED strip in binary. It’s highly visual, interactive, and there’s even a small cheat sheet explaining how binary works for anyone interested in translating the light pattern into a number. How well does it all hold up? So far so good, but it’s an experiment that doesn’t interfere at all with the operation of the little box, so it’s all good fun.

Hack a Day 28 Jun 21:00

Create your own Arduino Library

Project Description

In this short tutorial I will show you how to create your own Arduino Library. Making your own library seems daunting at first, but I will show you that it is not much harder than writing your own script/sketch. I would advise that you comment you code clearly, because when you come back to it in 5 years time, it will help to navigate you through your code at this time in history. Here we go, let's go through the process of creating a very simple Arduino library.

Parts Required

  • Arduino UNO or compatible board

Project Steps

Before we begin, there are a few questions you must ask yourself:

  1. What will the library be called ?
  2. What will the library do ?
  3. What are you trying to simplify?

For our library, these are the answers to the questions above:

  1. BlinkMe
  2. It will blink an LED attached to one of the digital pins
  3. The aim is to reduce the blink commands to a single line

Create a Folder

Create a folder on your computer which will be used to house all of the files in this project. Name the folder the same name as the library. In this case we will name it "BlinkMe". Make sure you use consistent naming throughout the tutorial. Capital and lowercase letters do matter.

Create the files

Using any text based editor (eg. notepad++, PSPad, Notepad2 etc), you will need to create 3 blank files:

  • The C++ file (BlinkMe.cpp) : Library code containing all of the functions
  • The Header file (BlinkMe.h): Contains the library function declarations
  • keywords.txt : Used for syntax highlighting within the Arduino IDE

I will tell you what you need to write inside each of these files, but make sure you have the blank BlinkMe.cpp, BlinkMe.h and keywords.txt files inside of the BlinkMe folder. Some people start by creating the header file first, but I personally like to start with the CPP file.
We will now look to populate the BlinkMe C++ file:

The C++ file (.cpp)

This file will contain all of the functions in your new library.
The first thing you will need to do is include the Arduino.h file. This will drag in all of the relevant Arduino code necessary for your library to function with an Arduino. And while we haven't yet created the header file (BlinkMe.h), we need to import that also. So the first two lines should be:

#include <Arduino.h>
 #include <BlinkMe.h>

The next section of code is the "constructor". This will be responsible for constructing the BlinkMe object. The BlinkMe object will allow you to call any of the public functions within the BlinkMe library. The constructor will allow us to define the default variables or constants.

BlinkMe::BlinkMe(){
    _dPin = 13;
 }

Sometimes we will want to blink an LED on a different pin. So we will create a function to set the pin that we would like use.

void setOUTPUT(int dPin){
    _dPin = dPin;
    pinMode(_dPin, OUTPUT);
 }

The only thing left is to create the useful part of the code. We will create a simple function that will blink the LED for a set duration. The function will have a parameter, which will be used to set the blink duration.

void blink(unsigned long delay_1){
    _delay_1 = delay_1;
    digitalWrite(_dPin, HIGH);
    delay(_delay_1);
    digitalWrite(_dPin, LOW);
    delay(_delay_1);
 }

Here is the complete "BlinkMe.cpp" file:

The Header file (.h)

The header file will be used to create the library function declarations. Open the "BlinkMe.h" file.
The first step is to check to make sure that the library is NOT already defined:

#ifndef BlinkMe_h

If it is not defined, then we must define the library:

#define BlinkMe_h

We then need to provide access to the standard Arduino types and constants

#include "Arduino.h"

And finally create the BlinkMe class:

//Create the class BlinkMe
class BlinkMe{
    public:
        BlinkMe();
        void setOUTPUT(int dPin);
        void blink(unsigned long delay_1);
    private:
        int _dPin;
        unsigned long _delay_1;
 };
#endif

Here is the complete header file:

keywords.txt (optional)

The keywords.txt file will contain the keywords for the library which will allow appropriate syntax highlighting. This file is optional, however it will highlight your classes or functions based on the keyword mapping.

  • LITERAL1: specifies constants (eg. HIGH, LOW,
  • KEYWORD1: specifies classes (eg. Serial)
  • KEYWORD2: specifies methods and functions (eg. analogRead, digitalWrite, delay)
  • KEYWORD3: specifies structures (eg. if, while, loop)
You need to make sure you use a single tab between the keyword and the "KEYWORD" mapping. In our example, BlinkMe is a class, so that would be a KEYWORD1. On the other hand, "blink" is a function, so that would be a KEYWORD2. So the keywords.txt file will contain the following text:

BlinkMe     KEYWORD1
setOUTPUT   KEYWORD2
blink       KEYWORD2

Example Sketch (optional)

It is often useful to include an sketch that provides an example of the library in use. It provides some context. If you plan to include the sketch in your library, then you must follow these simple rules:

  1. Create an "examples" folder.
  2. Create an example sketch, an place it within a folder of the same name as the sketch
  3. Place the sketch folder inside of the examples folder
You will end up with something like: examples/example_sketch/example_sketch.ino
In our case it will be: examples/blinkTest/blinkTest.ino

Here is the example sketch for this library (Save as blinkTest.ino):


The library

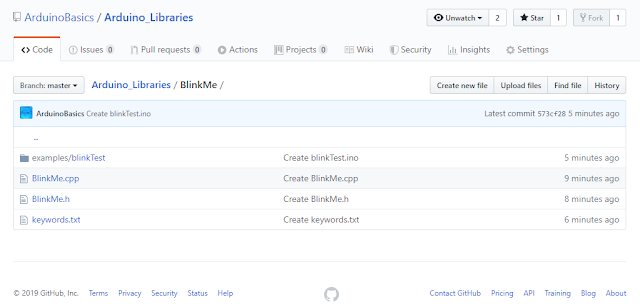
Here is a picture of the library contents:

And now the only thing left is to zip up the library folder and import it into the Arduino IDE. Use whatever program you want to zip up the BlinkMe folder, and note the location of the zip file. You need to import the zip file into the Arduino IDE:

  • Arduino IDE > Sketch > Include Library > Add .ZIP Library...
  • Select the library zip file you just created, and select "Open".
  • You can now use your library in the Arduino IDE.
  • Test it by running your example sketch: File > Examples > BlinkMe > blinkTest

Download

You can download the entire library here:
BlinkMe Library

Conclusion

In this tutorial, I showed you how to create a simple Arduino library. If you would like so see another example, have a look at my ToggleTimer library, which is very useful when trying to blink an LED without using a delay.You don't have to limit yourself to LEDs, you can use it for other projects where delay gets in the way. ToggleTimer is a non-blocking timer that toggles between two states.


If you found this tutorial helpful, please consider supporting me by buying me a virtual coffee/beer.

$3.00 AUD only
Social Media

You can find me on various social networks:

Follow me on Twitter: ScottC @ArduinoBasics.
I can also be found on Instagram, Pinterest, and YouTube.
And if all else fails, I have a server on Discord.


ScottC 29 Dec 10:09
arduino  blink  diy  led  library  tutorial  

Simplifying Basic LED Effects

There was a time when having a blinking blue LED on a project was all you needed to be one of the cool kids. But now you need something more complex. LEDs should not just snap on, they should fade in and out. And blinking? Today’s hotness is breathing LEDs. If that’s the kind of project you want, you should check out [jandelgado’s] jled library.

At first glance, an Arduino library for LED control might seem superfluous, but if you are interested in nice effects, the coding for them can be a bit onerous. If you don’t mind stopping everything while you fade an LED on (or off) then sure, you just write a loop and it is a few lines of code. But if you want to have it happen while other things continue to execute, it is a little different. The library makes it very simple and it is also nicely documented.

Obviously, to create a special effect LED, you need to create a JLed object. Then you can use modifier methods on that object to get certain effects. The only overhead is that you need to call the update method on the LED periodically. Here is one of the examples from the project:

#include <jled.h>

// connect LED to pin 13 (PWM capable). LED will breathe with period of
// 2000ms and a delay of 1000ms after each period.
JLed led = JLed(13).Breathe(2000).DelayAfter(1000).Forever();

void setup() { }

void loop() {
   led.Update();
}

Pretty easy and readable. Just remember that some Arduinos can’t do PWM on pin 13, so you might have to adjust. Our only complaint is that you have to update each LED. It would be nice if the JLed constructor kept a linked list of all LED objects so you could have a class method that updates all of them with one call. In the examples, the author keeps all the LEDs in an array and steps through that. However, that would be easy to fork and add. Oh wait, we did it for you. The library does do a lot of work, including taking advantage of higher PWM resolution available on the ESP8266, for example.

The library can turn an LED on or off (including delays), blink or breathe an LED forever or for a certain number of times, or fade an LED on or off. In addition to the presets, you can provide your own brightness function if you want to do some kind of custom pattern. You can modify most actions by specifying a delay before or after, a repeat count (which can be forever) and you can also tell the library that your LED is active low, so you don’t have to mentally remember to flip everything around in your code.

Rocket science? No. But we like it. Blocking for an LED effect is bad and this makes fancy asynchronous LEDs simple. Why not use it? Recent IDEs can install it from the manage library dialog, so it takes just a second.

Really, libraries are a key to building systems simple. Why not stand on the backs of others? Some of our favorites handle SPI and proportional integral derivative (PID) control.

Hack a Day 14 Jun 00:00

More Blinky = More Better – The WS2812FX Library

The WS2812 is an amazing piece of technology. 30 years ago, high brightness LEDs didn’t even exist yet. Now, you can score RGB LEDs that even take all the hard work out of controlling and addressing them! But as ever, we can do better.

Riffing on the ever popular Adafruit NeoPixel library, [Harm] created the WS2812FX library. The library has a whole laundry list of effects to run on your blinkenlights – from the exciting Hyper Sparkle to the calming Breathe inspired by Apple devices. The fantastic thing about this library is that it can greatly shorten development time of your garden-variety blinkables – hook up your WS2812s, pick your effect, and you’re done.

[Harm]’s gone and done the hard yards, porting this to a bevy of platforms – testing it on the Arduino Nano, Uno, Micro and ESP8266. As a proof of concept, they’ve also put together a great demonstration of the software – building some cute and stylish Christmas decorations from wood, aluminium, and hacked up Christmas light housings. Combining it with an ESP8266 & an app, the effects can be controlled from a smartphone over WiFi. The assembly video on YouTube shows the build process, using screws and nails to create an attractive frame using aluminium sheet.

This project is a great example of how libraries and modern hardware allow us to stand on the shoulders of giants. It’s quicker than ever to build amazingly capable projects with more LEDs than ever. Over the years we’ve seen plenty great WS2812 projects, like this sunrise alarm clock or this portable rave staff.
As always, blink hard, or go home. Video after the break.


Filed under: Arduino Hacks, Holiday Hacks, led hacks

These boxes make music out of metal and wood

Les Boites Mécaniques are a set of four automated boxes that produce music out of wood and metal. These experimental instruments enable anyone to explore the magic of making sound by pressing buttons on a remote, which activate each respective device to vibrate, knock, and rub materials.

The boxes were developed by Kogumi‘s Anatole Buttin and Yan Godat for educational electronic music workshops, and can be played either solo or in unison. There’s even a mode that allows users to control it all via MIDI notes on a computer.

In terms of hardware, each box is equipped with an Arduino Uno, a TLC59711 LED driver, step motors with AccelStepper library and a 3D-printed microstep driver.

You can watch how it all comes together to create a unique sound below!

Arduino Blog 27 Oct 11:19

3 simple filtering techniques to eliminate noise

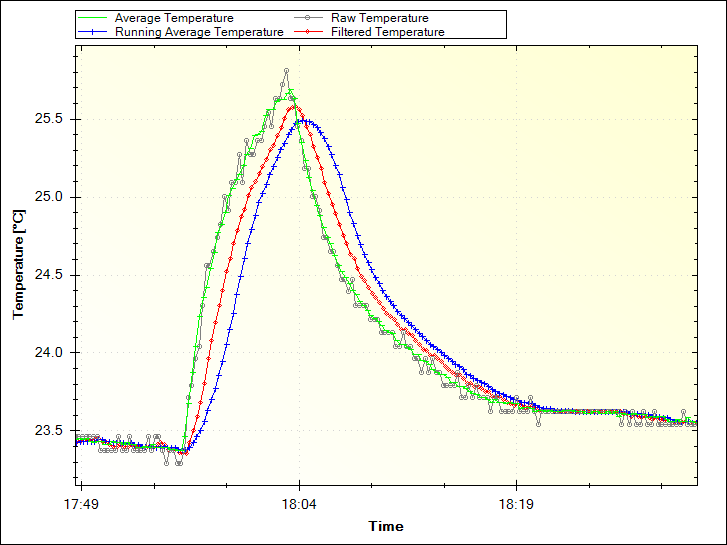
Increasing accuracy in the collection of data coming from sensors is a need that, sooner or later, Makers need to face. Paul Martinsen from MegunoLink created a tutorial to eliminate noise from sensor readings on Arduino with three simple filtering techniques.

The Averaging and Running Average techniques are easy to implement as they work by adding a number of measurements together, then dividing the total by the number of measurements. In both cases, the downside is that it can use a lot of memory.

The Exponential filter is a better solution for several reasons: it doesn’t require much memory, you can control how much filtering is applied with a single parameter, and it saves battery power because you don’t need to make many measurements at once. For this solution, they developed an Arduino filter library so you don’t need to go mad with math!

Interested? You can find the tutorial and explore the code on MegunoLing’s blog post here.

Arduino Blog 05 Sep 13:39

Hackaday Prize Entry: Magic Bit-Of-Wire Motion Detector Library For Arduino

We’re still not sure exactly how [connornishijima]’s motion detector works, though many readers offered plausible explanations in the comments the last time we covered it. It works well enough, though, and he’s gone and doubled down on the Arduino way and bundled it up nicely into a library.

In the previous article we covered [connor] demonstrating the motion detector. Something about the way the ADC circuit for the Arduino is wired up makes it work. The least likely theory so far involves life force, or more specifically, the Force… from Star Wars. The most likely theories are arguing between capacitance and electrostatic charge.

Either way, it was reliable enough a phenomenon that he put the promised time in and wrote a library. There’s even documentation on the GitHub. To initialize the library simply tell it which analog pin is hooked up, what the local AC frequency is (so its noise can be filtered out), and a final value that tells the Arduino how long to average values before reporting an event.

It seems to work well and might be fun to play with or wow the younger hackers in your life with your wizarding magics.


Filed under: Arduino Hacks

Minions Turn Your Keyboard into a Bluetooth Keyboard

Evil geniuses usually have the help of some anonymous henchmen or other accomplices, but for the rest of us these resources are usually out of reach. [Evan], on the other hand, is on his way to a helpful army of minions that will do his bidding: he recently built a USB-powered minion that turns a regular PS/2 mouse and keyboard into a Bluetooth mouse and keyboard.

[Evan] found his minion at a McDonald’s and took out essentially everything inside of it, using the minion as a case for all of the interesting bits. First he scavenged a PS/2 port from an old motherboard. An Arduino Nano is wired to an HC-05 Bluetooth chip to translate the signals from the PS/2 peripherals into Bluetooth. The HC-05 chip is a cheaper alternative to most other Bluetooth chips at around $3 vs. $40 for more traditional ones. The programming here is worth mentioning: [Evan] wrote a non-interrupt based and non-blocking PS/2 library for the Arduino that he open sourced which is the real jewel of this project.

Once all the wiring and programming is done [Evan] can turn essentially any old keyboard and mouse into something that’ll work on any modern device. He also put an NFC tag into the minion’s head so that all he has to do to connect the keyboard and mouse is to swipe his tablet or phone past the minion.

If you’re looking for an interesting case for your next project, this McDonald’s Minion toy seems to be pretty popular. PS/2 keyboards are apparently still everywhere, too, despite their obsolescence due to USB. But there are lots of other ways to get more use out of those, too.


Filed under: Arduino Hacks
Hack a Day 14 Apr 16:01

How to add library to proteus

In this post, we are going to discuss how to place library in proteus. As we all know that, there is no library of many components/ devices in arduino. We can add external libraries to proteus either provided by third party or written by an individual.

Basically, library consists of two files having extension .IDX and .LIB

We have to place these two files in the following directory:

C:\Program Files (x86)\Labcenter Electronics\Proteus 7 Professional\LIBRARY

If you are using 32-bit windows, then you to place  file in Program Files. As there is no Program Files(x86) in 32-bit windows.

Download arduino library from the link given below:

Download from here:

Now extract this rar file. You have to place only arduino.idx and arduino.lib in library folder.

Proteus
Hope, you will enjoy the tutorial.

Stay tuned for more updates..
FunWithElectronics 06 Apr 13:10
arduino  library  proteus