Posts with «blink» label

Create your own Arduino Library

Project Description

In this short tutorial I will show you how to create your own Arduino Library. Making your own library seems daunting at first, but I will show you that it is not much harder than writing your own script/sketch. I would advise that you comment you code clearly, because when you come back to it in 5 years time, it will help to navigate you through your code at this time in history. Here we go, let's go through the process of creating a very simple Arduino library.

Parts Required

  • Arduino UNO or compatible board

Project Steps

Before we begin, there are a few questions you must ask yourself:

  1. What will the library be called ?
  2. What will the library do ?
  3. What are you trying to simplify?

For our library, these are the answers to the questions above:

  1. BlinkMe
  2. It will blink an LED attached to one of the digital pins
  3. The aim is to reduce the blink commands to a single line

Create a Folder

Create a folder on your computer which will be used to house all of the files in this project. Name the folder the same name as the library. In this case we will name it "BlinkMe". Make sure you use consistent naming throughout the tutorial. Capital and lowercase letters do matter.

Create the files

Using any text based editor (eg. notepad++, PSPad, Notepad2 etc), you will need to create 3 blank files:

  • The C++ file (BlinkMe.cpp) : Library code containing all of the functions
  • The Header file (BlinkMe.h): Contains the library function declarations
  • keywords.txt : Used for syntax highlighting within the Arduino IDE

I will tell you what you need to write inside each of these files, but make sure you have the blank BlinkMe.cpp, BlinkMe.h and keywords.txt files inside of the BlinkMe folder. Some people start by creating the header file first, but I personally like to start with the CPP file.
We will now look to populate the BlinkMe C++ file:

The C++ file (.cpp)

This file will contain all of the functions in your new library.
The first thing you will need to do is include the Arduino.h file. This will drag in all of the relevant Arduino code necessary for your library to function with an Arduino. And while we haven't yet created the header file (BlinkMe.h), we need to import that also. So the first two lines should be:

#include <Arduino.h>
 #include <BlinkMe.h>

The next section of code is the "constructor". This will be responsible for constructing the BlinkMe object. The BlinkMe object will allow you to call any of the public functions within the BlinkMe library. The constructor will allow us to define the default variables or constants.

BlinkMe::BlinkMe(){
    _dPin = 13;
 }

Sometimes we will want to blink an LED on a different pin. So we will create a function to set the pin that we would like use.

void setOUTPUT(int dPin){
    _dPin = dPin;
    pinMode(_dPin, OUTPUT);
 }

The only thing left is to create the useful part of the code. We will create a simple function that will blink the LED for a set duration. The function will have a parameter, which will be used to set the blink duration.

void blink(unsigned long delay_1){
    _delay_1 = delay_1;
    digitalWrite(_dPin, HIGH);
    delay(_delay_1);
    digitalWrite(_dPin, LOW);
    delay(_delay_1);
 }

Here is the complete "BlinkMe.cpp" file:

The Header file (.h)

The header file will be used to create the library function declarations. Open the "BlinkMe.h" file.
The first step is to check to make sure that the library is NOT already defined:

#ifndef BlinkMe_h

If it is not defined, then we must define the library:

#define BlinkMe_h

We then need to provide access to the standard Arduino types and constants

#include "Arduino.h"

And finally create the BlinkMe class:

//Create the class BlinkMe
class BlinkMe{
    public:
        BlinkMe();
        void setOUTPUT(int dPin);
        void blink(unsigned long delay_1);
    private:
        int _dPin;
        unsigned long _delay_1;
 };
#endif

Here is the complete header file:

keywords.txt (optional)

The keywords.txt file will contain the keywords for the library which will allow appropriate syntax highlighting. This file is optional, however it will highlight your classes or functions based on the keyword mapping.

  • LITERAL1: specifies constants (eg. HIGH, LOW,
  • KEYWORD1: specifies classes (eg. Serial)
  • KEYWORD2: specifies methods and functions (eg. analogRead, digitalWrite, delay)
  • KEYWORD3: specifies structures (eg. if, while, loop)
You need to make sure you use a single tab between the keyword and the "KEYWORD" mapping. In our example, BlinkMe is a class, so that would be a KEYWORD1. On the other hand, "blink" is a function, so that would be a KEYWORD2. So the keywords.txt file will contain the following text:

BlinkMe     KEYWORD1
setOUTPUT   KEYWORD2
blink       KEYWORD2

Example Sketch (optional)

It is often useful to include an sketch that provides an example of the library in use. It provides some context. If you plan to include the sketch in your library, then you must follow these simple rules:

  1. Create an "examples" folder.
  2. Create an example sketch, an place it within a folder of the same name as the sketch
  3. Place the sketch folder inside of the examples folder
You will end up with something like: examples/example_sketch/example_sketch.ino
In our case it will be: examples/blinkTest/blinkTest.ino

Here is the example sketch for this library (Save as blinkTest.ino):


The library

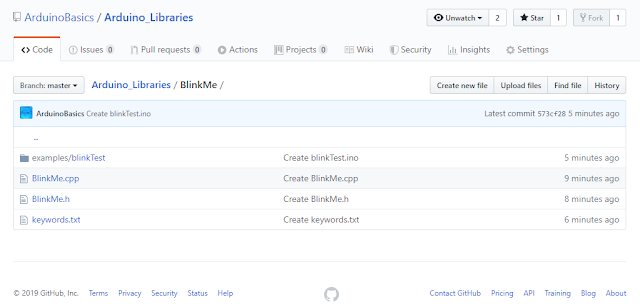
Here is a picture of the library contents:

And now the only thing left is to zip up the library folder and import it into the Arduino IDE. Use whatever program you want to zip up the BlinkMe folder, and note the location of the zip file. You need to import the zip file into the Arduino IDE:

  • Arduino IDE > Sketch > Include Library > Add .ZIP Library...
  • Select the library zip file you just created, and select "Open".
  • You can now use your library in the Arduino IDE.
  • Test it by running your example sketch: File > Examples > BlinkMe > blinkTest

Download

You can download the entire library here:
BlinkMe Library

Conclusion

In this tutorial, I showed you how to create a simple Arduino library. If you would like so see another example, have a look at my ToggleTimer library, which is very useful when trying to blink an LED without using a delay.You don't have to limit yourself to LEDs, you can use it for other projects where delay gets in the way. ToggleTimer is a non-blocking timer that toggles between two states.


If you found this tutorial helpful, please consider supporting me by buying me a virtual coffee/beer.

$3.00 AUD only

Social Media

You can find me on various social networks:

Follow me on Twitter: ScottC @ArduinoBasics.
I can also be found on Instagram, Pinterest, and YouTube.
And if all else fails, I have a server on Discord.


ScottC 29 Dec 10:09
arduino  blink  diy  led  library  tutorial  

Smart bicycle saddle developed with Arduino

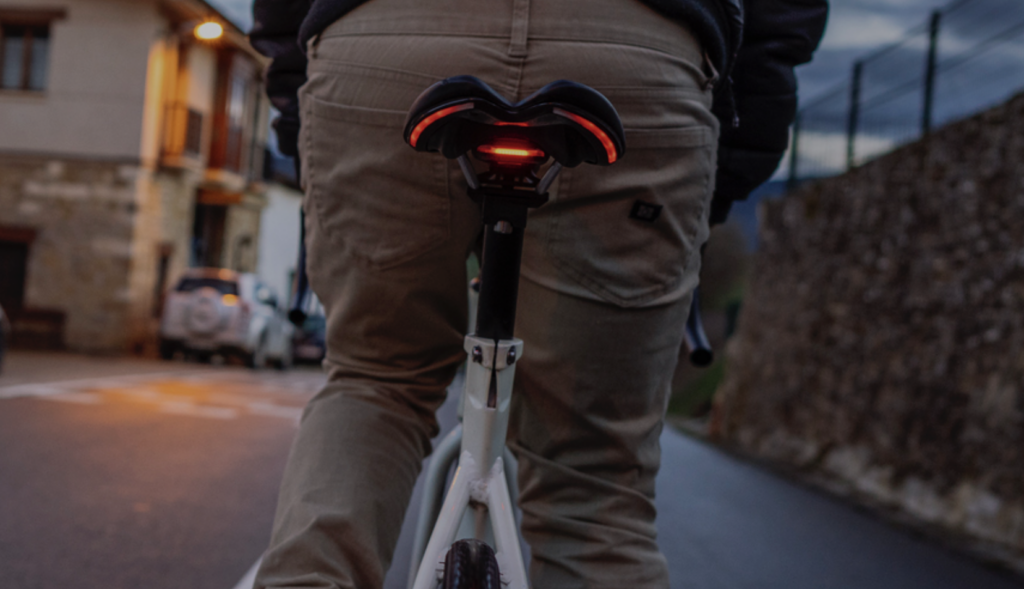
Riding a bicycle can be a great way to get around, and/or even to get some needed exercise. When you mix in automobile or foot traffic, though, things get a bit more complicated. This could be blamed, in part, on the fact that bikes don’t have the same running lights, turn or brake signals as motorized vehicles. 

To address this problem, BLINK!’s patented Integrated Lighting System (iLS) has been designed to provide a visible communication solution that’s easily understandable by other road users. 

This custom saddle—which was prototyped using an ATmega328P-based Arduino— features lighting for 270º visibility, and brightens automatically for braking when deceleration is detected. In addition, iLS includes a pair of remotely activated turn signals. This allows the rider to indicate direction changes without removing his or her hand from the handlebars to awkwardly point. 

BLINK! has been embedded into a wide range of saddles and installation should be fairly straightforward. Not only will it certainly help enhance road safety, iLS will look fantastic while doing so.

Keeping the Arduino website in motion

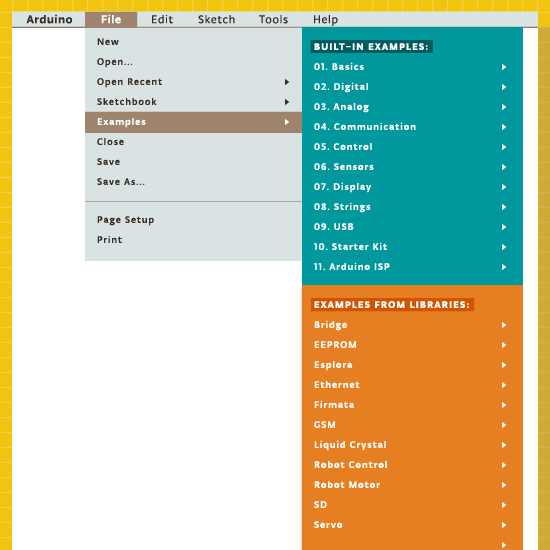
We never rest, even during summer, to serve our community and we announce today that we’ve refreshed over 150 example pages and redesigned the Examples area, offering an updated support to the current Arduino Software (IDE) Built-in and Libraries examples

Our website is a living entity that everyday hosts a huge number of visitors. They are looking for software, information, guidelines, ideas and also the right tutorial to start tinkering with their new board on a specific issue or project.

The Reference is the place where everything is documented and explained, with dry and essential information that is also included locally with every Arduino Software (IDE) installation.

Our software also includes a number of built-in sketches that help our users to quickly understand how the various functions and libraries may be used and applied to specific projects and tasks. We all started with the famous Blink and at the end of this tutorial we all felt the power and the excitement of having tamed our board with the upload of our first sketch. Keeping all these examples in good shape and updated is essential to keep you users safe from troubles or difficulties.

These examples evolve, as the libraries also evolve, therefore the sketches may be updated, amended or added. Each of these examples is commented and has an introductory part that gives a description of the purpose of the sketch and – if necessary – the instructions to put together the circuit. We know that the information provided inside the IDE and the sketches is not enough and therefore we made an area of our website where each sketch is explained and documented.

Year after year, board after board and library after library, many “hands” contributed to this area, filling gaps and amending things to reflect the Arduino Software (IDE) status. It has been an ongoing process that inevitably brought the Tutorials area in a state where many styles and ways of explaining things merged. We have big plans for our www.arduino.cc website and it is important to clean and fix the existing areas before we add new contents. This is why my first task – as editorial manager – has been the refresh and overall alignment of our Examples and Examples from Libraries pages.

We have roughly 150 pages documenting our Examples for the current products and libraries and going through them all wasn’t exactly a piece of cake: many things were checked for each example and sometimes things were outdated or missing. We also have our sister brand Genuino that got its space in all the relevant example pages. Now contents, style, look and feel and links in this area are ready for new and fresh developments.

I would like to end this post adding that this task was also a very good opportunity to refresh my knowledge about the powerful capabilities of Arduino programming language and its libraries. I had a few doubts on how to do a few things in my own sketches and going through all the examples gave me the hints I was missing.

The plain list of examples available in the Arduino Software (IDE) is just made of the sketch names, conversely in our pages you find a brief description of each of them. I suggest that you wander through these descriptions: let them excite your curiosity and inspire you!

Arduino Blog 11 Sep 10:00

Add motorized blinds to your home theater

[Chipsy] found himself with an interesting problem. The room that serves his home theater has a wall mirror which reflects part of the screen during viewing. In an otherwise dark room this was very distracting. His solution was to add a blind that covers the mirror during viewing, but who wants to constantly pull that down and back up again? Since the motorized projection screen he is using has a remote control he figured out a way to motorize the blind and synchronize it with the screen’s remote.

The screen uses mechanical relays to switch the motor. He patched into these with an Arduino to detect whether the screen was going up or down. It was easy enough to use his own relay and motor with the blind, but he needed a way to stop the blind once it was in position. For covering up the mirror he simply sets an 18 second timer, but for retracting the blind he wanted precise alignment so he added a magnet and sense its position with a reed switch. See the synchronized screen and blind in the clip after the break.


Filed under: home entertainment hacks

Blinking light switch

In addition to being a great replacement for that aging eye patch, these specs act as a light switch. By watching your eyelids, they are able to kill the lights whenever you blink.

The installation is a shared experience piece conceived by [Michal Kohút]. He wanted to illustrate the constant blinking we all do but rarely think about. The system uses an Arduino to capture events from the blink sensors and switch the lights accordingly. This way the wearer doesn’t experience a loss of illumination, but the observer does. Check out the video after the break for a quick demonstration.

One of the commenters from the source article shared a video link to another blink-based light project. That one uses electrodes attached to skin around your eye in order to detect eyelid motion.

[via Reddit]


Filed under: wearable hacks
Hack a Day 11 Aug 16:01

Reading from a Text File and Sending to Arduino

The following tutorial will demonstrate how to Read values from a Text file (.txt, .csv) to blink 1 of 9 LEDs attached to an Arduino. It uses the combination of an Arduino and Processing program to process the file. The Processing program will read the text file in real time, only sending new information to the Arduino.


Components Required

  • Arduino UNO
  • Breadboard
  • 9 LEDs
  • 9 x 330 ohm resistors
  • Wires to connect the circuit
  • USB connection cable: to connect the computer to the Arduino
  • A computer: to run the processing sketch, and to compile / upload the Arduino sketch
  • Processing Program installed on computer
  • Arduino Program installed on the computer
  • A comma separated text file (*.txt).


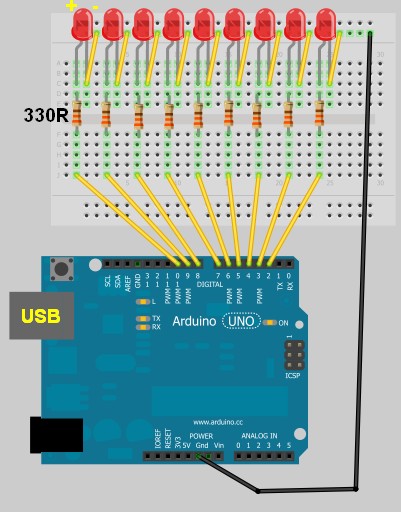
Arduino Layout


The Text File

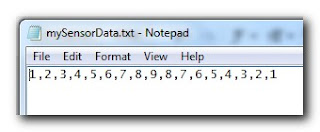
  • Open Notepad or equivalent text file editor, and paste the following data into it.

1,2,3,4,5,6,7,8,9,8,7,6,5,4,3,2,1

  • Save the file on your hard drive. In my case, I have chosen to save the file at this location.

D:/mySensorData.txt

  • It should look like the following screenshot


Additional notes regarding the Text file:
  • Just remember what you call it, and where you saved it, because we will be referring to this file later on in the Processing script.
  • Keep all values on the same line.
  • Separate each number with a comma.
  • The number 1 will blink the first LED which is attached to Pin 2 on the Arduino.
  • The number 9 will blink the last LED which is attached to Pin 10 on the Arduino.


Processing Code

You can download the Processing IDE from this site.

 1
2
3
4
5
6
7
8
9
10
11
12
13
14
15
16
17
18
19
20
21
22
23
24
25
26
27
28
29
30
31
32
33
34
35
36
37
38
39
40
41
42
43
44
45
46
47
48
49
50
51
52
53
54
55
56
57
58
59
60
61
62
63
64
65
66
67
68
69
70
71
72
73
74
75
76
77
78
79

style="color: blue;">import
processing.serial.*;

style="color: blue;">import
java.io.*;

style="color: rgb(43, 145, 175);">int
mySwitch=0;

style="color: rgb(43, 145, 175);">int
counter=0;
String [] subtext;
Serial myPort;


style="color: rgb(43, 145, 175);">void
setup(){

style="color: green;">//Create a switch that will control the frequency of text file reads.


style="color: green;">//When mySwitch=1, the program is setup to read the text file.


style="color: green;">//This is turned off when mySwitch = 0

mySwitch=1;


style="color: green;">//Open the serial port for communication with the Arduino


style="color: green;">//Make sure the COM port is correct

myPort =
style="color: blue;">new
Serial(this,
style="color: rgb(163, 21, 21);">"COM6"
, 9600);
myPort.bufferUntil(
style="color: rgb(163, 21, 21);">'\n'
);
}


style="color: rgb(43, 145, 175);">void
draw() {

style="color: blue;">if
(mySwitch>0){

style="color: green;">/*The readData function can be found later in the code.


style="color: green;"> This is the call to read a CSV file on the computer hard-drive. */

readData(
style="color: rgb(163, 21, 21);">"D:/mySensorData.txt"
);


style="color: green;">/*The following switch prevents continuous reading of the text file, until


style="color: green;"> we are ready to read the file again. */

mySwitch=0;
}

style="color: green;">/*Only send new data. This IF statement will allow new data to be sent to


style="color: green;"> the arduino. */


style="color: blue;">if
(counter<subtext.length){

style="color: green;">/* Write the next number to the Serial port and send it to the Arduino


style="color: green;"> There will be a delay of half a second before the command is


style="color: green;"> sent to turn the LED off : myPort.write('0'); */

myPort.write(subtext[counter]);
delay(500);
myPort.write(
style="color: rgb(163, 21, 21);">'0'
);
delay(100);

style="color: green;">//Increment the counter so that the next number is sent to the arduino.

counter++;
}
style="color: blue;">else
{
//If the text file has run out of numbers, then read the text file again in 5 seconds.
delay(5000);
mySwitch=1;
}
}


style="color: green;">/* The following function will read from a CSV or TXT file */


style="color: rgb(43, 145, 175);">void
readData(String myFileName){

File file=
style="color: blue;">new
File(myFileName);
BufferedReader br=
style="color: blue;">null
;

try{
br=
style="color: blue;">new
BufferedReader(
style="color: blue;">new
FileReader(file));
String text=
style="color: blue;">null
;


style="color: green;">/* keep reading each line until you get to the end of the file */


style="color: blue;">while
((text=br.readLine())!=
style="color: blue;">null
){
/* Spilt each line up into bits and pieces using a comma as a separator */
subtext = splitTokens(text,
style="color: rgb(163, 21, 21);">","
);
}
}
style="color: blue;">catch
(FileNotFoundException e){
e.printStackTrace();
}
style="color: blue;">catch
(IOException e){
e.printStackTrace();
}
style="color: blue;">finally
{
try {

style="color: blue;">if
(br != null){
br.close();
}
}
style="color: blue;">catch
(IOException e) {
e.printStackTrace();
}
}
}

I used this site to highlight and format my code.

Once you have copied the text above into the Processing IDE, you can now start working on the Arduino code as seen below.


Arduino Code

You can download the Arduino IDE from this site.

Copy and paste the following code into the Arduino IDE.

 1
2
3
4
5
6
7
8
9
10
11
12
13
14
15
16
17
18
19
20
21
22
23
24
25
26
27
28
29
30
31
32
33
34
35
36
37
38
39
40
41
42
43
44
45
46
47
48
49

style="color: green;">/* This program was created by ScottC on 8/5/2012 to receive serial


style="color: green;">signals from a computer to turn on/off 1-9 LEDs */


style="color: rgb(43, 145, 175);">void
setup() {

style="color: green;">// initialize the digital pins as an output.

pinMode(2, OUTPUT);
pinMode(3, OUTPUT);
pinMode(4, OUTPUT);
pinMode(5, OUTPUT);
pinMode(6, OUTPUT);
pinMode(7, OUTPUT);
pinMode(8, OUTPUT);
pinMode(9, OUTPUT);
pinMode(10, OUTPUT);

style="color: green;">// Turn the Serial Protocol ON

Serial.begin(9600);
}


style="color: rgb(43, 145, 175);">void
loop() {

style="color: rgb(43, 145, 175);">byte
byteRead;


style="color: green;">/* check if data has been sent from the computer: */


style="color: blue;">if
(Serial.available()) {


style="color: green;">/* read the most recent byte */

byteRead = Serial.read();

style="color: green;">//You have to subtract '0' from the read Byte to convert from text to a number.

byteRead=byteRead-
style="color: rgb(163, 21, 21);">'0'
;


style="color: green;">//Turn off all LEDs if the byte Read = 0


style="color: blue;">if
(byteRead==0){

style="color: green;">//Turn off all LEDS

digitalWrite(2, LOW);
digitalWrite(3, LOW);
digitalWrite(4, LOW);
digitalWrite(5, LOW);
digitalWrite(6, LOW);
digitalWrite(7, LOW);
digitalWrite(8, LOW);
digitalWrite(9, LOW);
digitalWrite(10, LOW);
}


style="color: green;">//Turn LED ON depending on the byte Read.


style="color: blue;">if
(byteRead>0){
digitalWrite((byteRead+1), HIGH);
style="color: green;">// set the LED on

}
}
}

Additional Information:
  • The Arduino code will still work without the processing program. You can open the serial monitor window to send the commands to the Arduino manually. In fact, if you encounter any problems, I would suggest you do this. It will help to identify the root cause of the problem (ie Processing or Arduino Code, or physical connections).
  • If you choose to use the Serial Monitor feature of the Arduino IDE, you cannot use the Processing program at the same time.

Once you have assembled the Arduino with all the wires, LEDs, resistors etc, you should now be ready to put it all together and get this baby cranking!


Connecting it all together

  • Connect the USB cable from your computer to the Arduino, and upload the code.
  • Keep the USB cable connected between the Arduino and the computer, as this will become the physical connection needed by the Processing Program
  • Make sure that you have the text file in the correct location on your hard drive, and that it only contains numbers relevant to the code provided (separated by commas).
  • Run the Processing program and watch the LEDs blink in the sequence described by the text file.
  • You can add more numbers to the end of the line, however, the processing program will not be aware of them until you save the file. The text file does not have to be closed.
Other programs can be used to create text file, but you will need the processing program to read the file and send the values to the Arduino. The Arduino will receive each value and react appropriately.

SIMILAR PROJECT: Use a mouse to control the LEDs on your Arduino - see this post.


An alternative Processing Sketch

This Processing sketch uses the loadStrings()method instead of the FileReader method used in the first sketch. This sketch also provides better control over sending the values to the Arduino. When the sketch first loads, the application window will be red. By clicking your mouse inside the window, the background will turn green and the file will be imported and sent to the Arduino, with every value being sent at half second intervals. If you update the text file and save, only new values will be transmitted, however, if you want the entire file to transmit again, you can press the window once (to reset the counter), and then again to read the file and send the values again from the beginning of the file.
I personally like this updated version better than the first, plus I was inspired to update this blog posting due to the fact that some people were having problems with the FileReader method in the first sketch. But both sketches should work (they worked for me).


 1
2
3
4
5
6
7
8
9
10
11
12
13
14
15
16
17
18
19
20
21
22
23
24
25
26
27
28
29
30
31
32
33
34
35
36
37
38
39
40
41
42
43
44
45
46
47
48
49
50
51
52
53
54
55
56
57
58
59
60
61
62

style="color: rgb(0, 128, 0);">/* TextFile Sender: Written by Scott C on 5th April 2013


style="color: rgb(0, 128, 0);"> using Processing Version 2.0b8 */


import processing.serial.*;

Serial comPort;

style="color: rgb(43, 145, 175);">int
counter=0;
style="color: rgb(0, 128, 0);">// Helps to keep track of values sent.


style="color: rgb(43, 145, 175);">int
numItems=0;
style="color: rgb(0, 128, 0);">//Keep track of the number of values in text file

boolean sendStrings=
style="color: rgb(0, 0, 255);">false
;
style="color: rgb(0, 128, 0);">//Turns sending on and off

StringLoader sLoader;
style="color: rgb(0, 128, 0);">//Used to send values to Arduino


style="color: rgb(43, 145, 175);">void
setup(){
comPort =
style="color: rgb(0, 0, 255);">new
Serial(
style="color: rgb(0, 0, 255);">this
, Serial.list()[0], 9600);
background(255,0,0);
style="color: rgb(0, 128, 0);">//Start with a Red background

}


style="color: rgb(43, 145, 175);">void
draw(){
}


style="color: rgb(43, 145, 175);">void
mousePressed() {

style="color: rgb(0, 128, 0);">//Toggle between sending values and not sending values

sendStrings=!sendStrings;


style="color: rgb(0, 128, 0);">//If sendStrings is True - then send values to Arduino


style="color: rgb(0, 0, 255);">if
(sendStrings){
background(0,255,0);
style="color: rgb(0, 128, 0);">//Change the background to green


style="color: rgb(0, 128, 0);">/*When the background is green, transmit


style="color: rgb(0, 128, 0);"> text file values to the Arduino */

sLoader=
style="color: rgb(0, 0, 255);">new
StringLoader();
sLoader.start();
}
style="color: rgb(0, 0, 255);">else
{
background(255,0,0);
style="color: rgb(0, 128, 0);">//Change background to red


style="color: rgb(0, 128, 0);">//Reset the counter

counter=0;
}
}


style="color: rgb(0, 128, 0);">/*============================================================*/


style="color: rgb(0, 128, 0);">/* The StringLoader class imports data from a text file


style="color: rgb(0, 128, 0);"> on a new Thread and sends each value once every half second */


style="color: rgb(0, 0, 255);">public

style="color: rgb(0, 0, 255);">class

style="color: rgb(43, 145, 175);">StringLoader
extends Thread{


style="color: rgb(0, 0, 255);">public
StringLoader(){

style="color: rgb(0, 128, 0);">//default constructor

}


style="color: rgb(0, 0, 255);">public

style="color: rgb(43, 145, 175);">void
run() {
String textFileLines[]=loadStrings(
style="color: rgb(163, 21, 21);">"d:/mySensorData.txt"
);
String lineItems[]=splitTokens(textFileLines[0],
style="color: rgb(163, 21, 21);">","
);
numItems=lineItems.length;

style="color: rgb(0, 0, 255);">for
(
style="color: rgb(43, 145, 175);">int
i = counter; i<numItems; i++){
comPort.write(lineItems[i]);
delay(500);
comPort.write(
style="color: rgb(163, 21, 21);">"0"
);
}
counter=numItems;
}
}


ScottC 09 May 14:09