Posts with «projector» label

Laser projector ditches galvanometer for spinning drum

Laser projectors like those popular in clubs or laser shows often use mirror galvanometers to reflect the laser and draw in 2D. Without galvos, and on a tight budget, [Vitaliy Mosesov] decided that instead of downgrading the quality, he would seek an entirely different solution: a spinning mirror drum.

He fires a laser at a rotating drum with twelve mirror faces, each at a different adjustable vertical angle. The laser will hit a higher or lower point on the projection surface depending on which mirror it’s reflecting off – this creates resolution in the Y direction.

Timing the pulsing of the laser so that it reflects off the mirror at a certain horizontal angle provides the X resolution.

As you can already tell, speed and timing is critical for this to work. So much so that [Vitaliy] decided he wanted to overclock his Arduino – from 16 MHz to 24.576 MHz. Since this changes the baud rate, an AVR ISP II was used for programming after the modification, and the ‘duino’s hardware serial initialization had to be hacked too.

For the laser itself, [Vitaliy] designed some nifty driver circuitry, which can respond quickly to the required >50 kHz modulation, supply high current, and filter out voltage transients on the power supply (semiconductor lasers have no protection from current spikes).

On the motor side of things, closed loop control is essential. A photo-interrupter was added to the drum for exact speed detection, as well as a differentiator to clean up the signal. Oh, and did we mention the motor is from a floppy disk drive?

We’ve actually seen builds like this before, including a dot-matrix version with multiple lasers and one made apparently out of Meccano and hot-glue that can project a Jolly Wrencher. But this build, with its multiple, adjustable mirrors, is a beauty.  Check it out in action below.

Hack a Day 20 Apr 16:30

Cheap Dual Mirror Laser Projector

[Stanley] wanted to make a laser projector but all he could find online were one’s using expensive galvanometer scanners. So instead he came up with his own solution that is to be admired for its simplicity and its adaptation of what he could find.

At its heart is an Arduino Uno and an Adafruit Motor Shield v2. The green laser is turned on and off by the Arduino through a transistor. But the part that makes this really a fun machine to watch at work are the two stepper motors and two mirrors that reflect the laser in the X and Y directions. The mirrors are rectangles cut from a hard disk platter, which if you’ve ever seen one, is very reflective. The servos tilt the mirrors at high speed, fast enough to make the resulting projection on the wall appear almost a solid shape, depending on the image.

He’s even written a Windows application (in C#) for remotely controlling the projector through bluetooth. From its interface you can select from around sixteen predefined shapes, including a what looks like a cat head, a heart, a person and various geometric objects and line configurations.

There is a sort of curving of the lines wherever the image consists of two lines forming an angle, as if the steppers are having trouble with momentum, but that’s probably to be expected given that they’re steppers controlling relatively large mirrors. Or maybe it’s due to twist in the connection between motor shaft and mirror? Check out the video after the break and let us know what you think.

The video’s in three parts: looking at the laser beams in action as you’d see them on a dance floor, then watching the projected images while looking at an insert of the Windows application, and then watching the steppers and mirror doing their rapid movements.

As for the expensive galvanometer scanners we mentioned above, check out this impressive laser projector that uses them. Another method is to use a spinning wheel with mirrors set to different angles, like this one that draws a marquee using a pill box as the wheel. And how about one with no mirrors at all, instead attaching the laser directly to servo motors, though that one does take longer to draw.


Filed under: laser hacks

A Laser Effect Projector Built with Safety in Mind

There’s just something about wielding a laser pointer on a dark, foggy night. Watching the beam cut through the mist is fun – makes you feel a little Jedi-esque. If you can’t get enough of lasers and mist, you might want to check out this DIY “laser sky” effect projector.

The laser sky effect will probably remind you of other sci-fi movies – think of the “egg scene” from Alien. The effect is achieved by sweeping a laser beam in a plane through swirling smoke or mist. The laser highlights a cross section of the otherwise hidden air currents and makes for some trippy displays. The working principle of [Chris Guichet]’s projector is simplicity itself – an octagonal mirror spun by an old brushless fan motor and a laser pointer. But after a quick proof of concept build, he added the extras that took this from prototype to product. The little laser pointer was replaced with a 200mW laser module, the hexagonal mirror mount and case were 3D printed, and the mirrors were painstakingly aligned so the laser sweeps out a plane. An Arduino was added to control the motor and provide safety interlocks to make sure the laser fires only when the mirror is up to speed. The effect of the deep ruby red laser cutting through smoke is mesmerizing.

If laser sky is a little too one-dimensional for you, expand into two dimensions with this vector laser projector, and if monochrome isn’t your thing try an RGB vector projector.


Filed under: Arduino Hacks, laser hacks

Astoundingly Great $60 3D Printer called Chimera Bests Your Printer

When most people think of 3D printing, they think of Fused Deposition Modelling (FDM) printers. These work by heating a material, squirting it out a nozzle that moves around, and letting it cool. By moving the nozzle around in the right patterns while extruding material out the end, you get a part. You’ve probably seen one of the many, many, many FDM printers out there.

Stereolithography printing (SLA) is a different technique which uses UV light to harden a liquid resin. The Chimera printer uses this technique, and aims to do it on the cheap by using recycled parts.

First up is the UV light source. DLP projectors kick out a good amount of UV, and accept standard video inputs. The Mitsubishi XD221u can be had for about $50 off eBay. Some modifications are needed to get the focus distance set correctly, but with that complete the X and Y axes are taken care of.

For the Z axis, the build platform needs to move. This was accomplished with a stepper motor salvaged from a disk drive. An Arduino drives the motor to ensure it moves at the right rate.

Creation Workshop was chosen as the software to control the Chimera. It generates the images for the projector, and controls the Z axis. The SLA process allows for high definition printing, and the results are rather impressive for such a cheap device. This is something we were just talking about yesterday; how to lower the cost of 3D printers. Obviously this is cheating a bit because it’s banking on the availability of cheap used parts. But look at it this way: it’s based on older technology produced at scale which should help a lot with the cost of sourcing this stuff new. What do you think?


Filed under: 3d Printer hacks
Hack a Day 10 Jun 22:01

Add motorized blinds to your home theater

[Chipsy] found himself with an interesting problem. The room that serves his home theater has a wall mirror which reflects part of the screen during viewing. In an otherwise dark room this was very distracting. His solution was to add a blind that covers the mirror during viewing, but who wants to constantly pull that down and back up again? Since the motorized projection screen he is using has a remote control he figured out a way to motorize the blind and synchronize it with the screen’s remote.

The screen uses mechanical relays to switch the motor. He patched into these with an Arduino to detect whether the screen was going up or down. It was easy enough to use his own relay and motor with the blind, but he needed a way to stop the blind once it was in position. For covering up the mirror he simply sets an 18 second timer, but for retracting the blind he wanted precise alignment so he added a magnet and sense its position with a reed switch. See the synchronized screen and blind in the clip after the break.


Filed under: home entertainment hacks

16×8 pixel laser projector

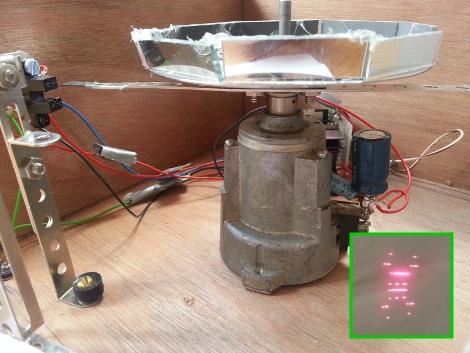
[Michiel] gave us a little shout-out by drawing the Hackaday logo with his recently completed 16×8 pixel laser projector. It uses a spinning set of mirrors mounted at slightly different angles to redirect the path of the red laser diode.

The projector is driven by an Arduino. To give it more than just a hard-coded existence [Michiel] included an Xbee module. This lets him connect to it with a computer in order to stream messages. One of the demo videos linked in his project log shows the web interface he coded which will push a message typed in the submission form out to the projector where it is scrolled like a marquee.

This type of spinning display is one of a few common methods for making laser projectors. In the image above you can see the optical sensor which is used to sync the diode with the spinning mirrors, each of which is responsible for a different row of pixels. He lists off several things that he learned when working on the project. We think the most important is the timing issues which go into something like this.


Filed under: laser hacks
Hack a Day 14 Sep 23:01