Posts with «audio» label

Creating a Numbers Station Of Your Very Own

Numbers stations are a weird phenomenon where odd voices read out long strings of numbers or random codewords to the confusion of the vast majority of the listening audience. If you’ve ever wanted to build one of your own, you could follow the example of [AudioWanderer].

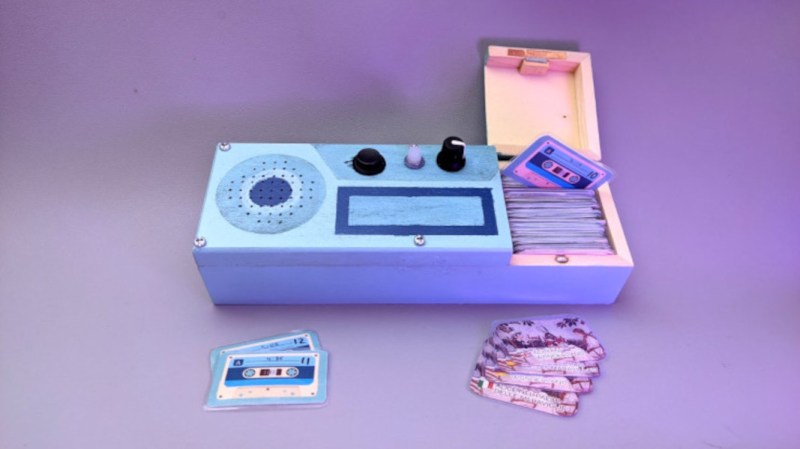
NumberMumble, as it’s called, is a numbers station emulator. It doesn’t signal spy networks or reveal national secrets. Instead, it randomly plays audio samples using an Arduino, including characteristic bursts of white noise that make it sound more authentic. It relies on the Mozzi library to help with audio tasks, including generating white noise and playing back samples. It’s also kitted out with a filter knob for varying the tone. Audio output is via PWM.

If you want to confuse your neighbours with oddball audio, put this thing on a radio transmitter and get broadcasting. But don’t, because that’s illegal without the proper licenses or — you know — if you happen to be a real spy. Video after the break.

Hack a Day 17 Mar 12:00

A High-End Studio Multiplexer Surrenders To An Arduino

The equipment used in professional radio and TV studios is both extremely high quality and very expensive indeed, and thus out of the reach of an experimenter. Happily as studios are refurbished there’s a steady supply of second-hand equipment which can be surprisingly cheap, but as [Nathan] found out with a Quartz audio router, comes with no control software. What’s to be done with what’s essentially a piece of junk? Remove its brain and replace it with one that can be controlled, of course!

On the PCB alongside a bank of switch matrices is an FPGA which does the heavy lifting. That’s “heavy” in a limited sense, because all it does is handle the chip select lines for the matrices and write data to their registers. This is a task that can be handled by a microcontroller, so in goes an Arduino Nano, which along with a few other board modifications delivers a serial-controlled studio router.

The interesting part for us in this project comes from a look at the date codes on the board, they’re from the early 2000s. This is (roughly) contemporary with the ATmega chip on the Arduino, so we’re curious as to why the designers saw fit to use an FPGA when the microcontrollers of the day were clearly up to the task for much less outlay. We suspect a touch of millennium-era price inflation, but we can’t be sure.

Meanwhile, old broadcast kit has featured here before.

Hack a Day 28 Dec 06:00

Kids’ Jukebox Based on Arduino with RFID

Consumer electronics aimed at young children tend to be quite janky and cheap-looking, and they often have to be to survive the extreme stress-testing normal use in this situation. You could buy a higher quality item intended for normal use, but this carries the risk of burning a hole in the pockets of the parents. To thread the needle on this dilemma for a child’s audiobook player, [Turi] built the Grimmboy for a relative of his.

Taking its name from the Brothers Grimm, the player is able of playing a number of children’s stories and fables in multiple languages, with each physically represented by a small cassette tape likeness with an RFID tag hidden in each one. A tape can be selected and placed in the player, and the Arduino at the center of it will recognize the tag and play the corresponding MP3 file stored locally on an SD card. There are simple controls and all the circuitry to support its lithium battery as well. All of the source code that [Turi] used to build this is available on the project’s GitHub page.

This was also featured at the Arudino blog as well, and we actually featured a similar project a while ago with a slightly different spin. Both are based on ideas from Tonuino, an open source project aimed at turning Arduinos into MP3 players. If you’re looking to build something with a few more features, though, take a look at this custom build based on the RP2040 microcontroller instead.

Hack a Day 17 Dec 06:00

Wearable Sensor Trained to Count Coughs

There are plenty of problems that are easy for humans to solve, but are almost impossibly difficult for computers. Even though it seems that with modern computing power being what it is we should be able to solve a lot of these problems, things like identifying objects in images remains fairly difficult. Similarly, identifying specific sounds within audio samples remains problematic, and as [Eivind] found, is holding up a lot of medical research to boot. To solve one specific problem he created a system for counting coughs of medical patients.

This was built with the idea of helping people with chronic obstructive pulmonary disease (COPD). Most of the existing methods for studying the disease and treating patients with it involves manually counting the number of coughs on an audio recording. While there are some software solutions to this problem to save some time, this device seeks to identify coughs in real time as they happen. It does this by training a model using tinyML to identify coughs and reject cough-like sounds. Everything runs on an Arduino Nano with BLE for communication.

While the only data the model has been trained on are sounds from [Eivind], the existing prototypes do seem to show promise. With more sound data this could be a powerful tool for patients with this disease. And, even though this uses machine learning on a small platform, we have seen before that Arudinos are plenty capable of being effective machine learning solutions with the right tools on board.

Hack a Day 16 Nov 00:00

Pocket Radio Powered By Tiny Microcontroller

Before the days of MP3 players and smartphones, and even before portable CD players, those of us of a certain age remember that our cassette players were about the only way to take music on-the-go. If we were lucky, they also had a built-in radio for when the single tape exhausted both of its sides. Compared to then, it’s much easier to build a portable radio even though cassettes are largely forgotten, as [wagiminator] shows us with this radio design based on an ATtiny.

The build is about as compact as possible, with the aforementioned ATtiny 402/412 as its core, it also makes use of an integrated circuit FM tuner,  an integrated audio amplifier with its own single speaker, and a small OLED display. The unit also boasts its own lithium-polymer battery charger and its user interface consists of only three buttons, plenty for browsing radio stations and controlling volume.

The entire build fits easily in the palm of a hand and is quite capable for a mobile radio, plus all of the schematics and code is available on the project page. While it doesn’t include AM capability, just the fact that FM is this accessible nowadays when a few decades ago it was cutting-edge technology is quite remarkable. If you’re looking for an even smaller FM receiver without some of the bells and whistles of this one, take a look at this project too.

Hack a Day 06 Jul 21:00
arduino  attiny  audio  code  fm  oled  radio  radio hacks  schematics  speaker  

GGWave Sings the Songs of Your Data

We’re suckers for alternative data transmission methods, and [Georgi Gerganov]’s ggwave made us smile. At its core, it’s doing what the phone modems of old used to do – sending data encoded as different audio tones. But GGwave does this with sophistication!

It splits the data into four-bit chunks, and uses 16 different frequency offsets to represent each possible value. But for each chunk, these offsets are added to one of six different base frequencies, which allows the receiving computer to tell which chunk it’s in. It’s like a simple framing concept, and it makes the resulting data sound charmingly like R2-D2. (It also uses begin and end markers to be double-sure of the framing.) The data is also sent with error correction, so small hiccups can get repaired automatically.

What really makes ggwave shine is that it’s ported to every platform you care about: ESP32, Arduino, Linux, Mac, Windows, Android, iOS, and anything that’ll run Python or JavaScript. So it’ll run in a browser. There’s even a GUI for playing around with alternative modulation schemes. Pshwew! This makes it easy for a minimalist microcontroller-based beeper button to control your desktop, or vice-versa. An ESP32 makes for an IoT-style WiFi-to-audio bridge. Write code on your cell phone, and you can broadcast it to any listening microcontroller. Whatever your use case, it’s probably covered.

Now the downside. The data rate is slow, around 64-160 bits per second, and the transmission is necessarily beepy-booopy, unless you pitch it up in to the ultrasound or use the radio-frequency HackRF demo. But maybe you want to hear when your devices are talking to each other? Or maybe you just think it’s cute? We do, but we wouldn’t want to have to transmit megabytes this way. But for a simple notification, a few bytes of data, a URL, or some configuration parameters, we can see this being a great software addition to any device that has a speaker and/or microphone.

Oh my god, check out this link from pre-history: a bootloader for the Arduino that runs on the line-in.

Hack a Day 06 Jul 19:30

Binaural Hearing Modeled with an Arduino

You don’t have two ears by accident. [Stoppi] has a great post about this, along with a video you can see below. (The text is in German, but that’s what translation is for.) The point to having two ears is that you receive audio information from slightly different angles and distances in each ear and your amazing brain can deduce a lot of spatial information from that data.

For the Arduino demonstration, cheap microphone boards take the place of your ears. A servo motor points to the direction of sound. This would be a good gimmick for a Halloween prop or a noise-sensitive security camera.

Math-wise, if you know the speed of sound, the distance between the sensors, and a few other pieces of data, you wind up with a fairly simple trigonometry problem. In non-math terms, it is easy to get a feel for why this works. If the sound hits both microphones at once, it must be coming from straight ahead. If it hits the left microphone first, it must be closer to that microphone and vice versa. If the sound were right in line with both microphones but closer to the left, the time delay would be exactly due to the speed of sound over the distance between the sensors. If the time is less than that, the sound must be somewhere in between.

The microphone modules have both analog outputs and digital outputs. The digital output triggers if the sound level exceeds a limit set by a potentiometer. By using these modules, the circuit is trivial. Just an Arudino, the two modules, and the servo motor.

Now imagine that you wanted all this spatial detail to come through your headphones. Recording binaural audio is a thing. You can 3D print a virtual head if you are interested. We’ve seen projects for this several times.

Probability-Based Drummer Leaves The Beats Up To Chance

Drum machines may seem like one of the many rites of passage for hardware makers, they’re a concept you can implement simply or take into the extreme making it as complex as you want. [Matt’s] DrumKid is one of them, and its long development history is wonderfully documented in the project logs.

[Matt’s] original intention was to use the automatic drummer as part of his band, wanting “the expressiveness of a good drummer but without the robotic tendencies of a simple drum machine”. For that, he created the first iteration of the DrumKid, a web-based project using the Web Audio API. The interface consisted of bars showing levels for different settings which could be intuitively tweaked, changing the probability of a drum sound being played. This gave the “drummer” its unpredictability, setting itself apart from any regular old drum machine.

Fast forward a few years, and [Matt] now wants to recreate his DrumKid as a proper piece of musical gear, porting the concept into a standalone hardware drum machine you can plug into your mixer. He decided to go with the Arduino framework for his project rather than the Teensy platform in order to make it cheaper to build. The controls are simplified down to a few buttons and potentiometers, and the whole thing runs off of three AAA batteries. Also, targeting the project for hardware like this allowed for new features to be added, such as a bit-crush filter.

We already saw the first prototype here on Hackaday when it was featured in a Hackaday Prize mentor session, and it’s nice to see how the project evolved since. After a number of revisions, the new prototype takes design cues from Teenage Engineering’s “Pocket Operator” drum machine, using the main PCB as its own faceplate rather than a 3D printed case in a familiar way we’ve seen before. Unfortunately, the latest board is non-functional due to a routing mistake, but you can see the previous working prototypes in his project logs.

The HackadayPrize2019 is Sponsored by:

Faux Walkie-Talkie for Comedy Walking Tour is a Rapid Prototyping Win

Chances are good that a fair number of us have been roped into “one of those” projects before. You know the type: vague specs, limited budget, and of course they need it yesterday. But you know 3D-printers and Raspberduinos and whatnot; surely you can wizard something together quickly. Pretty please?

He might not have been quite that constrained, but when [Sean Hodgins] got tapped to help a friend out with an unusual project, rapid prototyping skills helped him create this GPS-enabled faux-walkie talkie audio player. It’s an unusual device with an unusual purpose: a comedic walking tour of Vancouver “haunted houses” where his friend’s funny ghost stories are prompted by location. The hardware to support this is based around [Sean]’s useful HCC module, an Arduino-compatible development board. With a GPS module for localization and a VS1053 codec, SD card reader, and a small power amp for the audio end, the device can recognize when the user is within 50 meters of a location and play the right audio clip. The housing is a 3D-printed replica of an old toy walkie-talkie, complete with non-functional rubber ducky antenna.

[Sean]’s build looks great and does the job, although we don’t get to hear any of the funny stuff in the video below; guess we’ll have to head up to BC for that. That it only took two weeks start to finish is impressive, but watch out – once they know you’re a wizard, they’ll keep coming back.

Serial Connection Over Audio: Arduino Can Listen To UART

We’ve all been there: after assessing a problem and thinking about a solution, we immediately rush to pursue the first that comes to mind, only to later find that there was a vastly simpler alternative. Thankfully, developing an obscure solution, though sometimes frustrating at the time, does tend to make a good Hackaday post. This time it was [David Wehr] and AudioSerial: a simple way of outputting raw serial data over the audio port of an Android phone. Though [David] could have easily used USB OTG for this project, many microcontrollers don’t have the USB-to-TTL capabilities of his Arduino – so this wasn’t entirely in vain.

At first, it seemed like a simple task: any respectable phone’s DAC should have a sample rate of at least 44.1kHz. [David] used Oboe, a high performance C++ library for Android audio apps, to create the required waveform. The 8-bit data chunks he sent can only make up 256 unique messages, so he pre-generated them. However, the DAC tried to be clever and do some interpolation with the signal – great for audio, not so much for digital waveforms. You can see the warped signal in blue compared to what it should be in orange. To fix this, an op-amp comparator was used to clean up the signal, as well as boosting it to the required voltage.

Prefer your Arduino connections wireless? Check out this smartphone-controlled periodic table of elements, or this wireless robotic hand.

Hack a Day 31 May 09:00