Posts with «joystick» label

Odd Inputs and Peculiar Peripherals: The GameBug Turns Your Breadboard Into a Game Console
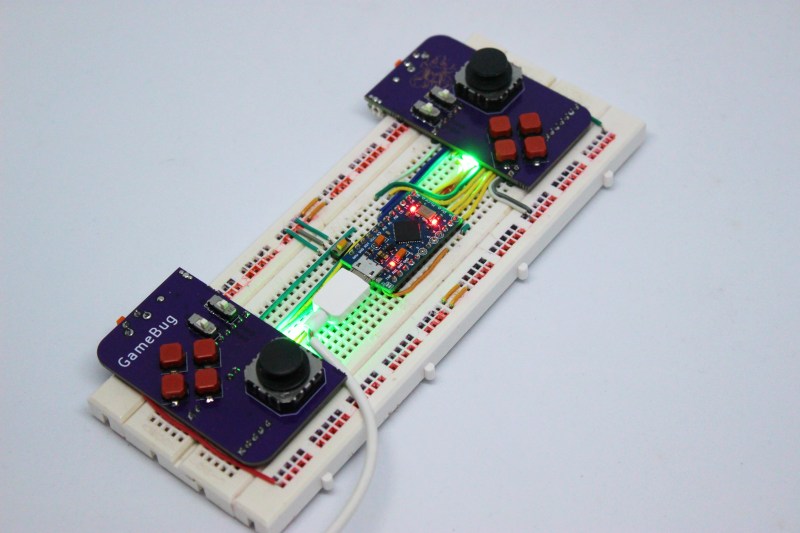
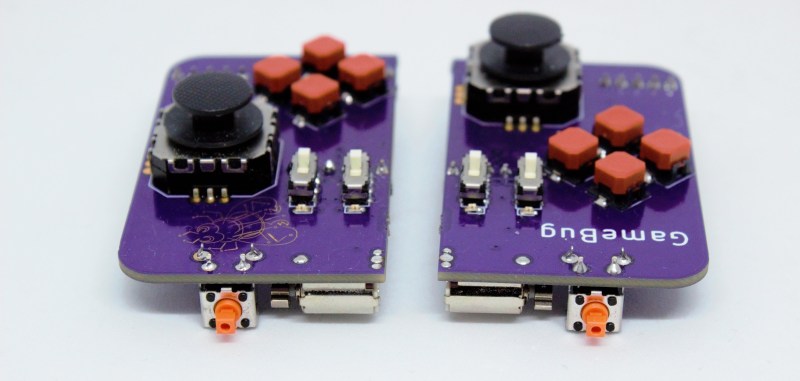
What’s more fun than playing video games? Designing your own video game hardware, of course! If you’ve followed these pages long enough you’ll have seen dozens of great examples of homebrew hardware, and perhaps been inspired to try such a project yourself. This often starts with assembling the basic bits onto a solderless breadboard, which is fine for programming but not so great for testing: squeezing pushbuttons into your breadboard works for basic debugging, but is not very user-friendly or reliable. A better solution can be found in [Dimitar]’s GameBug: a set of breadboard-compatible joypad-like controllers.

The GameBug’s design excels in its simplicity: a miniature analog joystick, four buttons arranged in a diamond pattern, a shoulder button and two sliding switches are sitting on a neat purple PCB. On the bottom are two rows of pin headers to ensure a snug fit on your solderless breadboard. There’s even a little vibrating motor for haptic feedback.

Interfacing with the GameBug is simplified by the integrated readout electronics. A Schmitt trigger-based debounce circuit ensures clean signals from all the pushbuttons, while a motor driver chip provides stable current to the haptic feedback system. An RGB LED can be used as yet another user feedback device, or simply for decorative lighting.

All design files are available on [Dimitar]’s GitHub page, along with an Arduino sketch to help you try out the GameBug’s functionality. Having a proper gamepad might come in handy with breadboard-based game systems like Tiny Duck Hunt or this impressive mess of wires that makes up a Colecovision.

[Emily]’s Eerie Educational Electric Eyeball Entertains

Like many of us, [Emily’s Electric Oddities] has had a lot of time for projects over the past year or so, including one that had been kicking around since late 2018. It all started at the Hackaday Superconference, when [Emily] encountered the Adafruit Hallowing board in the swag bag. Since that time, [Emily] has wanted to display the example code eyeball movement on a CRT, but didn’t really know how to go about it. Spoiler alert: it works now.

See? It’s educational.

Eventually, [Emily] learned about the TV out library for Arduino and got everything working properly — the eyeball would move around with the joystick, blink when the button is pressed, and the pupil would respond visually to changes in ambient light. The only problem was that the animation moved at a lousy four frames per second. Well, until she got Hackaday’s own [Roger Cheng] involved.

[Roger] was able to streamline the code to align with [Emily]’s dreams, and then it was on to our favorite part of this build — the cabinet design. Since the TV out library is limited to black and white output without shades of gray, Emily took design cues from the late 70s/early 80s, particularly the yellow and wood of the classic PONG cabinet. We love it!

Is Your Pet Eye the worst video game ever, as [Emily] proclaims it to be? Not a chance, and we’re pretty sure that the title still rests with Desert Bus, anyway. Even though the game only lasts until the eye gets tired and goes to sleep, it’s way more fun than Your Pet Rock. Don’t miss the infomercial/explanation/demonstration video after the break. If one video is just not enough, learn more about [Emily’s] philosophy of building weird projects from the Supercon talk she presented. It’s also worth mentioning that this one fits right into the Reinvented Retro contest.

Why are eyeballs so compelling? We can’t say for sure, but boy, this eyeball web cam sure is disconcerting.

Thanks for the tip, [Jake_of_All_Trades]!

Hack a Day 31 May 21:01

Turning A Desk Drawer Into A Flight Yoke

[Christofer Hiitti] found himself with the latest Microsoft Flight Simulator on his PC, but the joystick he ordered was still a few weeks out. So he grabbed an Arduino, potentiometers and a button and hacked together what a joke-yoke.

The genius part of this hack is the way [Christopher] used his desk drawer for pitch control. One side of a plastic hinge is attached to a potentiometer inside a drawer, while the other side is taped to the top of the desk. The second pot is taped to the front of the drawer for pitch control and the third pot is the throttle. It works remarkably well, as shown in the demo video below.

The linearity of the drawer mechanism probably isn’t great, but it was good enough for a temporary solution. The Arduino Leonardo he used is based on the ATmega32u4 which has a built-in USB, and with libraries like ArduinoJoystickLibrary the computer interface very simple. When [Christopher]’s real joystick finally arrived he augmented it with a button box built using the joke-yoke components.

We’ve seen There is no doubt that Microsoft Flight Simulator 2020 will spawn a lot of great controller and cockpit builds over the next few years. We’ve already covered a new joystick build, and a 3D printed frame to turn an Xbox controller into a joystick.

DIY Ergonomic Game Pad Lends a Hand

Does it seem like everyone you game against can do everything faster than you? Chances are good that they have some kind of dedicated game pad or macro pad with a bunch of custom shortcuts. If you can’t beat ’em, join ’em, but why buy one when you can build your own? [lordofthedum] did the smart thing when they built their own version of the Azeron game pad, which is an outrageously expensive but ergonomic and cool-looking macro pad that reminds us of the DataHand ergonomic keyboard.

Each finger hovers over a C-shaped group of three switches — one actuates by moving the finger forward, another by moving backward, and the third by pushing down like a regular button. The thumb gets a 4-way joystick. All of these inputs are wired up to an Arduino Pro Micro, which has sort of become the standard for DIY macro pads and keyboards. We think this looks fantastic, and really raises the bar for DIY macro pads.

Need a few more keys, but still want a thumb joystick? Check out the smooth and sweet Sherbet game pad.

Four on the Floor for Your Virtual Race Car

There was a time when building realistic simulations of vehicles was the stuff of NASA and big corporations. Today, many people have sophisticated virtual cockpits or race cars that they use with high-resolution screens or even virtual reality gear. If you think about it, a virtual car isn’t that hard to pull off. All you really need is a steering wheel, a few pedals, and a gear shifter. Sure, you can build fans to simulate the wind and put haptics in your seat, but really the input devices alone get you most of the way there. [Oli] decided he wanted a quick and easy USB gear shifter so he took a trip to the hardware store, picked up an arcade joystick, and tied it all together with an Arduino Leonardo. The finished product that you can see in the video below cost about $30 and took less than six hours to build.

The Leonardo, of course, has the ability to act like a USB human interface device (HID) so it can emulate a mouse or a keyboard or a joystick. That comes in handy for this project, as you would expect. The computer simply has to read the four joystick buttons and then decide which gear matches which buttons. For example up and to the left is first gear, while 4th gear is only the down button depressed. A custom-cut wooden shifter plate gives you the typical H pattern you expect from a stick shift.

Of course, the joystick doesn’t have a long handle like a true stick shift, so [Oli] added some extensions. In addition, a real shifter doesn’t require you to hold it in position as a joystick would. To rectify this, the shifter plate has magnets that grab the stick and hold it. They aren’t strong enough that you can’t move the stick, but they are strong enough to keep it from moving on its own.

We noticed that the design doesn’t allow for a clutch, so it isn’t quite the same as driving a real stick. However, [Oli] mentions several upgrades he has in mind and a clutch is one of them. Some haptics would be a cool addition so could feel the gears grind if you didn’t do the shift correctly.

The last shifter we saw like this was 3D printed. It is getting harder to find a car in the US with a manual transmission, but [Kristina Panos] is definitely a fan.

Matrix and Joystick

For the original tutorial, please visit: https://arduinobasics.blogspot.com


Project Description

In this project, we will use a little joystick to move a pixel around an 8x8 LED matrix. The joystick has a built-in button, such that when you press down onto the joystick, the colour of the pixel will change from red to blue to green. This is a very simple project, however, controlling the matrix adds a certain level of complexity. You will need to understand binary notation and bit-shifting techniques to grasp the concept of this tutorial.

All of the parts used in this project can be obtained from digitspace.com


Libraries

The SPI library is required for this project. However, this library is built into the current version of the Arduino IDE. No additional download is required. Just make sure to include it at the top of the sketch.


Arduino Code

The Arduino IDE can be downloaded from the official Arduino website: here.
Copy and paste the following code into your Arduino IDE and upload it to the Arduino UNO.


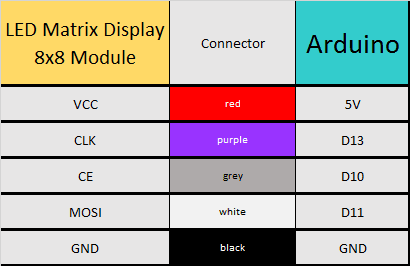
Connections


Project Video

As you can see from the video above, the pixel changes colour when the button is pressed. The position of the pixel relates to the position of the joystick. The lag between the joystick movement and pixel movement is minimal, and very satisfying.


Conclusion

This was a very fun and satisfying project that showcases the interaction between a joystick and a 8x8 LED matrix with the help of an Arduino UNO. This project was sponsored by the kind people at digitspace. Without their sponsorship, this tutorial would not have been possible. Please visit their website for some nice deals on Arduino related products.

If you found this tutorial helpful, please consider supporting me by buying me a virtual coffee/beer.

$3.00 AUD only

Social Media

You can find me on various social networks:

Follow me on Twitter: ScottC @ArduinoBasics.
I can also be found on Instagram, Pinterest, and YouTube.
And if all else fails, I have a server on Discord.


ScottC 09 Mar 07:41
8x8  arduino  ce  clk  fun  joystick  led  matrix  module  mosi  pixel  programming  spi  sw  tutorial  uno  x  y  

A HID For Robots

Whether with projects featured here or out in the real world, we have a tendency to focus most upon the end product. The car, solar panel, or even robot. But there’s a lot more going on behind the scenes that needs to be taken care of as well, whether it’s fuel infrastructure to keep the car running, a semiconductor manufacturer to create silicon wafers, or a control system for the robot. This project is one of the latter: a human interface device for a robot arm that is completely DIY.

While robots are often automated, some still need human input. The human input can be required all the time, or can be used to teach the robot initially how to perform a task which will then be automated. This “keyboard” of sorts built by [Ahmed] comes with a joystick, potentiometer, and four switch inputs that are all fully programmable via an Arduino Due. With that, you can perform virtually any action with whatever type of robot you need, and since it’s based on an Arduino it would also be easy to expand.

The video below and project page have all the instructions and bill of materials if you want to roll out your own. It’s a pretty straightforward project but one that might be worth checking out since we don’t often feature controllers for other things, although we do see them sometimes for controlling telescopes rather than robots.


Hack a Day 02 Jun 06:00

Flying the Friendly Skies with A Hall Effect Joystick

There are plenty of PC joysticks out there, but that didn’t stop [dizekat] from building his own. Most joysticks mechanically potentiometers or encoders to measure position. Only a few high-end models use Hall effect sensors. That’s the route [dizekat] took.

Hall effect sensors are non-contact devices which measure magnetic fields. They can be used to measure the position and orientation of a magnet. That’s exactly how [dizekat] is using a trio of sensors in his design. The core of the joystick is a universal joint from an old R/C car. The center section of the joint (called a spider) has two one millimeter thick disc magnets glued to it. The Hall sensors themselves are mounted in the universal itself. [Dizekat] used a small piece of a chopstick to hold the sensors in position while he found the zero point and glued them in. A third Hall effect sensor is used to measure a throttle stick positioned on the side of the box.

An Arduino micro reads the sensors and converts the analog signal to USB.  The Arduino Joystick Library by [Matthew Heironimus] formats the data into something a PC can understand.

While this is definitely a rough work in progress, we’re excited by how much [dizekat] has accomplished with simple hand tools and glue. You don’t need a 3D printer, laser cutter, and a CNC to pull off an awesome hack!

If you think Hall effect sensors are just for joysticks, you’d be wrong – they work as cameras for imaging magnetic fields too!

Hack a Day 18 Jan 09:00

Retractable Console Allows Wheelchair User to Get up Close and Personal

[Rhonda] has multiple sclerosis (MS), a disease that limits her ability to walk and use her arms. She and the other residents of The Boston Home, an extended care facility for people with MS and other neuromuscular diseases, rely on their wheelchairs for mobility. [Rhonda]’s chair comes with a control console that swings out of the way to allow her to come up close to tables and counters, but she has problems applying enough force to manually position it.

Sadly, [Rhonda]’s insurance doesn’t cover a commercial solution to her problem. But The Boston Home has a fully equipped shop to extend and enhance residents’ wheelchairs, and they got together with students from MIT’s Principles and Practices of Assistive Technology (PPAT) course to hack a solution that’s not only useful for [Rhonda] but should be generally applicable to other chairs. The students analyzed the problem, measured the forces needed and the clearances required, and built a prototype pantograph mount for the control console. They’ve made the device simple to replicate and kept the BOM as inexpensive as possible since patients are often out-of-pocket for enhancements like these. The video below shows a little about the problem and the solution.

Wheelchair hacks are pretty common, like the 2015 Hackaday Prize-winning Eyedrivomatic. We’ve also covered totally open-source wheelchairs, both manual and electric.


Filed under: Medical Hacks

Arduino Synth Guitar Really Rocks

[Gr4yhound] has been rocking out on his recently completed synth guitar. The guitar was built mostly from scratch using an Arduino, some harvested drum pads, and some ribbon potentiometers. The video below shows that not only does it sound good, but [Gr4yhound] obviously knows how to play it.

The physical portion of the build consists of two main components. The body of the guitar is made from a chunk of pine that was routed out by [Gr4yhound’s] own home-made CNC. Three circles were routed out to make room for the harvested Yamaha drum pads, some wiring, and a joystick shield. The other main component is the guitar neck. This was actually a Squire Affinity Strat neck with the frets removed.

For the electronics, [Gr4yhound] has released a series of schematics on Imgur. Three SoftPot membrane potentiometers were added to the neck to simulate strings. This setup allows [Gr4yhound] to adjust the finger position after the note has already been started. This results in a sliding sound that you can’t easily emulate on a keyboard. The three drum pads act as touch sensors for each of the three strings. [Gr4yhound] is able to play each string simultaneously, forming harmonies.

The joystick shield allows [Gr4yhound] to add additional effects to the overall sound. In one of his demo videos you can see him using the joystick to add an effect. An Arduino Micro acts as the primary controller and transmits the musical notes as MIDI commands. [Gr4yhound] is using a commercial MIDI to USB converter in order to play the music on a computer. The converter also allows him to power the Arduino via USB, eliminating the need for batteries.

[Thanks Wybren]


Filed under: Arduino Hacks, musical hacks