Motion control is a Holy Grail of input technology. Who doesn’t want an interface that they can control with simple and natural movements? But making this feel intuitive to the user, and making it work robustly are huge hills to climb. Leap Motion has done an excellent job creating just such a sensor, but what about bootstrapping your own? It’s a fun hack, and it will give you much greater appreciation for the currently available hardware.
Let’s get one thing straight: This device isn’t going to perform like a Leap controller. Sure the idea is the same. Wave your hands and control your PC. However, the Leap is a pretty sophisticated device and we are going to use a SONAR (or is it really SODAR?) device that costs a couple of bucks. On the plus side, it is very customizable, requires absolutely no software on the computer side, and is a good example of using SONAR and sending keyboard commands from an Arduino Leonardo to a PC. Along the way, I had to deal with the low quality of the sensor data and figure out how to extend the Arduino to send keys it doesn’t know about by default.
The Plan
The plan is to take an inexpensive SONAR module (the HC-SR04) and an Arduino Leonardo and use it to perform some simple tasks by mimicking keyboard input from the user. The Leonardo is a key element because it is one of the Arduinos that can impersonate a USB keyboard (or mouse) easily. The Due, Zero, and Micro can also do the trick using the Arduino library.
I wanted to determine how many gestures I could really determine from the HC-SR04 and then do different things depending on the gesture. My first attempt was just to have the Arduino detect a few fingers or a hand over the sensor and adjust the volume based on moving your hand up or down. What I didn’t know is that the default Arduino library doesn’t send multimedia keys! More on that later.
How the SONAR Works
The SONAR boards come in several flavors, but the one I used takes 4 pins. Power and ground, of course, are half of the pins. In fact, my early tests didn’t work and I finally realized the module requires more power than I could draw from the Arduino. I had to add a bench supply to power the module (and, of course, I could have powered the module and the Arduino from the same supply).
The other two pins are logic signals. One is an input and a high-going pulse causes the module to ping (8 cycles at 40kHz). There is a delay and then the other pin (an output) will go high and return low when the module detects the return ping. By measuring the time between your signal to ping and the return, you can judge the distance. In my case, I didn’t care about the actual distance (although that’s easy to compute). I just wanted to know if something was farther away or closer.
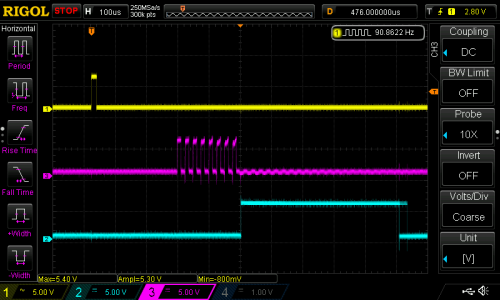 The scope trace to the right shows the sensor pointing at something relatively near. The top trace is the start pulse and the bottom trace is the input to the Arduino. The center trace is the output of the SONAR transducer. All the signal conditioning is inside the sensor, so you don’t need to worry about the actual signal processing to generate and recover the audio. You only need to measure the width of that bottom pulse.
The scope has persistence and you can see that the bottom trace does not always come out right at the same time (look at falling edge and you can see “ghosts” for previous samples. It shouldn’t come as a surprise that it may take a little effort to reduce the variations of the signal coming back from the SONAR.
Noise Reduction and Actions
Averaging
I wound up trying several different things to attempt to stabilize the input readings. The most obvious was to average more than one sample. The idea is that one or two samples that are way off will get wiped out by the majority of samples that are hovering around some center value. I also found that sometimes you just miss–especially when looking for fingers–and you get a very large number back. I elected to throw out any data that seemed way off when compared to the majority of received data.
Verifying
One other tactic I used was to verify certain elements with a second reading. For example, the start event occurs when the SONAR reports a value under the idle limit. The idle limit is a number less than the reading you get when the SONAR is pointed at the ceiling (or wherever it is pointing) and you don’t have anything blocking it. To recognize a valid start, the code reads twice to make sure the value is under the limit.
The code inside the Arduino loop is essentially a state machine. In the IDLE state, it looks for a reading that is below the idle limit. When found, that causes a transition to the sampling state. When the reading goes up or down more than some preset value, the code in the sample state sends a volume up or down key via the keyboard interface. If the sample goes back over the idle limit, the state machine returns to IDLE.
I got pretty good results with this data reduction, but I also found the NewPing library and installed it. Even though it isn’t hard to write out a pulse and then read the input pulse, the NewPing library makes it even easier (and the code shorter). It also has a method, ping_median, that does some sort of data filtering and reduction, as well.
You can select either method by changing the USE_NEW_PING #define at the top of the file. Each method has different configuration parameters since the return values are slightly different between the two methods.
I said earlier that the code sends volume up and down commands when it detects action. Actually, the main code doesn’t do that. It calls an action subroutine and that subroutine is what sends the keys. It would be easy to make the program do other things, as well. In this case, it simply prints some debugging information and sends the keys (see below). I didn’t react to the actual position, although since the action routine gets that as a parameter, you could act on it. For example, you could make extreme positions move the volume up two or three steps at a time.
Sending Keyboard Commands
I wanted to send standard multimedia keys to the PC for volume up and down. Many keyboards have these already and usually your software will understand them with no effort on your part. The problem, though, is that the default Arduino library doesn’t know how to send them.
Fortunately, I found an article about modifying the Arduino’s library to provide a Remote object that wasn’t exactly what I had in mind, but would work. Instead of sending keys, you have methods on a global Remote object that you can call to do things like change or mute the volume. The article was for an older version of the Arduino IDE, but it wasn’t hard to adapt it to the version I was using (version 2.1.0.5).
The action routine really only needs the UP_IN and DN_IN cases for this example. However, I put in all four branches for future expansion. Here’s the action subroutine:
void action(int why, unsigned value=0)
{
 Serial.print(value);
 switch (why)
 {
 case START_IN:
 Serial.println(" Start");
 break;
 case STOP_IN:
 Serial.println(" Stop");
 break;
 case UP_IN:
 Serial.println(" Up");
 Remote.increase();
 break;
 case DN_IN:
 Serial.println(" Down");
 Remote.decrease();
 break;
 }
}
The Final Result
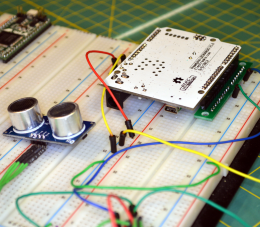 The final result works pretty well, although the averaging makes it less responsive than you might wish. You can turn down the number of samples to make it faster, but then it becomes unreliable. You can download the complete code from Github. The first thing you’ll want to do is check the top of the file to make sure your module is wired the same (pin 3 is the trigger pin and pin 8 is the echo return pin). You’ll also want to select if you are going to use the NewPing library or not. If you choose to use it, you’ll need to install it. I flipped my Leonardo upside down and mounted it on a breadboard with some adapters (see picture to right). It really needs a more permanent enclosure to be useful. Don’t forget to give the SONAR module its own 5V power supply.
If you look near the top of the loop function there is an #if statement blocking out 3 lines of code. Change the 0 to a 1 and you’ll be able to just get averaged data from the sensor. Put the module where you want it and see what kind of numbers you get. Depending on the method I used I was getting between 4000 and 9000 pointed up to the ceiling. Deduct a bit off of that for margin and change IDLETHRESHOLD (near the top of the file) to that number.
The DELTATHRESHOLD is adjustable too. The code sees any change that isn’t larger than that parameter as no change. You might make that bigger if you have shaky hands or smaller if you want to recognize more “zones”. However, the smaller the threshold, the more susceptible the system will be to noise. The display of samples is helpful because you can get an idea how much the readings vary when your hand is at a certain spot over the sensor. You can try using one or two fingers, but the readings are more reliable when the sound is bouncing off the fleshy part of your palm.
If you want to add some more gestures, you may have to track time a bit better. For example, holding a (relatively) stationary position for a certain amount of time could be a gesture. To get really sophisticated gestures, you may have to do some more sophisticated filtering of the input data than a simple average. A Kalman filter might be overkill, but would probably work well.
If you look around, many robots use these sensors to detect obstacles. Makes sense, they’re cheap and work reasonably well. There are also many projects that use these to show an estimate of distance (like an electronic tape measure). However, you can use them for many other things. I’ve even used a similar set up to measure the level of liquid in a tank and earlier this week we saw ultrasonic sensors used to monitor rice paddies.
If you really want to get serious, [uglyduck] has some analysis of what makes spurious readings on this device. He’s also redesigning them to use a different processor so he can do a better job. That might be a little further than I’m willing to go, although I was impressed with the 3D sonic touchscreen which also modified the SONAR units.
Filed under:
Arduino Hacks,
Featured,
peripherals hacks 

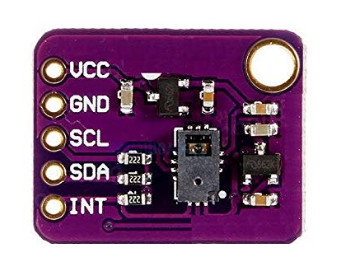 Looking through the provided source code, you can see just how easy it is to talk to the PAJ7620U2. With nothing more exotic than a


