Posts with «ws2812b» label

Multi-Volume Knob Gives All Your Programs a Turn

We’ve all been there. You’re manning the battle station, deep in the sim-racing or some other n00b-pwning zone and suddenly some loudmouth blows out your eardrums over Discord. It’s insulting to have to stop what you’re doing to find the right Windows volume slider. So why do that? Build [T3knomanzer]’s simple yet elegant multi-volume knob and stay zen in the zone.
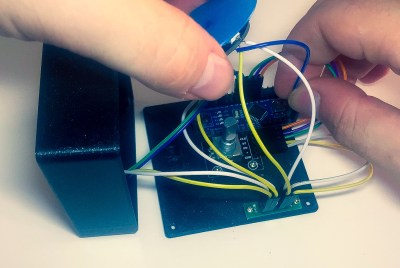
It’s easy, just turn the knob to cycle through your programs until Discord comes up on the little screen, and then push down to change it into a volume knob. If you need to change another volume, just click it again. Since there’s no Alt+Tabbing out to the desktop, no checkered flags should ever slip through your fingers.

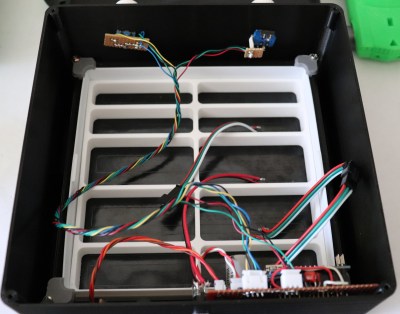
Inside the well-designed case you’ll find the usual suspects — Arduino Nano, rotary encoder, an OLED display, and an LED ring, each with their own place carved out.

This completely open-source knob looks great, and we love that it’s been made incredibly easy to replicate by standing up a site with foolproof, well-depicted, step-by-step instructions. Watch them take it for a spin after the break.

Want more than volume at your fingertips? Here’s a DIY USB knob that does shortcuts, too.

Light Up the Night with a Tetrahedral LED Hat

People get into electronics for all kinds of reasons, but we would guess that the ability to blink the blinkenlights is probably pretty high on the survey results. [Kuchbert] has been going to Deichkind shows for the last decade and has wanted to build one of the German techno-rap band’s signature tetrahedral LED hats for about as long.

Up inside the hat is an Arduino Nano driving WS2812B LEDs and a portable battery to power everything. Thanks to an HC-05 Bluetooth module, the show can be controlled with an Android app. The many, many holes in the acrylic panels were milled out, but they could just as easily be laser-cut, or if you have infinite patience, drilled by hand. The code is coming once it has been cleaned up a bit. Everything else you’d need is already there waiting. This helmet even has its own lil’ music video, which we’ve carefully beat-matched in after the break.

Naturally, this makes us think of all the Daft Punk helms that have blinked by on this blog over the years. This hand-soldered one might be the most meticulously made.

NeoPixel Matrix Simulation Lets You Virtually Groove to the Lights

You are stuck at home quarantined and you want to do some Arduino projects. The problem is you don’t have all the cool devices you want to use. Sure, you can order them, but the stores are slow shipping things that aren’t essential these days. If you want to get a headstart while you are waiting for the postman, check out Wokwi’s Playground. For example, you can write code to drive a virtual NeoPixel 16×16 matrix. There’s even example code to get you started.

There are quite a few other choices in the playground including Charlieplexed LEDs, a keypad, and an LCD. There are also challenges. For example, in the traffic light challenge, you are given code that uses a task scheduler library to implement a traffic light. You have to add a turn signal to the code.

In addition to LEDs in various configurations, the site has some serial bus components, an LCD, a keypad, and a NeoPixel strip. There are also a few tools including an EasyEDA to KiCad converter and a way to share sourcecode similar to Pastebin.

Of course, simulations only get you so far, but the site is a fun way to play with some different I/O devices. It would be very nice if you could compose for the different components together, but you could work your code in sections, if necessary. You can do similar things with TinkerCad circuits. If you want to install software, there’s a simulator for you, too.

Hack a Day 04 Apr 21:00

Seven-Segment Shelves Do Double Duty

[Lewis] of [DIY Machines] was always on the lookout for that perfect something to hang above the couch. After spending a lot of time fruitlessly searching, he designed and built this awesome shelving unit with recessed lighting that doubles as a huge 7-segment clock.

The clock part works as you probably expect — an Elegoo Nano fetches the time from a real-time clock module and displays it on the WS2812B LED strips arranged in 7-segment formations. There’s a photocell module to detect the ambient light level in the room, so the display is never brighter than it needs to be.

Don’t have a 3D printer yet? Then you may need to pass on this one. Aside from the wood back plane and the electronics, the rest of this build is done with printed plastic, starting with 31 carefully-designed supports for the shelves. There are also the LED strip holders, and the sleeve pieces that hide all the wires and give this project its beautifully finished look.

You may have noticed that the far left digit isn’t a full seven segments. If you’re committed to 24-hour time, you’d have to adjust everything to allow for that, but you’d end up with two more shelves. Given the fantastic build video after the break, it probably wouldn’t take too long to figure all that out.

We like big clocks and we cannot lie. If you have room for it, build something like this blinkenlit beauty.

Counter-Strike Gets the RGB LED Treatment

Inspired by the over-the-top stage lighting and pyrotechnics used during e-sport events, [Hans Peter] set out to develop a scaled-down version (minus the flames) for his personal Counter-Strike: Global Offensive sessions. It might seem like pulling something like this off would involve hacking the game engine, but as it turns out, Valve was kind enough to implement a game state API that made it relatively easy.

According to the documentation, the CS:GO client can be configured to send out state information to a HTTP server at regular intervals. It even provided example code for implementing a simple state server in Node.js, which [Hans] adapted for this project by adding some conditional statements that analyze the status of the current game.

These functions fire off serial commands to the attached Arduino, which in turn controls the WS2812B LEDs. The Arduino code takes the information provided by the HTTP server and breaks that down into various lighting routines for different conditions such as wins and losses. But things really kick into gear when a bomb is active.

[Hans] wanted to synchronize the flashing LEDs with the beeping sound the bomb makes in the game, but the API doesn’t provide granular enough data. So he recorded the audio of the bomb arming sequence, used Audacity to precisely time the beeps, and implemented the sequence in his Arduino code. In the video after the break you can see that the synchronization isn’t perfect, but it’s certainly close enough to get the point across in the heat of battle.

With the special place that Counter-Strike occupies in the hearts of hackers and gamers alike, it’s little surprise people are still finding unique ways to experience the game.

There’s More To MIDI Than Music – How About A Light Show?

MIDI instruments and controllers are fun devices if you want to combine your interest in music and electronics in a single project. Breaking music down into standardized, digital signals can technically turn anything with a button or a sensor into a musical instrument or effect pedal. On the other hand, the receiving end of the MIDI signal is mostly overlooked.

[FuseBerry], a music connoisseur with a background in electronics and computer science, always wanted to build a custom MIDI device, but instead of an instrument, he ended up with a MIDI controlled light show in the shape of an exploded truncated icosahedron ([FuseBerry]’s effort to look up that name shouldn’t go unnoticed). He designed and 3D-printed all the individual geometric shapes, and painstakingly equipped them with LEDs from a WS2818B strip. An Arduino Uno controls those LEDS, and receives the MIDI signals through a regular 5-pin DIN MIDI connector that is attached to the Arduino’s UART interface.

The LEDs are mapped to pre-defined MIDI notes, so whenever one of them is played, and their NoteOn message is received, the LEDs light up accordingly. [FuseBerry] uses his go-to DAW to create the light patterns, but any software / device that can send MIDI messages should do the trick. In the project’s current state, the light pattern needs to be created manually, but with some adjustments to the Arduino code, that could be more automated, something along the lines of this MIDI controlled Christmas light show.

Stecchino Game is all about Balancing a Big Toothpick

Stecchino demo by the creator

Self-described “Inventor Dad” [pepelepoisson]’s project is called Stecchino (English translation link here) and it’s an Arduino-based physical balancing game that aims to be intuitive to use and play for all ages. Using the Stecchino (‘toothpick’ in Italian) consists of balancing the device on your hand and trying to keep it upright for as long as possible. The LED strip fills up as time passes, and it keeps records of high scores. It was specifically designed to be instantly understood and simple to use by people of all ages, and we think it has succeeded in this brilliantly.

To sense orientation and movement, Stecchino uses an MPU-6050 gyro and accelerometer board. An RGB LED strip gives feedback, and it includes a small li-po cell and charger board for easy recharging via USB. The enclosure is made from a few layers of laser-cut and laser-engraved material that also holds the components in place. The WS2828B LED strip used is technically a 5 V unit, but [pepelepoisson] found that feeding them direct from the 3.7 V cell works just fine; it’s not until the cell drops to about three volts that things start to glitch out. All source code and design files are on GitHub.

Games are great, and the wonderful options available to people today allow for all kinds of interesting experimentation like a blind version of tag, or putting new twists on old classics like testing speed instead of strength.

Arduino BabyTV is Big Fun at Low Resolution

What kind of TV do you have? An older 720p model, or the now standard 1080p? Perhaps you’ve made the leap to the next generation, and are rocking a 4K display in the living room. All those are are fine and dandy if you just want to watch the local sportball contest, but where’s the challenge in that? With all the technology and modular components we have access to anymore, nowadays all the real hackers are making their own TVs.

Of course, when [Nikolai] built his very own LED TV, he did have to make a few concessions. For one thing, there’s no tuner on this model. Oh, and there’s the small issue of only having a 16×16 resolution. It might not be your idea of the perfect display, but it’s just perfect for his newborn son.

That’s right, [Nikolai] got his entry for the “Hacker Parent of the Year” award in early, and built an LED display for his son that he’s calling “BabyTV”.

Rather than the shows, trash, advertisements that they play on the kid channels, this TV only shows animated characters from retro games. We’ll concede that this project might be an elaborate Clockwork Orange style attempt at hypnotizing his son to instill an appreciation for classic gaming. But we’ll allow it.

To make his BabyTV go, [Nikolai] used a 16×16 WS2812B LED panel and an Arduino Nano. Two rotary encoders are used to allow adjusting brightness and change the character currently being shown on the screen. As a particularly clever hack, the Arduino has an IR sensor attached and is constantly watching for any signals. If an IR signal is detected, the BabyTV switches to the next image. So if Junior has a standard IR remote in his hands, any button he presses will cause the display to change to the next “channel”.

Historically speaking we haven’t seen much stuff for children here at Hackaday, but 2018 seems to be changing that. Recent projects like the incredible scratch built mini excavator and gorgeous AT-ST high chair would seem to indicate we’re currently witnessing a generation of hackers become parents. Don’t panic folks, but we might be getting old.

A Wordsearch Twist on the Word Clock

We love seeing new takes on existing ideas, and [Danny] certainly took the word clock concept in an unusual direction with his Wordsearch Clock. Instead of lighting up words to spell out the time, [Danny] decided to embrace the fact that the apparent jumble of letters on the clock face resembles a word search puzzle.

In a word search puzzle, words can be found spelled forward or backward with letters lined up horizontally, diagonally, or vertically. All that matters is that the correct letters are in a line and sequentially adjacent to one another. [Danny]’s clock lights up the correct letters and words one after the other, just as if it were solving a word search puzzle for words that just happen to tell the correct time. You can see it in action in the video, embedded below.

[Danny] went the extra mile in the planning phase. After using a word search puzzle generator tool to assist in designing the layout, he wrote a Processing sketch to simulate the clock’s operation. Visually simulating the clock allowed him to make tweaks to the layout, identify edge cases to address, and gain insight into the whole process. If you’re interested in making your own, there is a GitHub repository for the project.

Word Clocks are a great place to see innovation; you can go small like this micro word clock, you can push the concept for all it’s worth by adding heaps of weather data, or just go the extra mile on presentation like this walnut-finish clock.


Filed under: clock hacks
Hack a Day 17 Mar 03:00

Beautiful Linear RGB Clock

Yup, another clock project. But here, [Jan] builds something that would be more at home in a modern art museum than in the dark recesses of a hacker cave. It’s not hard to read the time at all, it’s accurate, and it’s beautiful. It’s a linear RGB LED wall clock.

You won’t have to learn the resistor color codes or bizarre binary encodings to tell what time it is. There are no glitzy graphics here, or modified classic timepieces. This project is minimal, clean, and elegant. Twelve LEDs display the hours, six and nine LEDs take care of the minutes in add-em-up-coded decimal. (It’s 3:12 in the banner image.)

The technical details are straightforward: WS2812 LEDs, an Arduino, three buttons, and a RTC. You could figure that out by yourself. But go look through the log about building the nice diffusing plexi and a very clean wall-mounting solution. It’s the details that separate this build from what’s hanging on our office wall. Nice job, [Jan].


Filed under: clock hacks
Hack a Day 19 Feb 03:00
arduino  clock  clock hacks  diy  rgb led  rtc  ws2812b