Posts with «sensor» label

Remote Water Quality Monitoring

While it can be straightforward to distill water to high purity, this is rarely the best method for producing water for useful purposes. Even drinking water typically needs certain minerals in it, plants may need a certain pH, and wastewater systems have a whole host of other qualities that need to be measured. Measuring water quality is a surprisingly complex endeavor as a result and often involves a wide array of sensors, much like this water quality meter from [RowlesGroupResearch].

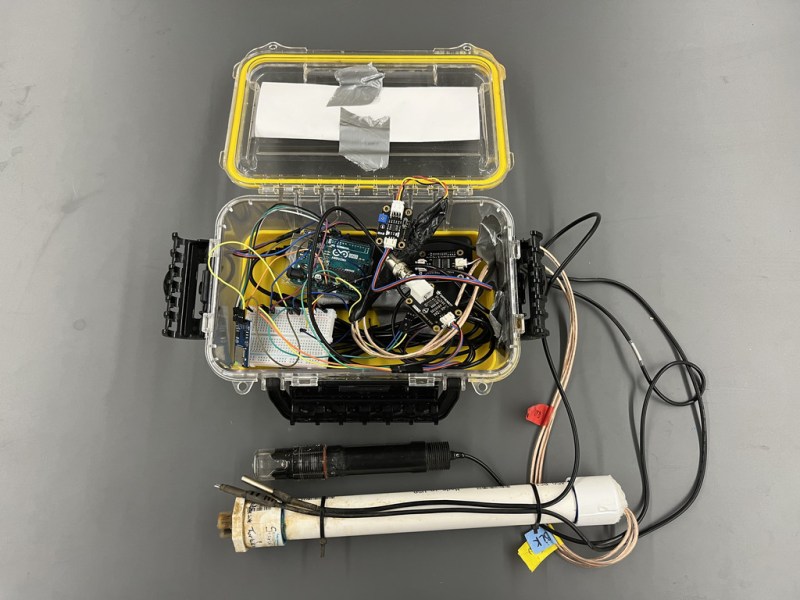
The water quality meters that they are putting to use are typically set up in remote locations, without power, and are targeting natural bodies of water and also wastewater treatment plants. Temperature and pH are simple enough to measure and grasp, but this device also includes sensors for total dissolved solids (TDS) and turbidity which are both methods for measuring various amounts and types of particles suspended in the water. The build is based around an Arduino so that it is easy for others to replicate, and is housed in a waterproof box with a large battery, and includes data logging to an SD card in order to make it easy to deploy in remote, outdoor settings and to gather the data at a later time.

The build log for this device also goes into detail about all of the steps needed to set this up from scratch, as well as a comprehensive bill of materials. This could be useful in plenty of professional settings such as community wastewater treatment facilities but also in situations where it’s believed that industrial activity may be impacting a natural body of water. For a water quality meter more focused on drinking water, though, we’d recommend this build that is trained on its own neural network.

Better Air Quality Sensing with CO2

Measuring air quality, as anyone who has tried to tackle this problem can attest, is not as straightforward as it might seem. Even once the nebulous term “quality” is defined, most sensors use something as a proxy for overall air health. One common method is to use volatile organic compounds (VOCs) as this proxy but as [Larry Bank] found out, using these inside a home with a functional kitchen leads to a lot of inaccurate readings. In the search for a more reliable sensor, he built this project which uses CO2 to help gauge air quality.

Most of the reason that CO2 sensors aren’t used as air quality sensors is cost. They are much more expensive than VOC sensors, but [Larry] recently found one that was more affordable and decided to build this project around it. The prototype used an Arduino communicating over I2C to the sensor and an OLED screen, which he eventually put in a 3D printed case to carry around to sample CO2 concentration in various real-world locations. The final project uses a clever way of interfacing with the e-paper display that we featured earlier.

While CO2 concentration doesn’t tell the full story of air quality in a specific place, it does play a major role. [Larry] found concentrations as high as 3000 ppm in his home, which can cause a drop in cognitive function. He’s made some lifestyle changes as a result which he reports has had a beneficial impact. For human-occupied indoor spaces, CO2 can easily be the main contributor to poor air quality, and we’ve seen at least one other project to address this concern directly.

Hack a Day 22 Nov 03:00

Weather Station Predicts Air Quality

Measuring air quality at any particular location isn’t too complicated. Just a sensor or two and a small microcontroller is generally all that’s needed. Predicting the upcoming air quality is a little more complicated, though, since so many factors determine how safe it will be to breathe the air outside. Luckily, though, we don’t need to know all of these factors and their complex interactions in order to predict air quality. We can train a computer to do that for us as [kutluhan_aktar] demonstrates with a machine learning-capable air quality meter.

The build is based around an Arduino Nano 33 BLE which is connected to a small weather station outside. It specifically monitors ozone concentration as a benchmark for overall air quality but also uses an anemometer and a BMP180 precision pressure and temperature sensor to assist in training the algorithm. The weather data is sent over Bluetooth to a Raspberry Pi which is running TensorFlow. Once the neural network was trained, the model was sent back to the Arduino which is now capable of using it to make much more accurate predictions of future air quality.

The build goes into quite a bit of detail on setting up the models, training them, and then using them on the Arduino. It’s an impressive build capped off with a fun 3D-printed case that resembles an old windmill. Using machine learning to help predict the weather is starting to become more commonplace as well, as we have seen before with this weather station that can predict rainfall intensity.

Low-Cost Computer Gesture Control with an I2C Sensor

Controlling your computer with a wave of the hand seems like something from science fiction, and for good reason. From Minority Report to Iron Man, we’ve seen plenty of famous actors controlling their high-tech computer systems by wildly gesticulating in the air. Meanwhile, we’re all stuck using keyboards and mice like a bunch of chumps.

But it doesn’t have to be that way. As [Norbert Zare] demonstrates in his latest project, you can actually achieve some fairly impressive gesture control on your computer using a $10 USD PAJ7620U2 sensor. Well not just the sensor, of course. You need some way to convert the output from the I2C-enabled sensor into something your computer will understand, which is where the microcontroller comes in.

Looking through the provided source code, you can see just how easy it is to talk to the PAJ7620U2. With nothing more exotic than a switch case statement, [Norbert] is able to pick up on the gesture flags coming from the sensor. From there, it’s just a matter of using the Arduino Keyboard library to fire off the appropriate keycodes. If you’re looking to recreate this we’d go with a microcontroller that supports native USB, but technically this could be done on pretty much any Arduino. In fact, in this case he’s actually using the ATtiny85-based Digispark.

This actually isn’t the first time we’ve seen somebody use a similar sensor to pull off low-cost gesture control, but so far, none of these projects have really taken off. It seems like it works well enough in the video after the break, but looks can be deceiving. Have any Hackaday readers actually tried to use one of these modules for their day-to-day futuristic computing?

Using Arduinos To Drive Undocumented Displays

For those of us old enough to remember the VCR (and the difficulty of programming one), the ubiquitous vacuum fluorescent display, or VFD, is burned into our memories, mostly because of their brightness and contrast when compared to the superficially-similar LCD. These displays are incredibly common even apart from VCRs, though, and it’s easy to find them for next to no cost, but figuring out how to drive one if you just pulled it out of a 30-year-old VCR is going to take some effort. In this build, [mircemk] shows us how he drives unknown VFD displays using an Arduino in order to build his own weather forecasting station.

For this demonstration [mircemk] decided to turn a VFD into a weather forecasting station. First of all, though, he had to get the VFD up and running. For this unit, which came from a point-of-sale (POS) terminal, simply connecting power to the device turned on a demo mode for the display which let him know some information about it. From there, and with the knowledge that most POS terminals use RS232 to communicate, he was able to zero in on the Rx and Tx pins on the on-board microcontroller and interface them with an Arduino. From there it’s a short step to being able to output whatever he wanted to this display.

For this project, [mircemk] wanted the display to output information about weather, but rather than simply pull data from some weather API he is actually using a sensor suite connected to the Arduino to measure things like barometric pressure in order to make a 12-hour forecast. The design is inspired by old Zambretti weather forecasters which used analog wheels to input local weather data. It’s an interesting build not only for the VFD implementation but also for attempting to forecast the weather directly with just a tiny sensor set instead of downloading a forecast to display. To do any better with your own forecasts, you’d likely need your own weather station.

Simulate Climate With An Arduino

There are usually two ways to go about any task: the easy way and the hard way. Sometimes we might not know there are two options, but once we see someone else’s solution we might feel differently. When running a greenhouse or small farm, for example, we might decide to set up dozens of sensors to measure temperature, humidity, soil moisture, dew point, sunlight, or any number of other variables. That’s the hard way. The easy way is to use the Arduino-powered Norman climate simulator from [934Virginia].

Rather than relying on an array of sensors, any of which could fail or provide erroneous data for any number of reasons, Norman relies on a simple input of data about the current location – target coordinates, specified date ranges, and minimum/maximum values for temperature and humidity – in order to learn and predict the weather conditions in that location. It makes extensive use of the Dusk2Dawn library, and models other atmospheric conditions using mathematical modeling methods in order to make relatively accurate estimates of the climate it is installed in. There are some simulations on the project’s Plotly page which show its successes as well.

Presumably anyone using this device could run a greenhouse relatively well on only $10 worth of electronics rather than relying on a suite of sensors and input data, which is helpful for anyone strapped for cash (especially in developing areas of the world). The project is named after Norman Borlaug, a famous soil scientist and someone worth reading about. The first (and possibly only) sensor we might want to add to this project is a soil moisture sensor, since yearly estimates won’t tell us whether it has just rained or not.

Images courtesy of Wikimedia Commons.

Hack a Day 03 Aug 06:00

Color Sensor Demystified

When [millerman4487] bought a TCS230-based color sensor, he was expecting a bit more documentation. Since he didn’t get it, he did a little research and some experimentation and wrote it up to help the rest of us.

The TCS3200 uses an 8×8 array of photodiodes. The 64 diodes come in four groups of 16. One group has a blue filter, one has green and the other has a red filter. The final set of diodes has no filter at all. You can select which group of diodes is active at any given time.

Sixteen photodiodes have blue filters, 16 photodiodes have green filters, 16 photodiodes have red filters, and 16 photodiodes are clear with no filters. The four types (colors) of photodiodes are interdigitated to minimize the effect of non-uniformity of incident irradiance. All photodiodes of the same color are connected in parallel. Pins S2 and S3 are used to select which group of photodiodes (red, green, blue, clear) are active.

The output of the array is a frequency that corresponds to the light intensity measured by one bank of photodiodes. You’ll need to make several pulse input measurements to compute the color and [millernam4487] provides code for it. You may, however, need to calibrate the device before you get good results.

We’ve looked at color sensors before, of course. They can even unlock doors.

Hack a Day 23 Jan 19:30

SENSEation Shows The Importance of Good Physical Design

Sensor network projects often focus primarily on electronic design elements, such as architecture and wireless transmission methods for sensors and gateways. Equally important, however, are physical and practical design elements such as installation, usability, and maintainability. The SENSEation project by [Mario Frei] is a sensor network intended for use indoors in a variety of buildings, and it showcases the deep importance of physical design elements in order to create hardware that is easy to install, easy to maintain, and effective. The project logs have an excellent overview of past versions and an analysis of what worked well, and where they fell short.

One example is the power supply for the sensor nodes. Past designs used wall adapters to provide constant and reliable power, but there are practical considerations around doing so. Not only do power adapters mean each sensor requires some amount of cable management, but one never really knows what one will find when installing a node somewhere in a building; a power outlet may not be nearby, or it may not have any unoccupied sockets. [Mario] found that installations could take up to 45 minutes per node as a result of these issues. The solution was to move to battery power for the sensor nodes. With careful power management, a node can operate for almost a year before needing a recharge, and removing any cable management or power adapter meant that installation time dropped to an average of only seven minutes.

That’s just one example of the practical issues discovered in the deployment of a sensor network in a real-world situation, and the positive impact of some thoughtful design changes in response. The GitHub repository for SENSEation has all the details needed to reproduce the modular design, so check it out.

Don’t Forget Your Mints When Using This Synthesizer

While synthesizers in the music world are incredibly common, they’re not all keyboard-based instruments as you might be imagining. Especially if you’re trying to get a specific feel or sound from a synthesizer in order to mimic a real instrument, there might be a better style synth that you can use. One of these types is the breath controller, a synthesizer specifically built to mimic the sound of wind instruments using the actual breath from a physical person. Available breath controllers can be pricey, though, so [Andrey] built his own.

To build the synthesizer, [Andrey] used a melodica hose and mouthpiece connected to a pressure sensor. He then built a condenser circuit on a custom Arduino shield and plugged it all into an Arduino Mega (although he notes that this is a bit of overkill). From there, the Arduino needed to be programmed to act as a MIDI device and to interact with the pressure sensor, and he was well on his way to a wind instrument synthesizer.

The beauty of synthesizers is not just in their ability to match the look and sound of existing instruments but to do things beyond the realm of traditional instruments as well, sometimes for a greatly reduced price point.

Smart Citizen Opens Eyes and Ears in Barcelona

More often than not, our coverage of projects here at Hackaday tends to be one-off sort of thing. We find something interesting, write it up for our beloved readers, and keep it moving. There’s an unending world of hacks and creations out there, and not a lot of time to cover them all. Still, it’s nice when we occasionally see a project we’ve previously covered “out in the wild” so to speak. A reminder that, while a project’s time on the Hackaday front page might be fleeting, their journey is far from finished.

A perfect example can be found in a recent article posted by the BBC about the battle with noise in Barcelona’s Plaza del Sol. The Plaza is a popular meeting place for tourists and residents alike, with loud parties continuing into the middle of the night, those with homes overlooking the Plaza were struggling to sleep. But to get any changes made, they needed a way to prove to the city council that the noise was beyond reasonable levels.

Enter the Smart Citizen, an open source Arduino-compatible sensor platform developed by Fab Lab Barcelona. We originally covered the Smart Citizen board back in 2013, right after it ran a successful funding campaign on Kickstarter. Armed with the data collected by Smart Citizen sensors deployed around the Plaza, the council has enacted measures to try to quiet things down before midnight.

Today people tend to approach crowdfunded projects with a healthy dose of apprehension, so it’s nice to see validation that they aren’t all flash in the pan ideas. Some of them really do end up making a positive impact, years after the campaign ends.

Of course, we can’t talk about distributed environmental monitoring without mentioning the fantastic work of [Radu Motisan], who’s made it his mission to put advanced sensors in the hands of citizen scientists.

[Thanks to muA for the tip.]