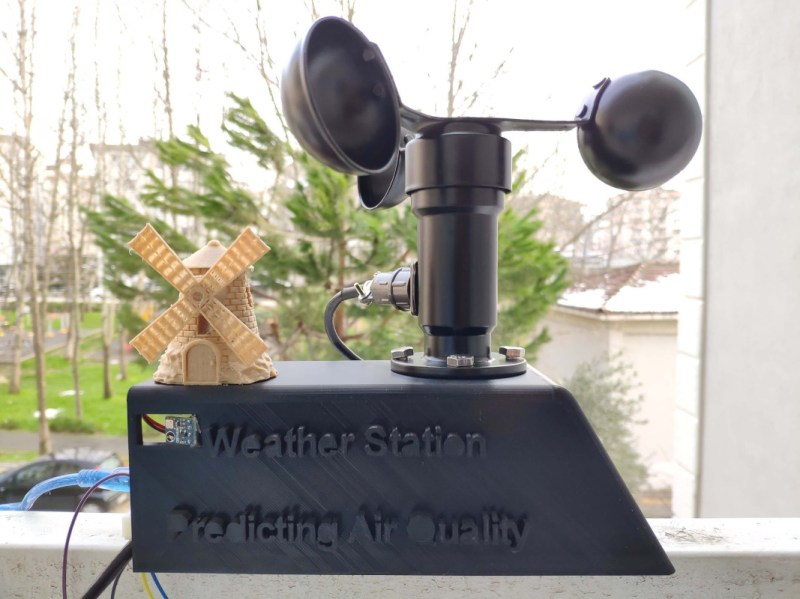
Measuring air quality at any particular location isn’t too complicated. Just a sensor or two and a small microcontroller is generally all that’s needed. Predicting the upcoming air quality is a little more complicated, though, since so many factors determine how safe it will be to breathe the air outside. Luckily, though, we don’t need to know all of these factors and their complex interactions in order to predict air quality. We can train a computer to do that for us as [kutluhan_aktar] demonstrates with a machine learning-capable air quality meter.
The build is based around an Arduino Nano 33 BLE which is connected to a small weather station outside. It specifically monitors ozone concentration as a benchmark for overall air quality but also uses an anemometer and a BMP180 precision pressure and temperature sensor to assist in training the algorithm. The weather data is sent over Bluetooth to a Raspberry Pi which is running TensorFlow. Once the neural network was trained, the model was sent back to the Arduino which is now capable of using it to make much more accurate predictions of future air quality.
The build goes into quite a bit of detail on setting up the models, training them, and then using them on the Arduino. It’s an impressive build capped off with a fun 3D-printed case that resembles an old windmill. Using machine learning to help predict the weather is starting to become more commonplace as well, as we have seen before with this weather station that can predict rainfall intensity.
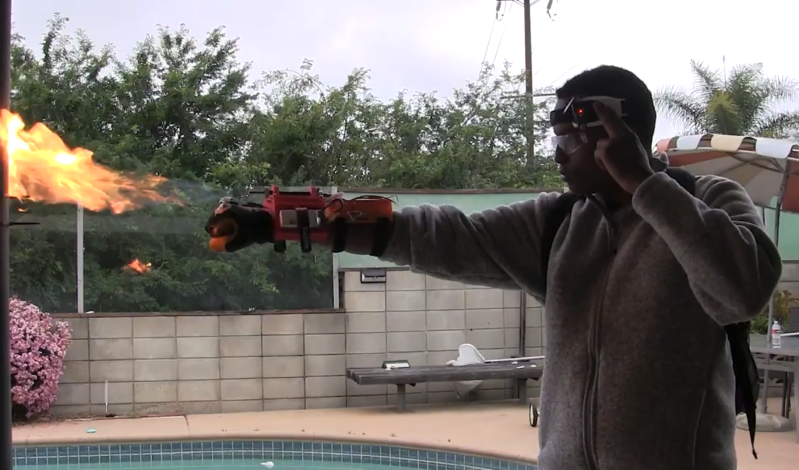
Mind control might seem like something out of a sci-fi show, but like the tablet computer, universal translator, or virtual reality device, is actually a technology that has made it into the real world. While these devices often requires on advanced and expensive equipment to interpret brain waves properly, with the right machine learning system it’s possible to do things like this mind-controlled flame thrower on a much smaller budget. (Video, embedded below.)
[Nathaniel F] was already experimenting with using brain-computer interfaces and machine learning, and wanted to see if he could build something practical combining these two technologies. Instead of turning to an EEG machine to read brain patterns, he picked up a much less expensive Mindflex and paired it with a machine learning system running TensorFlow to make up for some of its shortcomings. The processing is done by a Raspberry Pi 4, which sends commands to an Arduino to fire the flamethrower when it detects the proper thought patterns. Don’t forget the flamethrower part of this build either: it was designed and built entirely by [Nathanial F] as well using gas and an arc lighter.
While the build took many hours of training to gather the proper amount of data to build the neural network and works as the proof of concept he was hoping for, [Nathaniel F] notes that it could be improved by replacing the outdated Mindflex with a better EEG. For now though, we appreciate seeing sci-fi in the real world in projects like this, or in other mind-controlled projects like this one which converts a prosthetic arm into a mind-controlled music synthesizer.
Gesture recognition and machine learning are getting a lot of air time these days, as people understand them more and begin to develop methods to implement them on many different platforms. Of course this allows easier access to people who can make use of the new tools beyond strictly academic or business environments. For example, rollerblading down the streets of Atlanta with a gesture-recognizing, streaming TV that [nate.damen] wears over his head.
He’s known as [atltvhead] and the TV he wears has a functional LED screen on the front. The whole setup reminds us a little of Deep Thought. The screen can display various animations which are controlled through Twitch chat as he streams his journeys around town. He wanted to add a little more interaction to the animations though and simplify his user interface, so he set up a gesture-sensing sleeve which can augment the animations based on how he’s moving his arm. He uses an Arduino in the arm sensor as well as a Raspberry Pi in the backpack to tie it all together, and he goes deep in the weeds explaining how to use Tensorflow to recognize the gestures. The video linked below shows a lot of his training runs for the machine learning system he used as well.
[nate.damen] didn’t stop at the cheerful TV head either. He also wears a backpack that displays uplifting messages to people as he passes them by on his rollerblades, not wanting to leave out those who don’t get to see him coming. We think this is a great uplifting project, and the amount of work that went into getting the gesture recognition machine learning algorithm right is impressive on its own. If you’re new to Tensorflow, though, we have featured some projects that can do reliable object recognition using little more than a Raspberry Pi and a camera.
Arduino is on a mission to make machine learning easy enough for anyone to use. The other week we announced the availability of TensorFlow Lite Micro in the Arduino Library Manager. With this, some cool ready-made ML examples such as speech recognition, simple machine vision and even an end-to-end gesture recognition training tutorial. For a comprehensive background we recommend you take a look at that article.
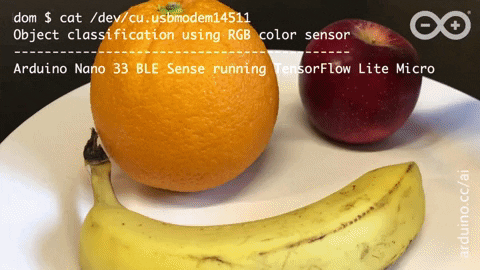
In this article we are going to walk through an even simpler end-to-end tutorial using the TensorFlow Lite Micro library and the Arduino Nano 33 BLE Sense’s colorimeter and proximity sensor to classify objects. To do this, we will be running a small neural network on the board itself.
Arduino BLE 33 Nano Sense running TensorFlow Lite Micro
The philosophy of TinyML is doing more on the device with less resources – in smaller form-factors, less energy and lower cost silicon. Running inferencing on the same board as the sensors has benefits in terms of privacy and battery life and means its can be done independent of a network connection.
The fact that we have the proximity sensor on the board means we get an instant depth reading of an object in front of the board – instead of using a camera and having to determine if an object is of interest through machine vision.
In this tutorial when the object is close enough we sample the color – the onboard RGB sensor can be viewed as a 1 pixel color camera. While this method has limitations it provides us a quick way of classifying objects only using a small amount of resources. Note that you could indeed run a complete CNN-based vision model on-device. As this particular Arduino board includes an onboard colorimeter, we thought it’d be fun and instructive to demonstrate in this way to start with.
We’ll show a simple but complete end-to-end TinyML application can be achieved quickly and without a deep background in ML or embedded. What we cover here is data capture, training, and classifier deployment. This is intended to be a demo, but there is scope to improve and build on this should you decide to connect an external camera down the road. We want you to get an idea of what is possible and a starting point with tools available.
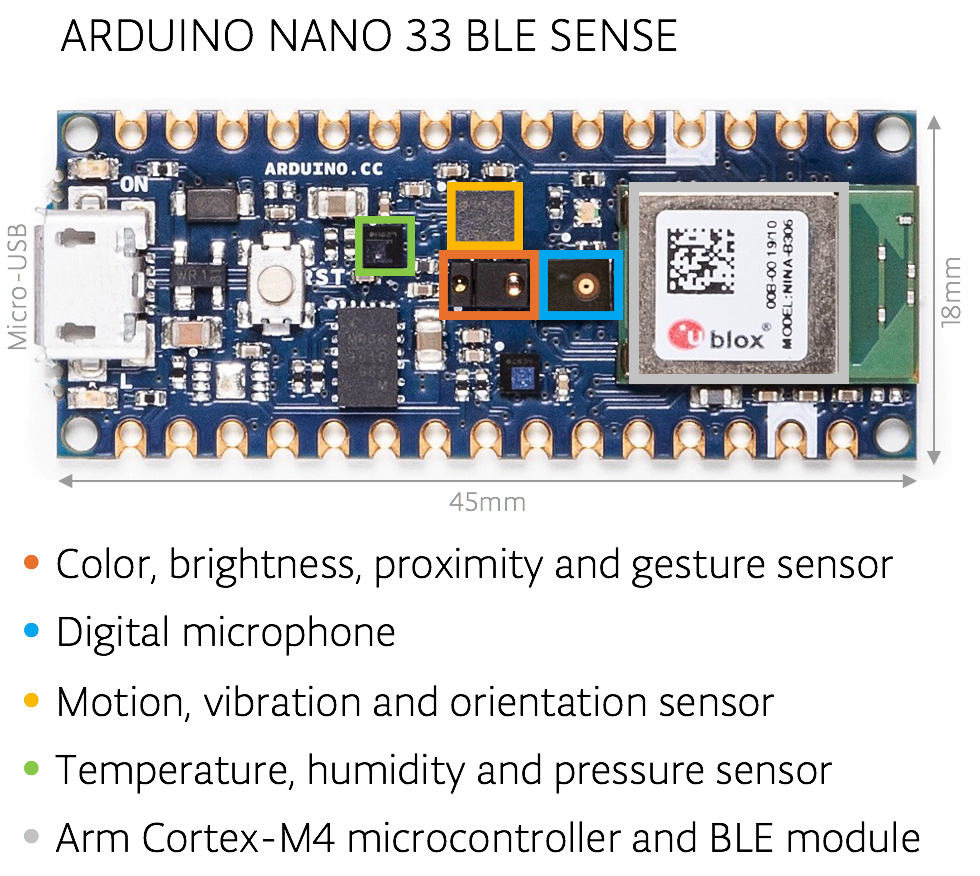
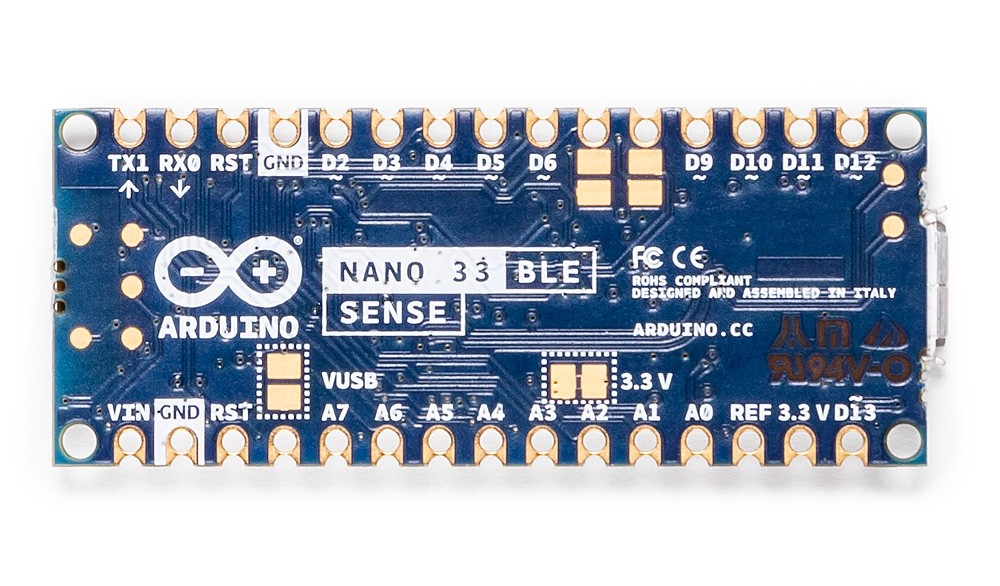
The Arduino Nano 33 BLE Sense board we’re using here has an Arm Cortex-M4 microcontroller running mbedOS and a ton of onboard sensors – digital microphone, accelerometer, gyroscope, temperature, humidity, pressure, light, color and proximity.
While tiny by cloud or mobile standards the microcontroller is powerful enough to run TensorFlow Lite Micro models and classify sensor data from the onboard sensors.
Setting up the Arduino Create Web Editor
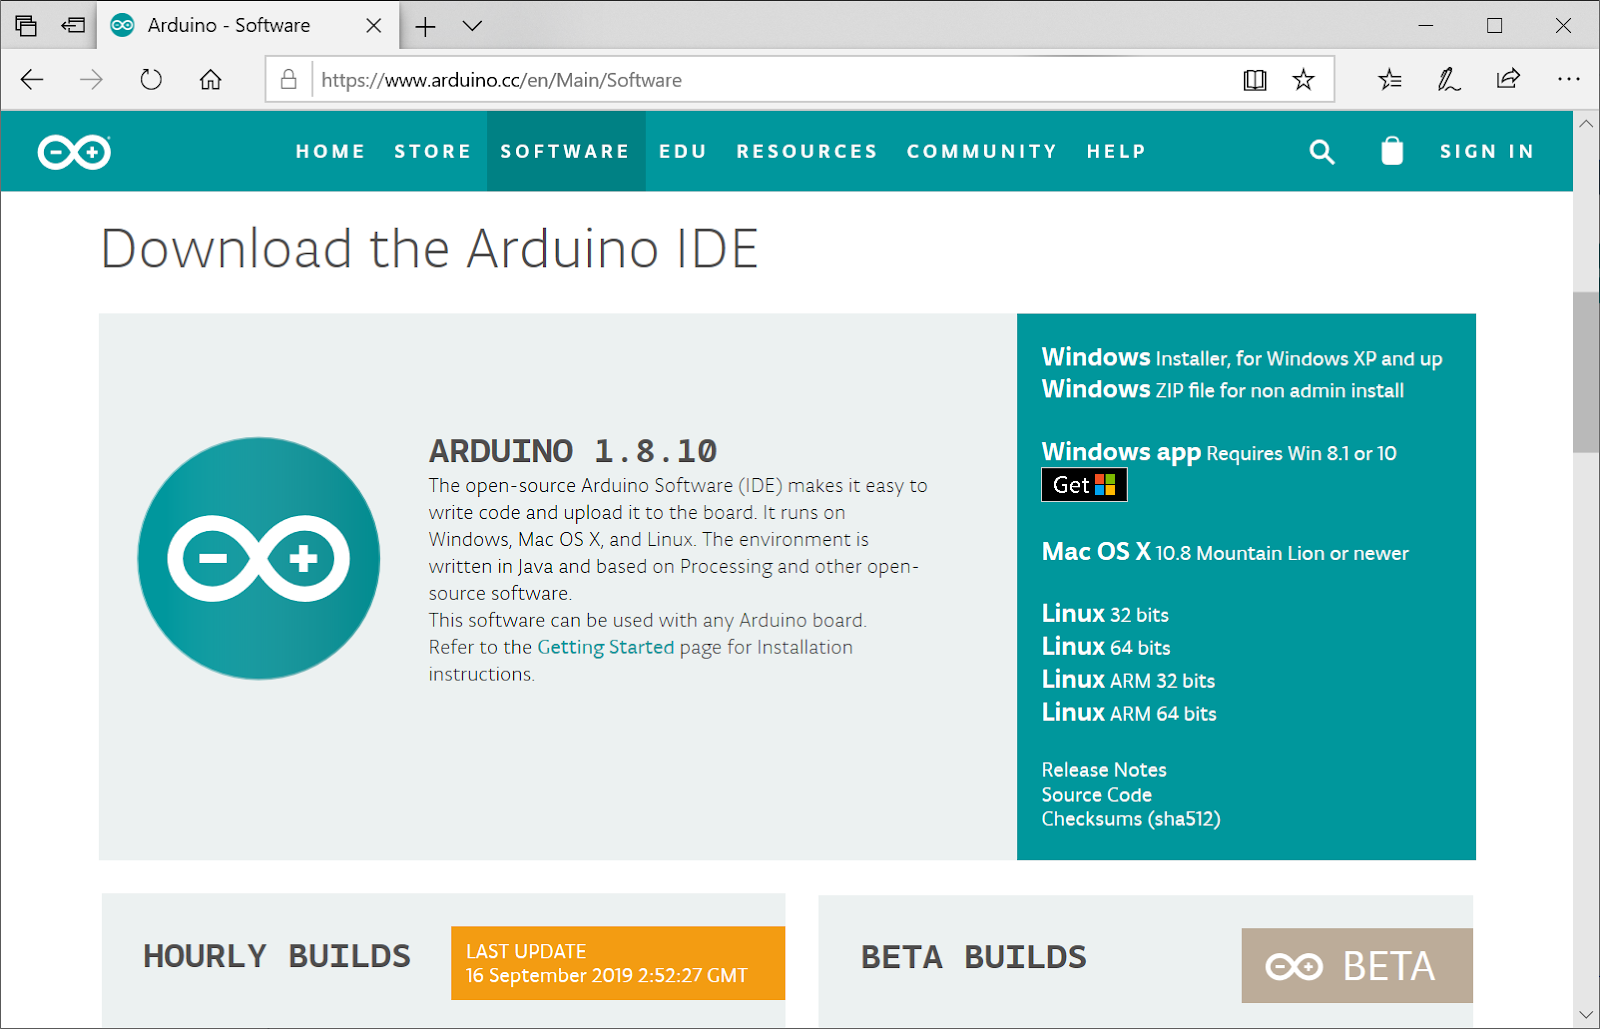
In this tutorial we’ll be using the Arduino Create Web Editor – a cloud-based tool for programming Arduino boards. To use it you have to sign up for a free account, and install a plugin to allow the browser to communicate with your Arduino board over USB cable.
You can get set up quickly by following the getting started instructions which will guide you through the following:
Download and install the plugin
Sign in or sign up for a free account
(NOTE: If you prefer, you can also use the Arduino IDE desktop application. The setup for which is described in the previous tutorial.)
Capturing training data
We now we will capture data to use to train our model in TensorFlow. First, choose a few different colored objects. We’ll use fruit, but you can use whatever you prefer.
Setting up the Arduino for data capture
Next we’ll use Arduino Create to program the Arduino board with an application object_color_capture.ino that samples color data from objects you place near it. The board sends the color data as a CSV log to your desktop machine over the USB cable.
To load the object_color_capture.ino application onto your Arduino board:
Connect your board to your laptop or PC with a USB cable
The Arduino board takes a male micro USB
Open object_color_capture.ino in Arduino Create by clicking this link
Your browser will open the Arduino Create web application (see GIF above).
Press OPEN IN WEB EDITOR
For existing users this button will be labeled ADD TO MY SKETCHBOOK
Press Upload & Save
This will take a minute
You will see the yellow light on the board flash as it is programmed
Open the serial Monitor
This opens the Monitor panel on the left-hand side of the web application
You will now see color data in CSV format here when objects are near the top of the board
Capturing data in CSV files for each object
For each object we want to classify we will capture some color data. By doing a quick capture with only one example per class we will not train a generalized model, but we can still get a quick proof of concept working with the objects you have to hand!
Say, for example, we are sampling an apple:
Reset the board using the small white button on top.
Keep your finger away from the sensor, unless you want to sample it!
The Monitor in Arduino Create will say ‘Serial Port Unavailable’ for a minute
You should then see Red,Green,Blue appear at the top of the serial monitor
Put the front of the board to the apple.
The board will only sample when it detects an object is close to the sensor and is sufficiently illuminated (turn the lights on or be near a window)
Move the board around the surface of the object to capture color variations
You will see the RGB color values appear in the serial monitor as comma separated data.
Capture at a few seconds of samples from the object
Copy and paste this log data from the Monitor to a text editor
Tip: untick AUTOSCROLL check box at the bottom to stop the text moving
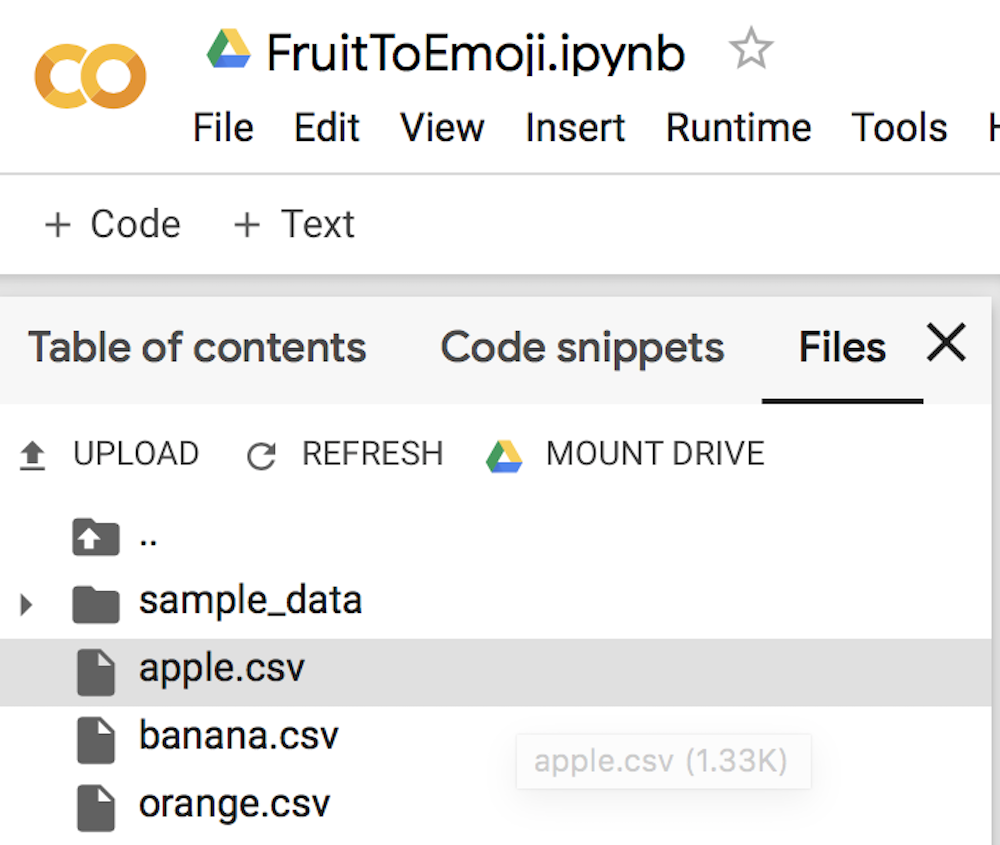
Save your file as apple.csv
Reset the board using the small white button on top.
Do this a few more times, capturing other objects (e.g. banana.csv, orange.csv).
NOTE: The first line of each of the .csv files should read:
Red,Green,Blue
If you don’t see it at the top, you can just copy and paste in the line above.
Training the model
We will now use colab to train an ML model using the data you just captured in the previous section.
First open the FruitToEmoji Jupyter Notebook in colab
Follow the instructions in the colab
You will be uploading your *.csv files
Parsing and preparing the data
Training a model using Keras
Outputting TensorFlowLite Micro model
Downloading this to run the classifier on the Arduino
With that done you will have downloaded model.h to run on your Arduino board to classify objects!
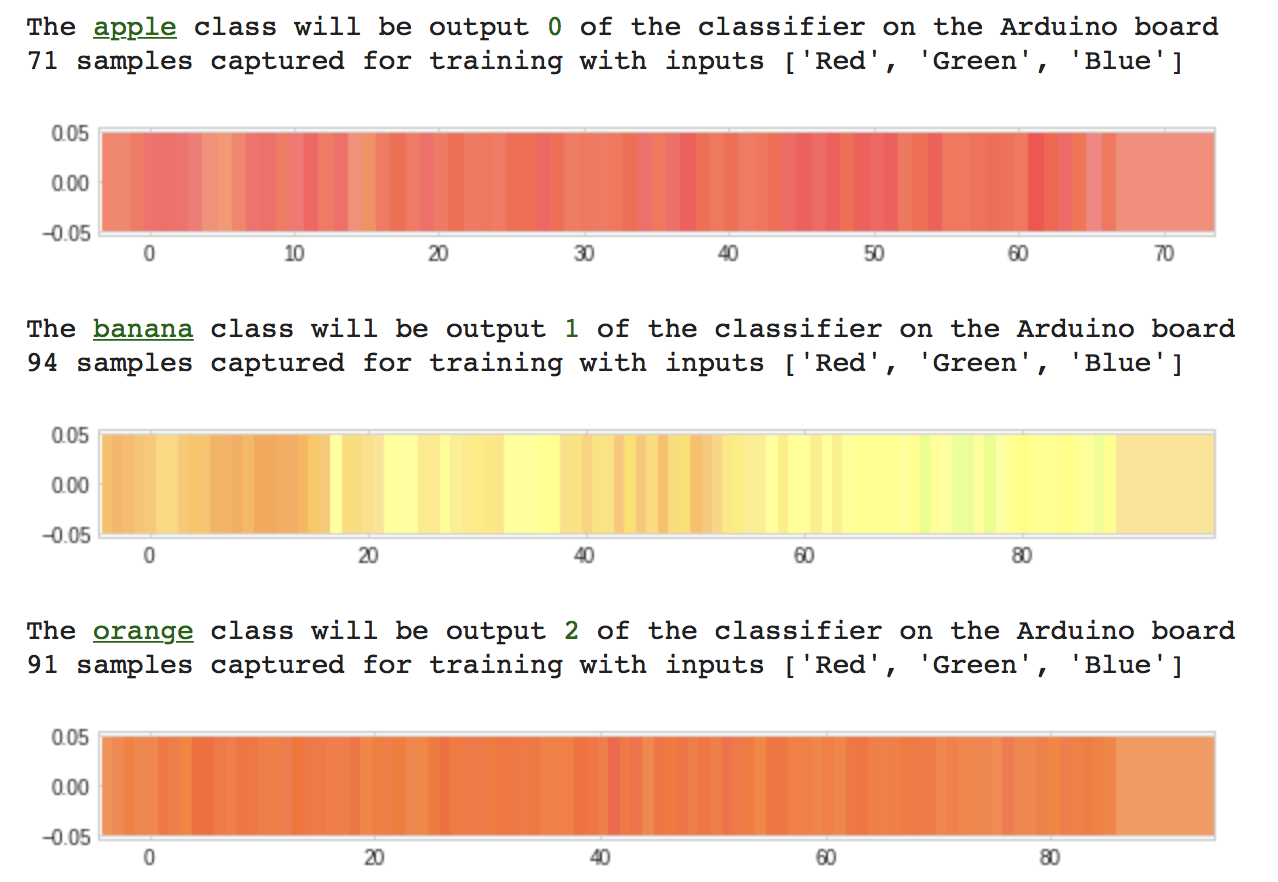
The colab will guide you to drop your .csv files into the file window, the result shown above
Normalized color samples captured by the Arduino board are graphed in colab
Program TensorFlow Lite Micro model to the Arduino board
Finally, we will take the model we trained in the previous stage and compile and upload to our Arduino board using Arduino Create.
Your browser will open the Arduino Create web application:
Press the OPEN IN WEB EDITOR button
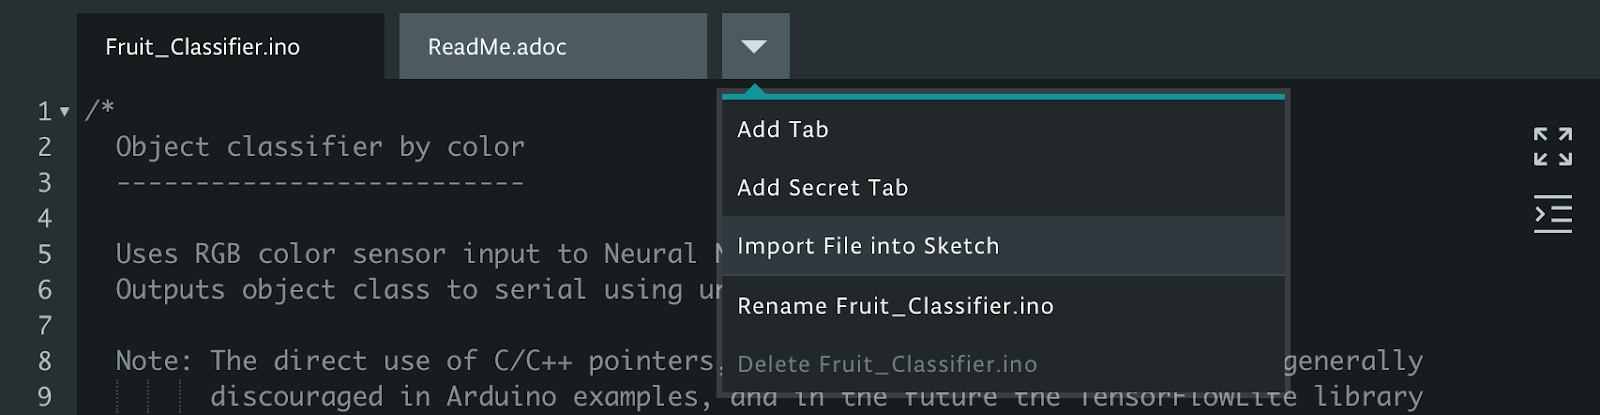
Import the model.h you downloaded from colab using Import File to Sketch:
Import the model.h you downloaded from colab
The model.h tab should now look like this
Compile and upload the application to your Arduino board
This will take a minute
When it’s done you’ll see this message in the Monitor:
Put your Arduino’s RGB sensor near the objects you trained it with
You will see the classification output in the Monitor:
Classifier output in the Arduino Create Monitor
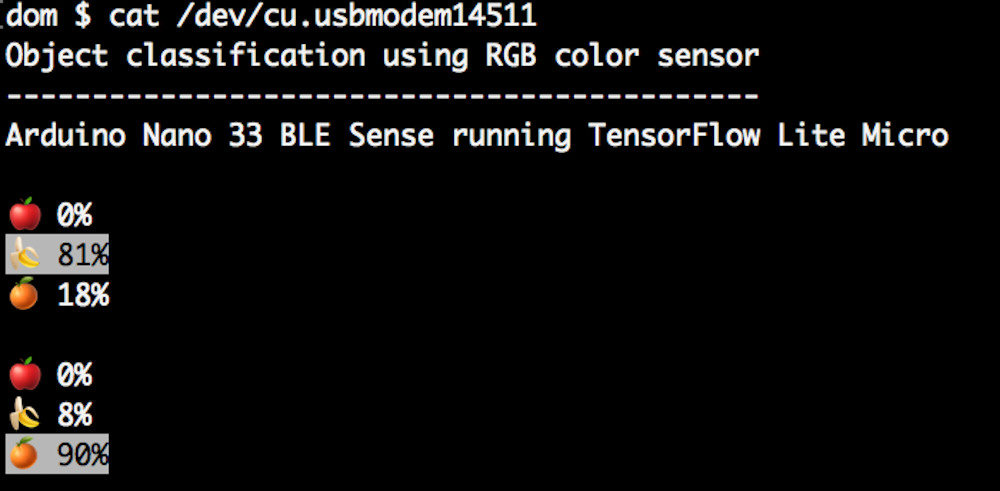
You can also edit the object_color_classifier.ino sketch to output emojis instead (we’ve left the unicode in the comments in code!), which you will be able to view in Mac OS X or Linux terminal by closing the web browser tab with Arduino Create in, resetting your board, and typing cat /cu/usb.modem[n].
Output from Arduino serial to Linux terminal using ANSI highlighting and unicode emojis
Learning more
The resources around TinyML are still emerging but there’s a great opportunity to get a head start and meet experts coming up 2-3 December 2019 in Mountain View, California at the Arm IoT Dev Summit. This includes workshops from Sandeep Mistry, Arduino technical lead for on-device ML and from Google’s Pete Warden and Daniel Situnayake who literally wrote the book on TinyML. You’ll be able to hang out with these experts and more at the TinyML community sessions there too. We hope to see you there!
Conclusion
We’ve seen a quick end-to-end demo of machine learning running on Arduino. The same framework can be used to sample different sensors and train more complex models. For our object by color classification we could do more, by sampling more examples in more conditions to help the model generalize. In future work, we may also explore how to run an on-device CNN. In the meantime, we hope this will be a fun and exciting project for you. Have fun!
This post was originally published by Sandeep Mistry and Dominic Pajakon the TensorFlow blog.
Arduino is on a mission to make machine learning simple enough for anyone to use. We’ve been working with the TensorFlow Lite team over the past few months and are excited to show you what we’ve been up to together: bringing TensorFlow Lite Micro to the Arduino Nano 33 BLE Sense. In this article, we’ll show you how to install and run several new TensorFlow Lite Micro examples that are now available in the Arduino Library Manager.
The first tutorial below shows you how to install a neural network on your Arduino board to recognize simple voice commands.
Example 1: Running the pre-trained micro_speech inference example.
Next, we’ll introduce a more in-depth tutorial you can use to train your own custom gesture recognition model for Arduino using TensorFlow in Colab. This material is based on a practical workshop held by Sandeep Mistry and Dan Coleman, an updated version of which is now online.
If you have previous experience with Arduino, you may be able to get these tutorials working within a couple of hours. If you’re entirely new to microcontrollers, it may take a bit longer.
Example 2: Training your own gesture classification model.
We’re excited to share some of the first examples and tutorials, and to see what you will build from here. Let’s get started!
Note: The following projects are based on TensorFlow Lite for Microcontrollers which is currently experimental within the TensorFlow repo. This is still a new and emerging field!
Microcontrollers and TinyML
Microcontrollers, such as those used on Arduino boards, are low-cost, single chip, self-contained computer systems. They’re the invisible computers embedded inside billions of everyday gadgets like wearables, drones, 3D printers, toys, rice cookers, smart plugs, e-scooters, washing machines. The trend to connect these devices is part of what is referred to as the Internet of Things.
Arduino is an open-source platform and community focused on making microcontroller application development accessible to everyone. The board we’re using here has an Arm Cortex-M4 microcontroller running at 64 MHz with 1MB Flash memory and 256 KB of RAM. This is tiny in comparison to Cloud, PC, or mobile but reasonable by microcontroller standards.
Arduino Nano 33 BLE Sense board is smaller than a stick of gum.
There are practical reasons you might want to squeeze ML on microcontrollers, including:
Function – wanting a smart device to act quickly and locally (independent of the Internet).
Cost – accomplishing this with simple, lower cost hardware.
Privacy – not wanting to share all sensor data externally.
Efficiency – smaller device form-factor, energy-harvesting or longer battery life.
There’s a final goal which we’re building towards that is very important:
Machine learning can make microcontrollers accessible to developers who don’t have a background in embedded development
On the machine learning side, there are techniques you can use to fit neural network models into memory constrained devices like microcontrollers. One of the key steps is the quantization of the weights from floating point to 8-bit integers. This also has the effect of making inference quicker to calculate and more applicable to lower clock-rate devices.
TinyML is an emerging field and there is still work to do – but what’s exciting is there’s a vast unexplored application space out there. Billions of microcontrollers combined with all sorts of sensors in all sorts of places which can lead to some seriously creative and valuable TinyML applications in the future.
A Micro USB cable to connect the Arduino board to your desktop machine
To program your board, you can use the Arduino Web Editor or install the Arduino IDE. We’ll give you more details on how to set these up in the following sections
The Arduino Nano 33 BLE Sense has a variety of onboard sensors meaning potential for some cool TinyML applications:
Environmental – temperature, humidity and pressure
Light – brightness, color and object proximity
Unlike classic Arduino Uno, the board combines a microcontroller with onboard sensors which means you can address many use cases without additional hardware or wiring. The board is also small enough to be used in end applications like wearables. As the name suggests it has Bluetooth LE connectivity so you can send data (or inference results) to a laptop, mobile app or other BLE boards and peripherals.
Tip: Sensors on a USB stick – Connecting the BLE Sense board over USB is an easy way to capture data and add multiple sensors to single board computers without the need for additional wiring or hardware – a nice addition to a Raspberry Pi, for example.
TensorFlow Lite for Microcontrollers examples
The inference examples for TensorFlow Lite for Microcontrollers are now packaged and available through the Arduino Library manager making it possible to include and run them on Arduino in a few clicks. In this section we’ll show you how to run them. The examples are:
micro_speech – speech recognition using the onboard microphone
magic_wand – gesture recognition using the onboard IMU
person_detection – person detection using an external ArduCam camera
For more background on the examples you can take a look at the source in the TensorFlow repository. The models in these examples were previously trained. The tutorials below show you how to deploy and run them on an Arduino. In the next section, we’ll discuss training.
How to run the examples using Arduino Create web editor
Once you connect your Arduino Nano 33 BLE Sense to your desktop machine with a USB cable you will be able to compile and run the following TensorFlow examples on the board by using the Arduino Create web editor:
Compiling an example from the Arduino_TensorFlowLite library.
Focus on the speech recognition example: micro_speech
One of the first steps with an Arduino board is getting the LED to flash. Here, we’ll do it with a twist by using TensorFlow Lite Micro to recognise voice keywords. It has a simple vocabulary of “yes” and “no”. Remember this model is running locally on a microcontroller with only 256KB of RAM, so don’t expect commercial ‘voice assistant’ level accuracy – it has no Internet connection and on the order of 2000x less local RAM available.
Note the board can be battery powered as well. As the Arduino can be connected to motors, actuators and more this offers the potential for voice-controlled projects.
Running the micro_speech example.
How to run the examples using the Arduino IDE
Alternatively you can use try the same inference examples using Arduino IDE application.
First, follow the instructions in the next section Setting up the Arduino IDE.
In the Arduino IDE, you will see the examples available via the File > Examples > Arduino_TensorFlowLite menu in the ArduinoIDE.
Select an example and the sketch will open. To compile, upload and run the examples on the board, and click the arrow icon:
For advanced users who prefer a command line, there is also the arduino-cli.
Training a TensorFlow Lite Micro model for Arduino
Gesture classification on Arduino BLE 33 Nano Sense, output as emojis.
Next we will use ML to enable the Arduino board to recognise gestures. We’ll capture motion data from the Arduino Nano 33 BLE Sense board, import it into TensorFlow to train a model, and deploy the resulting classifier onto the board.
The idea for this tutorial was based on Charlie Gerard’s awesome Play Street Fighter with body movements using Arduino and Tensorflow.js. In Charlie’s example, the board is streaming all sensor data from the Arduino to another machine which performs the gesture classification in Tensorflow.js. We take this further and “TinyML-ifiy” it by performing gesture classification on the Arduino board itself. This is made easier in our case as the Arduino Nano 33 BLE Sense board we’re using has a more powerful Arm Cortex-M4 processor, and an on-board IMU.
We’ve adapted the tutorial below, so no additional hardware is needed – the sampling starts on detecting movement of the board. The original version of the tutorial adds a breadboard and a hardware button to press to trigger sampling. If you want to get into a little hardware, you can follow that version instead.
Setting up the Arduino IDE
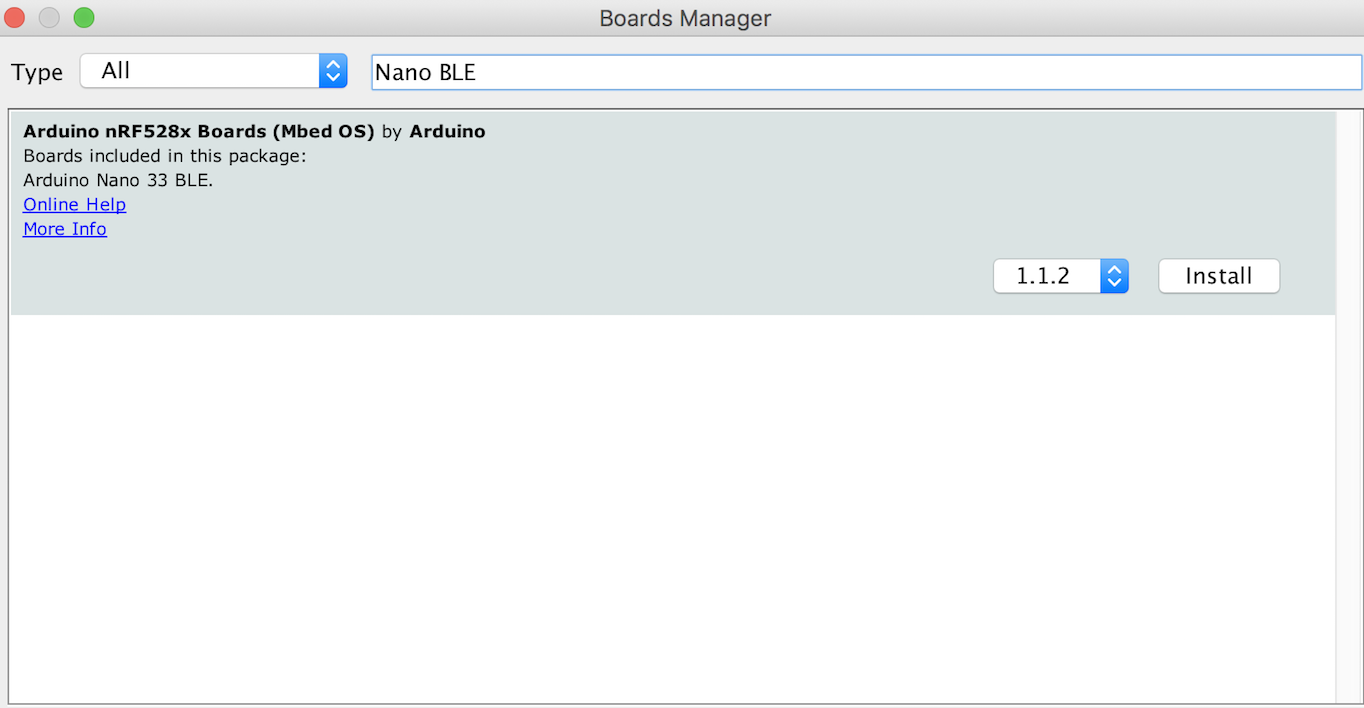
Following the steps below sets up the Arduino IDE application used to both upload inference models to your board and download training data from it in the next section. There are a few more steps involved than using Arduino Create web editor because we will need to download and install the specific board and libraries in the Arduino IDE.
First, we need to capture some training data. You can capture sensor data logs from the Arduino board over the same USB cable you use to program the board with your laptop or PC.
Arduino boards run small applications (also called sketches) which are compiled from .ino format Arduino source code, and programmed onto the board using the Arduino IDE or Arduino Create.
We’ll be using a pre-made sketch IMU_Capture.ino which does the following:
Monitor the board’s accelerometer and gyroscope
Trigger a sample window on detecting significant linear acceleration of the board
Sample for one second at 119Hz, outputting CSV format data over USB
Loop back and monitor for the next gesture
The sensors we choose to read from the board, the sample rate, the trigger threshold, and whether we stream data output as CSV, JSON, binary or some other format are all customizable in the sketch running on the Arduino. There is also scope to perform signal preprocessing and filtering on the device before the data is output to the log – this we can cover in another blog. For now, you can just upload the sketch and get sampling.
To program the board with this sketch in the Arduino IDE:
Compile and upload it to the board with Sketch > Upload
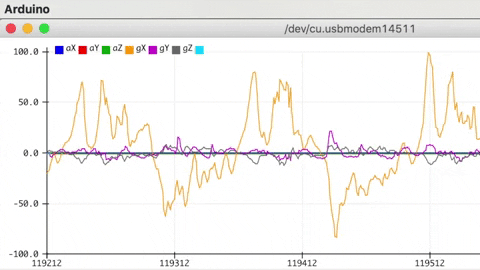
Visualizing live sensor data log from the Arduino board
With that done we can now visualize the data coming off the board. We’re not capturing data yet this is just to give you a feel for how the sensor data capture is triggered and how long a sample window is. This will help when it comes to collecting training samples.
In the Arduino IDE, open the Serial Plotter Tools > Serial Plotter
If you get an error that the board is not available, reselect the port:
Tools > Port > portname (Arduino Nano 33 BLE)
Pick up the board and practice your punch and flex gestures
You’ll see it only sample for a one second window, then wait for the next gesture
You should see a live graph of the sensor data capture (see GIF below)
Arduino IDE Serial Plotter will show a live graph of CSV data output from your board.
When you’re done be sure to close the Serial Plotter window – this is important as the next step won’t work otherwise.
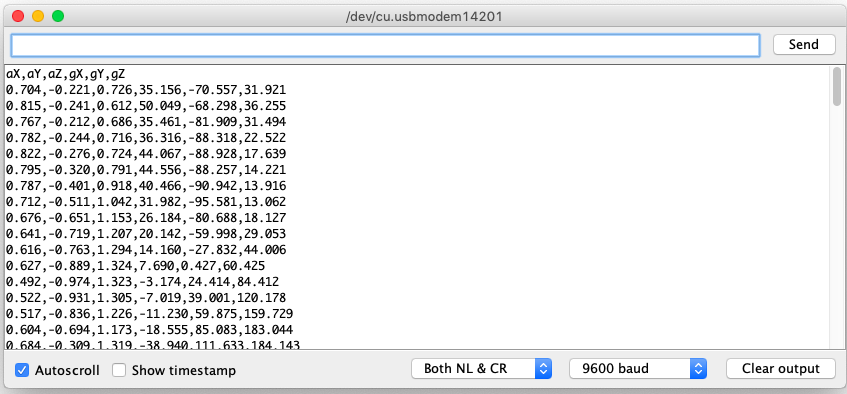
Capturing gesture training data
To capture data as a CSV log to upload to TensorFlow, you can use Arduino IDE > Tools > Serial Monitor to view the data and export it to your desktop machine:
Reset the board by pressing the small white button on the top
Pick up the board in one hand (picking it up later will trigger sampling)
In the Arduino IDE, open the Serial Monitor Tools > Serial Monitor
If you get an error that the board is not available, reselect the port:
Tools > Port > portname (Arduino Nano 33 BLE)
Make a punch gesture with the board in your hand (Be careful whilst doing this!)
Make the outward punch quickly enough to trigger the capture
Return to a neutral position slowly so as not to trigger the capture again
Repeat the gesture capture step 10 or more times to gather more data
Copy and paste the data from the Serial Console to new text file called punch.csv
Clear the console window output and repeat all the steps above, this time with a flex gesture in a file called flex.csv
Make the inward flex fast enough to trigger capture returning slowly each time
Note the first line of your two csv files should contain the fields aX,aY,aZ,gX,gY,gZ.
Linux tip: If you prefer you can redirect the sensor log output from the Arduino straight to a .csv file on the command line. With the Serial Plotter / Serial Monitor windows closed use:
$ cat /dev/cu.usbmodem[nnnnn] > sensorlog.csv
Training in TensorFlow
We’re going to use Google Colab to train our machine learning model using the data we collected from the Arduino board in the previous section. Colab provides a Jupyter notebook that allows us to run our TensorFlow training in a web browser.
Arduino gesture recognition training colab.
The colab will step you through the following:
Set up Python environment
Upload the punch.csv and flex.csv data
Parse and prepare the data
Build and train the model
Convert the trained model to TensorFlow Lite
Encode the model in an Arduino header file
The final step of the colab is generates the model.h file to download and include in our Arduino IDE gesture classifier project in the next section:
Create a new tab in the IDE. When asked name it model.h
Open the model.h tab and paste in the version you downloaded from Colab
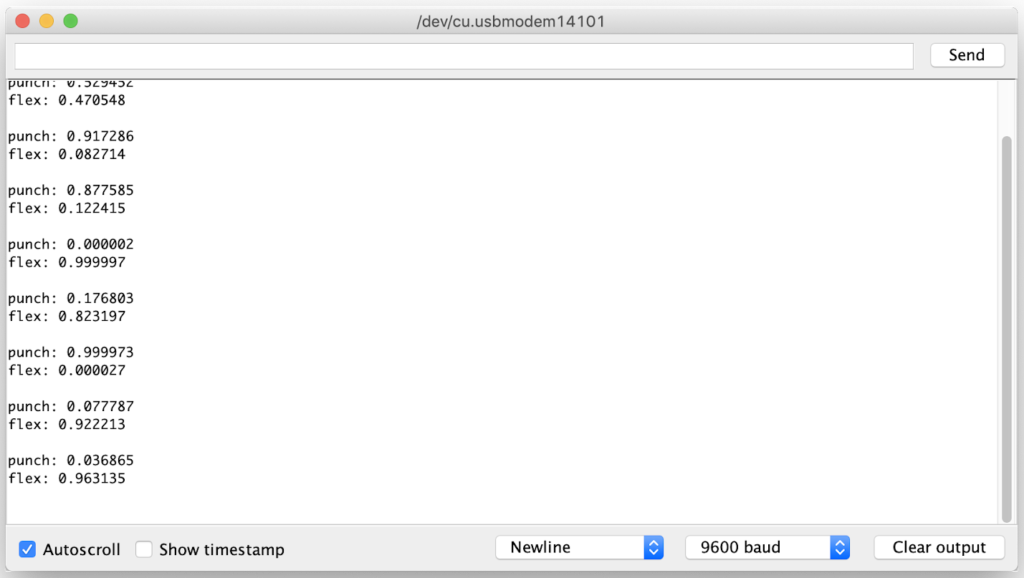
Upload the sketch: Sketch > Upload
Open the Serial Monitor: Tools > Serial Monitor
Perform some gestures
The confidence of each gesture will be printed to the Serial Monitor (0 = low confidence, 1 = high confidence)
Congratulations you’ve just trained your first ML application for Arduino!
For added fun the Emoji_Button.ino example shows how to create a USB keyboard that prints an emoji character in Linux and macOS. Try combining the Emoji_Button.ino example with the IMU_Classifier.ino sketch to create a gesture controlled emoji keyboard ?.
Conclusion
It’s an exciting time with a lot to learn and explore in TinyML. We hope this blog has given you some idea of the potential and a starting point to start applying it in your own projects. Be sure to let us know what you build and share it with the Arduino community.
That’s a question [Charlie Gerard] is going to have to tackle should her AI gesture-recognition controller experiments take off. [Charlie] put together the game controller to learn more about the dark arts of machine learning in a fun and engaging way.
The controller consists of a battery-powered Arduino MKR1000 with WiFi and an MPU6050 accelerometer. Held in the hand, the controller streams accelerometer data to an external PC, capturing the characteristics of the motion. [Charlie] trained three different moves – a punch, an uppercut, and the dreaded Hadouken – and captured hundreds of examples of each. The raw data was massaged, converted to Tensors, and used to train a model for the three moves. Initial tests seem to work well. [Charlie] also made an online version that captures motion from your smartphone. The demo is explained in the video below; sadly, we couldn’t get more than three Hadoukens in before crashing it.
When [314Reactor] got a robot car kit, he knew he wanted to add some extra things to it. At about the same time he was watching a Star Trek episode that featured exocomps — robots that worked in dangerous areas. He decided to use those fictional devices to inspire his modifications to the car kit. Granted, the fictional robots were intelligent and had a replicator. So you know he won’t make an actual working replica. But then again, the ones on the TV show didn’t have all that either.
A Raspberry Pi runs Tensorflow using the standard camera. This lets it identify objects of interest (assuming it gets them right) and sends the image back to the operator along with some identifying information. The kit already had an Arduino onboard and the new robot talks to it via a serial port. You can see a video about the project, below.
The design is complicated a bit by the fact that the original kit uses a Bluetooth adapter to send and receive serial commands from a mobile device. However, the controller software with the kit, though, allows for extra buttons, so the Arduino can receive command and send them to the Pi.
The code for the robot — known as Scorpion — is available on GitHub. The extra commands relate to the camera and also some servos that move pincers to mimic the TV robot. Images return to the operator via the Telegram cloud service.
We have to admit, the Scorpion isn’t quite the same as an exocomp. But we can see the influence on the design. It wasn’t smart enough to identify itself in the mirror, so we don’t think it achieved sentience.
In European medieval folklore, a practitioner of magic may call for assistance from a familiar spirit who takes an animal form disguise. [Alex Glow] is our modern-day Merlin who invoked the magical incantations of 3D printing, Arduino, and Raspberry Pi to summon her familiar Archimedes: The AI Robot Owl.
The key attraction in this build is Google’s AIY Vision kit. Specifically the vision processing unit that tremendously accelerates image classification tasks running on an attached Raspberry Pi Zero W. It no longer consumes several seconds to analyze each image, classification can now run several times per second, all performed locally. No connection to Google cloud required. (See our earlier coverage for more technical details.) The default demo application of a Google AIY Vision kit is a “joy detector” that looks for faces and attempts to determine if a face is happy or sad. We’ve previously seen this functionality mounted on a robot dog.
[Alex] aimed to go beyond the default app (and default box) to create Archimedes, who was to reward happy people with a sticker. As a moving robotic owl, Archimedes had far more crowd appeal than the vision kit’s default cardboard box. All the kit components have been integrated into Archimedes’ head. One eye is the expected Pi camera, the other eye is actually the kit’s piezo buzzer. The vision kit’s LED-illuminated button now tops the dapper owl’s hat.
Archimedes was created to join in Google’s promotion efforts. Their presence at this Maker Faire consisted of two tents: one introductory “Learn to Solder” tent where people can create a blinky LED badge, and the other tent is focused on their line of AIY kits like this vision kit. Filled with demos of what the kits can do aside from really cool robot owls.
Hopefully these promotional efforts helped many AIY kits find new homes in the hands of creative makers. It’s pretty exciting that such a powerful and inexpensive neural net processor is now widely available, and we look forward to many more AI-powered hacks to come.