Posts with «rgb led» label

RGB LED Matrix Helps Etch-a-Sketch Scratch Out a 21st Century Existence
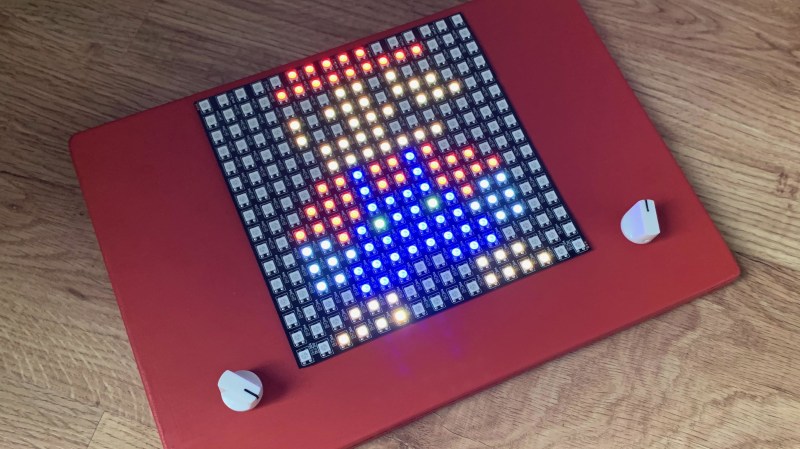
We never did crack open our Etch-a-Sketch, but we did scrape out a window large enough to really check out the mechanism inside. [MrLangford] is bringing the Etch-a-Sketch into the 21st century while at the same time, bringing an even bigger air of mystery, at least for the normies.

Instead of scraping aluminum powder off of plastic by driving a stylus on an x-y gantry with a pair of knobs, this bad boy uses rotary encoders to move the cursor around and put down squares of colored light. The familiar movements are there — the left knob moves the cursor left and right, and the right knob moves it up and down. But this wouldn’t be a 21st century toy without newfangled features. Push the left encoder down and it cycles through eight color choices, or push the right one down to go through them backwards. We hope one of the colors is setting it back to darkness in case you screw up. And while we’re dreaming up improvements, it would be awesome to add an accelerometer so you could shake it clear like a standard Etch-a-Sketch.

Inside the requisite red enclosure with white knobs are an Arduino Nano and a 16×16 RGB LED matrix. The enclosure is four sheets of 6mm MDF glued together, and we like the use of protoboard to distribute GND and 5 V in the name of keeping the thing slim.

If you’re not much of an artist, here’s a TV-sized Etch-a-Sketch build that can draw by itself.

Compact M&M Sorter Goes Anywhere

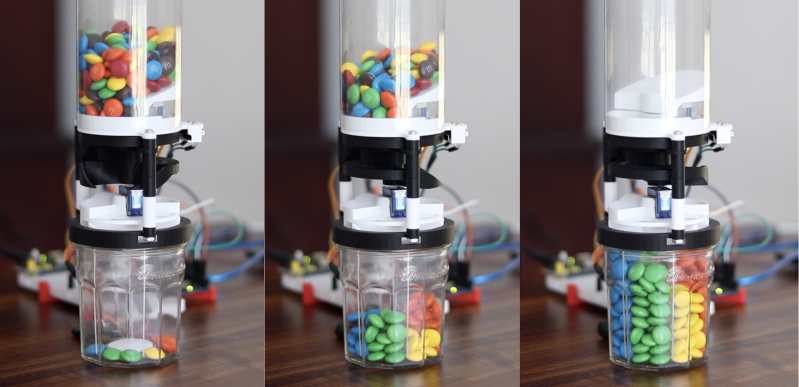
Let’s face it — eating different colored candy like M&Ms or Skittles is just a little more fun if you sort your pile by color first. The not-fun part is having to do it by hand. [Jackofalltrades_] decided to tackle this time-worn problem for engineering class because it’s awesome and it satisfies the project’s requirement for sensing, actuation, and autonomous sequencing. We’d venture to guess that it satisfies [Jackofalltrades_]’ need for chocolate, too.

Here’s how it works: one by one, M&Ms are selected, pulled into a dark chamber for color inspection, and then dispensed into the proper cubby based on the result. [Jackofalltrades_] lived up to their handle and built a color-detecting setup out of an RGB LED and light-dependent resistor. The RGB LED shines red, then, green, then blue at full brightness, and takes a voltage reading from the photocell to figure out the candy’s color. At the beginning, the machine needs one of each color to read in and store as references. Then it can sort the whole bag, comparing each M&M to the reference values and updating them with each new M&M to create a sort of rolling average.

We love the beautiful and compact design of this machine, which was built to maximize the 3D printer as one of the few available tools. The mechanical design is particularly elegant. It cleverly uses stepper-driven rotation and only needs one part to do most of the entire process of isolating each one, passing it into the darkness chamber for color inspection, and then dispensing it into the right section of the jar below. Be sure to check out the demo after the break.

Need a next-level sorter? Here’s one that locates and separates the holy grail of candy-coated chocolate — peanut M&Ms that didn’t get a peanut.

On-Air Sign Helps Keep Your Broadcasts G-Rated

Like many of us, [Michael] needed a way to let the family know whether pants are required to enter the room — in other words, whenever a videoconference is in progress. Sure he could hang a do not disturb sign, but those are easy to forget. There’s no need to worry about forgetting to change status because this beautiful wall-mounted sign can be controlled with Alexa.

Inside the gorgeous box made from walnut, curly maple, and oak is an ESP32, some RGB LEDs, and three MOSFETs. [Michael] is using the fauxmoESP library to interface the ESP32 with Alexa, which emulates a Phillips Hue bulb for the sake of using a protocol she already knows. [Michael] can change the color and brightness percentage with voice commands.

The sign is set up as four different devices — one default, and one for each color. Since talking to Alexa isn’t always appropriate, [Michael] can also change the color of the LEDs using sliders on a website that’s served up by the ESP. Check out the full build video after the break.

Need something quick and dirty that works just as well? Our own [Bob Baddeley] made a status indicator that’s simple and effective.

Sierpinski PCB Christmas Tree

It’s holiday time again! And that means it’s time to break out the soldering iron and the RGB LEDs! If you’re going to make a custom PCB to put those LEDs on, you’ll notice that you get few copies of your PCB in your order, so, might as well design it such that you can combine them all together into a single Sierpinski Christmas Tree, just like [Landon Carter] did.

Each PCB “tree” has three connections which can be used as either inputs or outputs by soldering one of two bridge connections on the PCB. The power and signal goes up and down through the tree, rather than across, so the connections go one on the top of the tree and two on the bottom. This way, each tree in the triangle can easily be connected, and each triangle can be easily connected to another. Each individual tree has three WS2812b-mini addressable RGB LEDs and the tree is controlled by an external Arduino.

The first order of 10 PCBs came in, which makes a 9 member tree – next up is a 27 member tree. After that, you’re going to need some pretty high vaulted ceilings in order to put these on the wall. On the upside, though, once the holidays are over, everything can be easily disconnected and packed away with the rest of the decorations. If you, too, are interested in RGB LED decorations, there are a few on the site for your perusal.

Hex Matrix Clock is Spellbinding

Just when we think we’ve seen all possible combinations of 3D printing, microcontrollers, and pretty blinkenlights coming together to form DIY clocks, [Mukesh_Sankhla] goes and builds this geometric beauty. It’s kaleidoscopic, it’s mosaic, and it sorta resembles stained glass, but is way cheaper and easier.

The crucial part of the print does two jobs — it combines a plate full of holes for a string of addressable RGB LEDs with the light-dividing walls that turn the LEDs into triangular pixels. [Mukesh] designed digits for a clock that each use ten triangles. You’d need an ESP8266 to run the clock code, or if you’d rather sit and admire the rainbow light show unabated by the passing of time, just use an Arduino Uno or something similar.

Most of the aesthetic magic here is in the printed pieces and the FastLED library. It has a bunch of really cool animations baked in that look great with this design. Check out the demo video after the break. The audio is really quiet until the very end of the video, so be warned. In our opinion, the audio isn’t necessary to follow along with the build.

The humble clock takes many lovely forms around here, including pop art.

Tic Tac Arduintoe Moves the Game To 4×4

We know you’re out there spending a lot more time with your loved ones, and appreciate that you may be running out of ways to keep everyone entertained. [Mukesh] dropped us a tip because he has the antidote to boredom — a new twist on that old chestnut, Tic Tac Toe.

Instead of the usual 3×3 configuration, [Mukesh] made the grid 4×4 so the game would be more engaging. Game play is otherwise the same — this Tic Tac Toe still results in a lot of draws, but they take longer and you can’t see them coming a mile away. What’s even more engaging is that you get to push clicky buttons that light up, and don’t have to draw a grid before every game.

Under the hood is an Arduino Uno that controls 16 push buttons and their corresponding RGB LEDs. Whoever goes first is blue, and player two gets pink. If you win, your color floods the board for a brief victory animation. If the game is a tie, the board turns red. We really like the printed two-piece buttons that house the LEDs and actuate the push buttons while keeping the two separate. Toe your way past the break to check out the build video.

Intrigued by the 4×4 version, but need a build that takes more time? Try building your TTT in TTL.

RGB Kitchen Uses Pots to Stir Up Color

Anyone who has done anything with RGB LEDs knows that their ability to display pretty much any color is somehow both the best and worst thing about them. How do you get it right? How do you make your results repeatable? [Thomas] has the answer. He dug around in the ol’ parts cupboard, found a few pots, and got to work making this stay-home stew of a project — an on-demand RGB LED color mixer.

Three cleverly color-coded potentiometers and an Arduino let [Thomas] step through 0-255 to mix various values of red, blue, and green. The shade that gets made is displayed live on a set of 10 individual NeoPixels that are laid out under a frosty diffusing panel. Each of the RGB values are also shown on an 16×2 LCD.

This is one of those projects that hits a sweet spot of being simple, useful, and fun. It’s even nice-looking and compact. What more could you want from a project cobbled together from ingredients on hand? [Thomas] is even giving away the code recipe.

Once you dial in your ideal colors, why not make a gesture-controlled lamp?

NeoPixel Matrix Simulation Lets You Virtually Groove to the Lights

You are stuck at home quarantined and you want to do some Arduino projects. The problem is you don’t have all the cool devices you want to use. Sure, you can order them, but the stores are slow shipping things that aren’t essential these days. If you want to get a headstart while you are waiting for the postman, check out Wokwi’s Playground. For example, you can write code to drive a virtual NeoPixel 16×16 matrix. There’s even example code to get you started.

There are quite a few other choices in the playground including Charlieplexed LEDs, a keypad, and an LCD. There are also challenges. For example, in the traffic light challenge, you are given code that uses a task scheduler library to implement a traffic light. You have to add a turn signal to the code.

In addition to LEDs in various configurations, the site has some serial bus components, an LCD, a keypad, and a NeoPixel strip. There are also a few tools including an EasyEDA to KiCad converter and a way to share sourcecode similar to Pastebin.

Of course, simulations only get you so far, but the site is a fun way to play with some different I/O devices. It would be very nice if you could compose for the different components together, but you could work your code in sections, if necessary. You can do similar things with TinkerCad circuits. If you want to install software, there’s a simulator for you, too.

Hack a Day 04 Apr 21:00

Seven-Segment Shelves Do Double Duty

[Lewis] of [DIY Machines] was always on the lookout for that perfect something to hang above the couch. After spending a lot of time fruitlessly searching, he designed and built this awesome shelving unit with recessed lighting that doubles as a huge 7-segment clock.

The clock part works as you probably expect — an Elegoo Nano fetches the time from a real-time clock module and displays it on the WS2812B LED strips arranged in 7-segment formations. There’s a photocell module to detect the ambient light level in the room, so the display is never brighter than it needs to be.

Don’t have a 3D printer yet? Then you may need to pass on this one. Aside from the wood back plane and the electronics, the rest of this build is done with printed plastic, starting with 31 carefully-designed supports for the shelves. There are also the LED strip holders, and the sleeve pieces that hide all the wires and give this project its beautifully finished look.

You may have noticed that the far left digit isn’t a full seven segments. If you’re committed to 24-hour time, you’d have to adjust everything to allow for that, but you’d end up with two more shelves. Given the fantastic build video after the break, it probably wouldn’t take too long to figure all that out.

We like big clocks and we cannot lie. If you have room for it, build something like this blinkenlit beauty.

Levitating Starship Model Comes In For a Landing

If everything goes according to plan, Elon Musk says the first generation of SpaceX’s massive Starship will make an orbital flight before the end of 2020. That’s a pretty bold claim, but when you’ve made landing rockets on their tails as in the old science fiction pulp magazines seem routine, we suppose you’ve earned the right to a bit of bravado. We’re excited to see the vehicle evolve over the next several months, but even if the real one stays grounded, we’ll gladly take this “flying” Starship model from [Chris Chimienti] as a consolation prize.

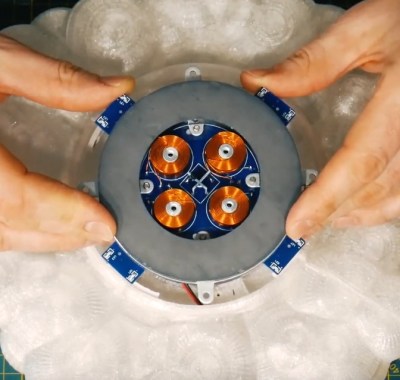
A magnetic levitation module, we’re officially in the future.

Feeling a bit let down by the 3D printable models of the Starship he found online, [Chris] set out to build his own. But it wasn’t enough to just make his bigger, stronger, and more accurate to Starship’s current design; he also wanted to make it a bit more exciting. Some RGB LEDs an Arduino embedded in the “cloud” stand the rocket sits on was a good start, and the landing pad inspired by SpaceX’s real autonomous spaceport drone ship Just Read the Instructions looks great all lit up.

But this is Starship we’re talking about, a vehicle that could literally push humanity towards being a multi-planet species. To do it justice, you’ve really got to knock it out of the park. So [Chris] found a magnetic levitation module online that could support a few hundred grams, and set to work on making his plastic Starship actually hover over the landing pad.

As you might imagine, it was a bit tricky. The first versions of the rocket looked great but came out too heavy, so he switched over to printing the model in so-called “spiral vase mode” which made it entirely hollow. Now far lighter and with a magnetic plate fit into the bottom, it was stable enough to float on its own. For the final touch, [Chris] added some red LEDs and a coin cell battery to the base of the Starship so it looks like the sleek craft is performing a last-second landing burn with its “impossible” full-flow staged combustion engines.

This isn’t the first time we’ve seen a model rocket with an electronic glowing cloud under it, but it’s certainly the first one we’ve seen that could levitate in mid-air. While this little rocket might not make it all the way to Mars, we wouldn’t be surprised to see it touching down on the desks of other hackers and makers in the near future.