Posts with «wearable hacks» label

Move Aside Yoda, it’s Furby’s Turn On Luke’s Back

When you want a backpack that turns heads and gets people talking, you can get ahead of the conversation with a talking backpack. [Nina] created a rucksack with the legendary babbler itself, the infamous Furby.

Believe it or not, no actual Furbies were sacrificed in the making of this backpack. The build uses an Arduino Nano, two servos, and a DFPlayer Mini for audio. A 3D printed faceplate is used for the iconic eyes and face. The code is fairly simple, waiting for a random delay and then triggering one of four effects. It can play a sound or blink and does its best to move the mouth while the sound is playing thanks to the handy busy line coming off the sound module. A unicorn children’s backpack offered a furry shell to stuff the electronics inside. A custom PCB makes the whole thing just a little neater internally.

Perhaps next [Nina] can integrate voice recognition so that the backpack can answer simple questions like an Alexa-powered Furby we’ve seen before.

REMOTICON 2021 // Hal Rodriguez and Sahrye Cohen Combine Couture and Circuitry

[Hal Rodriguez] and [Sahrye Cohen] of Amped Atelier focus on creating interactive wearable garments with some fairly high standards. Every garment must be pretty, and has to either be controllable by the wearer, through a set of sensors, or even by the audience via Bluetooth. Among their past creations are a dress with color sensors and 3D-printed scales on the front that change color, and a flowing pantsuit designed for a dancer using an accelerometer to make light patterns based on her movements.

Conductive Melody — a wearable musical instrument that is the focus of [Sahrye] and [Hal]’s Remoticon 2021 talk — was created for a presentation at Beakerhead Festival, a multi-day STEAM-based gathering in Calgary. [Sahrye] and [Hal] truly joined forces for this one, because [Sahrye] is all about electronics and costuming, and [Hal] is into synths and electronic music. You can see the demo in the video after the break.

The dress’s form is inspired by classical instruments and the types of clothing that they in turn inspired, such as long, generous sleeves for harp players and pianists. So [Hal] and [Sahrye] dreamed up a dress with a single large playable sleeve that hangs down from the mid- and upper arm. The sleeve is covered with laser-cut conductive fabric curlicues that look like a baroque interpretation of harp strings. Play a note by touching one of these traces, and the lights on the front of the dress will move in sync with the music.

[Sahrye] started the dress portion of Conductive Melody with a sketch of the garment’s broad strokes, then painted a more final drawing with lots of detail. Then she made a muslin, which is kind of the breadboard version of a project in garment-making where thin cotton fabric is used to help visualize the end result. Once satisfied with the fit, [Sahrye] then made the final dress out of good fabric. And we mean really good fabric — silk, in this case. Because as [Sahrye] says, if you’re going to make a one-off, why not make as nicely as possible? We can totally get behind that.

[Sahrye] says she is always thinking about how a wearable will be worn, and how it will be washed or otherwise cared for. That sequined and semi-sheer section of the bodice hides the LEDs and their wiring quite well, while still being comfortable for the wearer.

Inside the sleeve is an MPRP121 capacitive touch sensor and an Arduino that controls the LEDs and sends the signals to a Raspberry Pi hidden among the ruffles in the back of the dress.

The Pi is running Piano Genie, which can turn eight inputs into an 88-key piano in real time. When no one is playing the sleeve, the lights have a standby mode of mellow yellows and whites that fade in and out slowly compared to the more upbeat rainbow of musical mode.

We love to see wearable projects — especially such fancy creations! — but we know how finicky they can be. Among the lessons learned by [Sahrye] and [Hal]: don’t make your conductive fabric traces too thin, and silver conductive materials may tarnish irreparably. We just hope they didn’t have to waste too much conductive fabric or that nice blue silk to find this out.

Forget Smart Watch; Build a Smart Hat

Smart watches are pretty common today, but how many people do you know with a smart hat? [Oliver] built Wilson which he bills as “the IoT hat.” We wonder if the name was inspired by the Home Improvement character of the same name who only appeared as a hat above the fence line. You can see a video of the project, below.

The project is pretty straightforward for hardware. An LED strip, an Arduino, and a Bluetooth module. Oh. And a hat. The software, as you might expect, is a bit more complex. It allows you to display SMS messages to your hat.

As wearables go, your happiness with this project will depend on what’s important to you. If you want to read your text messages, you might like to stick with a watch since it is hard to see a hat while it is on your head. But if you want to show the world what’s on your mind — and your phone — this might be just the ticket.

Regardless of practicality, we thought it was a fun project and now that in person meetups are coming back, a great thing to wear at the next Supercon. It sure looks nicer than the heads up baseball cap, although you can read that one yourself. Oddly enough, most of the hat hacks we see involve baseball caps.

Electrochemistry at Home

A few years ago, I needed a teeny, tiny potentiostat for my biosensor research. I found a ton of cool example projects on Hackaday and on HardwareX, but they didn’t quite fulfill exactly what I needed. As any of you would do in this type of situation, I decided to build my own device.

Now, we’ve talked about potentiostats before. These are the same devices used in commercial glucometers, so they are widely applicable to a number of biosensing applications. In my internet perusing, I stumbled upon a cool chip from Texas Instruments called the LMP91000 that initially appeared to do all the hard work for me. Unfortunately, there were a few features of the LMP91000 that were a bit limiting and didn’t quite give me the range of flexibility I required for my research. You see, electrochemistry works by biasing a set of electrodes at a given potential and subsequently driving a chemical reaction. The electron transfer is measured by the sensing electrode and converted to a voltage using a transimpedance amplifier (TIA). Commercial potentiostats can have voltage bias generators with microVolt resolution, but I only needed about ~1 mV or so. The problem was, the LMP91000 has a resolution of ~66 mV on a 3.3 V supply, mandating that I augment the LMP991000 with an external digital-to-analog converter (DAC) as others had done.

However, changing the internal reference of the LMP91000 with the DAC confounded the voltage measurements from the TIA, since the TIA is also referenced to the same internal zero as the voltage bias generator. This seemed like a problem other DIY solutions I came across should have mentioned, but I didn’t quite find any other papers describing this problem. After punching myself a little, I thought that maybe it was a bit more obvious to everyone else except me. It can be like that sometimes. Oh well, it was a somewhat easy fix that ended up making my little potentiostat even more capable than I had originally imagined.

I could have made a complete custom potentiostat circuit like a few other examples I stumbled upon, but the integrated aspect of the LMP91000 was a bit too much to pass up. My design needed to be as small as possible since I would eventually like to integrate the device into a wearable. I was using a SAMD21 microcontroller with a built-in DAC, therefore remedying the problem was a bit more convenient than I originally thought since I didn’t need an additional chip in my design.

I am definitely pretty happy with the results. My potentiostat, called KickStat, is about the size of a US quarter dollar with a ton of empty space that could be easily trimmed on my next board revision. I imagine this could be used as a subsystem in any number of larger designs like a glucometer, cellphone, or maybe even a smartwatch.

Check out all the open-source files on my research lab’s GitHub page. I hope my experience will be of assistance to the hacker community. Definitely a fun build and I hope you all get as much kick out of it as I did.

Arduband Gives Your Eyes a Hand

Let’s face it, we probably all sit at our computers for way too long without getting up. Yes, there’s work to be done, games to be played, and the internet abounds with people who are wrong and must be down-voted and/or corrected. We totally get and respect all that. However, if you want to maintain your middle- and long-range vision, you should really get up regularly and gaze out the window for a bit.

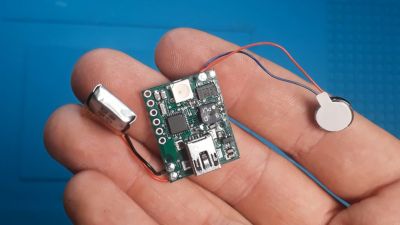
In fact, the Arduband does you one better. Its Arduino Nano and accelerometer check your position every ten minutes. If you haven’t changed your Z by the third check, then it’s time for a break. The combination of an RGB LED, buzzer, and vibrating disc motor working together should be enough to pull you out of any computerized stupor, and they won’t give up and go back to sleep until you have stood up and remained upright for one minute.

We like that [ardutronics123] spun up a board and made it small enough to be wrist-mounted using a watch strap. It would work just as well worn around your neck, and would probably even fit in your pocket. Blink a few times before you check out the build video after the break.

Arduband would be great on the go, but who does that anymore? If you spend every day at the same desk, you could point a time-of-flight sensor at your chair and start a timer.

Touch-Typing On Fingertips? Prototype Says It Could Work

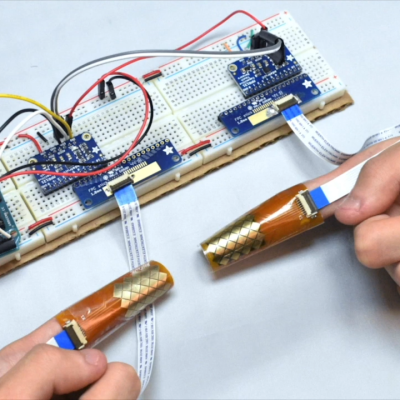
The fingertips are covered in touch sensors, each intended to be tapped by the thumbtip of the same hand.

Touch-typing with thumbs on a mobile phone keyboard is a pretty familiar way to input text, and that is part of what led to BiTipText, a method of allowing bimanual text input using fingertips. The idea is to treat the first segments of the index fingers as halves of a tiny keyboard, whose small imaginary keys are tapped with the thumbs. The prototype shown here was created to see how well the concept could work.

The prototype hardware uses touch sensors that can detect tap position with a high degree of accuracy, but the software side is where the real magic happens. Instead of hardcoding a QWERTY layout and training people to use it, the team instead ran tests to understand users’ natural expectations of which keys should be on which finger, and how exactly they should be laid out. This data led to an optimized layout, and when combined with predictive features, test participants could achieve an average text entry speed of 23.4 words per minute.

Judging by the prototype hardware, it’s understandable if one thinks the idea of fingertip keyboards may be a bit ahead of its time. But considering the increasingly “always on, always with you” nature of personal technology, the goal of the project was more about investigating ways for users to provide input in fast and subtle ways. It seems that the idea has some merit in principle. The project’s paper can be viewed online, and the video demonstration is embedded below.

One interesting thing is this: the inertia of users being familiar with a QWERTY layout is apparent even in a forward-thinking project like this one. We covered how Dvorak himself struggled with people’s unwillingness to change, even when there were clear benefits to doing so.

[via Arduino Blog]

Custom Firmware For Cheap Fitness Trackers

The concept of wearable hardware is an enticing one, but it can be difficult to tackle for the first-time maker. While many of us are experienced at designing PCBs and soldering up arcane gadgets, interfacing with the soft and fleshy human form can present unforeseen difficulties. There’s a way around that, of course – leveraging an existing platform where someone else has already done the work. That’s precisely what [Aaron Christophel] has done, by reverse engineering and developing custom firmware for cheap fitness trackers (Google Translate).

The first part of [Aaron]’s work consisted of research and disassembly. After purchasing a wide variety of fitness trackers online, he eventually came across his favored unit, the Tracker I6HRC by IWOWNFIT. This features an NRF52832 microcontroller, as well as an IPS display, some Flash storage, and a vibration motor. Connectivity is handled over Bluetooth Low Energy. [Aaron] particularly rates it for the well-made case that can be disassembled without damage, and the spare USB 2.0 pads on the board which can be used to program the device over the SWD interface.

[Aaron] has developed an Arduino-compatible firmware which is discussed further in a forum post.  Most of the peripherals on board have been explored, and reducing power consumption is a current area of active development.

Firmware hacks are always fun – have you considered giving your TV a custom boot screen? Have a FitBit original instead of the clone? There’s a hack for that too.

[Thanks to Jim for the tip!]

Flamethrower Gets Update, Retains Some Sketchiness

Part of what makes flamethrowers fun is their inherent danger. This is what makes a lot of things fun, though, from snowboarding to skydiving to motorcycle riding. As with all of these sensible hobbies, though, it’s important to take as much unnecessary risk out of the activity as possible to make sure you’re around as long as possible to enjoy your chosen activity. With that in mind, [Stephen] decided to make some improvements on his classic wrist-mounted flamethrower.

To start, he ditched the heavy lead-acid battery that powered the contraption in favor of a smaller 5 V battery. In fact, the entire build is much more compact and efficient. He was also able to use the same battery to run a tiny taser that acts as an ignition source for the flamethrower’s fuel. The fuel itself is butane, and the modified flamethrower is able to launch flames much further than the original due to improvements in the fuel delivery system. These improvements also include “Finding a way to prevent butane droplets from lighting and landing on [his] hand” which seems like a necessary feature as well.

The entire build now is very well refined and professional-looking, which is also a major improvement from the first version. It’s also worth watching the video after the break as well, which includes a minor run-in with the New York City fire marshal. And, it still retains some of the danger and all of the fun of the original builds which is something we always like to see.


Gamify Your Workout with the Wearable Console Controller

‘Tis soon to be the season when resolutions falter and exercise equipment purchased with the best of intentions is cast aside in frustration. But with a little motivation, like making your exercise machine a game console controller, you can maximize your exercise gear investment and get in some guilt-free gaming to boot.

Honestly, there is no better motivation for keeping up with exercise than taking classes, but not many people have the discipline — or the pocketbook — to keep going to the gym for the long haul. With this in mind, [Jason] looked for a way to control PS4  games like Mario Karts or TrackMania with his recumbent bike. In an attempt to avoid modifying the bike, [Jason] decided on a wearable motion sensor for his ankle. Consisting of an Uno, an MPU9250 accelerometer, and a transmitter for the 433-MHz ISM band, the wearable sends signals to a receiver whenever the feet are moving. This simulates pressing the up arrow controller key to set the game into action. Steering and other game actions are handled by a regular controller; we’d love to see this expanded to include strain gauges on the recumbent bike’s handles to allow left-right control by shifting weight in the seat. Talk about immersive gameplay!

While we like the simplicity of [Jason]’s build and the positive reinforcement it provides, it’s far from the first exercise machine hack we’ve seen. From making Google Street View bike-controlled to automatically logging workouts, exercise machines are ripe for the hacking.


Filed under: Misc Hacks, Wearable Hacks
Hack a Day 29 Nov 06:00

Be the Firebender You Want to See in the World

Always wanted to be a citizen of Fire Nation? Here’s one way to ace the citizenship exam: punch-activated flaming kung fu gauntlets of doom.

As with all the many, many, many flamethrower projects we’ve featured before, we’ve got to say this is just as bad an idea as they are and that you should not build any of them. That said, [Sufficiently Advanced]’s wrist-mounted, dual-wielding flamethrowers are pretty cool. Fueled by butane and containing enough of the right parts for even a minimally talented prosecutor to make federal bomb-making charges stick, the gauntlets each have an Arduino and accelerometer to analyze your punches. Wimpy punch, no flame — only awesome kung fu moves are rewarded with a puff of butane ignited by an arc lighter. The video below shows a few close calls that should scare off the hairy-knuckled among us; adding a simple metal heat shield might help mitigate potential singeing.

Firebending gloves not enough to satisfy your inner pyromaniac? We understand completely.

Thanks to [Nils Hitze] for the hot tip. Yep.


Filed under: misc hacks, wearable hacks