Posts with «atmel» label

A Mega-Tiny Arduino

Integrated circuits, chipsets, memory modules, and all kinds of other transistor-based technology continues to get smaller, cheaper, and more energy efficient as time moves on. Not only are the components themselves smaller, but their supporting infrastructure is as well. Computers like the Raspberry Pi are about the size of a credit card and have computing power on the order of full-sized PCs from a few decades ago. The Arduino is no exception to this trend, either, and this new dev board called the Epi 32U4 might be the smallest ATmega platform we’ve seen so far.

As the name suggests, the board is based around the ATmega32U4 which is somewhat unique among Atmel chips in that it includes support for USB within the chip itself rather than relying on external translating circuitry. This makes it an excellent choice for any project which involves sending keyboard, mouse, or other peripheral information to a computer. This goes a few steps further with eliminating “bloat” compared to other boards, too. There’s no on-board voltage regulator, no LEDs except for a single one on pin 13, and even the pins and screw terminals are hemispherical rather than through-hole to save space.

One of the other features this board boasts over other small form factor boards is on-board USB-C, which is definitely a perk as more and more devices switch away from the various forms of older USB-type plugs. The project’s specifications are also available on this GitHub page for anyone that wants to produce their own. And, if you don’t have a 32U4 on hand and still want to build a keyboard project, it’s possible to get some other Arduinos to support these features but it’ll take a little more work.

Thanks to [Rasmus L] for the tip!

Hack a Day 03 Mar 00:00

Tiny Operating System For Tiny Computer

Before the World Wide Web became ubiquitous as the de facto way to access electronic information, there were many other ways of retrieving information online. One of the most successful of these was Minitel, a French videotex service that lasted from 1980 all the way until 2012. But just because the service has been deactivated doesn’t mean its hardware can’t be used for modern builds like this Arduino-based operating system. (Google Translate from French)

Called ZARDOS, the operating system is built to run on an Arduino MEGA although a smaller version is available for the Uno. The Arduino is connected by a serial cable to the Minitel terminal. It can take input from a keyboard and PS/2 mouse and displays video on the terminal screen with the same cable. There is functionality built-in for accessing data on a cartridge system based on SD cards which greatly expands the limited capabilities of the Atmel chip as well, and there is also support for a speaker and a Videotex printer.

Even though the build uses a modern microcontroller, it gives us flashbacks to pre-WWW days with its retro terminal. All of the code is available on the project site for anyone looking to build an Arduino-based operating system, although it will take a little bit of hardware hacking to build a Minitel terminal like this. Either way, it’s a great way to revive some antique French hardware similar to a build we’ve seen which converts one into a Linux terminal.

Thanks to [troisieme_type] for the tip!

The Smaller, Tinier Arduino Platform

While many of the Arduino platforms are great tools for gaining easy access to microcontrollers, there are a few downsides. Price and availability may be the highest on the list, and for those reasons, some have chosen to deploy their own open-source Arduino-compatible boards.

The latest we’ve seen is the Franzininho, an Arduino Gemma-like board that’s based on the ATtiny85, a capable but tiny microcontroller by Atmel in a compact 8-pin configuration. This board has everything the Gemma has, including a built-in LED and breakout pins. One of the other perks of the Franzininho over the Gemma is that everything is based on through-hole components, making the assembly much easier than the surface mount components of the Gemma.

It’s worth noting that while these boards are open source, the Arduinos are as well. It’s equally possible to build your own 100% identical Arduino almost as easily. If you want more features, you can add your own by starting from one of these platforms and do whatever you want with it, like this semi-educational Atmel breakout board.

Thanks to [Clovis] for the tip!

Balancing Robot Needs Innovative Controller and Motor

A self-balancing robot is a great way to get introduced to control theory and robotics in general. The ability for a robot to sense its position and its current set of circumstances and then to make a proportional response to accomplish its goal is key to all robotics. While hobby robots might use cheap servos or brushed motors, for any more advanced balancing robot you might want to reach for a brushless DC motor and a new fully open-source controller.

The main problem with brushless DC motors is that they don’t perform very well at low velocities. To combat this downside, there are a large number of specialized controllers on the market that can help mitigate their behavior. Until now, all of these controllers have been locked down and proprietary. SmoothControl is looking to create a fully open source design for these motors, and they look like they have a pretty good start. The controller is designed to run on the ubiquitous ATmega32U4 with an open source 3-phase driver board. They are currently using these boards with two specific motors but plan to also support more motors as the project grows.

We’ve seen projects before that detail why brushless motors are difficult to deal with, so an open source driver for brushless DC motors that does the work for us seems appealing. There are lots of applications for brushless DC motors outside of robots where a controller like this could be useful as well, such as driving an airplane’s propeller.


Filed under: robots hacks

First Look – Arduino M0 Pro with 32 bit ARM Cortex M0

Here at tronixstuff we keep an open mind with regards to new hardware, and in this spirit we have the following “first look” of the new Arduino M0 Pro (previously called the Arduino Zero) from Arduino SRL. If the term Arduino SRL is new to you – click here to learn more.

This is the second Arduino-branded board that takes the leap from 8-bit to 32-bit microcontrollers (with the Due being the first), and according to Arduino SRL offers a lot of promise:

With the new Arduino M0 pro board, the more creative individual will have the potential to create one’s most imaginative and new ideas for IoT devices, wearable technologies, high tech automation, wild robotics and other not yet thinkable adventures in the world of makers.

The Arduino M0 pro represents a simple, yet powerful, 32-bit extension of the Arduino UNO platform. The board is powered by Atmel’s SAMD21 MCU, featuring a 32-bit ARM Cortex® M0 core.

With the addition of the M0 board, the Arduino family becomes larger with a new member providing increased performance.

The power of its Atmel’s core gives this board an upgraded flexibility and boosts the scope of projects one can think of and make; moreover, it makes the M0 Pro the ideal educational tool for learning about 32-bit application development.
Atmel’s Embedded Debugger (EDBG), integrated in the board, provides a full debug interface with no need for additional hardware, making debugging much easier. EDBG additionally supports a virtual COM port for device programming and traditional Arduino boot loader functionality uses.

Lots of buzzwords in there, so let’s push that aside and first consider the specifications:

Microcontroller – ATSAMD21G18, 48pins LQFP – the “main” microcontroller
EDBG Microcontroller – AT32UC3A4256, 100pins VFBGA
Operating Voltage – 3.3 V
DC Input Voltage (recommended) – 6-15 V
DC Input Voltage (limits) – 4.5-20 V
Digital I/O Pins – 14, with 12 PWM and UART
Analogue Input Pins – 6, 12-bit ADC channels
Analogue Output Pins – 1, 10-bit DAC
DC Current per I/O Pin – 7 mA
Flash Memory – 256 KB
SRAM – 32 KB
Clock Speed – 48 MHz

Lots of good stuff there – increased clock speed, increased flash memory (sketch space) and SRAM (working memory). No EEPROM however you can emulate one.

Note that the M0 Pro is a 3.3V board – and also the DC current per I/O pin is only 7 mA. Once again the user will need to carefully consider their use of external circuitry and shields to ensure compatibility (as the “classic” Arduino boards are 5V and can happily source/sink much more current per I/O pin).

The ADC (analogue-to-digital) converters have an increased resolution – 12-bit… and the addition of a true DAC (digital-to-analogue) converter allows for a true variable voltage output. This could be useful for sound generation or other effects. You can pore over the complete details including board schematics from the arduino.org website.

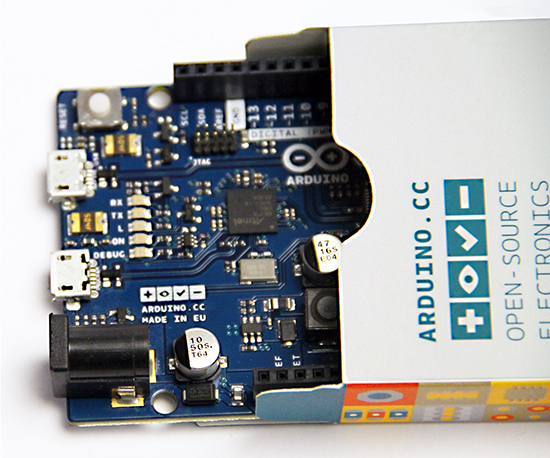
Moving on, let’s have a look around the Arduino M0 Pro board itself:

You can’t miss the sticker asking you to download the IDE – as Arduino SRL have forked up the Arduino IDE and run off with it. Click here to download. Upon removing the sticker you have:

Note the connector for the JTAG interface which works in conjunction with Atmel Studio software for debugging. You can also use the USB connection which connects to the EDBG microcontroller (example). When Atmel offers a native MacOS version we’ll investigate that further. SPI isn’t D10~D13 as per the older boards, instead it is accessed via the six pins on the right-hand side of the board. Turning the M0 Pro over doesn’t reveal any surprises:

And like the Due there are two USB ports:

A Programming USB port for uploading sketches through the Arduino IDE and “normal” use, along with a native USB port for direct connection to the main microcontroller’s serial connection. For “regular” Arduino IDE use, you can stick with the Programming port as usual.

So let’s try out the M0 Pro. We’ve downloaded the arduino.org IDE (which can co-exist with the arduino.cc IDE). Drivers are included with the IDE for Windows users, so the board should be plug and play. Note that if you need to reflash the Arduino bootloader – Atmel Studio is required. Moving on – within the Arduino IDE you need to set the board type to “Arduino M0 Pro (Programming Port)”:

… and the Programmer to “M0 Pro Programming Port”:

… both of these options are found in the Tools menu. When using these faster boards we like to run a simple speed test that calculates Newton Approximation for pi using an infinite series, written by Steve Curd from the Arduino forum. You can download the sketch to try yourself.

In previous tests the Arduino Mega2560 completed the test in 5765 ms, and the Arduino Due crushed it in 690 ms. As you can see below the M0 Pro needed 1950 ms for the test:

Not bad at all compared to a Mega. Thus the M0 Pro offers you a neat speed bump in an Uno-compatible form-factor. At this point those of you who enjoy making your own boards and dealing with surface-mount components have an advantage – the Atmel ATSAMD21G18 is available in TQFP package for under US$6… so you could cook up your own high-performance boards. Example.

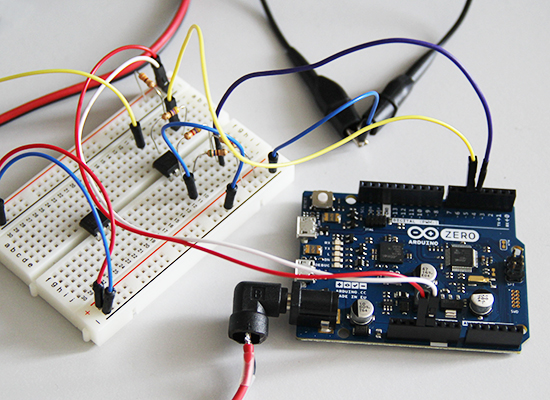
At this point I’m curious about the onboard 10-bit DAC that’s connected to pin A0, so I connected the DSO to A0 and GND, and uploaded the following sketch:

void setup() 
{
  pinMode(A0,OUTPUT);
}

void loop() 
{
  for (int i=0; i<1024; i++)
  {
    analogWrite(A0,i);
  }
  for (int i=1023; i>=0; --i)
  {
    analogWrite(A0,i);
  }
}

… which resulted with the following neat triangle waveform:

… and here it is with the statistics option:

With a frequency of 108.7 Hz there’s a lot of CPU overhead – no doubt controlling the MCU without the Arduino abstraction will result with increased performance. Finally – for some other interesting examples and “how to” guides for the M0 Pro, visit the Arduino labs page for this board.

Conclusion for now

There are many pros and cons with the Arduino M0 Pro. It is not the best “all round” or beginner’s board due to the limitations of the hardware GPIO. There’s the DAC which could be useful for creating Arduino-controlled power supplies – and plenty of PWM outputs… but don’t directly connect servos to them. However if you can live with the current limits – and need a faster clock speed with an Arduino Uno-compatible board type – then the M0 Pro is an option for you.

Furthermore the M0 Pro offers an interesting bridge into the world of 32-bit microcontrollers, and no doubt the true performance of the MCU can be unlocked by moving away from the Arduino IDE and using Atmel Studio. If you have any questions for the arduino.org team about the Arduino M0 Pro ask in their support forum.

And if you would like your own Arduino M0 Pro – tronixlabs.com is offering a 10% discount off this new board until the end of November 2015. Enter the coupon code “tronixstuff” in the shopping cart page to activate the discount**. tronixlabs.com – which along with being Australia’s #1 Adafruit distributor, also offers a growing range and great value for supported hobbyist electronics from Altronics, DFRobot, Freetronics, Jaycar, Seeedstudio and much much more.

As always, have fun and keep checking into tronixstuff.com. Why not follow things on twitterGoogle+, subscribe  for email updates or RSS using the links on the right-hand column, or join our forum – dedicated to the projects and related items on this website.

** discount not available in conjunction with any other offer, and not valid for CCHS/MELBPC deliveries or pickup orders. 

The post First Look – Arduino M0 Pro with 32 bit ARM Cortex M0 appeared first on tronixstuff.

Arduino Zero now available for purchase!

One year ago Arduino and Atmel unveiled the new Arduino Zero. Today, after some months of beta-testing, we are happy to have the board finally available for purchase on the US Store.

Arduino Zero is a simple and powerful 32-bit extension of the well-known Arduino UNO. It allows creative individuals to realize truly innovative ideas especially in areas like smart IoT devices, wearable technology, high-tech automation, and robotics. Arduino Zero acts also as a great educational tool for learning 32-bit application development.

Powered by Atmel SAMD21 MCU, Arduino Zero features a 32-bit ARM Cortex® M0+ core. One of its “most wanted” features is the Atmel Embedded Debugger (EDBG), which provides a full debug interface without the need for additional hardware.

Arduino Zero’s silk has an additional graphic element: the Genuino logo. Genuino is the Arduino sister brand from the Arduino founders (M. Banzi, D. Cuartielles, T. Igoe, D. Mellis), team and community. We added the Genuino logo to the Arduino Zero to stress its authenticity, and to make it easier for the Arduino community to spot original boards. We are going to include this logo to all genuine Arduino boards from now on.

To start using the board you need to download the latest version of the IDE (1.6.5), which comes with a set of great improvements:

  • a new modern editor (thanks @ricardojlrufino)
  • serial monitor stays open while you upload a new sketch (thanks @avishorp and @Wackerbarth)
  • File > Open Recent menu shows the last 5 opened sketches
  • Tons of fixes and improvements: the list is available here. They are 470 issues closed since previous version, 1.6.4: massive!

Learn more about the Arduino Zero and get started with it at the following links:

Updated Arduino Zero product page

Getting Started Page

Github repository

Interact in the Arduino Forum

And if you are one of the lucky ones and have Arduino Zero in your hands, start practicing its features with the following tutorials:

- Arduino Zero Low Power Overview

It shows the low power characteristics of the Arduino Zero thanks to a low power microcontroller using the 32 bit ARM Cortex M0+ architecture.

Simple Audio Feature

It shows how to experiment with sound starting to play a wave file stored on the SD card.


Celebrate with us a decade of Making at Maker Faire Bay Area

The Maker Faire Bay Area is celebrating 10 years of making! The weekend is starting  and we’ll be there celebrating t0o. We invite makers, artists, designers, teachers, educators and passionate DIYers to visit our team at the Arduino booth (#2223) right next to Atmel! We’ll be showcasing cool demos of Arduino Create, Arduino Materia 101, Arduino at Heart Primo and you’ll be able to have a close look to some of the new boards like Arduino Gemma.

On Saturday at 12:30PM  Massimo Banzi will be on the Center Stage for his traditional keynote on the State of Arduino. You are welcome to attend and learn about the latest developments in Arduino open-source microcontroller ecosystem.

If you are coming with kids, don’t miss Teach Physical computing to kids workshop, with sessions running the whole weekend!


Atmel and Arduino Announce Wi-Fi Shield 101 at World Maker Faire

Atmel and Arduino teamed up at World Maker Faire to introduce the Wi-Fi shield 101. [Gary] from Atmel gave us the lowdown on this new shield and its components. The shield is a rather spartan affair, carrying only devices of note: an Atmel WINC1500 WiFi module, and an ATECC108 crypto chip.

The WINC1500 is a nifty little WiFi module in its own right. WINC handles IEEE 802.11 b/g/n at up to 72 Mbps. 72Mbps may not sound like much by today’s standards, but it’s plenty fast for most embedded applications. WINC handles all the heavy lifting of the wireless connection. Connectivity is through SPI, UART or I2C, though on the Arduino shield it will be running in SPI mode.

The ATECC108 is a member of Atmel’s “CryptoAuthentication” family. It comes packaged in an 8-pin SOIC, and is compatible with serial I2C EEPROM specifications. Internally the similarities to serial EEPROMs end. The ‘108 has a 256-bit SHA engine in hardware, as well as a Federal Information Processing Standards (FIPS) level random number generator. Atmel sees this chip as being at the core of secure embedded systems. We think it’s pretty darn good, so long as we don’t hear about it at the next DEFCON.

The Wi-Fi shield 101 and associated libraries should be out in January 2015. We can’t wait to see all the new projects (and new ways to blink an LED) the shield will enable.


Filed under: Arduino Hacks, wireless hacks

‘Duinos and VR Environments

At the Atmel booth at Maker Faire, they were showing off a few very cool bits and baubles. We’ve got a post on the WiFi shield in the works, but the most impressive person at the booth was [Quin]. He has a company, he’s already shipping products, and he has a few projects already in the works. What were you doing at 13?

[Quin]‘s Qduino Mini is your basic Arduino compatible board with a LiPo charging circuit. There’s also a ‘fuel gauge’ of sorts for the battery. The project will be hitting Kickstarter sometime next month, and we’ll probably put that up in a links post.

Oh, [Quin] was also rocking some awesome kicks at the Faire. Atmel, I’m trying to give you money for these shoes, but you’re not taking it.

[Sophie] had a really cool installation at the faire, and notably something that was first featured on hackaday.io. Basically, it’s a virtually reality Segway, built with an Oculus, Leap Motion, a Wobbleboard, an Android that allows you to cruise on everyone’s favorite barely-cool balancing scooter through a virtual landscape.

This project was a collaboration between [Sophie], [Takafumi Ide], [Adelle Lin], and [Martha Hipley]. The virtual landscape was built in Unity, displayed on the Oculus, controlled with an accelerometer on a phone, and has input with a Leap Motion. There are destructible and interactable things in the environment that can be pushed around with the Leap Motion, and with the helmet-mounted fans, you can feel the wind in your hair as you cruise over the landscape on your hovering Segway-like vehicle. This is really one of the best VR projects we’ve ever seen.


Filed under: misc hacks
Hack a Day 28 Sep 03:00