Posts with «ble» label

Wearable Sensor Trained to Count Coughs

There are plenty of problems that are easy for humans to solve, but are almost impossibly difficult for computers. Even though it seems that with modern computing power being what it is we should be able to solve a lot of these problems, things like identifying objects in images remains fairly difficult. Similarly, identifying specific sounds within audio samples remains problematic, and as [Eivind] found, is holding up a lot of medical research to boot. To solve one specific problem he created a system for counting coughs of medical patients.

This was built with the idea of helping people with chronic obstructive pulmonary disease (COPD). Most of the existing methods for studying the disease and treating patients with it involves manually counting the number of coughs on an audio recording. While there are some software solutions to this problem to save some time, this device seeks to identify coughs in real time as they happen. It does this by training a model using tinyML to identify coughs and reject cough-like sounds. Everything runs on an Arduino Nano with BLE for communication.

While the only data the model has been trained on are sounds from [Eivind], the existing prototypes do seem to show promise. With more sound data this could be a powerful tool for patients with this disease. And, even though this uses machine learning on a small platform, we have seen before that Arudinos are plenty capable of being effective machine learning solutions with the right tools on board.

Hack a Day 16 Nov 00:00

Annoy Yourself into Better Driving with This Turn Signal Monitor

Something like 99% of the people on the road at any given moment will consider themselves an above-average driver, something that’s as statistically impossible as it is easily disproven by casual observation. Drivers make all kinds of mistakes, but perhaps none as annoying and avoidable as failure to use their turn signal. This turn signal monitor aims to fix that, through the judicious use of negative feedback.

Apparently, [Mark Radinovic] feels that he has a predisposition against using his turn signal due to the fact that he drives a BMW. To break him of that habit, one that cost him his first BMW, he attached Arduino Nano 33 BLEs to the steering wheel and the turn signal stalk. The IMUs sense the position of each and send that over Bluetooth to an Arduino Uno WiFi. That in turn talks over USB to a Raspberry Pi, which connects to the car’s stereo via Bluetooth to blare an alarm when the steering wheel is turned but the turn signal remains untouched. The video below shows it in use; while it clearly works, there are a lot of situations where it triggers even though a turn signal isn’t really called for — going around a roundabout, for example, or navigating a sinuous approach to a drive-through window.

While [Mark] clearly built this tongue firmly planted in cheek, we can’t help but think there’s a better way — sniffing the car’s CANbus to determine steering angle and turn signal status comes to mind. This great workshop on CANbus sniffing from last year’s Remoticon would be a great place to start if you’d like a more streamlined solution than [Mark]’s.

[via Tom’s Hardware]

Hack a Day 07 Nov 15:15

Mini Wireless Thermal Printers Get Arduino Library (and MacOS App)

[Larry Bank]’s Arduino library to print text and graphics on BLE (Bluetooth Low Energy) thermal printers has some excellent features, and makes sending wireless print jobs to a number of common models about as easy as can be. These printers are small, inexpensive, and wireless. That’s a great mix that makes them attractive for projects that would benefit from printing out a hardcopy.

It’s not limited to simple default text, either. Fancier output can be done using Adafruit_GFX library-style fonts and options, which sends the formatted text as graphics. You can read all about what the library can do in this succinct list of concise functions.

But [Larry] hasn’t stopped there. While experimenting with microcontrollers and BLE thermal printers, he also wanted to explore talking to these printers from his Mac using BLE directly. Print2BLE is a MacOS application that allows dragging image files into the application’s window, and if the preview looks good, the print button makes it come out of the printer as a 1-bpp dithered image.

Small thermal printers make for neat projects, like this retrofitted Polaroid camera, and now that these little printers are both wireless and economical, things can only get easier with the help of a library like this. Of course, if that’s all starting to look a little too easy, one can always put the thermal back in thermal printing by using plasma, instead.

Hackaday Links: April 26, 2020

Gosh, what a shame: it turns out that perhaps 2 billion phones won’t be capable of COVID-19 contact-tracing using the API that Google and Apple are jointly developing. The problem is that the scheme the two tech giants have concocted, which Elliot Williams expertly dissected recently, is based on Bluetooth LE. If a phone lacks a BLE chipset, then it won’t work with apps built on the contact-tracing API, which uses the limited range of BLE signals as a proxy for the physical proximity of any two people. If a user is reported to be COVID-19 positive, all the people whose BLE beacons were received by the infected user’s phone within a defined time period can be anonymously notified of their contact. As Elliot points out, numerous questions loom around this scheme, not least of which is privacy, but for now, something like a third of phones in mature smartphone markets won’t be able to participate, and perhaps two-thirds of the phones in developing markets are not compatible. For those who don’t like the privacy-threatening aspects of this scheme, pulling an old phone out and dusting it off might not be a bad idea.

We occasionally cover stories where engineers in industrial settings use an Arduino for a quick-and-dirty automation solution. This is uniformly met with much teeth-gnashing and hair-rending in the comments asserting that Arduinos are not appropriate for industrial use. Whether true or not, such comments miss the point that the Arduino solution is usually a stop-gap or proof-of-concept deal. But now the purists and pedants can relax, because Automation Direct is offering Arduino-compatible, industrial-grade programmable controllers. Their ProductivityOpen line is compatible with the Arduino IDE while having industrial certifications and hardening against harsh conditions, with a rich line of shields available to piece together complete automation controllers. For the home-gamer, an Arduino in an enclosure that can withstand harsh conditions and only cost $49 might fill a niche.

Speaking of Arduinos and Arduino accessories, better watch out if you’ve got any modules and you come under the scrutiny of an authoritarian regime, because you could be accused of being a bomb maker. Police in Hong Kong allegedly arrested a 20-year-old student and posted a picture of parts he used to manufacture a “remote detonated bomb”. The BOM for the bomb was strangely devoid of anything with wireless capabilities or, you know, actual explosives, and instead looks pretty much like the stuff found on any of our workbenches or junk bins. Pretty scary stuff.

If you’ve run through every binge-worthy series on Netflix and are looking for a bit of space-nerd entertainment, have we got one for you. Scott Manley has a new video that goes into detail on the four different computers used for each Apollo mission. We knew about the Apollo Guidance Computers that guided the Command Module and the Lunar Module, and the Launch Vehicle Digital Computer that got the whole stack into orbit and on the way to the Moon, but we’d never heard of the Abort Guidance System, a backup to the Lunar Module AGC intended to get the astronauts back into lunar orbit in the event of an emergency. And we’d also never heard that there wasn’t a common architecture for these machines, to the point where each had its own word length. The bit about infighting between MIT and IBM was entertaining too.

And finally, if you still find yourself with time on your hands, why not try your hand at pen-testing a military satellite in orbit? That’s the offer on the table to hackers from the US Air Force, proprietor of some of the tippy-toppest secret hardware in orbit. The Hack-A-Sat Space Security Challenge is aimed at exposing weaknesses that have been inadvertantly baked into space hardware during decades of closed development and secrecy, vulnerabilities that may pose risks to billions of dollars worth of irreplaceable assets. The qualification round requires teams to hack a grounded test satellite before moving on to attacking an orbiting platform during DEFCON in August, with prizes going to the winning teams. Get paid to hack government assets and not get arrested? Maybe 2020 isn’t so bad after all.

Why we chose to build the Arduino Nano 33 BLE core on Mbed OS

This post is from Martino Facchin, who is in charge of the firmware development team at Arduino. Hopefully this is the first of a series of posts describing the inner workings of what we do.

The new, shiny and tiny Nano 33 BLE and Nano 33 BLE Sense are on their way to becoming a serious threat to any hacker’s summer vacation. (I’d recommend spending a couple of days at the lake or beach anyway despite the board’s awesomeness!)

Quoting Sir Isaac Newton (who walked the same streets of Cambridge, UK that the Arm engineers use to get to work everyday), starting from scratch is not always a clever idea. Tens of thousands of man-hours have been spent since the beginning of computer science to reinvent the wheel, sometimes with great results, other times just bringing more fragmentation and confusion.

Since we didn’t have an official Arduino core for the Nordic nRF52840 Cortex-M4 microcontroller, which the Nano 33 BLE and Nano BLE Sense are based upon, we took a look at the various alternatives:

  • Using Nordic softdevice infrastructure
  • Writing a core from scratch
  • Using Mbed OS as a foundation

Option one looks juicy but clashes with a cornerstone of Arduino: open-source software. In fact, softdevice’s closed source approach limits the user’s freedom.

Option two would take a lot of burden on our shoulders for a single board, making the core not very reusable.

So, we went to option three: basing the core on Mbed OS foundation, sharing its drivers and libraries.

As many of you may know, Mbed is a fully preemptive RTOS (real-time operating system), meaning you can run multiple “programs” (more specifically, threads) at the same time, much like what happens in your notebook or smartphone. At Arduino, we have been looking for an RTOS to use on our more advanced boards for a long time but we never found something we liked until we started working with the Mbed OS. Programming an RTOS is usually quite complicated (every university grade course on operating systems will be full of frightening terms like ‘mutex’ and ‘starvation’), but you don’t have to worry if you just want to use it as an Arduino; setup() and loop() are in their usual place, and nobody will mess with your program while it’s running.

But if you want to do MORE, all Mbed infrastructure is there, hidden under the mbed:: namespace. As a side effect of reusing its drivers, we can now support every Mbed board in Arduino with minimal to no effort. Plus, the structure of the core allows any Mbed developer to use Arduino functions and libraries, simply by prepending arduino:: before the actual function call.

Mbed also supports tickless mode; in this way, every time you write delay() in your code, the board will try to go in low power modes, knowing exactly when to wake up for the next scheduled event (or any external interrupt). We are able to achieve an impressive 4.5uA of lower consumption while running a plain old Blink on the Nano 33 BLE (a minimal hardware modification is needed to obtain this value but another blog post is coming). As for Bluetooth support, you can start creating your BLE devices today using the wonderful https://github.com/arduino-libraries/ArduinoBLE but we support plain Cordio APIs as well, in case you need features not yet available in Arduino BLE.

And of course, it’s all open-source! 

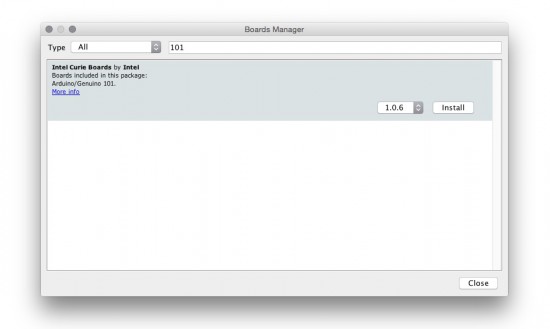
If you just want to make awesome projects with its plethora of onboard sensors, fire up your Arduino IDE, open the board manager and search for Nano 33 BLE; one click and you are ready to go! 

If you want to hack the core, add another Mbed board or merely take a look, your next entry point is the GitHub repo. Don’t be shy if you find a bug or have a suggestion; we love our community, and will try to be as responsive as possible. 

Building Badges The Hard Way

What’s a hacker to do to profess his love for his dearest beloved? [Nitesh Kadyan] built his lady-love this awesome LED pendant – the LED BLE Hearty Necklace Badge.

The hardware is pretty vanilla by today’s hacker standards. An ATMega328p  does most of the heavy lifting. An HM-11 BLE module provides connection to an Android mobile app. Two 74HC595 shift registers drive 16 columns of red LEDs and a ULN2803 sinks current from the 8 rows. The power section consists of a charger for the 320mAh LiPo and an LDO for the BLE module. All the parts are SMD with the passives mostly being 0603, including the 128 LEDs.

128 LEDs soldered wrong way around

[Nitesh] didn’t get a stencil made for his first batch of boards, so all the parts were painstakingly soldered manually and not in a reflow oven. And on his first board, he ended up soldering all of the LED’s the wrong way around. Kudos to him for his doggedness and patience.

The Arduino code on the ATmega is also quite straightforward. All characters are stored as eight bytes each in program memory and occupy 8×8 pixels on the matrix. The bytes to be displayed are stored in a buffer and the columns are left shifted fast enough for the marquee text effect. The Android app is built by modifying a demo BLE app provided by Google. The firmware, Android app, and the KiCAD design files are all hosted on his Github repository.

[Nitesh] is now building a larger batch of these badges to bring them to hillhacks – the annual hacker-con for making and hacking in the Himalayas. Scheduled for later this month, you’ll have to sign up on the mailing list for details and if you’d like to snag one of these badges. To make it more interesting, [Nitesh] has added two games to the code – Tetris and Snakes. Hopefully, this will spur others to create more games for the badge, such as Pong.

Hackaday Prize Entry: Reflowduino, the Open Source Reflow Oven Controller

Face it — you want a reflow oven. Even the steadiest hands and best eyes only yield “meh” results with a manual iron on SMD boards, and forget about being able to scale up to production. But what controller should you use when you build your oven, and what features should it support? Don’t worry — you can have all the features with this open source reflow oven controller.

Dubbed the Reflowduino for obvious reasons, [Timothy Woo]’s Hackaday Prize entry has everything you need in a reflow oven controller, and a few things you never knew you needed. Based on an ATMega32, the Reflowduino takes care of the usual tasks of a reflow controller, namely running the PID loop needed to accurately control the oven’s temperature and control the heating profile. We thought the inclusion of a Bluetooth module was a bit strange at first, but [Timothy] explains that it’s a whole lot easier to implement the controller’s UI in software than in hardware, and it saves a bunch of IO on the microcontroller. The support for a LiPo battery is somewhat baffling, as the cases where this would be useful seem limited since the toaster oven or hot plate would still need a mains supply. But the sounder that plays Star Wars tunes when a cycle is over? That’s just for fun.

Hats off to [Timothy] for a first-rate build and excellent documentation, which delves into PID theory as well as giving detailed instructions for every step of the build. Want to try lower-end reflow? Pull out a halogen work light, or perhaps fire up that propane torch.


Filed under: The Hackaday Prize, tool hacks

A DIY interactive book that uses digital gestures

Digital and craft maker lab Tazas recently worked with a group of master students on an interactive book/prototype to reflect on how gestures like swiping have become as natural as shaking hands. Digital Gestures is a metaphor of the human body’s physiological senses, which identifies 10 actions inherent to our daily interactions with technology: drag and drop, spread and squeeze, swipe, double tap, scroll, zoom, rotate, draw, press, press and hold.

The project was brought to life using four basic electronic components and some digital fabrication: a web server (VPS), an AtHeart Blend Micro Bluetooth module linking objects to the elements contained on the server, an iPod Touch connected viewing medium and conductive ink. All the elements are arranged on a laser cut wooden base, while an iPod digitally decrypts the printed* pages filed on its left.

To play, the viewer places an illustrated page on the support and touches a specific key point beforehand determined as conductive. When touching, the viewer has the ability to interact on the screen in order to understand the illustrated use. This experimental reflection raises many questions about the conditioning that man receives from the machine by accepting these precepts without altering their function. What will become of our so-called ‘daily’ gestures? Will our close to real behavioral experiment be upset? Answers that require that ‘use must be done.’

You can see how it magically works below!


How to Develop a Sellable Bluetooth Low-Energy (BLE) Product

Bluetooth Low-Energy (BLE) is a great bluetooth solution for your electronics product even if energy use isn't a factor.

Read more on MAKE

The post How to Develop a Sellable Bluetooth Low-Energy (BLE) Product appeared first on Make: DIY Projects and Ideas for Makers.

Intel releases an improved version of the Arduino 101 core!

A few weeks ago, an announcement was posted on the Arduino Forum mentioning new improvements on the software side of the Arduino/Genuino 101. With this release, the board–which was developed in collaboration with Intel–is reaching its full potential, with not only better code generation but unlocking useful features to make your sketches even more interactive as well.

You can easily upgrade the core using the Arduino IDE’s Board Manager (pictured below), while Arduino Create users will be automatically updated, so no action is required–the cool thing about the cloud!

In more detail:

  • The GCC compiler has been updated to support hardware extensions to the ARC EM core in the Intel® Curie™ module. This provides significant improvements in floating point operations, bit shifting, and other operations to enhance Sketch performance.
  • The Arduino/Genuino 101 platform offers 2MB Flash storage onboard, which is now enabled for user sketches.
  • An experimental driver has been implemented to enable the I2S interface via the CurieI2S library. Connecting the I2S bus to an external DAC (digital to analog converter) allows users to play high-quality music (HiFi).

Other improvements and bug fixes:

  • Motion Sensor: Several sample sketches, like MotionDetection, have been implemented to demonstrate the application of the IMU data
  • Bluetooth LE: Several new examples for BLE peripheral library added
  • IMU: Correct motion detection setting implemented
  • Library CurieTimerOne APIs are now compatible with the TimerOne library

For comprehensive release notes refer to the Intel Open Source Technology Center on GitHub.