Posts with «servos» label

Arduino Activated Automotive Aerodynamic Apparatus is… (Spoiler Alert!)

Sometimes a great hack is great for no other reason than that it’s fun, and [Michael Rechtin]’s DIY Active Aero Spoiler and Air Brake certainly qualifies as a fun hack. This is a mod designed to live in a world where looks are everything, stickers add horsepower, and a good sound system is more important than good wheel alignment. Why is that? Because like the switch that exists only to activate the mechanism that turns it off, the DIY Active Aero Spoiler and Air Brake seen below is almost completely useless. So to understand its allure, we must understand its inspiration.

For a few decades now, luxury sports car manufacturers have been adding active aerodynamic components to their vehicles. For example, several Porsche models feature adaptive spoilers that adjust to driving conditions. Super cars such as the Bugatti Veyron have spoilers that flip up at high angles during braking to increase drag and reduce braking distance. All of these features are sadly missing from the average two or four door family-car-turned-wannabe-track-fiend. Until now!

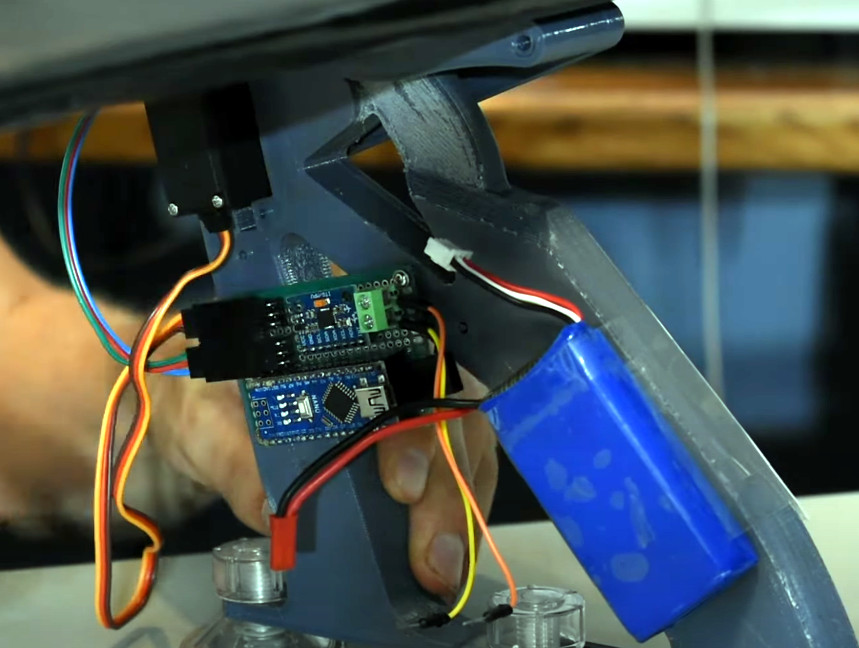
[Michael] has created a new active spoiler for every mall-bound muffler-challenged hand me down. The build starts with a CNC cut foam wing which is covered with fiberglass, Bondo (an automotive necessity) and some faux carbon fiber for that go-fast feel. An Arduino, IMU, two servos, and a battery pack detect deceleration and automatically increase the spoiler angle just like the big boys, but without needing any integration into the vehicles systems. Or bolts, for that matter.

It’s unlikely that the braking force is enough to slow down the vehicle though, given that it’s not enough to pop the suction cups holding it to the trunk lid. But does it have the “wow” factor that it was designed to induce? Spoiler Alert: It does!

As it turns out, this isn’t the first adjustable spoiler featured here at Hackaday, and this adjustable spoiler on a car that’s made for actual racing is quite interesting.

Thanks to [Zane] for the tip on this project!

Automated Sentry Turret For Your Secret Lab

There are few things as frustrating when you’re trying to get some serious hacking done than intruders repeatedly showing up without permission. [All Parts Combined] has the solution for you, with a Kinect-based robotic sentry turret to keep them at bay.

The system consists of a Microsoft Kinect V2 connected to a PC, which runs an app to do all the processing, and outputs the targeting information to an Arduino over serial. The Arduino controls a simple 2-axis servo mount with an electric airsoft gun zip-tied to it. The trigger switch is replaced with a relay, also connected to the Arduino.

The Kinect V2 comes with SDKs that really simplify tracking human movement, and outputs the data in an easy-to-use format. [All Parts Combined] used the SDK in Unity, which allows him to choose which body parts to track. He added scripts that detect a few basic gestures, issues voice commands, and generates the serial commands for the Arduino. The servo angles are calculated with simple geometry, using XY coordinates of the target received from the SDK, and the known distance between the Kinect and turret. When an intruder enters the Kinect’s field of view it immediately starts aiming at the intruder’s heart, issues a “Hands Up!” command, and tells the intruder to leave. If the intruder doesn’t comply, it starts an audible countdown before firing. [All Parts Combined] also added a secret disarming gesture (double hand pistols), which turns the turret into an apologetic comrade. All it needs is a Portal-inspired enclosure.

It’s a fun project that illustrates how the Kinect can make complex computer vision tasks relatively simple. Unfortunately the V2 is no longer in production, having been replaced by the more expensive, developer focused Azure Kinect. We’ve covered several Kinect-based projects, including a 3D room scanner and a robotic basketball hoop.

Hack a Day 07 Jun 03:01

This Arduino Keeps Its Eyes On You

[Will] wanted to build some animatronic eyes that didn’t require high-precision 3D printing. He wound up with a forgiving design that uses an Arduino and six servo motors. You can see the video of the eyes moving around in the video below.

The bill of materials is pretty simple and features an Arduino, a driver board, and a joystick. The 3D printing parts are easy to print with no supports, and will work with PLA. Other than opening up holes there wasn’t much post-processing required, though he did sand the actual eyeballs which sounds painful.

The result is a nice tight package to hold six motors, and the response time of the eye motion is very impressive. This would be great as part of a prop or even a robot in place of the conventional googly eyes.

While the joystick is nice, we’d like to see an ultrasonic sensor connected so the eyes track you as you walk across the room. Maybe they could be mounted behind an old portrait for next Halloween. Then again, perhaps a skull would be even better. If you want a refresher about servos, start with a laser turret tutorial.

7 Lessons from Building a GoPro Auto-Panorama Device

Trick your GoPro into taking pictures with a recording

Read more on MAKE

The post 7 Lessons from Building a GoPro Auto-Panorama Device appeared first on Make: DIY Projects and Ideas for Makers.

Tertiarm - low cost, 3d printed robot arm based on Ikea lamp

Primary image

What does it do?

Move things, push buttons, etc.

Cost to build

Embedded video

Finished project

Complete

Number

Time to build

Type

URL to more information

Weight

read more

Let's Make Robots 07 Feb 15:54

Tertiarm - low cost, 3d printed robot arm based on Ikea lamp

Primary image

What does it do?

Move things, push buttons, etc.

Cost to build

Embedded video

Finished project

Complete

Number

Time to build

Type

URL to more information

Weight

read more

Let's Make Robots 07 Feb 15:54

Tertiarm - low cost, 3d printed robot arm based on Ikea lamp

Primary image

What does it do?

Move things, push buttons, etc.

Cost to build

Embedded video

Finished project

Complete

Number

Time to build

Type

URL to more information

Weight

read more

Let's Make Robots 07 Feb 15:54

Make a Wi-Fi Enabled Light Switch Turner Onner

Use a servo to flick a light switch mechanically — without ever touching 110V power — with this Wi-Fi “Turner Onner”

Read more on MAKE

The post Make a Wi-Fi Enabled Light Switch Turner Onner appeared first on Make: DIY Projects and Ideas for Makers.

Quadrupede bluetooth Spider


After printing pieces to Prusa I3 is the new 4-legged spider with bluetooth comm :)


read more

Let's Make Robots 07 Jun 20:27
32 servo controler  6v  arduino  balance  battery  biped  bluetooth  fast  greek  grrobot  hands  head  hexapod  humanoid  led  legs  mg995  mini servo  move  one leg  program  relay  robot  robotics  servos  slow  ssc32  step  vb.net  walk  warior  

Nerf-firing Rover

Primary image

What does it do?

Navigate via RC control, fires Nerf gun, supports autonomous control via Raspberry Pi

This rover makes use of the following:

CPPM RC radio input from openTx RC radio

Arduino Nano to handle communcations from RC, Raspberry Pi via USB (not attached  yet), I/O to servos via i2c, I/O to/from Roboclaw motor controller via serial (gets velocity from encoders on motors), and output to various DC-driven devices (headlight, gripper).

5.8ghz video transmitter for FPV roving

Cost to build

$600, 00

Embedded video

Finished project

Number

Time to build

50 hours

Type

wheels

URL to more information

Weight

read more