Posts with «pid» label

Start Your Semiconductor Fab with This DIY Tube Furnace

Most of us are content to get our semiconductors from the usual sources, happily abstracting away the complexity locked within those little epoxy blobs. But eventually, you might get the itch to roll your own semiconductors, in which case you’ll need to start gearing up. And one of the first tools you’ll need is likely to be something like this DIY tube furnace.

For the uninitiated, [ProjectsInFlight] helpfully explains in the video below just what a tube furnace is and why you’d need one to start working with semiconductors. Perhaps unsurprisingly, a tube furnace is just a tube that gets really, really hot — like 1,200° C. In addition to the extreme heat, commercial furnaces are often set up to seal off the ends of the tube to create specific conditions within, such as an inert gas atmosphere or even a vacuum. The combination of heat and atmospheric control allows the budding fabricator to transform silicon wafers using chemical and physical processes.

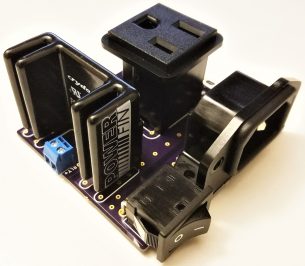
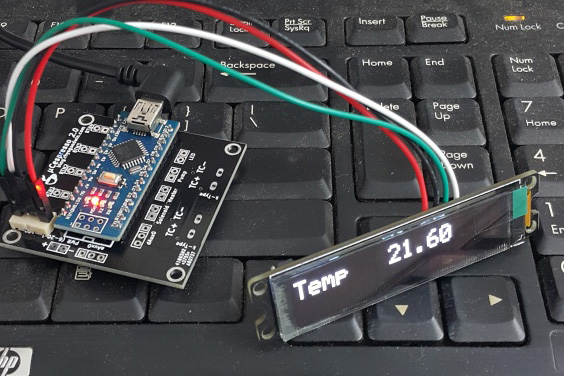
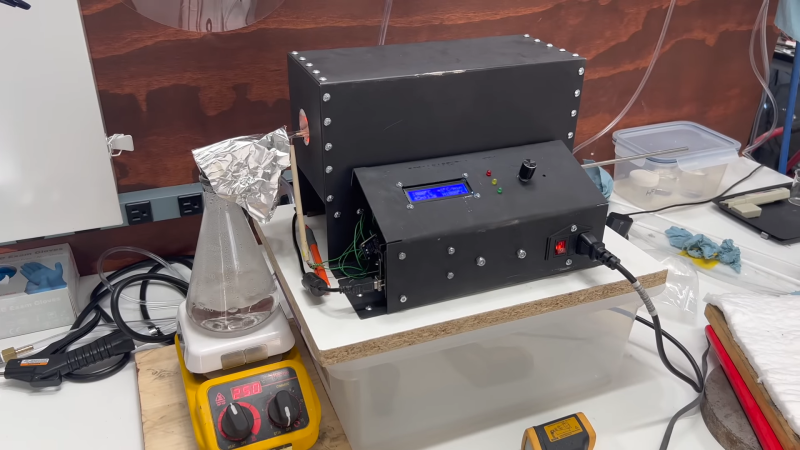
[ProjectsInFlight]’s tube furnace started with a length of heat-resistant quartz glass tubing and a small tub of sodium silicate refractory cement, from the plumbing section of any home store. The tube was given a thin coat of cement and dried in a low oven before wrapping it with nichrome wire. The wrapped tube got another, thicker layer of silicate cement and an insulating wrap of alumina ceramic wool before applying power to cure everything at 1,000° C. The cured tube then went into a custom-built sheet steel enclosure with plenty of extra insulation, along with an Arduino and a solid-state relay to control the furnace. The video below concludes with testing the furnace by growing a silicon dioxide coating on a scrap of silicon wafer. This was helped along by the injection of a few whisps of water vapor while ramping the furnace temperature up, and the results are easily visible.

[ProjectsInFlight] still needs to add seals to the tube to control the atmosphere in there, an upgrade we’ll be on the lookout for. It’s already a great start, although it might take a while to catch up to our friend [Sam Zeloof].

Measuring the Time is a Breeze With This Air Flow Clock

If you’ve ever had surgery, and you’re over a certain age, chances are good you’re familiar with the dreaded incentive spirometer. It’s a little plastic device with one or more columns, each of which has a plastic ball in it. The idea is to blow into the thing to float the balls, to endure that your lungs stay in good shape and reduce the chance of pneumonia. This unique air-powered clock reminds us a little of that device, without all the pain.

Like a spirometer, [Nir Tasher]’s clock has three calibrated tubes, each big enough to hold a foam ball loosely. At the bottom of each tube is a blower whose motor is under PWM control. A laser rangefinder sits below each ball and measures its height; the measurement is used by a PID loop to control the speed of each fan and thus the height of each ball. The video below shows that the balls are actually pretty steady, making the clock easy to read. It doesn’t, however, reveal what the clock sounds like; we’re going to go out on a limb here and guess that it’s pretty noisy. Still, we think it’s a fantastic way to keep time, and unique in the extreme.

[Nir]’s Air Flow clock is an early entry in the 2020 Hackaday Prize, the greatest hardware design contest on Earth. Everyone should enter something, or at least check out the cool things people are coming up with. It’s still early in the process, but there are so many neat projects already. What are you waiting for?

The HackadayPrize2020 is Sponsored by:

Supersize DIY R/C Servos From Windscreen Wipers

We’re all familiar with the experience of buying hobby servos. The market is awash with cheap clones which have inflated specs and poor performance. Even branded servos often fail to deliver, and sometimes you just can’t get the required torque or speed from the small form factor of the typical hobby servo.

Enter [James Bruton] and his DIY RC servo from a windscreen wiper motor. Windscreen wiper motors are cheap as chips, and a classic salvage. The motor shaft is connected to a potentiometer via a pulley and some string, providing the necessary closed-loop feedback. Instead of using the traditional analog circuitry found inside a servo, an Arduino provides the brains. This means PID control can be implemented on the ‘duino, and tuned to get the best response from different load characteristics. There’s also the choice of different interfacing options: though [James]’ Arduino code accepts PWM signals for a drop-in R/C servo replacement, the addition of a microcontroller means many other input signal types and protocols are available. In fact, we recently wrote about serial bus servos and their numerous advantages.

We particularly love this because of the price barrier of industrial servomotors; sure, this kind of solution doesn’t have the precision or torque that off-the-shelf products provide, but would be sufficient for many hacks. Incidentally, this is what inspired one of our favourite open source projects: ODrive, which focuses on harnessing the power of cheap brushless motors for industrial use.

Reflowduino: Put That Toaster Oven To Good Use

There are few scenes in life more moving than the moment the solder paste melts as the component slides smoothly into place. We’re willing to bet the only reason you don’t have a reflow oven is the cost. Why wouldn’t you want one? Fortunately, the vastly cheaper DIY route has become a whole lot easier since the birth of the Reflowduino – an open source controller for reflow ovens.

This Hackaday Prize entry by [Timothy Woo] provides a super quick way to create your own reflow setup, using any cheap means of heating you have lying around. [Tim] uses a toaster oven he paid $21 for, but anything with a suitable thermal mass will do. The hardware of the Reflowduino is all open source and has been very well documented – both on the main hackaday.io page and over on the project’s GitHub.

The board itself is built around the ATMega32u4 and sports an integrated MAX31855 thermocouple interface (for the all-important PID control), LiPo battery charging, a buzzer for alerting you when input is needed, and Bluetooth. Why Bluetooth? An Android app has been developed for easy control of the Reflowduino, and will even graph the temperature profile.

When it comes to controlling the toaster oven/miscellaneous heat source, a “sidekick” board is available, with a solid state relay hooked up to a mains plug. This makes it a breeze to setup any mains appliance for Arduino control.

We actually covered the Reflowduino last year, but since then [Tim] has also created the Reflowduino32 – a backpack for the DOIT ESP32 dev board. There’s also an Indiegogo campaign now, and some new software as well.

If a toaster oven still doesn’t feel hacky enough for you, we’ve got reflowing with hair straighteners, and even car headlights.

Reflow Rig Makes SMD Soldering a Wok in The Park

For a DIY reflow setup, most people seem to rely on the trusty thrift store toaster oven as a platform to hack. But there’s something to be said for heating the PCB directly rather than heating the surrounding air, and for that one can cruise the yard sales looking for a hot plate to convert. But an electric wok as a reflow hotplate? Sure, why not?

At the end of the day [ThomasVDD]’s reflow wok is the same as any other reflow build. It has a heat source that can be controlled easily, temperature sensors, and a microcontroller that can run the proportional-integral-derivative (PID) control algorithm needed for precise temperature control. That the heating element he used came from an electric wok was just a happy accident. A laser-cut MDF case complete with kerf-bent joints holds the heating element, the solid-state relay, and the Arduino Nano that runs the show. A MAX6675 thermocouple amp senses the temperature and allows the Nano to cycle the temperature through different profiles for different solders. It’s compact, simple, and [ThomasVDD] now has a spare wok to use on the stove top. What’s not to like?

Reflow doesn’t just mean oven or hotplate, of course. Why not give reflow headlights, a reflow blowtorch, or even a reflow work light a try?

PID Control with Arduino

Experience — or at least education — often makes a big difference to having a successful project. For example, if you didn’t think about it much, you might think it is simple to control the temperature of something that is heating. Just turn on the heater if it is cold and turn it off when you hit the right temperature, right? That is one approach — sometimes known as bang-bang — but you’ll find there a lot of issues with that approach. Best practice is to use a PID or Proportional/Integral/Derivative control. [Electronoob] has a good tutorial about how to pull this off with an Arduino. You can also see a video, below.

The demo uses a 3D printer hot end, a thermocouple, a MAX6675 that reads the thermocouple, and an Arduino. There’s also an LCD display and a FET to control the heater.

The idea behind a PID controller is that you measure the difference between the current temperature and the desired temperature known as the setpoint. The proportional gain tells you how much output occurs due to that difference. So if the setpoint is way off, the proportional term will generate a lot of output to the heater. If it is close, only a little bit of output will result. This helps prevent overshoot where the temperature goes too high and has to come back down.

The integral term adds a little bit to the output based on the cumulative error over time. The derivative term reacts to changes in the temperature difference. For example, if something external causes the temperature to drop suddenly, the derivative term can goose the output to compensate.

However, the operative word is “can.” Part of setting up a PID is finding the coefficients for each term which for some systems could be zero or even negative (indicating a reverse effect).  There are a lot of other subtleties, too, like what happens if the output stops affecting the temperature for a long period and the integral amount grows to unmanageable magnitude.

By the way, we’ve covered a PID library for Arduino before. While this post talks about temperature, PID control is used for everything from flight control to levitation.

Hack a Day 14 Apr 09:00

Hackaday Prize Entry: Reflowduino, the Open Source Reflow Oven Controller

Face it — you want a reflow oven. Even the steadiest hands and best eyes only yield “meh” results with a manual iron on SMD boards, and forget about being able to scale up to production. But what controller should you use when you build your oven, and what features should it support? Don’t worry — you can have all the features with this open source reflow oven controller.

Dubbed the Reflowduino for obvious reasons, [Timothy Woo]’s Hackaday Prize entry has everything you need in a reflow oven controller, and a few things you never knew you needed. Based on an ATMega32, the Reflowduino takes care of the usual tasks of a reflow controller, namely running the PID loop needed to accurately control the oven’s temperature and control the heating profile. We thought the inclusion of a Bluetooth module was a bit strange at first, but [Timothy] explains that it’s a whole lot easier to implement the controller’s UI in software than in hardware, and it saves a bunch of IO on the microcontroller. The support for a LiPo battery is somewhat baffling, as the cases where this would be useful seem limited since the toaster oven or hot plate would still need a mains supply. But the sounder that plays Star Wars tunes when a cycle is over? That’s just for fun.

Hats off to [Timothy] for a first-rate build and excellent documentation, which delves into PID theory as well as giving detailed instructions for every step of the build. Want to try lower-end reflow? Pull out a halogen work light, or perhaps fire up that propane torch.


Filed under: The Hackaday Prize, tool hacks

PID Controlled Charcoal BBQ – Put an Arduino on it!

At Maker Faire Milwaukee this past weekend, [basement tech]  was showing off his latest build, a PID controlled charcoal grill. While it hasn’t QUITE been tested yet with real food, it does work in theory.

PID (a feedback loop with some fancy math used to adjust the input to get a consistent output) controlled cooking is commonly used for sous vide, where one heats up a water bath to a controlled temperature to cook food in plastic bags. Maintaining water temperature is fairly easy. Controlling a charcoal barbecue is much more difficult. [basement tech] accomplishes this with controlled venting and fans. With the charcoal hot and the lid on, there are two ways to control temperature; venting to let hot air out, and blowing air on the coals to make them hotter. A thermocouple sensor stuck through the grill gives the reading of the air inside, and an Arduino nearby reads that and adjusts the vents and fans accordingly.

The video goes into extensive detail on the project, and describes some of the challenges he had along the way, such as preventing the electronics and servos from melting.

There’s not a lot of time left in the grilling season, so we hope [basement tech] gets an opportunity to enjoy the meats of his labor. Maybe he can trade food with [Jason] and his PID controlled meat smoker.


Filed under: cooking hacks

See a Cheap Smoker get an Automation Power Up

[Jason] learned a lot by successfully automating this meat smoker. This is just the first step in [Jason’s] smoker project. He decided to begin by hacking a cheaper charcoal-fed unit first, before setting his sights on building his own automatic pellet-fed smoker. With a charcoal smoker it’s all about managing the airflow to that hot bed of coals.

Custom mount for servo was actually one of the more challenging things to get just right.

[Jason] started by making sure the bottom was sealed off from stray airflow, then he cut a hole into the charcoal pan and attached a length of steel pipe. The opposite end of the pipe has a fan. Inside the pipe there is a baffle separating the fan from the charcoal pan. The servo motor shown here controls that valve.

The pipe is how air is introduced into the smoker, with the fan and valve to control the flow rate. The more air, the higher the temperature. The hunk of pipe was left uncut and works fine but is much longer than needed; [Jason says] the pipe is perfectly cool to the touch only a foot and a half away from the smoker.

With the actuators in place he needed a feedback loop. A thermocouple installed into the lid of the smoker is monitored by an Arduino running a PID control loop. This predicts the temperature change and adjusts the baffle and fan to avoid overshooting the target temp. The last piece of hardware is a temperature probe inside the meat itself. With the regulation of the smoker’s temperature taken care of and the meat’s internal temperature being monitored, the learning (and cooking) process is well underway.

There are many, many smoker automation projects out there. Some smokers are home-made electric ones using flower pots, and some focus more on modifying off the shelf units. In a way, every PID controlled smoker is the same, yet they end up with different problems to solve during their creation. There is no better way to learn PID than putting it into practice, and this way to you get a tasty treat for your efforts.


Filed under: cooking hacks

Brasilia Espresso Machine PID Upgrade Brews Prefect Cup of Energy

Coffee, making and hacking addictions are just bound to get out of control. So did [Rhys Goodwin’s] coffee maker hack. What started as a little restoration project of a second-hand coffee machine resulted in a complete upgrade to state of the art coffee brewing technology.

The Brasilia Lady comes with a 300 ml brass boiler, a pump and four buttons for power, coffee, hot water and steam. A 3-way AC solenoid valve, wired directly to the buttons, selects one of the three functions, while a temperamental bimetal switch keeps the boiler roughly between almost there and way too hot.

To reduce the temperature swing, [Rhys] decided to add a PID control loop, and on the way, an OLED display, too. He designed a little shield for the Arduino Nano, that interfaces with the present hardware through solid state relays. Two thermocouples measure the temperature of the boiler and group head while a thermal cut-off fuse protects the machine from overheating in case of a malfunction.

Also, the Lady’s makeup received a complete overhaul, starting with a fresh powder coating. A sealed enclosure along with a polished top panel for the OLED display were machined from aluminum. [Rhys] also added an external water tank that is connected to the machine through shiny, custom lathed tube fittings. Before the water enters the boiler, it passes through a custom preheater, to avoid cold water from entering the boiler directly. Not only does the result look fantastic, it also offers a lot more control over the temperature and the amount of water extracted, resulting in a perfect brew every time. Enjoy [Rhys’s] video where he explains his build:

Thanks to [Pirate14] for the tip!


Filed under: cooking hacks, home hacks