Posts with «silicon» label

Start Your Semiconductor Fab with This DIY Tube Furnace

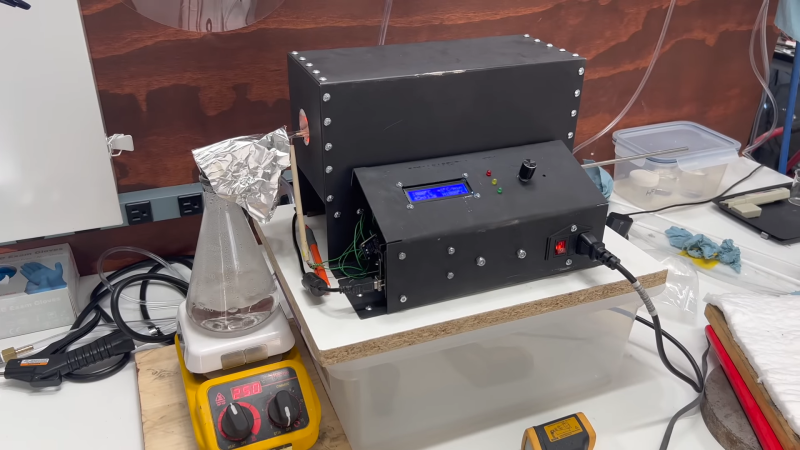
Most of us are content to get our semiconductors from the usual sources, happily abstracting away the complexity locked within those little epoxy blobs. But eventually, you might get the itch to roll your own semiconductors, in which case you’ll need to start gearing up. And one of the first tools you’ll need is likely to be something like this DIY tube furnace.

For the uninitiated, [ProjectsInFlight] helpfully explains in the video below just what a tube furnace is and why you’d need one to start working with semiconductors. Perhaps unsurprisingly, a tube furnace is just a tube that gets really, really hot — like 1,200° C. In addition to the extreme heat, commercial furnaces are often set up to seal off the ends of the tube to create specific conditions within, such as an inert gas atmosphere or even a vacuum. The combination of heat and atmospheric control allows the budding fabricator to transform silicon wafers using chemical and physical processes.

[ProjectsInFlight]’s tube furnace started with a length of heat-resistant quartz glass tubing and a small tub of sodium silicate refractory cement, from the plumbing section of any home store. The tube was given a thin coat of cement and dried in a low oven before wrapping it with nichrome wire. The wrapped tube got another, thicker layer of silicate cement and an insulating wrap of alumina ceramic wool before applying power to cure everything at 1,000° C. The cured tube then went into a custom-built sheet steel enclosure with plenty of extra insulation, along with an Arduino and a solid-state relay to control the furnace. The video below concludes with testing the furnace by growing a silicon dioxide coating on a scrap of silicon wafer. This was helped along by the injection of a few whisps of water vapor while ramping the furnace temperature up, and the results are easily visible.

[ProjectsInFlight] still needs to add seals to the tube to control the atmosphere in there, an upgrade we’ll be on the lookout for. It’s already a great start, although it might take a while to catch up to our friend [Sam Zeloof].

Project Review – Silicon Chip Capacitance Substitution Box

Introduction

Every month Australian electronics magazine Silicon Chip publishes a variety of projects, and in some cases various (well … one of two) electronics retailers will pick up the project and offer it as a kit. However for an increasing number of new projects they don’t, which leaves the interested reader with one option – build the entire project from scratch.

But thankfully this is no longer the case – as the team from Silicon Chip now offer a range of project PCBs and matching front panels for sale directly from their website. Although buying these parts is not the cheapest option, it gives the busy person who likes making things a quick start – or the inexperienced more opportunities to complete a successful project.

So as a test of this new service, I bought the PCB and front panel for the Capacitance Substitution Box project described by Nicholas Vinen in the Juily 2012 issue of SC:

This is something I’ve meant to make for a while – but didn’t really have the inclination to make one from scratch, so it was neat to see a version published in the magazine. I believe the subjects in the magazine article are oftern prototypes, which explains the difference in colour for the front panel.

The parts arrived in a week after placing the order, and are of a high quality:

When complete, the capacitance substitution box PCB and panel will fit nicely into an Altronics H0151 enclosure, so you don’t need to do any drilling or filing. The next task was to organise the required parts. The rotary switches, terminal posts and the usual odds and ends can be found at Altronics, Jaycar or other suppliers. However the main components – the capacitors – offered two options.

The first option is to simply use capacitors from personal stock or the stores. However the tolerance of these parts can vary wildly, with up to twenty percent either way. This is ok for simple uses, however when values are combined – the tolerance of larger values can negate the lower values completely. So instead I’ve chosen the second option – which involves using brand-name low-tolerance capacitors.

Thus I turned to element14 who stock not only a huge range of not only regular but also the low-tolerance capacitors, and can also have them on my desk usually by the next working day. Finally, it’s nice to have all the parts arrive in little bags… neatly organised ready to go:

It’s easy to search for low-tolerance parts with element14, as the automatic filtering has tolerance as a parameter:

Furthermore you can also ensure you have the voltage rating of at least 50V DC as well. So after half an hour the capacitor order was completed and arrived when expected – using parts from Panasonic, Vishay, and Wima. The tolerances of our capacitors used varied between one and ten percent, which will help improve the accuracy of the substitution box.

Assembly

The PCB has the capacitor values labelled neatly on the silk-screen, so soldering in all the capacitors was a relatively simple but long operation. Having them arrive in separate packets made life a lot easier. During the soldering process it’s a good idea to have a  break or two, which helps you avoid fatigue and making any mistakes.

There may be a few capacitors that are a little too wide to fit with the others, so they can be mounted on the other side of the PCB:

However they all end up fitting well:

The next step was to configure the first rotary switch for six position use, then cut the plastic stopped from the side of each rotary switch. In the following image you have a before and after example:

Now the rotary switches can have their shafts trimmed and then be soldered onto the PCB:

However ensure you have the first rotary switch in the right way – that is the selections are selected across the top half, not the bottom. Remove the nuts from the rotary switches, and double-check all the capacitors are fitted, as once the next step is completed … going back will be difficult to say the least.

At this point the banana sockets can be fitted to the panel, and then soldered into place, and then you’re finished. Just place the panel/PCB combination inside the box and screw it down:

Using the Capacitance Substitution Box

Does it work? Yes – however you don’t get exact values, there will always be a tolerance due to the original tolerance of the capacitors used and the stray capacitance of the wires between the box and the circuit (or capacitance meter). Nevertheless our example was quite successful. You can see the box in action with our Altronics LC meter kit in this video.

Again, using the best tolerance capacitors you can afford will increase the accuracy of this project.

Conclusion

Over time this would be a useful piece of equipment to have – so if your experiments or projects require varying capacitor value, this project will serve the purpose nicely. Plus it helps with mental arithmetic and measures of capacitance! Please do not ask me for copies of the entire Silicon Chip article, refusal may offend. Instead – visit their website for a reprint or digital access.

And if you enjoyed this article, or want to introduce someone else to the interesting world of Arduino – check out my book (now in a third printing!) “Arduino Workshop”.

Have fun and keep checking into tronixstuff.com. Why not follow things on twitterGoogle+, subscribe  for email updates or RSS using the links on the right-hand column, or join our forum – dedicated to the projects and related items on this website. Sign up – it’s free, helpful to each other –  and we can all learn something.

The post Project Review – Silicon Chip Capacitance Substitution Box appeared first on tronixstuff.
Kit Review – Altronics/Silicon Chip ISD2590 Digital Message Recorder

Introduction

Every month Australian electronics magazine Silicon Chip publishes a variety of projects, and in February 1994 they published the “90 Second Digital Message Recorder” project. That was a long time ago, however you can still find the kit today at Altronics (and at the time of writing, on sale for AU$26), and thus the subject of our review.

The kit offers a simple method of recording and playing back 90 seconds of audio, captured with an electret microphone. When mounted in a suitable enclosure it will make a neat way of leaving messages or instructions for others at home.

Assembly

The kit arrives in typical Altronics fashion:

… and includes everything required including IC sockets for the ISD2590 and the audio amplifier:

The PCB missed out on silk-screening – which is a pity:

however it is from an original design from twenty years ago. The solder mask is neat and helps prevent against lazy soldering mistakes:

Finally the detailed instructions including component layout and the handy Altronics reference guide are also included. After checking and ordering the resistors, they were installed first along with the links:

 If you have your own kit, there is a small error in the instructions. The resistor between the 2k2 and the 10uF electrolytic at the top of the board is 10k0 not 2k2. Moving on, these followed by the capacitors and other low-profile components:

The rest of the components went in without any fuss, and frankly it’s a very easy kit to assemble:

 The required power supply is 6V, and a power switch and 4 x AA cell holder is included however were omitted for the review.

How it works

Instead of some fancy microcontrollers, the kit uses an ISD2590P single chip voice recording and playback IC:

It’s a neat part that takes care of most of the required functions including microphone preamp, automatic gain control, and an EEPROM to store the analogue voltage levels that make up the voice sample. The ISD2590 samples audio at 5.3 kHz which isn’t CD quality, but enough for its intended purpose.

Apart from some passive components for power filtering, controls and a speaker amplifier there isn’t much else to say. Download the ISD2590 data sheet (pdf), which is incredibly detailed including some example circuits.

Operation

Once you apply power it’s a simple matter of setting the toggle switch on the PCB down for record, or up for playback. You can record in more than one session, and each session is recorded in order until the memory is full. Then the sounds can be played back without any fuss.

The kit is supplied with the generic 0.25W speaker which is perhaps a little weak for the amplifier circuit in the kit, however by turning down the volume a little the sound is adequate. In this video you can see (and hear) a quick recording and playback session.

Conclusion

This kit could be the base for convenient message system – and much more interesting than just scribbling notes for each other. Or you could built it into a toy and have it play various tunes or speech to amuse children. And for the price it’s great value to experiment with an ISD2590 – just use an IC socket. Or just have some fun  – we did.  Full-sized images are available on flickr

And if you enjoyed this article, or want to introduce someone else to the interesting world of Arduino – check out my book (now in a third printing!) “Arduino Workshop”.

Have fun and keep checking into tronixstuff.com. Why not follow things on twitterGoogle+, subscribe  for email updates or RSS using the links on the right-hand column, or join our forum – dedicated to the projects and related items on this website. Sign up – it’s free, helpful to each other –  and we can all learn something.
Tronixstuff 23 Jan 03:34

Kit Review – Altronics/Silicon Chip ISD2590 Digital Message Recorder

Introduction

Every month Australian electronics magazine Silicon Chip publishes a variety of projects, and in February 1994 they published the “90 Second Digital Message Recorder” project. That was a long time ago, however you can still find the kit today at Altronics (and at the time of writing, on sale for AU$26), and thus the subject of our review.

The kit offers a simple method of recording and playing back 90 seconds of audio, captured with an electret microphone. When mounted in a suitable enclosure it will make a neat way of leaving messages or instructions for others at home.

Assembly

The kit arrives in typical Altronics fashion:

… and includes everything required including IC sockets for the ISD2590 and the audio amplifier:

The PCB missed out on silk-screening – which is a pity:

however it is from an original design from twenty years ago. The solder mask is neat and helps prevent against lazy soldering mistakes:

Finally the detailed instructions including component layout and the handy Altronics reference guide are also included. After checking and ordering the resistors, they were installed first along with the links:

 If you have your own kit, there is a small error in the instructions. The resistor between the 2k2 and the 10uF electrolytic at the top of the board is 10k0 not 2k2. Moving on, these followed by the capacitors and other low-profile components:

The rest of the components went in without any fuss, and frankly it’s a very easy kit to assemble:

 The required power supply is 6V, and a power switch and 4 x AA cell holder is included however were omitted for the review.

How it works

Instead of some fancy microcontrollers, the kit uses an ISD2590P single chip voice recording and playback IC:

It’s a neat part that takes care of most of the required functions including microphone preamp, automatic gain control, and an EEPROM to store the analogue voltage levels that make up the voice sample. The ISD2590 samples audio at 5.3 kHz which isn’t CD quality, but enough for its intended purpose.

Apart from some passive components for power filtering, controls and a speaker amplifier there isn’t much else to say. Download the ISD2590 data sheet (pdf), which is incredibly detailed including some example circuits.

Operation

Once you apply power it’s a simple matter of setting the toggle switch on the PCB down for record, or up for playback. You can record in more than one session, and each session is recorded in order until the memory is full. Then the sounds can be played back without any fuss.

The kit is supplied with the generic 0.25W speaker which is perhaps a little weak for the amplifier circuit in the kit, however by turning down the volume a little the sound is adequate. In this video you can see (and hear) a quick recording and playback session.

Conclusion

This kit could be the base for convenient message system – and much more interesting than just scribbling notes for each other. Or you could built it into a toy and have it play various tunes or speech to amuse children. And for the price it’s great value to experiment with an ISD2590 – just use an IC socket. Or just have some fun  – we did.  Full-sized images are available on flickr

And if you enjoyed this article, or want to introduce someone else to the interesting world of Arduino – check out my book (now in a third printing!) “Arduino Workshop”.

Have fun and keep checking into tronixstuff.com. Why not follow things on twitterGoogle+, subscribe  for email updates or RSS using the links on the right-hand column, or join our forum – dedicated to the projects and related items on this website. Sign up – it’s free, helpful to each other –  and we can all learn something.

The post Kit Review – Altronics/Silicon Chip ISD2590 Digital Message Recorder appeared first on tronixstuff.

Tronixstuff 23 Jan 03:34

Old Kit Review – Silicon Chip Transistor Beta Tester

Introduction

After exploring a quiet , dusty electronics store in the depths of suburbia the other week, I came across this kit from Altronics (K2534) which is the subject of this review. The Transistor Beta tester is the second revision of a tester designed by John Clarke for the March 1991 issue of Silicon Chip magazine, and promises to offer a simple way of measuring the gain of almost any NPN or PNP bipolar transistor. But first some public answers to recent feedback…

John – Why do you publish these “Old Kit Reviews”?

They’re more of  a selfish article, like many electronics enthusiasts I’ve enjoyed kits for decades – and finding kits from days gone by is a treat. From various feedback some of you are enjoying them, so I’ll continue with them for fun and some nostalgia. If you’re not interested, just ignore the posts starting with “Old”!

Where’s the schematic?

After publishing a few kit reviews, people have been asking me for the schematics. For kits that are based on magazine articles from Silicon Chip and the like, the details are Copyright and I can’t legitimately give you a copy. You need to contact the magazine or kit supplier. The surviving electronics magazines often run “on the smell of an oily rag” so in order to support them I promote the idea of paying for copies which are obtainable from the magazine. Plus Australia is a small country, where people in this industry know each other through first or second connections – so I don’t want to annoy the wrong people. However Google is an awesome tool,  and if you want to make your own beta tester there are many example circuits to be found – so have fun.

Back to the review – what is “beta”?

Apart from a letter of the Greek alphabet and a totally-underrated form of VCR format, beta is a term used to define the amount of gain of a transistor. From the guide:

Assembly

Here’s our kit from 1991, rescued from the darkness of the store:

Which contained the nice box, plus all the required components except for an IC socket, and a few screws and mounting nuts that should have been included. The instructions looked to be a photocopy of a photocopy, harking back to the 1980s…

Looks like an off-brand 555 has been used (or substituted), however a bit of research indicated that it is most likely from LG Semiconductor:

The PCB was made to the usual standard at the time, just drilled:

The front panel was well done, and kindly pre-drilled by a previous customer. The kit came with a 3mm LED however this mystery person had drilled the hole out for a 5mm:

… but hadn’t cut the oblong for the slide switch wide enough. But the biggest problem was that the PCB was just a smidge too wide for the included enclosure:

Nevertheless it was time to get started, and the resistors were measured, lined up and fitted:

Then the rest of the components fitted as normal, however they need to stay below the horizontal level of the slide switch bezel:

… which was somewhat successful. Then to fit the potentiometer, battery snap …

and the test leads:

 And we’re finished:

How it works

Operation is quite simple, just wire up the test leads to the transistor’s base, collector and emitter – set the PNP/NPN switch and press test. Then you turn the knob until the LED just turns on – at which point the scale indicates the gain.

“Modern-day” replacements

Digital technology has taken over with this regard, and a device such as the one below can not only give the gain, but also the component details, identify legs, and much more:

I’ll be sticking with this one for the time being. Jaycar have discontinued the analyser shown above, but Altronics have the “Peak” unit which looks even more useful.

Conclusion

Well… that was fun. A lot of promise, however with a few details not taken care of the kit was just a bit off. Considering this was around twenty years old and possibly shop-soiled I can’t complain. For the record the good people at Altronics have a great line of kits. Full-sized images and a lot more information about the kit are available on flickr.

And while you’re here – are you interested in Arduino? Check out my new book “Arduino Workshop” from No Starch Press.

In the meanwhile have fun and keep checking into tronixstuff.com. Why not follow things on twitterGoogle+, subscribe  for email updates or RSS using the links on the right-hand column? And join our friendly Google Group – dedicated to the projects and related items on this website. Sign up – it’s free, helpful to each other –  and we can all learn something.

The post Old Kit Review – Silicon Chip Transistor Beta Tester appeared first on tronixstuff.

Tronixstuff 15 Dec 04:15

Old Kit Review – Diesel Sound Simulator for Model Railroads

Introduction

In this review of an older kit (circa 1993~1997) we examine the Diesel Sound Simulator for Model Railroads kit from (the now defunct) Dick Smith Electronics, based on the article published in the December 1992 issue of Silicon Chip magazine.

The purpose of this kit is to give you a small circuit which can fit in a HO scale (or larger) locomotive, or hidden underneath the layout – that can emulate the rumbling of a diesel-electric locomotive to increase the realism of a train. However the kit is designed for use with a PWM train controller (also devised by Silicon Chip!) so not for the simple direct-DC drive layouts.

Assembly

The diesel sound kit was from the time when DSE still cared about kits, so you received the sixteen page “Guide to Kit Construction” plus the kit instructions, nasty red disclaimer sheet, feedback card, plus all the required components and the obligatory coil of solder that was usually rubbish:

Everything required to get going is included, except IC sockets. My theory is it’s cheaper to use your own sockets than source older CMOS/TTL later on if you want to reuse the ICs, so sockets are now mandatory here:

The PCB is from the old school of “figure-it-out-yourself”, no fancy silk-screening here:

Notice the five horizontal pads between the two ICs – these were for wire bridges in case you needed to break the PCB in two to fit inside your locomotive.

Actual assembly was straight-forward, all the components went in without any issues. Having two links under IC2 was a little annoying, however a short while later the PCB was finished and the speaker attached:

How it works

As mentioned earlier this diesel sound kit was designed for use with the Silicon Chip train PWM controller, so the design is a little different than expected. It can handle a voltage of around 20 V, and the sound is determined by the speed of the locomotive.

The speed is determined by the back EMF measured from the motor – and (from the manual) this is the voltage produced by the motor which opposes the current flow through it and this voltage is directly proportional to speed.

Not having a 20V DC PWM supply laying about I knocked up an Arduino to PWM a 20V DC supply via an N-MOSFET module and experimented with the duty cycle to see what sort of noises could be possible. The output was affected somewhat by the supply voltage, however seemed a little higher in pitch than expected.

You can listen to the results in the following video:

I reckon the sound from around the twenty second mark isn’t a bad idle noise, however in general not that great. The results will ultimately be a function of a lower duty-cycle than I could create at the time and the values of R1 and R2 used in the kit.

 Conclusion

Another kit review over. With some time spent experimenting you could generate the required diesel sounds, a Paxman-Valenta it isn’t… but it was a fun kit and I’m sure it was well-received at the time. To those who have been asking me privately, no I don’t have a secret line to some underground warehouse of old kits – just keep an eye out on ebay and they pop up now and again. Full-sized images and much more information about the kit are available on flickr.

And while you’re here – are you interested in Arduino? Check out my new book “Arduino Workshop” from No Starch Press.

In the meanwhile have fun and keep checking into tronixstuff.com. Why not follow things on twitterGoogle+, subscribe  for email updates or RSS using the links on the right-hand column? And join our friendly Google Group – dedicated to the projects and related items on this website. Sign up – it’s free, helpful to each other –  and we can all learn something.

The post Old Kit Review – Diesel Sound Simulator for Model Railroads appeared first on tronixstuff.

Tronixstuff 10 Nov 08:12