Posts with «battery» label

Bringing Modern Technology to a Sled

Street sledding, a popular pastime in Norway, is an activity that is slowly dwindling in popularity, at least as far as [Justin] aka [Garage Avenger] has noticed. It used to be a fun way of getting around frozen lakes and roads during winter, and while some still have their sleds [Justin] wanted to see if there was a way to revitalize one of these sleds for the modern era. He’s equipped this one with powerful electric turbines than can quickly push the sled and a few passengers around the ice.

Since this particular sled is sized for child-sized passengers, fuel-burning jet engines have been omitted and replaced with electric motors that can spin their turbine blades at an impressive 80,000 rpm. The antique sled first needed to be refurbished, including removing the rust from the runners and reconditioning the wood. With a sturdy base ready to go, the sled gets a set of 3D printed cowlings for the turbines, a thumb throttle on the upgraded handlebars, and a big battery with an Arduino to bring it all together.

With everything assembled and a sheet of ice to try it out on, the powerful sled easily gets its passengers up to the 20-30 kph range depending on passenger weight and size. There’s a brake built on an old ice skate for emergency stops, and the sled was a huge hit for everyone at the skating pond. There are plenty of other ways to spruce up old sleds, too, like this one which adds a suspension for rocketing down unplowed roads.

Arduino Measures Remaining Battery Power With Zero Components, No I/O Pin

[Trent M. Wyatt]’s CPUVolt library provides a fast way to measure voltage using no external components, and no I/O pin. It only applies to certain microcontrollers, but he provides example Arduino code showing how handy this can be for battery-powered projects.

The usual way to measure VCC is simple, but has shortcomings.

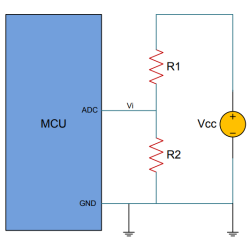
The classical way to measure a system’s voltage is to connect one of your MCU’s ADC pins to a voltage divider made from a couple resistors. A simple calculation yields a reading of the system’s voltage, but this approach has two disadvantages: one is that it constantly consumes power, and the other is that it ties up a pin that you might want to use for something else.

There are ways to mitigate these issues, but it would be best to avoid them entirely. Microchip application note 2447 describes a method of doing exactly that, and that’s precisely what [Trent]’s Arduino library implements.

What happens in this method is one selects Vbg (a fixed internal voltage reference that is temperature-independent) as Vin, and selects Vcc as the ADC’s voltage reference. This is essentially backwards from how the ADC is normally used, but it requires no external hookup and is only a bit of calculation away from determining Vcc in millivolts. There is some non-linearity in the results, but for the purposes of measuring battery power in a system or deciding when to send a “low battery” signal, it’s an attractive solution.

Being an Arduino library, CPUVolt makes this idea very easy to use, but the concept and method is actually something we have seen before. If you’re interested in the low-level details, then check out our earlier coverage which goes into some detail on exactly what is going on, using an ATtiny84.

Battery Bot Makes Sure Cordless Tool Packs Are Always Topped Up

There was a time not that long ago when every tool was cordless. But now, cordless power tools have proliferated to the point where the mere thought of using a plain old wrist-twisting screwdriver is enough to trigger a bout of sympathetic repetitive injury. And the only thing worse than that is to discover that the batteries for your tools are all dead.

As [Lance] from the “Sparks and Code” channel freely admits, the fact that his impressive collection of batteries is always dead is entirely his fault, and that’s what inspired his automatic battery charging robot. The design is pretty clever; depleted batteries go into a hopper, under which is a 3D-printed sled. Batteries drop down into the sled, which runs the battery out from under the hopper to the charging station, which is just the guts of an old manual charger attached to a lead screw to adjust the height of the charging terminals for different size batteries. When the battery is charged, the sled pushes it a little further into an outfeed hopper before going back to get another battery from the infeed side.

Of course, that all vastly understates the amount of work [Lance] had to put into this. He suffered through a lot of “integration hell” problems, like getting the charger properly connected to the Arduino running the automation. But with a lot of tweaking, he can now just dump in a bunch of depleted packs and let the battery bot handle everything. The video after the break shows all the gory details.

Of course, there’s another completely different and much simpler solution to the dead battery problem.

Send Old-Fashioned Pager Messages with New-Fashioned Hardware

In a world of always-connected devices and 24/7 access to email and various social media and messaging platforms, it’s sometimes a good idea to take a step away from the hustle and bustle for peace of mind. But not too big of a step. After all, we sometimes need some limited contact with other humans, so that’s what [EverestX] set out to do with his modern, pocket-sized communication device based on pager technology from days of yore.

The device uses the POCSAG communications protocol, a current standard for pager communications that allows for an SMS-like experience for those still who still need (or want) to use pagers. [EverestX] was able to adapt some preexisting code and port it to an Atmel 32u4 microcontroller. With a custom PCB, small battery, an antenna, and some incredibly refined soldering skills, he was able to put together this build with an incredibly small footprint, slightly larger than a bottle cap.

Once added to a custom case, [EverestX] has an excellent platform for sending pager messages to all of his friends and can avoid any dreaded voice conversations. Pager hacks have been a favorite around these parts for years, and are still a viable option for modern communications needs despite also being a nostalgic relic of decades past. As an added bonus, the 32u4 microcontroller has some interesting non-pager features that you might want to check out as well.

Thanks to [ch0l0man] for the tip!

Hack a Day 18 May 21:00

Weather Station Is A Tutorial in Low Power Design

Building your own weather station is a fun project in itself, but building it to be self-sufficient and off-grid adds another set of challenges to the mix. You’ll need a battery and a solar panel to power the station, which means adding at least a regulator and charge controller to your build. If the panel and battery are small, you’ll also need to make some power-saving tweaks to the code as well. (Google Translate from Italian) The tricks that [Danilo Larizza] uses in his build are useful for more than just weather stations though, they’ll be perfect for anyone trying to optimize their off-grid projects for battery and solar panel size.

When it comes to power conservation, the low-hanging fruit is plucked first. [Danilo] set the measurement intervals to as long as possible and put the microcontroller (a NodeMCU) to sleep in between. Removing the power from the sensors when the microcontroller was asleep was another easy step, but the device was still crashing overnight. Then he turned to a hardware solution and added a more efficient battery charger to the setup, which saved even more power. This is all the more impressive because the station communicates via WiFi which is notoriously difficult to run in low-power applications.

Besides the low power optimizations, the weather station itself is interesting for its relative simplicity. It could be built with things most of us have knocking around. Best of all, [Danilo] published the source code on his site, so most of the hard work has been done already. If you’re thinking he seems a little familiar, it’s because we’ve featured some of his projects before, like his cheap WiFi extender antenna and his homemade hybrid tube amplifier.

Quadrupede bluetooth Spider


After printing pieces to Prusa I3 is the new 4-legged spider with bluetooth comm :)


read more

Let's Make Robots 07 Jun 20:27
32 servo controler  6v  arduino  balance  battery  biped  bluetooth  fast  greek  grrobot  hands  head  hexapod  humanoid  led  legs  mg995  mini servo  move  one leg  program  relay  robot  robotics  servos  slow  ssc32  step  vb.net  walk  warior  

Powering SG90 servos with lipo and BEC

Hi there,

I'm building a robot with 15+ SG90 micro servo's.

To power it, I've bought a 2C lipo battery, and a 5/6 volt BEC.

I've hooked up the BEC's 5v (red) to all the servo's red, and the BEC's ground to the servo's ground, as well as some arduino grounds (that control the servo).

The BEC has an on/off switch.  When the BEC is switched to off, and I plug the battery into the BEC, a surge of current flows through to the motors.  They all "twitch" very rapidly, and I've had some wires melt/smoke.

My questions are:

read more

What is the Matrix…Clock?

We’re surprised we haven’t seen this kind of clock before, or maybe we have, but forgot about it in the dark filing cabinets of our minds. The above picture of [danjhamer’s] Matrix Clock doesn’t quite do it justice, because this is a clock that doesn’t just tick away and idly update the minutes/hours.

Instead, a familiar Matrix-esque rain animation swoops in from above, exchanging old numbers for new. For the most part, the build is what you would expect: a 16×8 LED Matrix display driven by a TLC5920 LED driver, with an Arduino that uses a DS1307 RTC (real-time clock) with a coin cell battery to keep track of time when not powered through USB. [danjhamer] has also created a 3D-printed enclosure as well as added a piezo speaker to allow the clock to chime off customizable musical alarms.

You can find schematics and other details on his Hackaday.io project page, but first, swing down below the jump to see more of the clock’s simple but awesome animations.


Filed under: Arduino Hacks, clock hacks

Programmable Lithium Charger Shield for Arduino

Surely you need yet another way to charge your lithium batteries—perhaps you can sate your desperation with this programmable multi (or single) cell lithium charger shield for the Arduino<! Okay, so you’re not><em>hurting</em> for another method of juicing up your batteries. If you’re a regular around these parts of the interwebs, you’ll recall the <a href="http://hackaday.com/2014/09/21/a-li-ion-battery-charging-guide/">lithium charging guide</a> and that <a href="http://hackaday.com/2014/09/05/an-obsessively-thorough-battery-and-more-showdown/">rather incredible, near-encyclopedic rundown of both batteries and chargers</a>, which likely kept your charging needs under control.</p> <p>That said, this shield by Electro-Labs might be the perfect transition for the die-hard-’duino fanatic looking to migrate to tougher projects. The build features an LCD and four-button interface to fiddle with settings, and is based around an LT1510 constant current/constant voltage charger IC. You can find the schematic, bill of materials, code, and PCB design on the Electro-Labs webpage, as well as a brief rundown explaining how the circuit works. Still want to add on the design? Throw in <a href="http://hackaday.com/2014/07/16/finally-an-easy-to-make-holder-for-lithium-ion-batteries/">one of these Li-ion holders</a> for quick battery swapping action.</p> <p>[via <a href="http://embedded-lab.com/blog/?p=9644">Embedded Lab</a>]</p><br />Filed under: <a href="http://hackaday.com/category/arduino-hacks/">Arduino Hacks</a>, <a href="http://hackaday.com/category/microcontrollers/">Microcontrollers</a> <a><img src="http://feeds.wordpress.com/1.0/comments/hackadaycom.wordpress.com/138748/" /></a> <img src="http://pixel.wp.com/b.gif?host=hackaday.com&blog=4779443&post=138748&subd=hackadaycom&ref=&feed=1" />

Battery Shield Mounts Underneath The Arduino

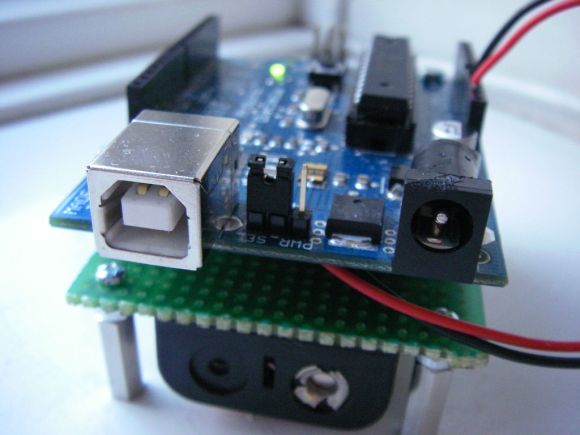
So, what do you do when your Arduino project needs to operate in a remote area or as a portable device? There are LiPo battery shields available, and although they may work well, recharging requires access to a USB port. You can also go the 9v battery route plugged into the on-board regulator of the Arduino but the low mAh rating of a 9v won’t allow your project to stay running for very long. [AI] needed a quick-change battery option for his Arduino project and came up with what he is calling the AA Undershield.

As the name implies, AA sized batteries are used in the project, two of them actually. Yes, two AA batteries at 1.5v each would equal only 3 volts when connected in series. The Arduino needs 5v so [AI] decided to use a MAX756 DC-to-DC step-up regulator to maintain a steady stream of 5v. This article has some nice graphs showing the difference in performance between a 9v battery being stepped down to 5v verses two AA’s being bumped up to 5v.

The ‘under’ in Undershield comes from this shield being mounted underneath the Arduino, unlike every other shield on the planet. Doing so allows use of a standard 0.100″-spaced prototype PCB and is an easy DIY solution to that odd-sized space between the Arduino’s Digital 7 and 8 pins. The Arduino mounts to the Undershield via its normal mounting holes with the help of some aluminum stand offs.

[AI] did a great job documenting his build with schematics and lots of photos so that anyone that is interested in making one for themselves can do so with extreme ease.


Filed under: Arduino Hacks