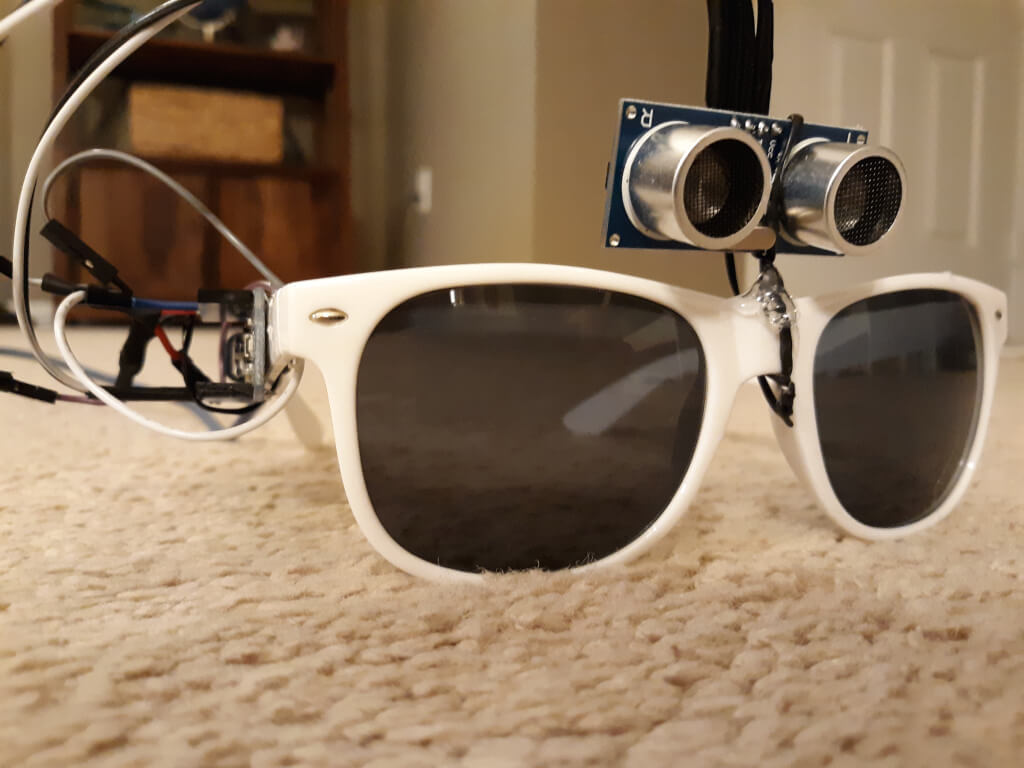
Touching your face is a subconscious behavior that we all do, and it is also an easy way to pick up illnesses like the coronavirus and flu. However, like many infectious diseases, proper hygiene can help reduce your risk. With this in mind, Nick Bild designed a simple solution in the form of a modified pair of glasses to provide a subtle reminder not to go near your eyes, mouth, and nose.
The project, which Bild calls Sentinel, consists of an ultrasonic sensor mounted on top of the bridge and an Arduino Nano along the temple. Whenever a hand (or object) is detected in close proximity to the face, a red warning LED lights up in the wearer’s peripheral vision.
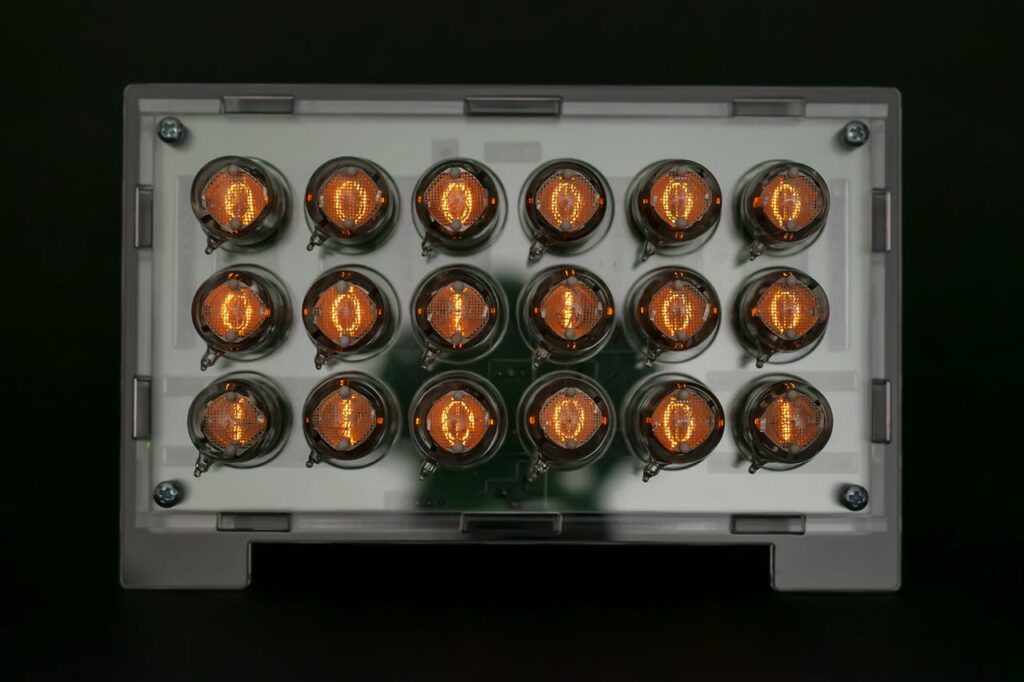
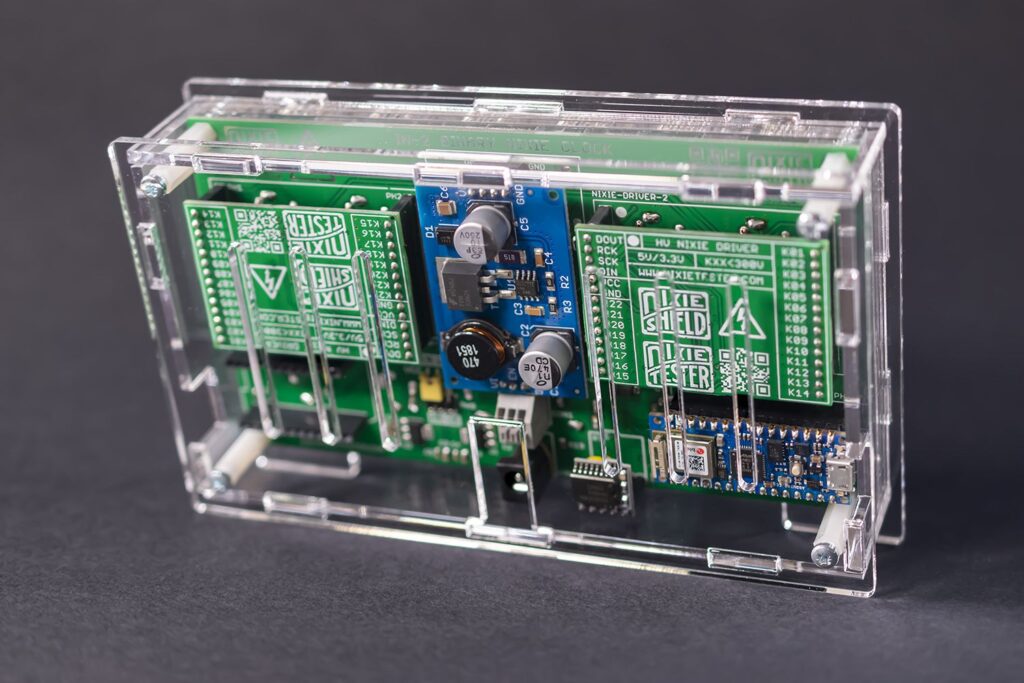
Nixie tubes are, of course, an elegant display method from a more civilized age, but actually powering and controlling them can be a challenge. This can mean a great project and learning opportunity, but if you’d rather just skip ahead to programming these amazing lights, then Marcin Saj’s IN-2 binary Nixie clock is definitely worth a look.
This retro-style unit features a 6 x 3 array of small IN-2 tubes, which are turned to “1” or “0” depending on the time. Reading the results takes a bit of binary math, but it would be good practice for those that would like to improve their skills.
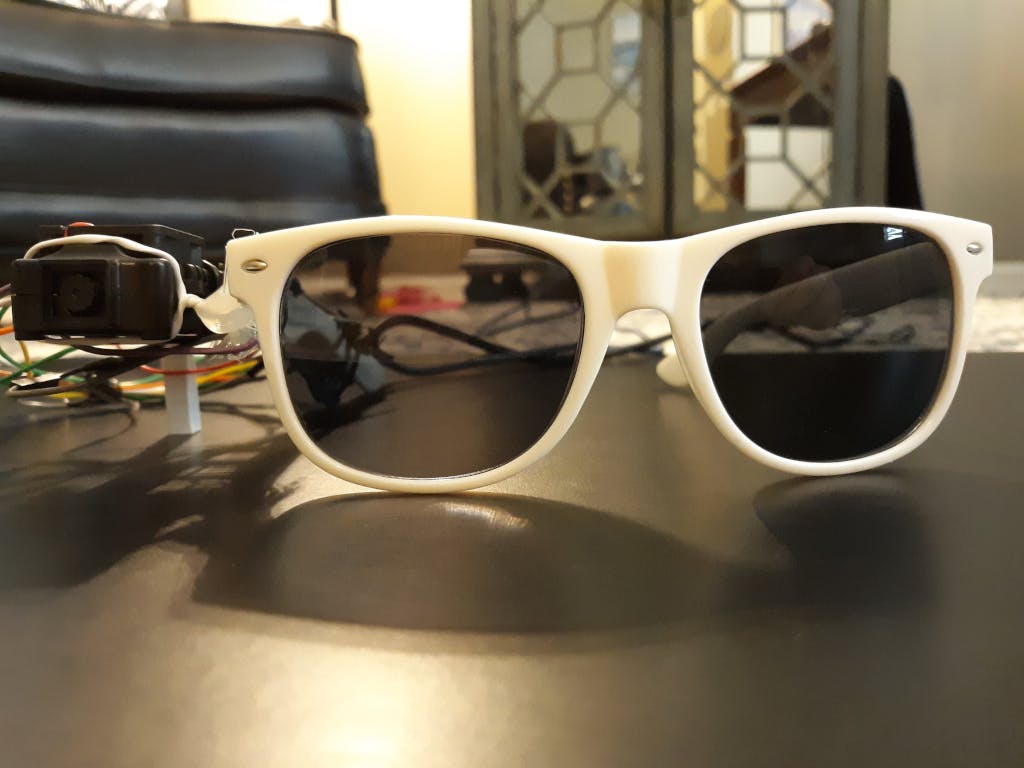
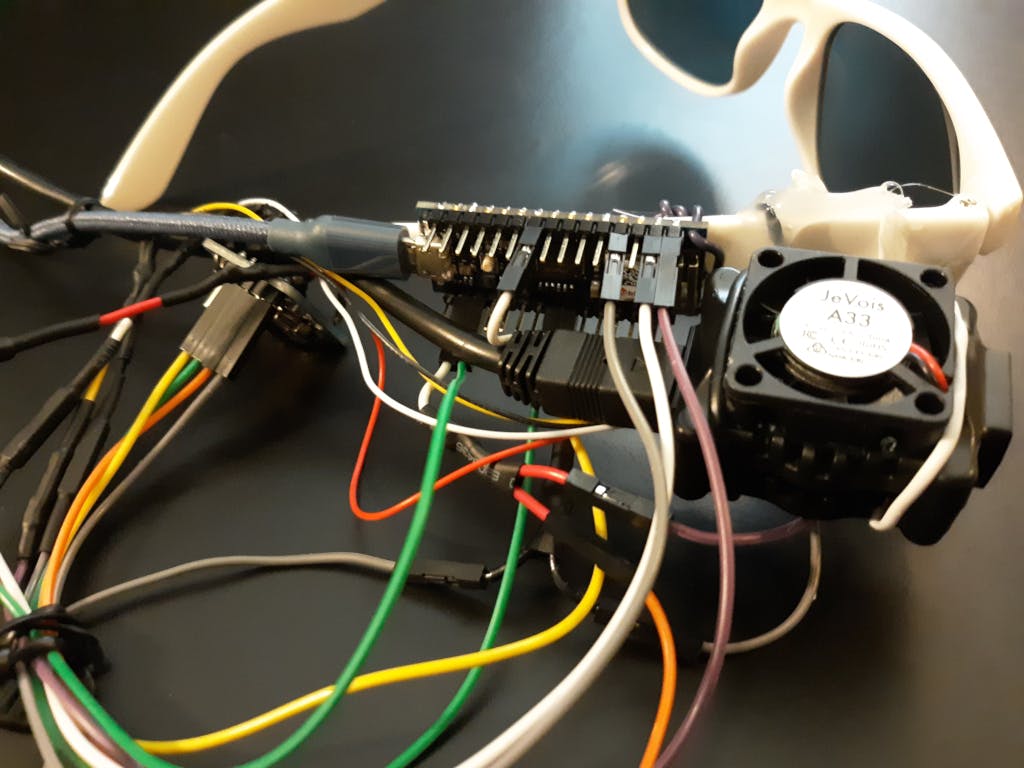
When you get a notification on your smartphone, more often than not, you’re doing something more pressing. You then silence the alarm, and perhaps forget about it. Nick Bild, however, has created a pair of smart glasses that take a new “look” at things by instead giving you a notification when you’re staring at an appropriate item.
For instance, as demonstrated in the demo below, if your calendar says to “Go for a walk,” the Newrons would light up when you’re glancing at a pair of sneakers.
The prototype is controlled by an Arduino Nano 33 IoT, which connects to the Google Calendar API over WiFi to view your schedule. Object recognition is taken care of with a JeVois A33 machine vision camera and notifications are shown on an LED.
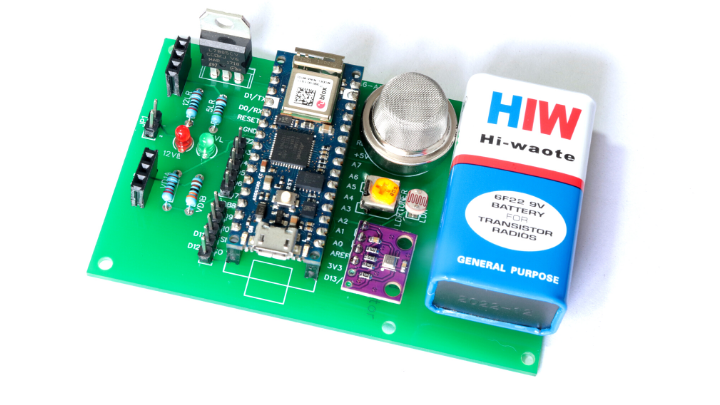
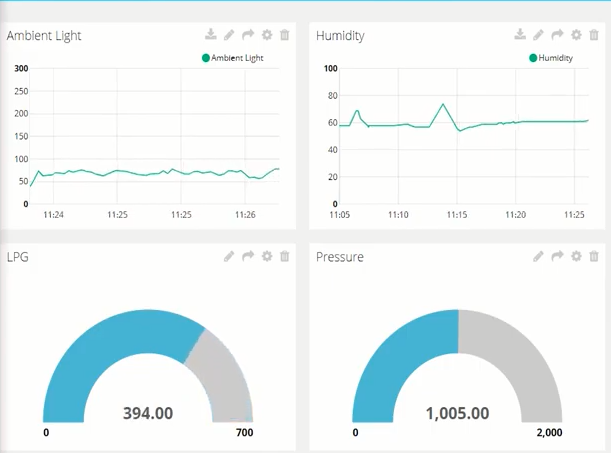
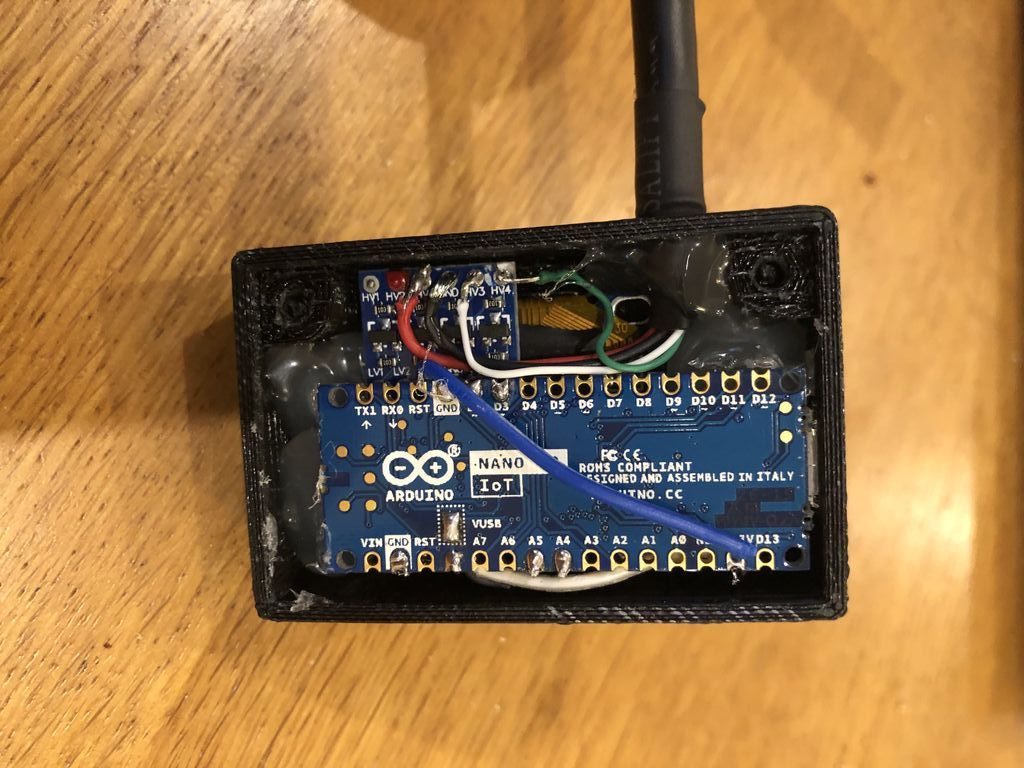
Using an Arduino Nano 33 IoT, Jithin Sanal designed a home monitoring system capable of detecting noxious gases with an MQ2 sensor as well as sensing temperature, pressure, humidity, and ambient light via a BME280 sensor and an LDR. All of this is mounted onto a custom PCB that’s powered by a 9V battery, or one could also use a 9-12V adapter if more convenient.
Data is passed on to Ubidots over WiFi, which provides a configurable dashboard for viewing the readings anywhere in the world. The system can also send notifications via SMS, email, or Telegram to let you know if anything is awry.
You can now securely connect your TV set to Alexa using Arduino IoT Cloud and a few lines of code.
Here are some of the features which will be available to you:
Power on/off
Switch channel
Volume up/down/mute
Switch input sources
The easiest way to operate any kind of television is to act as if we were its very own clicker. In order to do so, we’ll show you how to capture the commands from the remote and play them back via Arduino (the TV will never know what hit it).
We’ll then create an Arduino IoT Cloud Thing with a TV property, and adapt the generated code to our needs. Finally, we’ll configure Alexa to access and control our TV.
Share your creativity with us! Our community means a lot to us, so we would love to see what you create. Make sure you document and post your amazing projects on the Arduino Project Hub and use the #ArduinoAlexa hashtag to make it discoverable by everyone!
Have fun playing with Alexa and IoT Cloud. If you have questions and/or build this project, let us know in the comments below.
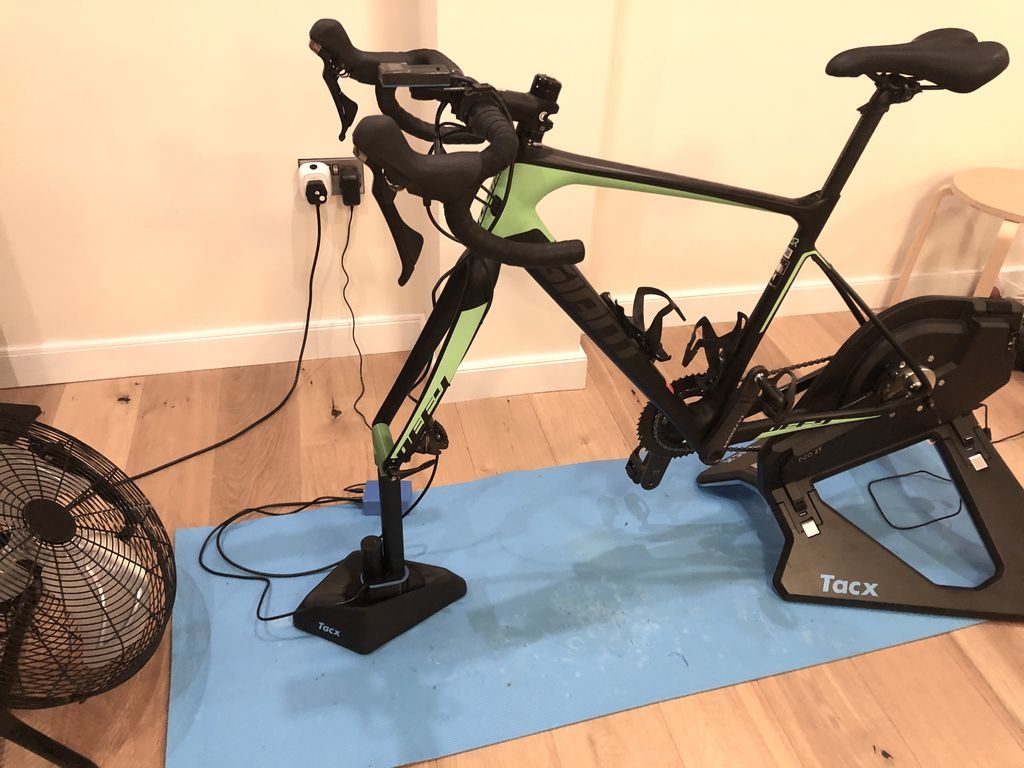
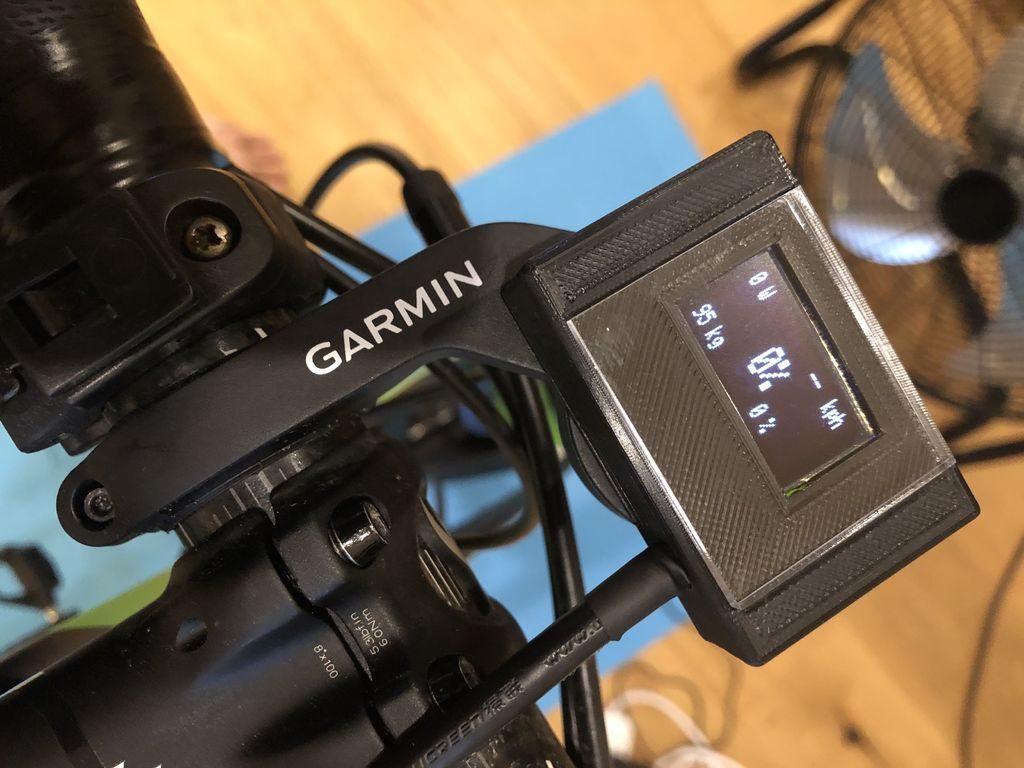
Although he would probably rather be outdoors, after an injury Matt Ockendon had a lot more time to ride his Tacx Neo indoor trainer and tinker. He decided he wanted his rig to be able to simulate the grade of hills, but as commercially available units with this capability are quite expensive, he instead devised his own solution dubbed “OpenGradeSIM.”
Ockendon’s OpenGradeSIM utilizes a Nano 33 IoT to gather power and speed data from his trainer over BLE, then calculates the grade that would be needed to produce such results.
With this data in hand, the Nano controls a linear actuator using an L298N-based driver board to raise or lower the bike’s front end. The derived bike angle is sensed via the Nano’s built-in IMU, providing an elegant closed-loop system. Additionally, the incline is shown on a 1.3″ I2C OLED display that serves as a mini dashboard while Ockendon cycles.
This post is from Sandeep Mistry, Senior Software Engineer at Arduino.
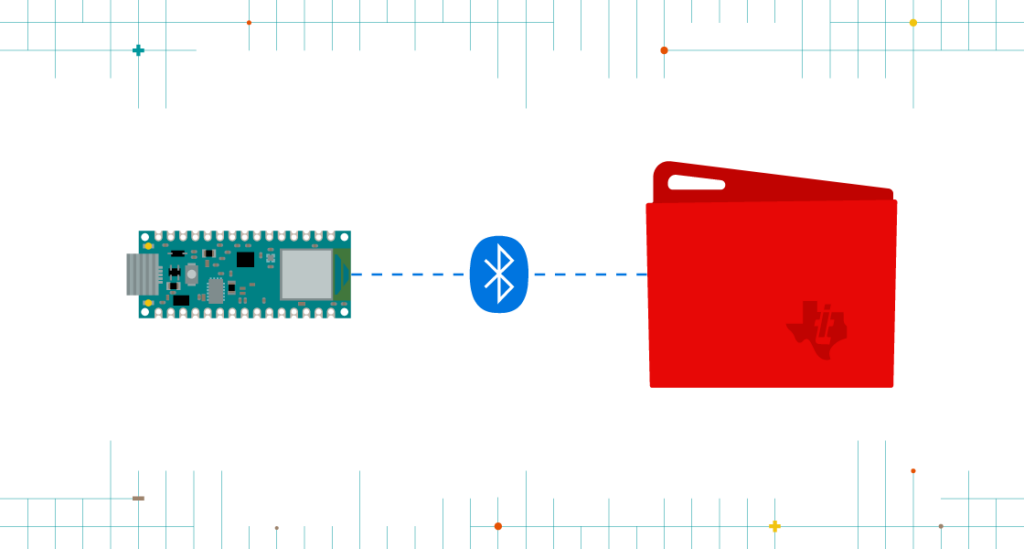
Today, we are pleased to announce BLE (Bluetooth Low Energy) central support in v1.1.0 of the ArduinoBLE library. This major feature addition allows your Arduino board to scan for and connect to BLE peripheral devices. With one simple library, you can now use BLE to directly connect your Arduino board to:
A smartphone, tablet, laptop or PC
BLE peripherals (e.g. TI SensorTag) – NEW!
Another Arduino board – NEW!
The ArduinoBLE library and new BLE central feature are supported on the following Arduino boards:
Prior to this release, Arduino only officially supported BLE peripheral functionality on these boards. A BLE peripheral is typically used to expose some sensor data or actuators to another device BLE central capable device such as a smartphone or PC. With the new BLE central functionality, you’ll be able to wirelessly connect two boards together for communication or connect to a third party BLE peripheral, such as a TI SensorTag.
We think that the ArduinoBLE library is much easier to use than anything else out there and are excited to see what you build with this new capability!
The development journey
Back in 2015, the Arduino 101 was released, based on the Curie module developed by Intel. It was the first official Arduino board with on-board BLE support. The CurieBLE library initially only supported BLE peripheral mode.
After launch, the Arduino and Intel teams worked together to design an Arduino friendly BLE API that supported both BLE Peripheral and Central functionality. This was released later in 2016 in the v2.0 of the Arduino core for Arduino 101.
The BLE features of the 101 were also incorporated into the CTC 101 kit in many classrooms around the world. Students used smartphones or tablets for exercises in the kit to interact with project based lessons running on the board. Unfortunately, Intel decided to stop producing the Curie module in 2017, bringing the Arduino 101 board to end of life.
Last year, at Maker Faire Bay Area 2018, Arduino launched two new boards: the MKR WiFi 1010 and Uno WiFi Rev.2. Both boards use the u-blox NINA-W102 as a 2.4 GHz wireless module. Initially both boards only supported WiFi using the WiFiNINA library. However, the ESP32 chip inside the u-blox NINA-W102 supports Bluetooth classic and BLE as well.
Later in 2018, the Arduino core team was tasked with adding BLE support to the MKR WiFi 1010 board so that it could be used with the upcoming Arduino Science Kit Physics Lab product. The Science Kit Physics Lab product is another educational kit, targeted for students in the classroom. We had several choices to move forward, including:
Bridging the ESP-IDF’s BLE API’s via RPC to the main MCU that sketches run on
Basing things on the industry standard Bluetooth HCI protocol and investing in a Bluetooth HCI host stack as an Arduino library
The first option above was expected to take an equal amount of time to the second, but also would make the BLE library exposed to users highly dependent on the underlying firmware running on the ESP32. It was also not as portable to other chip sets in the future. Thus, ArduinoBLE was created. The NINA firmware only needed small change to bridge its virtual Bluetooth HCI controller to the UART pins of the module.
Earlier this year, we released the Arduino Nano 33 IoT and Arduino Nano 33 BLE boards. Since the Arduino Nano 33 IoT uses the same chipset as the MKR WiFi 1010, things worked out of the box. For the Nano 33 BLE, which is based on the Nordic nRF52840 chip, a new Arduino core was developed for this board based on mbed OS (see this blog post for more info). mbed OS includes a radio stack called Cordio, which provides both a Bluetooth HCI link controller and HCI host. Creating a single C++ class that interfaced with Cordio’s Bluetooth HCI link layer allowed us to re-use 95%+ of ArduinoBLE on this board.
After the Nano 33 BLE started shipping, there was even more demand for BLE central support. So, development for feature was scheduled and is now available. It combines the API designed for the Arduino 101 in CurieBLE ported on top of ArduinoBLE’s Bluetooth HCI host stack.
Many thanks to Tom Igoe, one of the co-founders of Arduino, for providing feedback on the official Arduino BLE libraries throughout the years.
A few weeks ago, we announced that Arduino now works with TinyGo, the popular compiler that brings the Go programming language to microcontrollers. We had the opportunity to sit down with Ron Evans, Technologist for Hire, and learn more about the Arduino and TinyGo integration.
Some of our audience knows about Go (we ourselves use it to develop many of our tools). In a few words: what is TinyGo and how does it stand compared to Go itself?
TinyGo is a Go compiler for small places like microcontrollers. TinyGo is written in Go like the standard Go compiler, but TinyGo then uses the LLVM toolchain to compile Go programs to a fraction of their normal size. TinyGo also employs a different runtime implementation in order to target constrained environments.
Why choosing TinyGo over other languages?
If software is eating the world, then Go is eating the world of software. The popularity of Go is still rapidly expanding, and TinyGo helps bring the new “enterprise standard” language down to the smallest of processors. Also as a compiled language, TinyGo can offer substantially better performance and size efficiency than that of interpreted languages like JavaScript and Python.
How does TinyGo compare to embedded python and JavaScript implementations?
One good reason to use Go is the clear and maintainable code that Go insists that you create. Generally speaking, the normal Go tooling that is included with the language itself is what you use when writing TinyGo code. For example, the standard built-in code formatting. TinyGo includes implementations of the Go “net” package targeting the Arduino Nano33 IoT, so you can more easily reuse existing Go code for TCP/UDP or higher level protocols such as MQTT. This really makes it a lot easier to build commercial or industrial IoT solutions.
Another reason to use TinyGo is the ability to utilize Go’s concurrency. TinyGo implements “goroutines” which can greatly simplify your code to take the greatest performance advantage offered by modern 32-bit microcontrollers.
With security in IoT being one of today’s hottest topics, which tools does TinyGo offer that enable the development of secure projects?
There are a number of things that can make development, deployment, and operations using TinyGo good for edge computing applications that require greater security. Since the code is compiled to binary, it is possible to use code signing and other well known approaches for secure computing.
Another is that any device data must be encrypted while in transit from from the device to any cloud storage or analytics. TinyGo on the Arduino Nano33 IoT can use standard APIs for SSL communication to cloud services, such as using the Eclipse Foundation’s Paho MQTT client for Go. This makes it a lot easier for developers to do the right thing the first time when creating applications.
How can TinyGo improve the Arduino ecosystem? How will our existing audience benefit from using it? Will they be able to use the Arduino libraries already existing?
There is a very active community in the Arduino world, with lots of existing useful libraries. We are planning much deeper integration for TinyGo powered by Arduino, more on this in the near future…
Many people love TinyGo because it’s simple yet powerful. Do you see any similarity with the Arduino mission of ‘making technology simple for everybody?'”
Arduino has really pioneered the open hardware movement, and defining clear APIs to devices has been a huge contribution. TinyGo very much tries to embody this same spirit, while at the same time provide an idiomatic Go language programming experience. Combine the sensibilities that have made TinyGo so popular and that are fueling our continuing growth, alongside the amazing capabilities powered by Arduino, and there are no limits to what we can do!
We are excited to announce a new partnership with Chirp, a London-based company on a mission to simplify connectivity using sound. Chirp’s machine-to-machine communications software enables any device with a loudspeaker or microphone to exchange data via inaudible sound waves.
Starting today, our Chirp integration will allow Arduino-powered projects to send and receive data wirelessly over sound waves, using just microphones and loudspeakers. Thanks to some compatible libraries included in the official Arduino Library Manager and in the Arduino Create — as well as further comprehensive documentation, tutorials and technical support — it will be easy for anyone to add data-over-sound capabilities to their Arduino projects.
Creative applications of Arduino and Chirp include, but certainly are not limited to:
Triggering events from YouTube audio
Securely unlocking a smart lock with sound
Sending Wi-Fi credentials to bring offline devices onto a Wi-Fi network
Having a remote control that only interacts with the gadgets in the same room as you
“Connectivity is a fundamental asset for our users, as the demands of IoT uptake require devices to communicate information seamlessly and with minimal impact for the end user. Chirp’s data-over-sound solution equips our boards with robust data transmission, helping us to deliver enhanced user experiences whilst increasing the capabilities of our hardware at scale,” said Massimo Banzi, Arduino co-founder.
“Sound is prevailing as a highly effective and versatile means of seamless data transmission, presenting developers with a simple to use, software-defined solution which can connect devices. Working with Arduino to extend the integration of data-over-sound across its impressive range of boards will not only increase the reach of Chirp’s technology, but provide many more developers with an accessible and easily integrated connectivity solution to help them drive their projects forward in all purposes and environments. We can’t wait to see what the Arduino community builds,” commented James Nesfield, Chirp CEO.
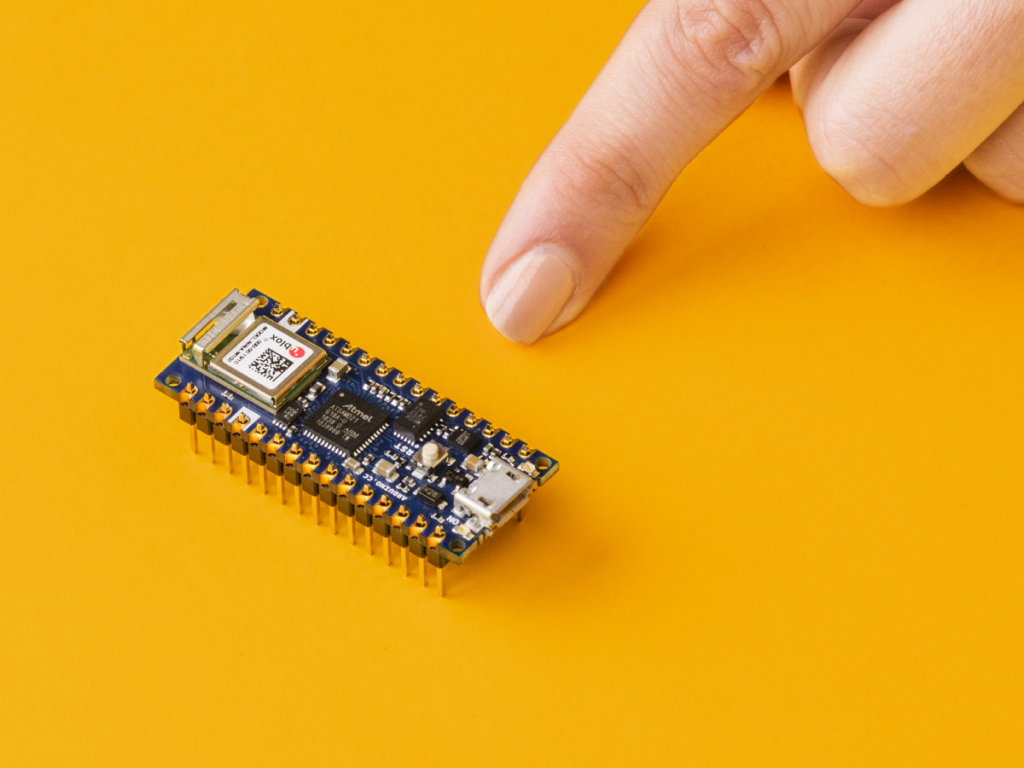
To learn how to send data with sound with an Arduino Nano 33 BLE Sense and Chirp, check out this tutorial and visit Chirp website here.
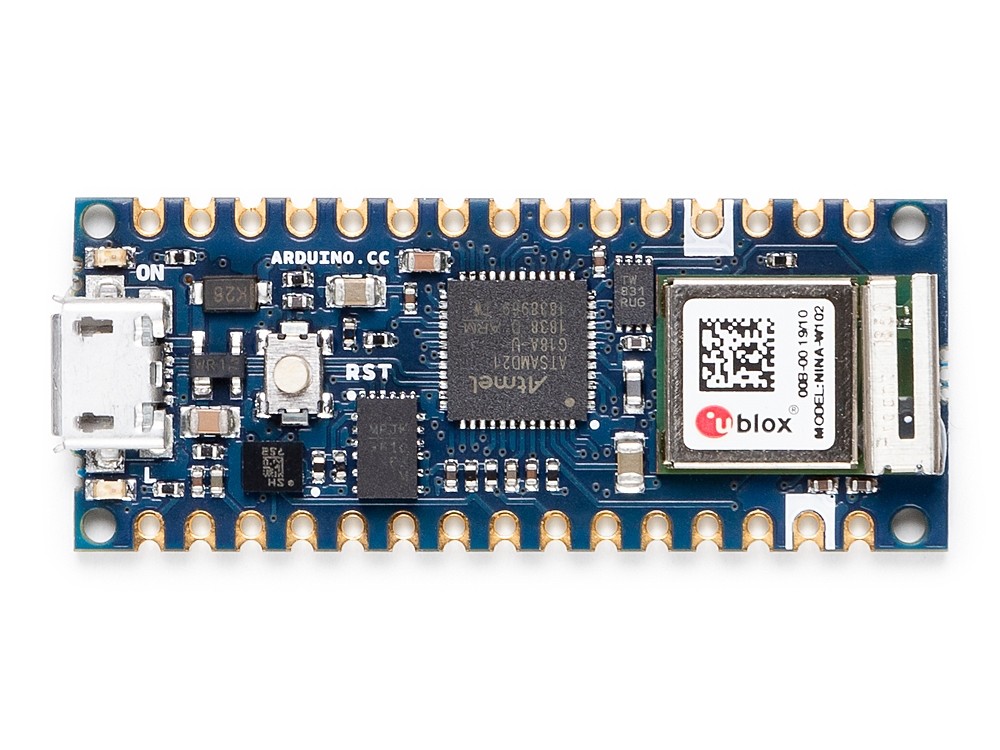
The Nano form factor has been a crowd-pleaser amongst makers for years due to its small footprint and ease of integration into any project. As announced at Maker Faire Bay Area, the Nano 33 IoT is part of the new 3.3V variant of the family, adding a pre-certified ESP32-based WiFi and Bluetooth module that brings sophisticated connectivity to its tiny package. The inclusion of an ECC608A crypto chip provides the security that Arduino users are now used to as opposed to other competing solutions that lack a secure key storage.
Today, we sat down with Dario Pennisi, Arduino hardware and firmware development manager, to learn more about the Nano IoT 33.
What are three key features of this board? How will they impact the experience of our users?
1. Secure WiFi and Bluetooth connectivity with a 6-axis IMU.
2. Pre-certified module with external processor ensures maintaining RF compliance when writing application code versus ESP32 modules where modifying code impacts certification.
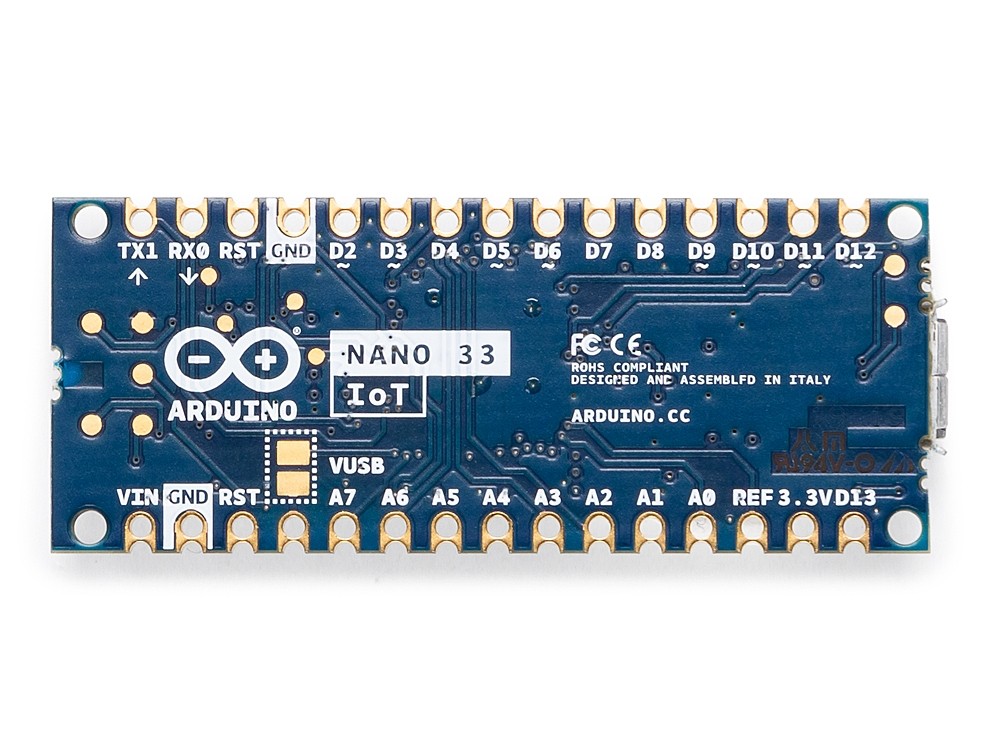
3. On-board DC-DC power supply enables the board to be powered up to 21V maintaining high efficiency and offering a lot of current to external devices without overheating. This is a big improvement over other products on the market that have LDO and heat up quite a bit when powered at high voltages.
What are a few applications and why is this board a great option for them?
1. Add WiFi and Bluetooth connectivity with strong security to all the existing Arduino Nano applications.
2. On-board IMU can be used to wirelessly monitor vibration, orientation, and rotational speed of small objects thanks to its lightweight and compact form factor.
3. Run directly from high voltages from lead or multi-cell Lithium-ion batteries providing 3.3V power supply to peripherals at significant output current.
Which Arduino board is the most similar to the Nano 33?
The Nano 33 IoT is essentially a MKR WiFi 1010, but sacrifices a battery charger and shield compatibility in favor of a miniaturized footprint and lower cost. The Nano 33 IoT is built around the ESP32, which is primarily aimed at WiFi but supports Bluetooth as well, although with higher power consumption than the Nano 33 BLE.