Posts with «iot cloud» label

How to deal with API clients, the lazy way — from code generation to release management

This post is from Massimiliano Pippi, Senior Software Engineer at Arduino.

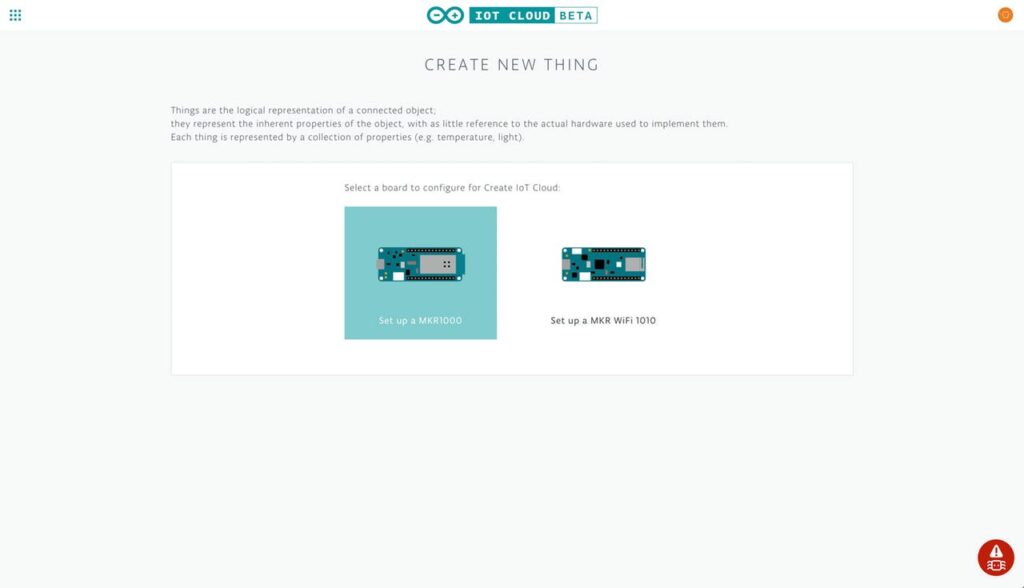
The Arduino IoT Cloud platform aims to make it very simple for anyone to develop and manage IoT applications and its REST API plays a key role in this search for simplicity. The IoT Cloud API at its core consists of a set of endpoints exposed by a backend service, but this alone is not enough to provide a full-fledge product to your users. What you need on top of your API service are:

  • Good documentation explaining how to use the service.
  • A number of plug-and-play API clients that can be used to abstract the API from different programming languages.

Both those features are difficult to maintain because they get outdated pretty easily as your API evolves but clients are particularly challenging: they’re written in different programming languages and for each of those you should provide idiomatic code that works and is distributed according to best practices defined by each language’s ecosystem.

Depending on how many languages you want to support, your engineering team might not have the resources needed to cover them all, and borrowing engineers from other teams just to release a specific client doesn’t scale much. 

Being in this exact situation, the IoT Cloud team at Arduino had no other choice than streamlining the entire process and automate as much as we could. This article describes how we provide documentation and clients for the IoT Cloud API.

Clients generation workflow

When the API changes, a number of steps must be taken in order to ship an updated version of the clients, as it’s summarized in the following drawing. 

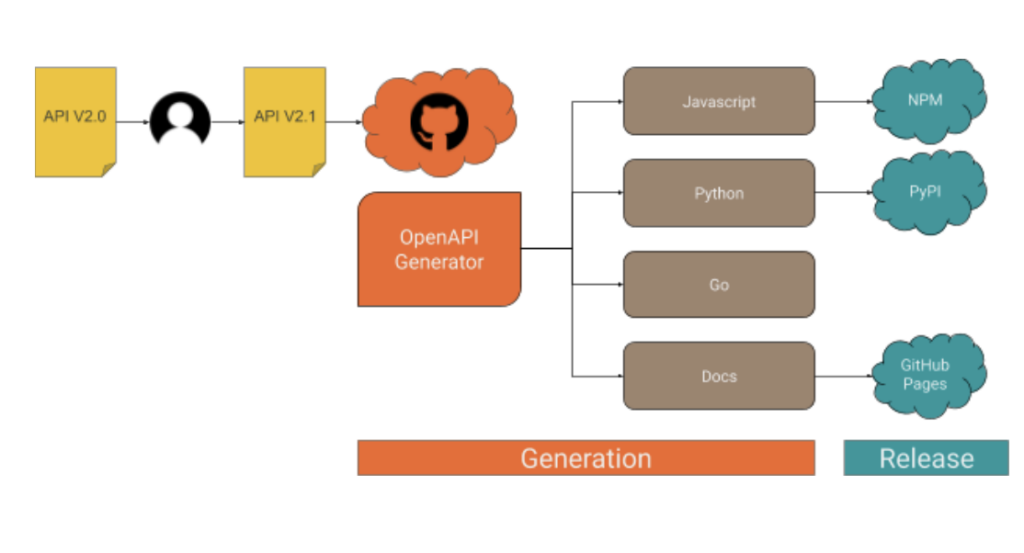
As you can see, what happens after an engineer releases an updated version of the API essentially boils down to the following macro steps:

1. Fresh code is generated for each supported client.
2. A new version of the client is released to the public.

The generation process

Part 1: API definition

Every endpoint provided by the IoT Cloud API is listed within a Yaml file in OpenAPI v3 format, something like this (the full API spec is here):

/v2/things/{id}/sketch:
    delete:
      operationId: things_v2#deleteSketch
      parameters:
      - description: The id of the thing
        in: path
        name: id
        required: true
        schema:
          type: string
      responses:
        "200":
          content:
            application/json:
              schema:
                $ref: '#/components/schemas/ArduinoThing'
          description: OK
        "401":
          description: Unauthorized
        "404":
          description: Not Found

The format is designed to be human-readable, which is great because we start from a version automatically generated by our backend software that we manually fine-tune to get better results from the generation process. At this stage, you might need some help from the language experts in your team in order to perform some trial and error and determine how good the generated code is. Once you’ve found a configuration that works, operating the generator doesn’t require any specific skill, the reason why we were able to automate it.

Part 2: Code generation

To generate the API clients in different programming languages we support, along with API documentation we use a CLI tool called openapi-generator. The generator parses the OpenAPI definition file and produces a number of source code modules in a folder on the filesystem of your choice. If you have more than one client to generate, you will notice very soon how cumbersome the process can get: you might need to invoke openapi-generator multiple times, with different parameters, targeting different places in the filesystem, maybe different git repositories; when the generation step is done, you have to go through all the generated code, add it to version control, maybe tag, push to a remote… You get the gist. 

To streamline the process described above we use another CLI tool, called Apigentools, which wraps the execution of openapi-generator according to a configuration you can keep under version control. Once Apigentools is configured, it takes zero knowledge of the toolchain to generate the clients – literally anybody can do it, including an automated pipeline on a CI system.

Part 3: Automation

Whenever the API changes, the OpenAPI definition file hosted in a GitHub repository is updated accordingly, usually by one of the backend engineers of the team. A Pull Request is opened, reviewed and finally merged on the master branch. When the team is ready to generate a new version of the clients, we push a special git tag in semver format and a GitHub workflow immediately starts running Apigentools, using a configuration stored in the same repository. If you look at the main configuration file, you might notice for each language we want to generate clients for, there’s a parameter called ‘github_repo_name’: this is a killer feature of Apigentools that let us push the automation process beyond the original plan. Apigentools can output the generated code to a local git repository, adding the changes in a new branch that’s automatically created and pushed to a remote on GitHub.

The release process

To ease the release process and to better organize the code, each API client has its own repo: you’ll find Python code in https://github.com/arduino/iot-client-py, Go code in https://github.com/arduino/iot-client-go and so on and so forth. Once Apigentools finishes its run, you end up with new branches containing the latest updates pushed to each one of the clients’ repositories on GitHub. As the branch is pushed, another GitHub workflow starts (see the one from the Python client as an example) and opens a Pull Request, asking to merge the changes on the master branch. The maintainers of each client receive a Slack notification and are asked to review those Pull Requests – from now on, the process is mostly manual.

It doesn’t make much sense automate further, mainly for two reasons:

  1. Since each client has its own release mechanism: Python has to be packaged in a Wheel and pushed to PyPI, Javascript has to be pushed to NPM, for Golang a tag is enough, docs have to be made publicly accessible. 
  2. We want to be sure a human validates the code before it’s generally available through an official release.

Conclusions

We’ve been generating API clients for the IoT Cloud API like this for a few months, performing multiple releases for each supported programming language and we now have a good idea of the pros and cons of this approach.

On the bright side: 

  • The process is straightforward, easy to read, easy to understand.
  • The system requires very little knowledge to be operated.
  • The time between a change in the OpenAPI spec and a client release is within minutes.
  • We had an engineer working two weeks to set up the system and the feeling is that we’re close to paying off that investment if we didn’t already.

On the not-so-bright side: 

  • If operating the system is trivial, debugging the pipeline if something goes awry requires a high level of skill to deep dive into the tools described in this article.
  • If you stumble upon a weird bug on openapi-generator and the bug doesn’t get attention, contributing patches upstream might be extremely difficult because the codebase is complex.

Overall we’re happy with the results and we’ll keep building up features on top of the workflow described here. A big shoutout to the folks behind openapi-generator and Apigentools!

Arm Pelion Device Management comes to the Arduino IoT Cloud

As part of Arduino’s expanding relationship with Arm and continuing commitment to professionals, Arm Pelion Device Management users can now seamlessly use Arduino IoT Cloud to quickly create IoT applications.

Combining the speed of application development of the low-code Arduino IoT Cloud with the secure, scalable lifecycle management features of Arm Pelion Device Management brings the best of both worlds.

The integration enables Pelion Device Management users to import all their resources via the Pelion API and translate them into Arduino IoT Cloud properties. They can see and manage everything in the cloud, with the Arduino IoT interface (web or mobile client) providing the simplicity for designers to focus their efforts on the IoT application, creating control panels and summary dashboards. Scalability is a fundamental of the Pelion Device Management service, and new devices will automatically appear in the Arduino IoT Cloud as soon as they are registered in Pelion.

If you are an existing client of Pelion Device Management and would like to know more about the integration with Arduino IoT Cloud and the professional services available from the Arduino Pro team, please contact us here

Take control of your dashboard — the new Arduino IoT Cloud Dashboard with advanced features!

The new dashboard for the Arduino IoT Cloud comes with a host of enhanced features. It allows you to gather and display data from multiple IoT devices in one dashboard, and control those devices as required through your dashboard to fully integrate your solution.

Using widgets to connect to the properties enables you to set up a new dashboard in minutes, and you can fully customize your dashboard by: grouping devices however you like, dragging and dropping to rearrange the layout, and selecting from multiple options to visualize the data.

It is now possible to import historical data into the dashboard to provide a backdated view for all your properties, hence creating a new dashboard  no longer means losing previous information. You can present the information in your dashboard as far back as you’ve been collecting the data.

A new ‘duplicate dashboard” function lets you copy any of your existing dashboards setup and layout, plus you can easily see which things are associated with which devices when setting up a new solution.

It really is that simple!

LoRa made easy: Connect your devices to the Arduino IoT Cloud

An important new feature is now available in the Arduino IoT Cloud — full support for LoRa® devices!

LoRa® is one of our favorite emerging technologies for IoT because it enables long-range and low power transmission of data without using cellular or WiFi connections. It’s a very powerful and promising technology but it comes with its own complexity. In our pursuit to make IoT easier, we’ve already released a few products that enable anyone to build a LoRa® device (or a fleet of LoRa® devices!). Thanks to the Arduino MKR WAN 1310 board, combined with the Arduino Pro Gateway you can create your own LoRaWAN network. But we have decided to do more than that, and it’s time to release one more important piece….

The  Arduino IoT Cloud now provides an incredibly easy way to collect data sent by your LoRa® devices. With a few clicks, the IoT Cloud will generate a sketch template for the boards that you can adapt to read data from your sensors, pre-process it as you want, and then send it to the IoT Cloud. With a few more clicks (no coding required), you’ll be able to create a graphical dashboard that displays the collected data in real-time and lets users see their history through charts and other widgets. You will not need to worry about coding your own compression, serialization and queueing algorithm, as it will all be done under the hood in a smart way — you’ll be able to transmit multiple properties (more than five), pushing the boundary beyond the packet size limits of LoRaWAN

This is our take on edge computing – you program the device to collect and prepare your data locally, and then we take care of shipping such data to a centralized place.

Such a simplified tool for data collection is already quite innovative, but we decided to take it an important step further. All the available solutions for LoRa® currently focus on collecting data, but they do not address it from the other way round i.e. sending data from a centralized application to the LoRa® device(s). Arduino IoT Cloud now lets you do this — you’ll be able to control actuators connected to your device by sending messages via LoRa®, with no coding needed.

Build and control your own LoRaWAN network with Arduino IoT Cloud, the Pro Gateway and the new improved MKR WAN 1310 board that features the latest low-power architecture to extend the battery life and enable the power consumption to go as low as 104uA.

Full control of your TV using Alexa and Arduino IoT Cloud

We’re excited to announce that the official Arduino Amazon Alexa skill now supports television control.

You can now securely connect your TV set to Alexa using Arduino IoT Cloud and a few lines of code.

Here are some of the features which will be available to you:

  • Power on/off
  • Switch channel
  • Volume up/down/mute
  • Switch input sources

The easiest way to operate any kind of television is to act as if we were its very own clicker. In order to do so, we’ll show you how to capture the commands from the remote and play them back via Arduino (the TV will never know what hit it).

We’ll then create an Arduino IoT Cloud Thing with a TV property, and adapt the generated code to our needs. Finally, we’ll configure Alexa to access and control our TV.

Afterwards, we’ll be able to ask things such as:

  • “Alexa, turn the volume up on TV.”
  • “Alexa, mute TV” or “Alexa, unmute TV.”
  • “Alexa, next channel on TV.”

The complete step-by-step guide is available on our Project Hub.

Share your creativity with us! Our community means a lot to us, so we would love to see what you create. Make sure you document and post your amazing projects on the Arduino Project Hub and use the #ArduinoAlexa hashtag to make it discoverable by everyone!

Have fun playing with Alexa and IoT Cloud. If you have questions and/or build this project, let us know in the comments below.

Create a voice-controlled device with Alexa and Arduino IoT Cloud in 7 minutes

We’re excited to announce the launch of the official Arduino Amazon Alexa Skill. 

You can now securely connect Alexa to your Arduino IoT Cloud projects with no additional coding required. You could use Alexa to turn on the lights in the living room, check the temperature in the bedroom, start the coffee machine, check on your plants, find out if your dog is sleeping in the doghouse… the only limit is your imagination! 

Below are some of the features that will be available:

  • Changing the color and the luminosity of lights
  • Retrieving temperature and detect motion activity from sensors
  • Using voice commands to trigger switches and smart plugs

Being compatible with one of the most recognized cloud-based services on the market, bridges the communication gap between different applications and processes, and removes many tricky aspects that usually follows wireless connectivity and communication.

Using Alexa is as simple as asking a question — just ask, and Alexa will respond instantly. 

Integrating Arduino with Alexa is as quick and easy as these four simple steps:

1. Add the Arduino IoT Cloud Smart Home skill.

2. Link your Arduino Create account with Alexa.

3. Once linked, go to the device tab in the Alexa app and start searching for devices.

4. The properties you created in the Arduino IoT Cloud now appear as devices!

Boom — you can now start voice controlling your Arduino project with Alexa!

IoT – secure connections

The launch of the Arduino IoT Cloud & Alexa integration brings easy cross platform communication, customisable user interfaces and reduced complexity when it comes to programming. These features will allow many different types of users to benefit from this service, where they can create anything from voice controlled light dimmers to plant waterers. 

While creating IoT applications is a lot of fun, one of the main concerns regarding IoT is data security. Arduino IoT Cloud was designed to have security as a priority, so our compatible boards come with an ECC508 crypto chip, ensuring that your data and connections remain secure and private to the highest standard. 

The latest update to the Arduino IoT Cloud enables users with a Create Maker Plan subscription to use devices based on the popular ESP8266, such as NodeMCU and ESPduino. While these devices do not implement a crypto chip, the data transferred over SSL is still encrypted. 

Getting started with this integration

In order to get started with Alexa, you need to go through a few simple steps to make things work smoothly:

  • Setting up your Arduino IoT Cloud workspace with your Arduino Create account
  • Getting an IoT Cloud compatible board
  • Installing the Arduino Alexa Skill

Setting up the Arduino IoT Cloud workspace

Getting started with the Arduino IoT Cloud is fast and easy, and by following this tutorial you will get a detailed run through of the different functionalities and try out some of the examples! Please note, you will need an Arduino Create account in order to use the Arduino IoT Cloud and a compatible board.

Getting an IoT Cloud compatible board

The Arduino IoT Cloud currently supports the following Arduino boards: MKR 1000, MKR WiFi 1010, MKR GSM 1400 and Nano 33 IoT. You can find and purchase these boards from our store

The following properties in the Arduino IoT Cloud can currently be used with Alexa:

  • Light
  • Dimmable light
  • Colored light
  • Smart plug
  • Smart switch
  • Contact sensor
  • Temperature sensor
  • Motion sensor

Any of these properties can be created in the Arduino IoT Cloud platform. A sketch will be generated automatically to read and set these properties.

Installing the Arduino Alexa Skill

To install the Arduino Alexa Skill, you will need to have an Amazon account and download the latest version of the Alexa app on a smartphone or tablet, or use the Amazon Web application. You can find the link to the Amazon Alexa app here. Once we are successfully logged into the app, it is time to make the magic happen. 


To integrate Alexa and Arduino IoT Cloud, you need to add the Arduino skill. Then link your Arduino Create account with Alexa. Once linked, select the device tab in the Alexa app and start discovering devices.

The smart home properties already in existence in the Arduino IoT Cloud now appear as devices, and you can start controlling them with the Alexa app or your voice!

For more information, please visit the Arduino Alexa Skill.

Step-by-step guide to connecting Arduino IoT Cloud with Alexa

 A simple and complete step-by-step guide showing you how to connect the Arduino IoT Cloud with Alexa, is available via this tutorial.

Share your creativity with us!

Community is everything for Arduino, so we would love to see what you create! Make sure you document and share your amazing projects for example on Arduino Project Hub and use the #ArduinoAlexa hashtag to make it discoverable by everyone! 

Arduino IoT Cloud: Support for ESP8266 and other third party boards

With the latest release of Arduino IoT Cloud (version 0.8.0) we did a lot of work behind the scenes, and while it might be transparent to most users, it introduced some big changes. But the one we’re most excited about is that the Arduino IoT Cloud has begun supporting a number of third party devices.

Starting with the uber-popular ESP8266 by Espressif — NodeMCU, Sparkfun’s ESP Thing, ESPDuino, and Wemos (to name a few) — along with other inexpensive commercially available plugs and switches based on this module. You can now add one to your Cloud Thing and control it using our intuitive web-based Dashboard.

Like every new release, there were plenty of obstacles to get around, especially providing security between the third party boards and the  Arduino IoT Cloud, where there’s no possibility to go through our secure certificate provisioning process because the hardware is lacking an essential component: the cryptographic element.

The Arduino IoT Cloud was born with security in mind and developed around the Arduino MKR series of boards featuring Microchip’s ATTECx08, an encryption chip capable of elliptic-curve cryptography. These boards store the bits necessary to authenticate with a server in a very secure way, guaranteeing your board is connecting to the real server and exchanging data over TLS.

When it comes to boards that don’t have enough RAM and do not feature such cryptographic elements, we had to enable a secondary way to get in. Data transfer will still be encrypted over SSL, but the server authentication part will be a little less strict, allowing the Arduino IoT Cloud to be available to a wider user base. Nevertheless, we do inform users that if they want the highest levels of security they’ll have to use a board which embeds a cryptographic chip. As more and more IoT device users become concerned with security, manufacturers are starting to implement such technologies. We have just recently seen standalone ECC modules which can be paired with your microcontroller of choice. It’s looking bright, and we’re proud to have been amongst the first to bring about this change.

For third party boards without a crypto chip, we had to extend our API and allow the creation of a device-exclusive unique identifier (which will be used as a username) and the generation of a Device Key, providing the final user to access the platform using a username: password pair. 

Internally we already used those tools and APIs; we’re just opening them up for use by a broader audience.

One small requirement for this to work is that you’ll need to upgrade your Arduino Create plan to the ‘Maker plan.’ This will give you access to ESP8266 compilation and IoT Cloud pairing of the device. The Maker plan will also extend the amount of original Arduino boards and Things you can create and manage.

This is just the first step in opening up to more and more hardware, and we have a lot of things lined up for our users. We really hope you’ll enjoy the ease of development and the tools to bring your application to the Cloud in the shortest possible time.

Head over to Arduino IoT Cloud and show us what you got!

Getting started with the Arduino IoT Cloud

As previously announced, the Arduino IoT Cloud is an easy to use Internet of Things application platform that enables developers to go from unboxing their board to a working device in just minutes.

To help you get started, we’ve put together a quick project that’ll walk you through connecting a MKR1000 (or MKR WiFi 1010) to the Arduino IoT Cloud.

By the end of the tutorial, you’ll be able to control and monitor your board over the Internet using the Arduino IoT Cloud site.

First, we’ll add the board to the Arduino IoT Cloud as a Thing — a representation of the board in the cloud. We’ll then give the Thing a set of Properties which represent sensors, LEDs, motors, and many other components in the project that you’ll want to access from the cloud.

Want to see more? You can find the entire step-by-step guide here.

Announcing the Arduino IoT Cloud Public Beta

In our pursuit to democratize Internet of Things development, today we are excited to announce the Arduino IoT Cloud!

The Arduino IoT Cloud is an easy-to-use platform that makes it very simple for anyone to develop and manage their IoT applications, then deploy them to a large number of users. It allows users to create applications that solve real-life problems, and hopefully, improve their lives.

With the launch of the Arduino IoT Cloud, Arduino now provides its one million users a complete end-to-end approach to IoT that includes hardware, firmware, cloud services, and knowledge. After six months of private beta testing, I am very pleased to release the public beta of the Arduino IoT Cloud with automatic dashboard generation, Webhooks support, and full TLS secure transport.

— Luca Cipriani, Arduino CIO

Convenience and flexibility are key considerations for the Arduino IoT Cloud. Arduino boards usually require you to program them by entering code by way of a sketch — now the Arduino IoT Cloud can do this for you. It will quickly and automatically generate a sketch when setting up a new thing, thus enabling a developer to go from unboxing their board to a working device within five minutes. The Arduino IoT Cloud also provides other methods of interaction, including HTTP REST API, MQTT, Command-Line Tools, Javascript, and Websockets.

Going from an idea to a fully-functional IoT device has been a tedious process even for the most advanced engineers and developers… until now. Arduino now offers a complete platform with the MKR family providing a streamlined way to create local IoT nodes and edge devices using a range of connectivity options and compatibility with third-party hardware, gateway, and cloud systems. Whilst the Arduino IoT Cloud lets users manage, configure and connect not only Arduino hardware but the vast majority of Linux-based devices — truly democratizing IoT development.
— Massimo Banzi, Arduino CTO and Co-Founder

Want to learn more or try out the Arduino IoT Cloud for yourself? You’re just a click away!