Posts with «cons» label

REMOTICON 2021 // Hal Rodriguez and Sahrye Cohen Combine Couture and Circuitry

[Hal Rodriguez] and [Sahrye Cohen] of Amped Atelier focus on creating interactive wearable garments with some fairly high standards. Every garment must be pretty, and has to either be controllable by the wearer, through a set of sensors, or even by the audience via Bluetooth. Among their past creations are a dress with color sensors and 3D-printed scales on the front that change color, and a flowing pantsuit designed for a dancer using an accelerometer to make light patterns based on her movements.

Conductive Melody — a wearable musical instrument that is the focus of [Sahrye] and [Hal]’s Remoticon 2021 talk — was created for a presentation at Beakerhead Festival, a multi-day STEAM-based gathering in Calgary. [Sahrye] and [Hal] truly joined forces for this one, because [Sahrye] is all about electronics and costuming, and [Hal] is into synths and electronic music. You can see the demo in the video after the break.

The dress’s form is inspired by classical instruments and the types of clothing that they in turn inspired, such as long, generous sleeves for harp players and pianists. So [Hal] and [Sahrye] dreamed up a dress with a single large playable sleeve that hangs down from the mid- and upper arm. The sleeve is covered with laser-cut conductive fabric curlicues that look like a baroque interpretation of harp strings. Play a note by touching one of these traces, and the lights on the front of the dress will move in sync with the music.

[Sahrye] started the dress portion of Conductive Melody with a sketch of the garment’s broad strokes, then painted a more final drawing with lots of detail. Then she made a muslin, which is kind of the breadboard version of a project in garment-making where thin cotton fabric is used to help visualize the end result. Once satisfied with the fit, [Sahrye] then made the final dress out of good fabric. And we mean really good fabric — silk, in this case. Because as [Sahrye] says, if you’re going to make a one-off, why not make as nicely as possible? We can totally get behind that.

[Sahrye] says she is always thinking about how a wearable will be worn, and how it will be washed or otherwise cared for. That sequined and semi-sheer section of the bodice hides the LEDs and their wiring quite well, while still being comfortable for the wearer.

Inside the sleeve is an MPRP121 capacitive touch sensor and an Arduino that controls the LEDs and sends the signals to a Raspberry Pi hidden among the ruffles in the back of the dress.

The Pi is running Piano Genie, which can turn eight inputs into an 88-key piano in real time. When no one is playing the sleeve, the lights have a standby mode of mellow yellows and whites that fade in and out slowly compared to the more upbeat rainbow of musical mode.

We love to see wearable projects — especially such fancy creations! — but we know how finicky they can be. Among the lessons learned by [Sahrye] and [Hal]: don’t make your conductive fabric traces too thin, and silver conductive materials may tarnish irreparably. We just hope they didn’t have to waste too much conductive fabric or that nice blue silk to find this out.

Hackaday Links: December 5, 2021

Sad news from Germany, with the recent passing of a legend in the crypto community: Mr. Goxx, the crypto-trading hamster. The rodent rose to fame in the crypto community for his trades, which were generated at random during his daily exercise routines — his exercise wheel being used like a roulette wheel to choose a currency, and a pair of tunnels determined whether the transaction would be a buy or sell. His trading career was short, having only started this past June, but he was up 20% over that time — that’s nothing to sneeze at. Our condolences to Mr. Goxx’s owners, and to the community which sprung up around the animal’s antics.

It might seem a little early to start planning which conferences you’d like to hit in 2022, but some require a little more lead time than others. One that you might not have heard of is DINACON, the Digital Naturalism Conference, which explores the intersection of technology and the natural world. The con is set for the entire month of July 2022 and will be held in Sri Lanka. It has a different structure than most cons, in that participants attend for a week or so on a rotating basis, much like a biology field station summer session. It sounds like a lot of fun, and the setting couldn’t be more idyllic.

If you haven’t already killed your holiday gift budget buying NFTs, here’s something you might want to consider: the Arduino Uno Mini Limited Edition. What makes it a Limited Edition, you ask? Practically, it’s the small footprint compared to the original Uno and the castellated edges, but there are a bunch of other extras. Each elegant black PCB with gold silk screening is individually numbered and comes in presentation-quality packaging. But the pièce de résistance, or perhaps we should say the cavallo di battaglia, is that each one comes with a hand-signed letter from the Arduino founders. They honestly look pretty sharp, and at $45, it’s really not a bad collector’s piece.

And finally, the YouTube algorithm giveth again, when this infrastructure gem popped up in our feed. You wouldn’t think there’d be much of interest to see in a water main repair, but you’d be wrong, especially when that main is 50′ (15 m) below the surface, and the repair location is 600′ (183 m) from the access hatch. Oh yeah, and the pipe is only 42″ (1 m) in diameter, and runs underneath a river. There’s just so much nope in this one, especially since the diver has to swim into a special turning elbow just to get pointed in the right direction; how he turns around to swim out is not worth thinking about. Fascinating tidbits include being able to see the gravel used to protect the pipe in the riverbed through the crack in the pipe, and learning that big water mains are not completely filled, at least judging by the small air space visible at the top of the pipe. Those with claustrophobia are probably best advised to avoid this one, but it’s still amazing to see how stuff like this is done.

A Miniature Radio Telescope in Every Backyard

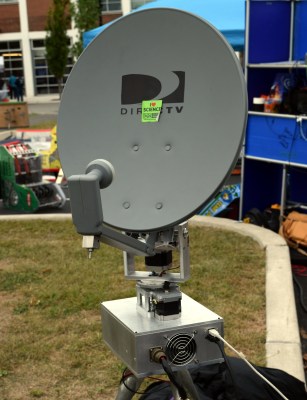
You probably wouldn’t expect to see somebody making astronomical observations during a cloudy day in the center of a dense urban area, but that’s exactly what was happening at the recent 2019 Philadelphia Mini Maker Faire. Professor James Aguirre of the University of Pennsylvania was there demonstrating the particularly compact Mini Radio Telescope (MRT) project built around an old DirecTV satellite dish and a smattering of low-cost components, giving visitors a view of the sky in a way most had never seen before.

Thanks to the project’s extensive online documentation, anyone with a spare satellite dish and a couple hundred dollars in support hardware can build their very own personal radio telescope that’s capable of observing objects in the sky no matter what the time of day or weather conditions are. Even if you’re not interested in peering into deep space from the comfort of your own home, the MRT offers a framework for building an automatic pan-and-tilt directional antenna platform that could be used for picking up signals from orbiting satellites.

With the slow collapse of satellite television in the United States these dishes are often free for the taking, and a fairly common sight on the sidewalk come garbage day. Perhaps there’s even one (or three) sitting on your own roof as you read this, waiting for a new lease on life in the Netflix Era.

Whether it’s to satisfy your own curiosity or because you want to follow in Professor Aguirre’s footsteps and use it as a tool for STEM outreach, projects like MRT make it easier than ever to build a functional DIY radio telescope.

Point and Shoot

The MRT, and really any radio telescope project like this, is essentially made up of two separate systems: one that provides the motorized aiming of the dish, and the receiver that actually captures the signals. Either system could work independently of the other, but when combined with the appropriate software “glue”, they allow the user to map the sky in radio frequencies.

Obviously, the electronics and mechanical components required to pan an antenna across the sky aren’t terribly complex. If you wanted to keep things really simple and were content with moving in a single axis, you could even do it with a “barn door” tracker. What’s really kicked off the recent explosion of DIY radio telescopes is the RTL-SDR project and the era of low-cost Software Defined Radios (SDRs) it’s inspired.

Unsurprisingly, the MRT also uses an RTL-SDR receiver for processing signals from the Low-Noise Block (LNB) in the dish. Professor Aguirre says that since they are still using the stock DirecTV LNB, the telescope is fairly limited in what it can actually “see”. But it’s good enough to image the sun or pick up satellites in orbit, which is sufficient for the purposes of demonstrating the basic operating principles of a radio telescope.

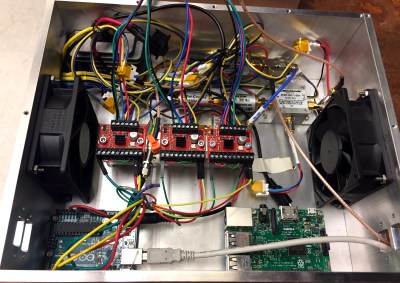
To move the satellite dish, the MRT is using an Arduino connected to a trio of Big Easy Drivers from Sparkfun. These are in turn connected to the stepper motors in the antenna mount, which are sufficiently geared so they can move the dish around without the need for a counterweight. This makes it an excellent candidate for enclosure inside a dome, which would allow for all-weather observations.

Both the RTL-SDR receiver and the Arduino are connected to a Raspberry Pi, which runs the software for the telescope and provides the interface for the user. The MRT GitHub repository contains all of the various tools and programs created for the project, mostly written in Python, which should provide a useful reference even if you’re not interested in duplicating the telescope’s overall design.

Wandering Through the Sky

When we visited Professor Aguirre, he was attempting to use the MRT to find the Sun. You’d think that a simple enough task in the middle of the afternoon, but thanks to an unbroken layer of steel-gray clouds hanging low in the October sky, Sol was absolutely nowhere to be found with our meager human senses.

Geostationary satellites as seen by the MRT

As the dish made its slow robotic pans across the sky, we spoke with the Professor about the telescope and the various revisions it went through over the years. Eventually the display lit up, showing a representation of an unusually strong signal, clearly the MRT was hearing something out there. After brief scrutiny, the Professor announced that we hadn’t found the sun; instead, the telescope most likely crossed paths with a geostationary satellite.

It was this raconteur style of discovery that kept visitors to the Mini Radio Telescope enthralled. Nobody expected this hacked together contraption of consumer-grade hardware to discover a new exoplanet or help solve some long-pondered mystery of the cosmos while sitting in a Philadelphia parking lot.

But it was more than capable of pointing out objects tens of thousands of kilometers away while our own eyes couldn’t even figure out where the Sun was. It reaffirmed in a very real way that something was out there, and students both young and old couldn’t help but be fascinated by it.

Maker Faire NY: Developing for the Final Frontier

The cost of getting a piece of hardware into space is now cheaper than ever, thanks in no small part to the rapid progress that’s been made by commercial launch providers such as SpaceX. In the near future, as more low-cost providers come online, it should get even cheaper. Within a few years, we could be seeing per kilogram costs to low Earth orbit that are 1/10th what they were on the Space Shuttle. To be sure, this is a very exciting time to be in the business of designing and building spacecraft.

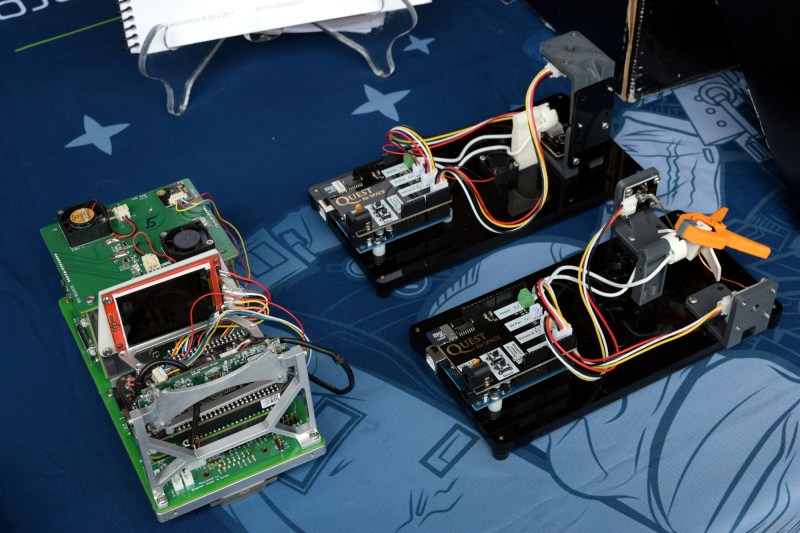
But no matter how cheap launches to orbit get, it’ll never be cheaper than simply emailing some source code up to the International Space Station (ISS). With that in mind, there are several programs which offer students the closest thing to booking passage on a Falcon 9: the chance to develop software that can be run aboard the Station. At the 2018 World Maker Faire in New York we got a chance to get up close and personal with functional replicas of the hardware that’s already on orbit, known in space parlance as “ground units”.

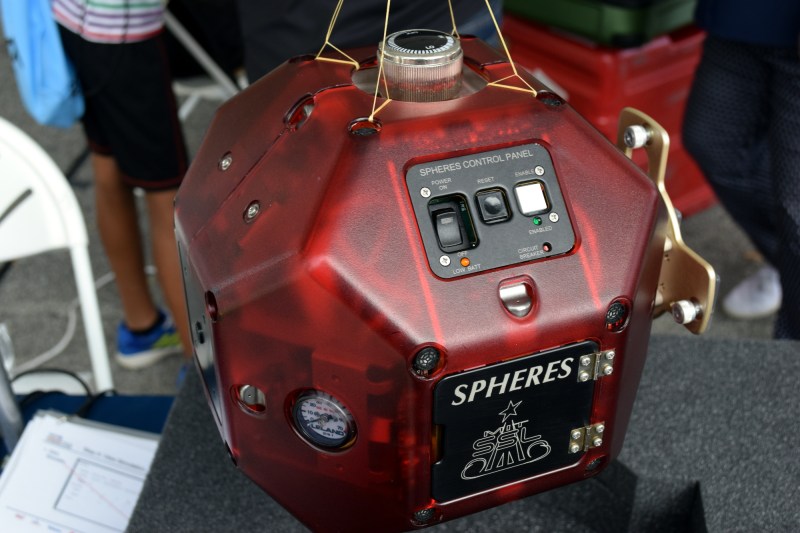
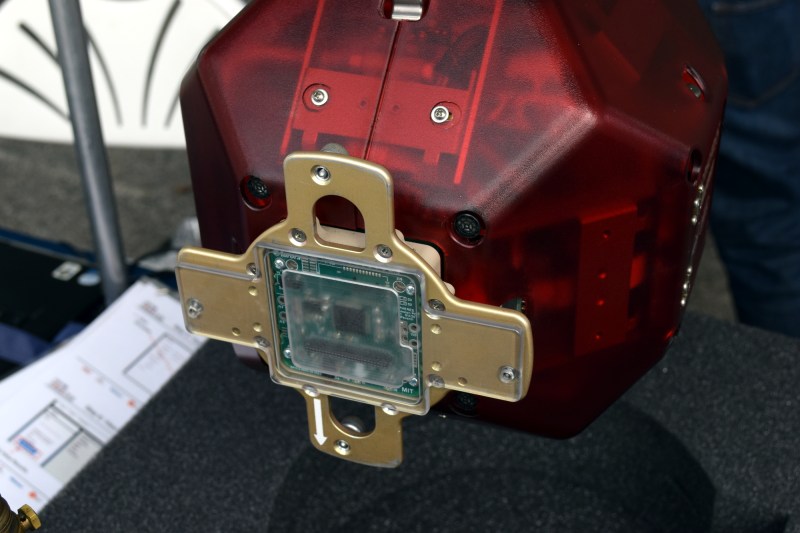
On display was a replica of one of the SPHERES free-flying satellites that have been on the ISS since 2006. They are roughly the size of a soccer ball and utilize CO2 thrusters and ultrasonic sensors to move around inside of the Station. Designed by MIT as a way to study spaceflight techniques such as docking and navigation without the expense and risk of using a full scale vehicle, the SPHERES satellites are perhaps the only operational spacecraft to have never been exposed to space itself.

MIT now runs the annual “Zero Robotics” competition, which tasks middle and high school students with solving a specific challenge using the SPHERES satellites. Competitors run their programs on simulators until the finals, which are conducted using the real hardware on the ISS and live-streamed to schools.

We also saw hardware from “Quest for Space”, which is a company offering curricula for elementary through high school students which include not only the ground units, but training and technical support when and if the school decides to send the code to the matching hardware on the Station. For an additional fee, they will even work with the school to design, launch, and recover a custom hardware experiment.

Their standard hardware is based on off-the-shelf platforms such as Arduino and LEGO Mindstorms EV3, which makes for an easy transition for school’s existing STEM programs. The current hardware in orbit is setup for experiments dealing with heat absorption, humidity, and convection, but “Quest for Space” notes they change out the hardware every two years to provide different experiment opportunities.

Projects such as these, along with previous efforts such as the ArduSat, offer a unique way for the masses to connect with space in ways which would have been unthinkable before the turn of the 21st century. It’s still up for debate if anyone reading Hackaday in 2018 will personally get a chance to slip Earth’s surly bonds, but at least you can rest easy knowing your software bugs can hitch a ride off the planet.

Giant Connect Four Pits You Against the Computer

You can build a Connect Four solver in software, but it won’t be all that much fun. Now apply that same automation to a 15-foot-tall plywood version of the classic board game and you’ve just created a smile-making-machine for everyone within eyesight. Behold the Mono-Purpose Automated Robot Versed In Connnect4 (Marvin) which Ben and Jonathan dreamed up on their way home from Maker Faire last year, and made into their exhibit this year.

On the physical side of things they got really creative in lifting the discs and sorting them into the column chosen by the software brain of the game. A chain travels along one side with fingers every few feet. The fingers travel along the channel, lifting the discs. Those fingers are a couple of bolts, with some metal filler, all epoxied into one solid unit.

At the top of the disc elevator, and at the top position of each column in the gaming board, there are IR reflectance sensors which send feedback to the Arduino that drives the hardware. This proved a major issue during setup the day before the Faire. The reflectance sensors are just blasting out IR and not using a carrier signal. In direct sunlight, the detector was in a constant state of being tripped. After some trial and error, the logic for the sensors was flipped to detect the absence of sunlight by placing black plastic behind that top row of the board and putting duct tape over the IR emittors.

There’s a router and laptop rolled into the system. The Arduino makes an HTTP request to software on the laptop. In addition to determining where the next move should be made, the laptop is connected to a large screen which shows the current state of the gaming board. This is a head-to-head, human versus machine game. The human player drops their discs from the top of the board using a paint roller that hooks into a hole at the center of the disc. This way the player’s disc passes by the sensors, triggering the machine’s next move.

It’s a clever build and due to the sheer size it’s pretty awesome they were able to get it to the Faire from Philadelphia. Don’t miss the video after the break that shows off the fun and excitement of this gaming giant.

Adafruit And The Arduinos At Maker Faire

The apparent lull on the Arduino front the last few weeks was just the calm before the storm that is the Bay Area Maker Faire (BAMF). Both companies claiming the Arduino name were there over the weekend, with news and new products in tow. Ironically, you could see from one booth straight over to the other. Small world.

Perhaps the biggest news from Arduino LLC is that hacker-friendly Adafruit is now going to be making officially-licensed boards in the US. Competing with this news, Arduino SRL brought its new boards, including the Yun Mini and ARM-powered Arduino M0. And [Massimo Banzi] and Arduino LLC seem to be taking an end-run around the Arduino SRL trademark by announcing the “Genuino” brand for European production. For all the details, read on!

The Adafruit Connection

As announced by [Massimo] in his “State of the Arduino” keynote speech at the BAMF, Arduino is licensing Adafruit to produce a range of the “most-requested” Arduino boards at their factory in New York. So those of you looking to support Arduino LLC with your purchases also get to help line [Ladyada]’s pockets at the same time. That’s a big win in our book.

Photo: Atmel

It’s not a complete surprise that Adafruit should get tapped as a US fab for Arduino.cc. They’ve been selling the boards and producing copious Arduino-related tutorials since their beginnings in 2005. More recently, Adafruit partnered with Arduino LLC to create the Gemma board, which is basically an ATTiny85-based Arduino-a-like in a tiny round, wearable-friendly board. (If you’re familiar with the Adafruit lineup, it’s essentially a Trinket in the round format of a LilyPad Arduino.)

Indeed, after the deal is done and the dust has settled, it’s a bit surprising to us that this hasn’t happened earlier, what with both Adafruit and Sparkfun producing licensed boards and Arduino LLC looking for new manufacturers. Anyway, good job Adafruit and Arduino (LLC)!

(New) Hardware from Arduino SRL

Arduino SRL had its Yun Mini, which is essentially a smaller version of the Yun — a mashup of an Arduino Leonardo with an OpenWRT-capable router chipset. We’ve reported on these previously but it’s fun to see them in the flesh.

The M0 is interesting. Before the troubles began, Arduino designed an ARM-M0+ based board with Atmel. Now Arduino LLC has it listed on their website as the Arduino Zero, but still hasn’t got any for sale yet. Arduino SRL has the boards on their website as the Arduino Zero Pro, with a different name, but is now touting this version as the “M0 Pro”. What’s in a name? Not much. The circuit layouts and parts appear identical.

The Portal Battle

Both of the Arduino companies are working on getting your Arduino development into “the cloud”. (Conscience compels us to note that “the cloud” is actually just other people’s computers.) Anyway, this essentially means new web-based and browser-based versions of the IDE that tie into web services. Interestingly enough, the two companies have different takes on what that entails.

According to their Maker Faire press release, Arduino SRL will be launching a web portal for makers to “promote and distribute their products” and share code and ideas. Located at my.arduino.org (which currently seems to be password-access only), the idea seems to be to create a mini-Tindie for Arduino-based products. This couples with their “Arduino IDE-alpha”, a JavaScript-based IDE that will run in the browser.

Meanwhile, Arduino LLC displayed previously announced their alternative development platform, Arduino Create. Arduino Create lets you write, compile and upload sketches “directly from the browser with the Arduino Web Editor”, and store your code in the “Arduino Cloud”. Arduino Create looks slick: certainly a lot better than the homely Java IDE that we’re all used to. It’s too early to tell what this “cloud” is all about, but it looks like it will include code sharing, schematic and wiring hookup storage, and easy sharing among users.

We already use blogs, Hackaday.io (shameless plug!), Github, and other “cloud” services to store our projects and code, so we’re not entirely sure what either of these portal offerings will bring to the table. It’s 2015, is anyone still hurting for project hosting space on the web?

Cynically, we note that both of these companies are in a battle to “own” the Arduino community and that getting people to host code and projects on their servers is an obvious strategy, and providing a web-based IDE to facilitate this capture is the tactic.

And before we leave “the cloud”, we should note that both Arduinos are late to the game. codebender has been around and programming Arduinos on the web since 2012.

New Names

Photo: Making Society

Finally, as if it weren’t bad enough with Arduino LLC and Arduino SRL, [Massimo Banzi] also announced that licensed boards for the European market will be sold under the new “Genuino”.

Actually, this is a pretty cagey maneuver, because it side-steps the European trademark issues (which [Massimo] referred to as “the bullsh*t” in his talk) and is a cute name to boot. “Genuine”, get it?

Our take? As [Massimo] almost said in this video interview with Make, “a rose by any name would smell as sweet.” If Arduino LLC loses the trademark lawsuit in Italy, they’ll not be allowed to sell boards using the “Arduino” name. The best way to limit the damage in the future is to make the switch now, while everyone is watching, and give the market time to adapt.


Filed under: Arduino Hacks, cons

Student Trolls Anti-Arduino Prof With Parasite MCU

Like some of our grouchier readers, [PodeCoet]’s Digital Sub-Systems professor loathes everyone strapping an Arduino onto a project when something less powerful and ten times as complicated will do. One student asked if they could just replace the whole breadboarded “up counter” circuit mess with an Arduino, but, since the class is centered around basic logic gates the prof shot him down. Undeterred, our troll smuggled an MCU into a chip and used it to spell out crude messages.

No Arduino? No problem. It took him 4 tries but [PodeCoet] hollowed out the SN74LS47N display driver from the required circuit and made it the puppet of a PIC16F1503 controller. The PIC emulated the driver chip in every way – as ordered it showed the count up and down – except when left unattended for 15 seconds. Then instead of digits the PIC writes out “HELLO”, followed by three things normally covered by swimsuits and lastly a bodily function.

For such a simple hack it is wonderfully and humorously documented. There are annotated progress/failure pictures and video of the hack working.

It is not as elaborate as the microscopic deception in the infamously impossible 3 LED circuit, but it gets to the point sooner.


Filed under: cons, Microcontrollers
Hack a Day 25 Dec 18:01

Coin-op Sega Rally used to race RC cars

Head to head video game action can’t even compare to this use of a coin-op Sega Rally game to race actual RC vehicles. Take a close look at those screens and you’ll see there are no computer graphics, just a feed for a camera on each of the toy cars.

The project was conceived for the Sapo Codebits VI conference in Portugal. The arcade cabinets had their controls connected to an Arduino, but getting video up and running wasn’t nearly as easy. After fruitless attempts to get the original CRTs to work the team ended up replacing them with functioning CRT units of the same size. The cars themselves have two camera, one on top of the vehicle’s cab and one mounted on a boom for a perspective that was above and behind the vehicle. The drivers can switch between either view. The cars were set loose in the room serving as the event’s retro gaming area and players were free to race each other wherever they pleased. Don’t miss the video clip after the break which shows off all of the fun.


Filed under: cons, toy hacks
Hack a Day 30 Nov 11:01
arcade  arduino  c car  coin-op  cons  r  rally  retro gaming  sega  toy hacks  

Toorcamp: Nibble Node.js Widget

The hardware hacking village at Toorcamp provided space and tools to work on hardware. It was interesting to see what hardware hacks people had brought to work on. One example is [Owen]‘s Nibble Node.js Widget. The widget combines the popular node.js platform and custom hardware to create a node for the “internet of things.” The hardware consists of a Arduino Pro Micro, a bluetooth module, a LCD display, and a speaker in a laser cut box.

By using a custom package in node.js, the Nibble becomes an object which can be controlled by its methods. This allows for the developer to push messages to the display and control the device without worrying about the details of the hardware. Since node.js is designed for web applications, it’s simple to make the device controllable from the web.

[Owen] also wrote an emulator for the DCPU from the upcoming game, 0x10c. DCPU assembly is passed in from node.js, which compiles it and sends it to the Nibble. The device can then run the application using the DCPU emulation, which also allows for control of the display and the speaker.

There’s a lot of neat things that can be done with this minuscule cube, and [Owen] plans to release an NPM package for the node.js code.


Filed under: cons
Hack a Day 20 Aug 13:30
arduino  cons  node.js  toorcamp  

Arduino, resistor, and barrel plug lay waste to millions of hotel locks

The security flaws on this common hotel keycard lock are nothing short of face-palmingly stupid. Look closely at the picture above. This is a hotel room door swinging open. The device he holds in his hand is an Arduino connected to the OUTSIDE portion of the door lock. It takes approximately 200 milliseconds from the time an attacker plugs the device in, until the door can be opened. Yes, in less than 1/4 of one second an Arduino can open any of the millions of these locks in service.

The exploit in Onity programmable keycard locks was revealed by [Cody Brocious] at the Blackhat conference. Apparently the DC barrel jack on the outside of the lock serves as a one-wire protocol interface. Once communications are established a 32-bit sitecode can be read from any of the locks and immediately used to open the door. There is no authentication or encryption used to obfuscate this kind of attack. To make matters worse, you can even read out master key and skeleton key codes. These codes facilitate ‘magic’ keys used to open a variety of different doors through the system.

We’re no strangers to easy hotel beak-ins. But how can a digital lock possibly be sold with this type of vulnerability present? Really!?

Here’s the white paper on the exploit as well as the slides from his talk (PDF).

[via Reddit]


Filed under: cons, security hacks
Hack a Day 25 Jul 20:01