Posts with «beer hacks» label

Voice Controlled Sofa Meets Your Every Beverage Need

It’s often taken for grated, but the modern world is full of luxuries. Home automation, grocery delivery, and even access to the Internet are great tools to have at hand, but are trivial to most of us. If these modern wonders are not enough for you, and the lap of luxury is still missing a certain je ne sais quoi, allow us to introduce you to the ultimate convenience: a voice controlled, beer-dispensing sofa with a built-in refrigeration system.

This is a project from [Garage Avenger] and went through a number of iterations before reaching this level of polish. Metal work on the first version didn’t fit together as expected, and there were many attempts at actual refrigeration before settling on repurposing an actual refrigerator. With those things out of the way, he was able to get to the meat of a project. The couch-refrigerator holds 12 beers, and they are on a conveyor belt which automatically places the next beer onto the automated drawer. When commanded (by voice, app, or remote) the sofa opens the drawer so the occupant can grab one easily without having to move more than an arm. Everything, including the voice recognition module, is controlled by an Arduino, as is tradition.

The attention to detail is excellent as well. The remote control contains a built-in bottle opener, for one, there are backlights and a glass cover for the refrigerator, and the drawer is retracted automatically when it senses the beer has been obtained. We couldn’t ask for much more from our own couches, except maybe that they take us where we want to go. But maybe it’s best to keep these two couch use cases separate for now.

Arduino and the Other Kind of Homebrew

Usually, when we are talking about homebrew around here, we mean building your own equipment. However, most other people probably mean brewing beer, something that’s become increasingly popular as one goes from microbreweries to home kitchen breweries. People have been making beer for centuries so you can imagine it doesn’t take sophisticated equipment, but a little automation can go a long way to making it easier. When [LeapingLamb] made a batch using only a cooler, a stock pot, and a propane burner, he knew he had to do something better. That’s how Brew|LOGIC was born.

There are many ways to make beer, but Brew|LOGIC focuses on a single vessel process and [LeapingLamb] mentions that the system is akin to a sous vide cooker, keeping the contents of the pot at a specific temperature.

Honestly, though, we think he’s selling himself a bit short. The system has a remote application for control and is well-constructed. This isn’t just a temperature controller thrown into a pot. There’s also a pump for recirculation.

The common stock pot gets some serious modifications to hold the heating element and temperature probe. It also gets some spring-loaded clamps to hold the lid down. Expect to do a lot of drilling.

The electronics uses an Arduino, a Bluetooth board, and some relays (including a solid state relay). The finished system can brew between 5 and 15 gallons of beer at a time. While the system seems pretty good to us, he did list some ideas he has for future expansion, including valves, sensors for water level and specific gravity, and some software changes.

After reading that the system was similar to a sous vide cooker, we wondered if you could use a standard one. Turns out, you can. If you want to make better beer without electronic hacking, there’s always the genetic kind.

Latskap Semi-Automatic Liquor Cabinet

A well-stocked liquor cabinet is a necessity for the classy gentleman or gentlelady who likes to entertain. Having the proper spirits and mixers on hand to make anything from a martini to a sidecar is always a solid way to ensure guests have a good time at your cocktail party. In the past, a beautifully crafted cherry or walnut liquor cabinet was enough to impress visitors with your affluence. These days, if you don’t want to look like a pauper, you have to take it a step further.

[Elias Bakken] and his uncle [Mike Moulton] have decided to take liquor cabinets into the 21st century with a semi-automatic liquor cabinet called Latskap. The project is still in progress, and in the prototyping stage, but their build log on Hackaday.io is showing a lot of potential. It shouldn’t be long before they have a fully functional prototype finished.

Latskap has a few primary functions: the first is that it automatically opens when someone approaches it. Then the thirsty guest can use the touchscreen to choose the drink they’d like from the menu. The bottles inside the cabinet are resting on NeoPixels, and the system lights up the liquor and mixer bottles needed for that drink. Finally, a scale at the front of the cabinet weighs the glass as ingredients are poured, and tells the parched patron when they’ve poured the correct amount for their drink.

We’ve seen liquor dispensers in the past that are designed to mix a cocktail all on their own, but the Latskap takes an interesting new approach. The main benefit of this design is that the number of bottles is limited only by how much room is available. There are no complex pumping systems necessary. We’re definitely looking forward to seeing the finished product!


Filed under: Beer Hacks
Hack a Day 18 Aug 16:30

Keep an Eye on Your Fermenting Beer with BrewMonitor

The art of brewing beer is as old as civilization itself. Many people enjoy brewing their own beer at home. Numerous steps must be taken before you can take a swig, but fermentation is one of the most critical. [Martin Kennedy] took up the hobby with his friends, and wanted a convenient way to monitor the fermentation temperature remotely. He started working on the BrewMonitor, a cloud-based homebrewing controller powered by an Arduino clone.

His goal was to create something cheap, convenient, and easy to set up. Traditional fermentation monitoring equipment is very expensive. The typical open-source alternative will set you back 80 euros (roughly $101), using the Arduino-sensor with a Raspberry Pi gateway via the BrewPi webserver. [Martin] did not want to go through the hassle of viewing BrewPi remotely, since it requires a home network and all of the configuration that would entail. Instead, he coupled an Arduino clone with a DS18B20 temperature sensor while using an ESP8266 module for wireless communication, all for less than 18 euros ($23). This connects to a simple webpage based on Scotch.io with a PHP backend (Laravel with RESTful API), a MySQL database, and an AngularJS frontend to display the graph. Once the sensor is placed into the fermenter bucket’s thermowell, the temperature is transmitted once a minute to the REST API. You can see the temperature over time (in Celsius). The design files are available on GitHub.

[Martin] would like to expand the functionality of BrewMonitor, such as adding the ability to adjust the temperature remotely by controlling a heater or fridge, and lowering its cost by single boarding it. Since the information is stored on the cloud, upgrading the system is much easier than using a separate gateway device. He doesn’t rule out crowdfunding campaigns for the future. We would like to see this developed further, since different yeast species and beer styles require very stringent conditions, especially during the weeks-long fermentation process; a 5-degree Celsius difference can ruin an entire brew! Cloud-based temperature adjustment seems like the next big goal for BrewMonitor. DIY brewers salute you, [Martin]!

[via Dangerous Prototypes]


Filed under: Beer Hacks

End Table Kegerator Hides the Tap when You’re Not Looking

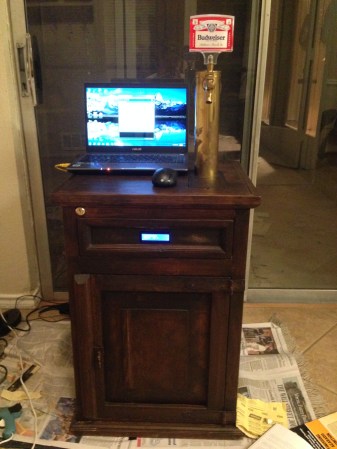
What’s better than an ordinary end table? How about an end table that can serve you beer? [Sam] had this exact idea and used his skills to make it a reality. The first step of the build was to acquire an end table that was big enough to hold all of the components for a functional kegerator. This proved to be a bit tricky, but [Sam] got lucky and scored a proper end table from a garage sale for only $5.00.

Next, [Sam] used bathroom sealant to seal up all of the cracks in the end table. This step is important to keep the inside cold. Good insulation will keep the beer colder, while using less electricity. Next, a hole was cut into the top of the table for the draft tower.

The draft tower is mounted to a couple of drawer slides. This allows the tower to raise up and down, keeping it out of sight when you don’t want it. The tower raises and lowers using a simple pulley system. A thin, high strength rope is attached to the tower. The other end is attached to a spool and a small motor. The motor can wind or unwind the spool in order to raise and lower the tower.

The table houses an Arduino, which controls the motor via a homemade H bridge. The Arduino is hooked up to a temperature sensor and a small LCD screen. This way, the users can see how cold their beer will be before they drink it.

To actually keep the beer cold, [Sam] ripped apart a mini fridge. He moved the compressor and condenser coils to the new table. He had to bend the coils to fit, taking care not to kink them. Finally he threw in the small keg, co2 tank and regulator. The final product is a livingroom gem that provides beer on demand.

Demo video (which is going the wrong way) can be found after the break.


Filed under: Arduino Hacks, Beer Hacks

The Fridge Hacking Guide by BrewPi

The team behind BrewPi are at it again! This time they have created an online guide showing how to convert a min-fridge into a Raspberry Pi & Arduino controlled fermentation chamber. In it, they describe 3 possible options:

  • Option 1: Make a simple switched power cord, without hacking into the fridge electronics.
  • Option 2: Make a switched power cord, but also override or remove the thermostat.
  • Option 3: Rip out the thermostat and fully integrate the SSRs into your fridge (which is what [Koen] and [Elco] did).

First things first though. They had to clean the fridge. And depending on they got it or how long it has been unplugged for, the inside might have been pretty rank and disgusting from mold growing out of every corner. This took a good hour or so to clean properly lest the brewing process get infected with external grossness. This is all worth it because a well-controlled fermentation chamber results in a superior batch of beer.

With cleaning behind them the team added some temperature sensors to measure the beer and fridge levels. [Koen] and [Elco] suggest using the OneWire distribution board that comes with their BrewPi kit for this. Then, the cables were routed through the fridge and take control of the compressor.

Because [Koen] and [Elco] decided to go with the SSR method, the good news was: they didn’t need to hack into the start relay, and just left it as it is. But, they did need to gain access to the compressor and make a few changes. For one, the two SSR’s will be added with one of the AC terminals connected to LIVE (brown) and the other to the heater and the compressor.

No matter which method is chosen though, the end product will allow anyone to monitor and easily control the temperature range of your micro-brew, along with being able to log data and produce web-embedded graphs like the one shown below. It works by using the Arduino attached to run the temperature control algorithm autonomously. And, the Raspberry Pi adds stability.


Filed under: Beer Hacks

Vintage Kegerator

[Kerber] got his hands on a classic 1950′s General Electric fridge, and converted it into this classy vintage kegerator.

As his build log shows, it took an intensive restoration process to get this fridge back in shape. He completely stripped it down, scraping off the sixty year old insulation, fibreglass, and glue. Then the chassis was sanded down to a smooth finish and painted black. R-19 insulation was added to replace the old stuff.

Next up was electronics. An Arduino, DS18B20 temperature sensor, and a solid state relay were used to regulate the temperature and prevent frozen beer. There’s also a Guruplug server that reads data from the Arduino every minute. It makes this data accessible through a web page, so the temperature of the kegs can be monitored from anywhere. [Kerber] admits that this is overkill, but leaves room for future expansion.

The kegerator draws about 180 Watts, and runs for about 6 minutes per hour to keep the temperature regulated. This is pretty impressive considering the age of the fridge. The final restoration looks great, and serves up data along with the beer.


Filed under: beer hacks

KegDroid makes drinking beer more fun

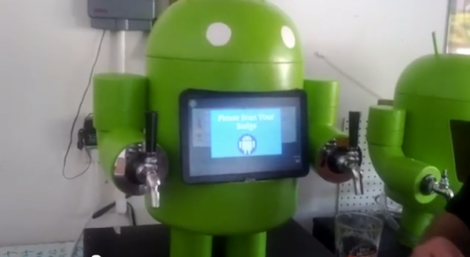
Are you bored with just drinking beer? Are your friends constantly sneaking into your house and stealing your sacred beverages? If so, perhaps you need KegDroid – the Android controlled beer tap created by [Paul Carff].

Looking for a way to add more excitement to drinking his beer, [Paul] spiced up his tap with a little extra technology. He added an Android tablet for touchscreen navigation of the menus, an Arduino to control the flow sensors and solenoid valves, and an NFC reader to act as security for restricted access.  Users must be authenticated before they are allowed to pour any alcohol.

Your name and photo are pulled from your Google+ account as you’re logged in, then you simply select your beverage of choice, and if you’d like a one, eight, or twelve ounce pour. Flow sensors automatically shut off when you have the desired quantity.

Seems like you get more foam than beer, but all in all it’s a cool bar top app.

Check out the video after the break.


Filed under: android hacks, arduino hacks, beer hacks

Hacking Beer Cans for Fun and Publicity

Although beer is generally a good way to get people to come to your trade show booth, [Robofun.ru] decided to put a new spin on things. Instead of (or possibly in addition to) giving out beer, they decided to turn 40 Staropramen beer cans into a keyboard.

This was done using an Arduino hooked up to four Sparkfun MPR121 Capacitive Touch Sensor Breakout Boards, allowing them to act as keys. These inputs are translated via the Arduino into a standard output (we assume USB) that can be plugged into any computer.  Additionally, a Sparkfun MP3 trigger board was used to control the sound effects.  Rounding out the build, a Raspberry Pi computer was used to run the human machine interface, a large plasma display.

Be sure to check out this keyboard in action after the break. If this isn’t enough alternative input fun, why not check our post about how to make a banana piano and giant NES controller.


Filed under: arduino hacks, beer hacks, Raspberry Pi

Malting kiln controller for preparing beer brewing grains

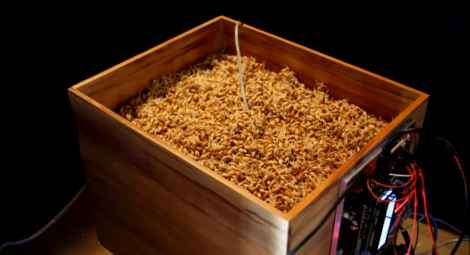
A quick primer is in order: when it comes to hobby brewing there’s two main types, extract brewing and all-grain brewing. The former uses a syrup that has been extracted from the grains at a factory while the latter adds the steps to do this yourself. But in both cases the brewing grains have already been malted. This is a careful process of soaking the grains and then kiln drying them. [Richard Oliver] built his own malt kiln controller to add the preliminary step to his home brewing ritual. Now the only thing he’s not doing himself is growing the grains (and perhaps culturing the yeast).

His original design used a food dehydrator for the drying step, but this didn’t work because the temperature wasn’t at the correct level. The new build uses the ceramic heating element from a 300W hot air gun. A blower directs air through the element and into the wooden box that serves as the kiln. An Arduino monitors the heated air to keep it right in the sweet spot. He’s included a graphing GUI for easy monitoring, which is shown in the video after the break.


Filed under: beer hacks
Hack a Day 12 Oct 12:01