Posts with «3d» label

Hang Ten With Help From the Surf Window

Unless you live in a special, unique place like Hawaii or Costa Rica it’s unlikely you’ll be able to surf every day. It’s not easy to plan surf sessions or even surf trips to most locations because the weather conditions will need to be just right. Not only the wave height (swell) but also the wind speed and direction, tide, water and air temperature, and even amount and type of marine life present can all impact your surf session. You’ll want something which can easily tell you right away if conditions are good.

This project from [luke] is called the Surf Window shows the surf conditions at the local beach with just one glance. Made out of various pieces of wood, each part represents one of the weather conditions at the beach. A rotating seagull gives the wind direction, for example, and the wave height is represented by 3D, moving waves. All of the parts are connected with various motors and linkages to an Arduino Mega +WiFi R3 which grabs all of its information from Magicseaweed, a surf forecasting site.

The Surf Window can show the current conditions at virtually any surfable beach in the world, so if you really want to know how Jaws, Mavericks, or even Reef Road is breaking right now, you could use this to give you a more nuanced look. Don’t forget to take the correct board for the conditions!

Robot Maps Rooms with Help From iPhone

The Unity engine has been around since Apple started using Intel chips, and has made quite a splash in the gaming world. Unity allows developers to create 2D and 3D games, but there are some other interesting applications of this gaming engine as well. For example, [matthewhallberg] used it to build a robot that can map rooms in 3D.

The impetus for this project was a robotics company that used a series of robots around their business. The robots navigate using computer vision, but couldn’t map the rooms from scratch. They hired [matthewhallberg] to tackle this problem, and this robot is a preliminary result. Using the Unity engine and an iPhone, the robot can perform in one of three modes. The first is a user-controlled mode, the second is object following, and the third is 3D mapping.

The robot seems fairly easy to construct and only carries and iPhone, a Node MCU, some motors, and a battery. Most of the computational work is done remotely, with the robot simply receiving its movement commands from another computer. There’s a lot going on here, software-wise, and a lot of toolkits and software packages to install and communicate with one another, but the video below does a good job of showing what you’ll need and how it all works together. If that’s all too much, there are other robots with a form of computer vision that can get you started into the world of computer vision and mapping.

Add Intuitiveness to OpenSCAD With Encoders

The first time I saw 3D modeling and 3D printing used practically was at a hack day event. We printed simple plastic struts to hold a couple of spring-loaded wires apart. Nothing revolutionary as far as parts go but it was the moment I realized the value of a printer.

Since then, I have used OpenSCAD because that is what I saw the first time but the intuitiveness of other programs led me to develop the OpenVectorKB which allowed the ubiquitous vectors in OpenSCAD to be changed at will while keeping the parametric qualities of the program, and even leveraging them.

All three values in a vector, X, Y, and Z, are modified by twisting encoder knobs. The device acts as a keyboard to

  1. select the relevant value
  2. replace it with an updated value
  3. refresh the display
  4. move the cursor back to the starting point

There is no software to install and it runs off a Teensy-LC so reprogramming it for other programs is possible in any program where rotary encoders may be useful. Additional modes include a mouse, arrow keys, Audacity editing controls, and VLC time searching.

Here’s an article in favor of OpenSCAD and here’s one against it. This article does a good job of explaining OpenSCAD.

[Editor’s note: This is a Hackaday writer’s hack, hence the “I” in place of the usual “we”. We all love custom peripherals though, and a good number of us love OpenSCAD, so you could probably read it either way, but we don’t want to take credit for [Brian]’s work.]


Filed under: 3d Printer hacks, Arduino Hacks

ATMega328 3D!

Small OLED displays are inexpensive these days–cheap enough that pairing them with an 8-bit micro is economically feasible. But what can you do with a tiny display and not-entirely-powerful processor? If you are [ttsiodras] you can do a real time 3D rendering. You can see the results in the video below. Not bad for an 8-bit, 8 MHz processor.

The code is a “points-only” renderer. The design drives the OLED over the SPI pins and also outputs frame per second information via the serial port.

As you might expect, 3D output takes a good bit of math, and the chip in question isn’t very good at handling real numbers. [Ttsiodras] handles this using an old technique: fixed point arithmetic. The idea is simple. Normally, we think of a 16-bit word as holding unsigned values of 0 – 65535. However, if you choose, you can also use it to represent numbers from 0-50.999, for example. Mentally, you scale everything by 1,000 and then reverse the operation when you want to output. Addition and subtraction are straightforward, but multiplication and division require some extra work.

If you want to read more about fixed point math, you are in the right place. We’ve also covered a great external tutorial, too. But if you think this is the first time we’ve covered a 3D graphics engine for the ATmega parts, you’re wrong.


Filed under: Arduino Hacks

3D Printed Fish Feeder

[Helios Labs] recently published version two of their 3D printed fish feeder. The system is designed to feed their fish twice a day. The design consists of nine separate STL files and can be mounted to a planter hanging above a fish tank in an aquaponics system. It probably wouldn’t take much to modify the design to work with a regular fish tank, though.

The system is very simple. The unit is primarily a box, or hopper, that holds the fish food. Towards the bottom is a 3D printed auger. The auger is super glued to the gear of a servo. The 9g servo is small and comes with internal limiters that only allow it to rotate about 180 degrees. The servo must be opened up and the limiters must be removed in order to enable a full 360 degree rotation. The servo is controlled by an Arduino, which can be mounted directly to the 3D printed case. The auger is designed in such a way as to prevent the fish food from accidentally entering the electronics compartment.

You might think that this project would use a real-time clock chip, or possibly interface with a computer to keep the time. Instead, the code simply feeds the fish one time as soon as it’s plugged in. Then it uses the “delay” function in order to wait a set period of time before feeding the fish a second time. In the example code this is set to 28,800,000 milliseconds, or eight hours. After feeding the fish a second time, the delay function is called again in order to wait until the original starting time.


Filed under: 3d Printer hacks, Arduino Hacks

PieceMaker Factory: A Glimpse Into The Future of Toys?

Late Friday night I saw what may be the future of toys, or at least something completely unique at my local Toys'R'Us.

Read more on MAKE

Workshop gratuito sulla stampa 3D per insegnanti e studenti

Anche se un po’ sotto data, se domani siete dalle parti dell’ “Erasmo da Rotterdam” di Bollate (MI) potreste partecipare ad un workshop gratuito sulla “Stampa 3D, la Modellazione Solida e il Rapid Prototyping” organizzato dalla rivista ElettronicaIn, aperto ad insegnanti /  studenti / curiosi.

Il workshop riguarda il rapido sviluppo che ha coinvolto la stampa tridimensionale in questi ultimi anni, rivoluzionando la produzione di modelli tridimensionali e di prototipi in tutti i settori tecnologici: progettazione architettonica, design industriale, industria meccanica, robotica, fino alla produzione di oggetti di consumo e gadget. Il limite è legato solo alla creatività e all’estro del progettista.

a tenere il workshop sarà Simone Majocchi, autore di libri su Arduino e giornalista/divulgatore scientifico: iscrivetevi.

Via [elettronicaIn]

Arduino Blog 26 Oct 19:26

Build a Touchless 3D Tracking Interface with Everyday Materials


Combine low-tech materials with some high-tech components and build a completely Touchless 3D Tracking Interface. Explore capacitive sensing by using several panels of cardboard lined with aluminum foil. These panels, when charged, create electric fields that correspond to X, Y, and Z axes to create a 3D cube. With the aid of an Arduino microcontroller and some supplied code, movements inside the cube are tracked as your hand moves around inside the field.

For Weekend Projects makers looking for an introduction to Arduino, this is a great project to learn from. Once you’ve gathered all your parts, this project should only take a couple hours to complete – you’ll be playing 3D Tic Tac Toe before the weekend is over!

Once your touchless 3D tracker is up and running, what you do with it is only limited by your own imagination! The original implementation of this project comes from media artist Kyle McDonald, who has suggested the following uses and applications:

  • Make an RGB or HSB color picker
  • Control video or music parameters; sequence a beat or melody
  • Large, slightly bent surface with multiple plates + a projector = “Minority Report” interface

Sign up below for the Weekend Projects Newsletter to receive the projects before anybody else does, get tips, see other makers’ builds, and more.

Sign Up for the "Weekend Projects" Newsletter
-->-->
-->-->

More:
See all of the Weekend Projects posts


Filed under: Arduino, MAKE Projects, Weekend Projects

3D Printed Binary Clock

Let's Make Robots 03 Aug 21:43
2  3d  3mm  arduino  binary  clock  cube  inches  ldr  powered  print  printed  teensy  usb  

Arduino based Milling Machine

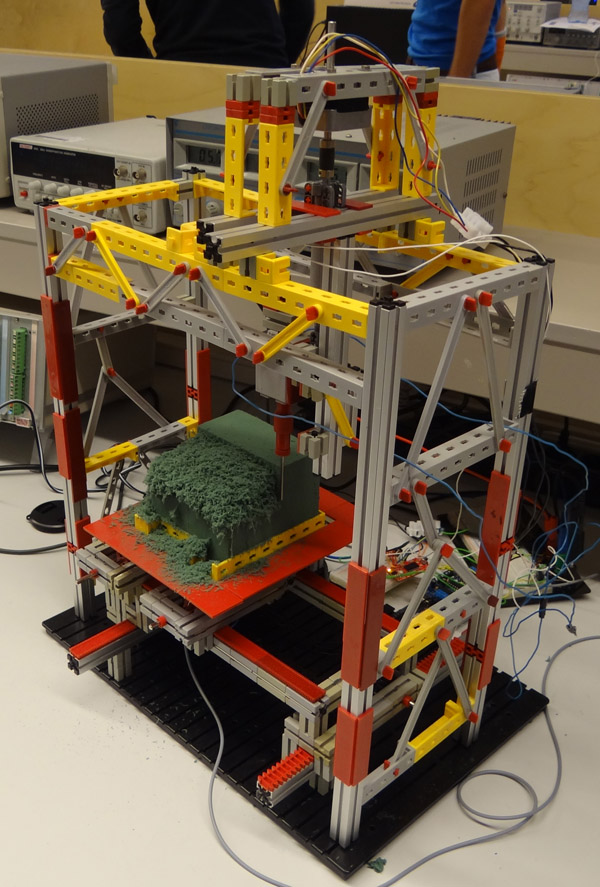
This is a working model of an Arduino based Milling Machine created using FischerTechnik. For those of you who are unaware of FischerTechnik, it is similar to the LEGOTM Building Blocks.

A group of four Mechanical Engineering students at the Delft University of Technology (Netherlands) created this project as part of their Mechatronics class in their Second year of Bachelor of Sciences (B.Sc.) Program.

Laurens Valk, one of the creators, explains the essence of Arduino in the project:

“The system uses the Adafruit motor shield to run two stepper motors, and the Sparkfun EasyDriver for the third stepper motor. The Arduino runs code that listens to Matlab commands over USB. We expanded that code a little to make it possible to add the third stepper motor and some other commands. Most of the actual code was programmed in Matlab, with the Arduino as the interface between computer and motors/sensors.”

We had a little chat with Laurens. Here is the excerpt:


When did you first hear about Arduino, and when did you first start using it?
I’ve seen a lot of Arduino projects over the years, but this was the first time we used it in a project. Personally, I usually build robots with MINDSTORMS NXT, but this felt like a good opportunity to combine mechanical work (the printer hardware) with real electronics (Arduino).
How did you end up making a Milling Machine/ 3D Printer for your project?

We chose to come up with our own design challenge and decided not to do the standard exercise. Initially we thought about making a (2D) plotter or scanner. Then quickly we started thinking about the same things, except in 3D. One of the projects that inspired us was the LEGO Milling Machine by Arthur Sacek. Both a scanner and printer would still be doable in 3D, but the time was limited, so we settled with the printer idea.

All construction had to be done in one workweek for logistical reasons. To make sure we were able to finish in time, we prepared much of the electronics and software outside the lab. We finished just in time, but unfortunately we could do only one complete print before we had to take it apart. Not surprisingly, it was very exciting to wait for the result of the one and only complete test run. We couldn’t see the result until we used the vacuum cleaner to remove the dust.

Here is a video showing the working of this machine. [And the Vacuum Cleaner Laurens is talking about]:

This gives an Insight into the many feats that an Arduino can accomplish.